> ## Documentation Index
> Fetch the complete documentation index at: https://gcore.com/docs/llms.txt
> Use this file to discover all available pages before exploring further.

# Create and configure a volume

export const MethodSection = ({children}) => children ?? null;

export const MethodSwitch = ({children}) => {
  const tabs = React.Children.toArray(children).map(c => {
    if (!c || !c.props) return null;
    if (c.props.id) return c;
    const inner = c.props.children;
    if (inner && inner.props && inner.props.id) return inner;
    return null;
  }).filter(Boolean);
  const firstId = tabs.length > 0 ? tabs[0].props.id : "";
  const [active, setActive] = React.useState(firstId);
  React.useEffect(() => {
    try {
      const saved = localStorage.getItem("gcore_docs_method");
      if (saved && tabs.find(t => t.props.id === saved)) {
        setActive(saved);
      }
    } catch (_) {}
  }, []);
  React.useEffect(() => {
    try {
      document.querySelectorAll("h2[id], h3[id]").forEach(heading => {
        const visible = heading.offsetParent !== null;
        document.querySelectorAll(`a[href="#${heading.id}"]`).forEach(link => {
          if (link.closest("h1,h2,h3,h4,h5,h6")) return;
          const li = link.closest("li");
          if (li) li.style.display = visible ? "" : "none";
        });
      });
    } catch (_) {}
    window.dispatchEvent(new Event("scroll"));
  }, [active]);
  const handleClick = id => {
    setActive(id);
    try {
      localStorage.setItem("gcore_docs_method", id);
    } catch (_) {}
  };
  return <div>
      <div className="not-prose flex gap-0 border-b border-zinc-200 dark:border-zinc-800 mb-8 mt-2" role="tablist">
        {tabs.map(tab => {
    const isActive = active === tab.props.id;
    return <button key={tab.props.id} role="tab" aria-selected={isActive} onClick={() => handleClick(tab.props.id)} className={["px-4 py-2 text-sm font-medium border-b-2 -mb-px transition-colors cursor-pointer", isActive ? "border-primary text-primary" : "border-transparent text-zinc-500 hover:text-zinc-800 dark:hover:text-zinc-200"].join(" ")}>
              {tab.props.label}
            </button>;
  })}
      </div>

      {tabs.map(tab => <div key={tab.props.id} style={{
    display: active === tab.props.id ? "" : "none"
  }}>
          {tab.props.children}
        </div>)}
    </div>;
};

<MethodSwitch>
  <MethodSection id="portal" label="Customer Portal">
    <p>
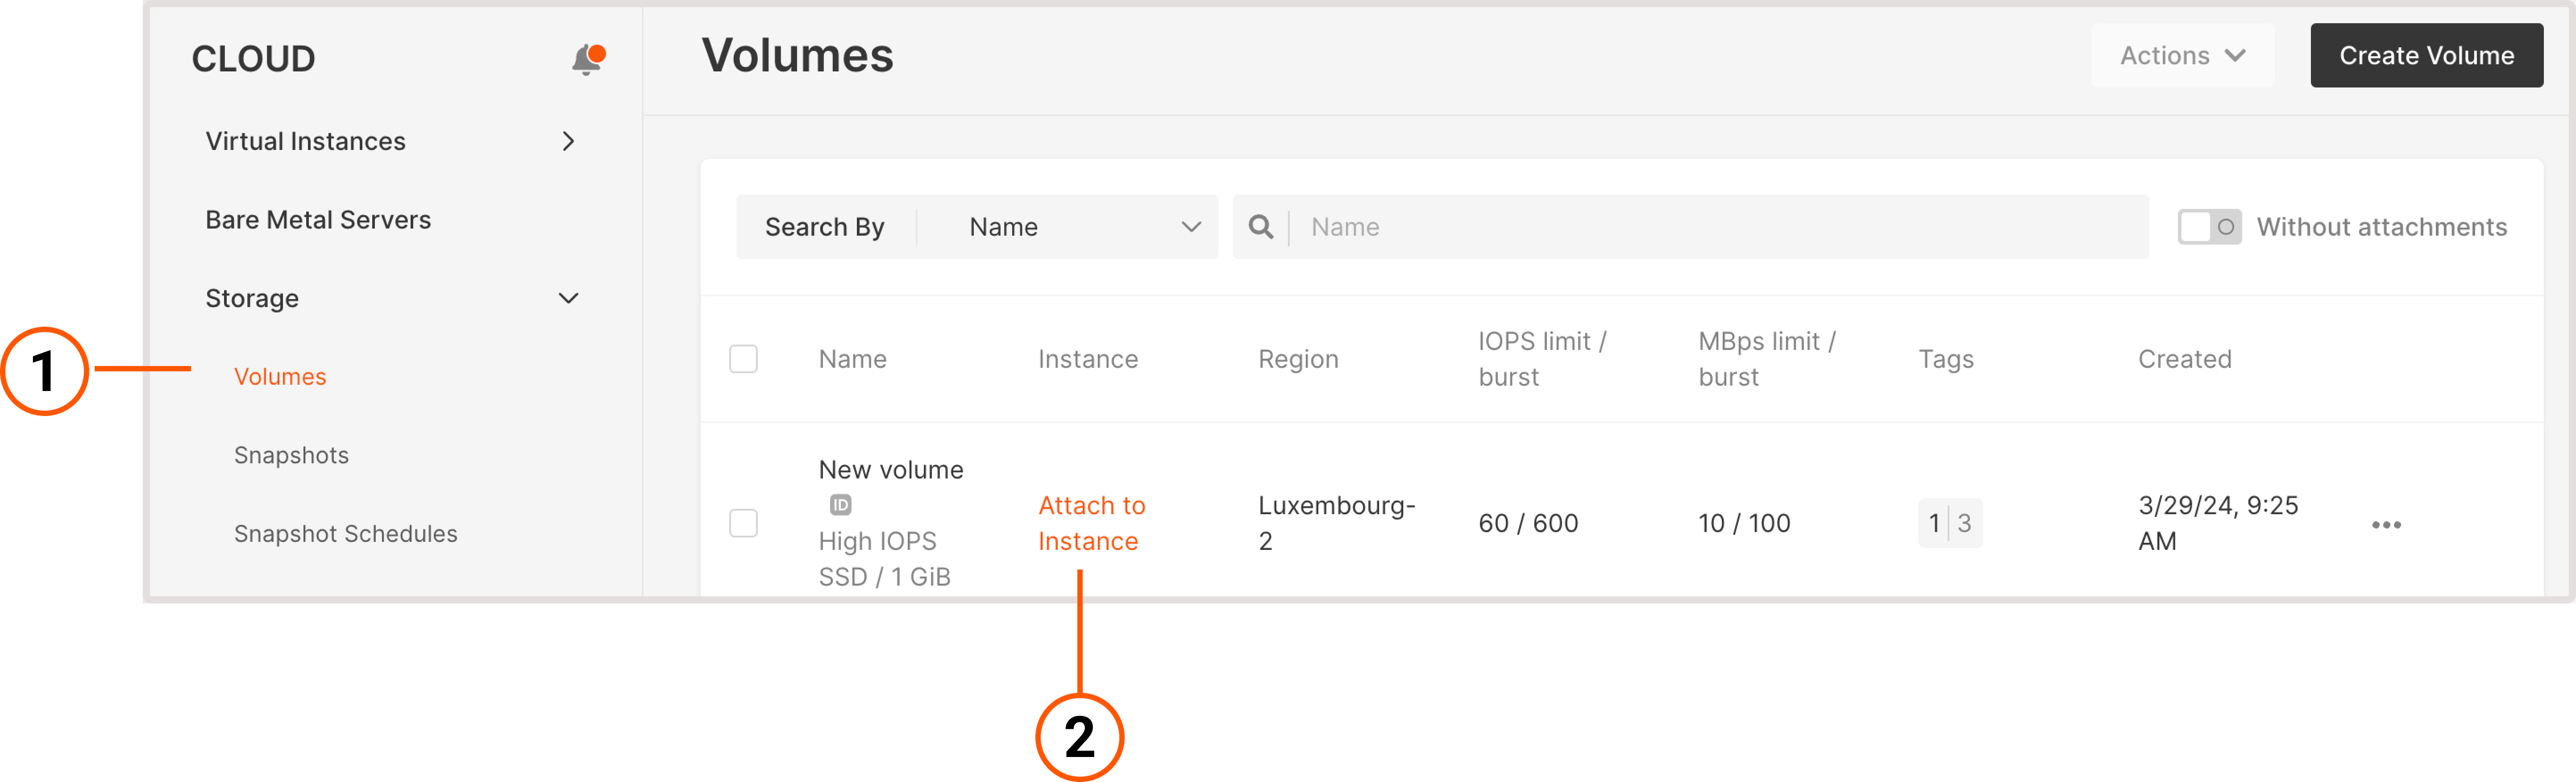
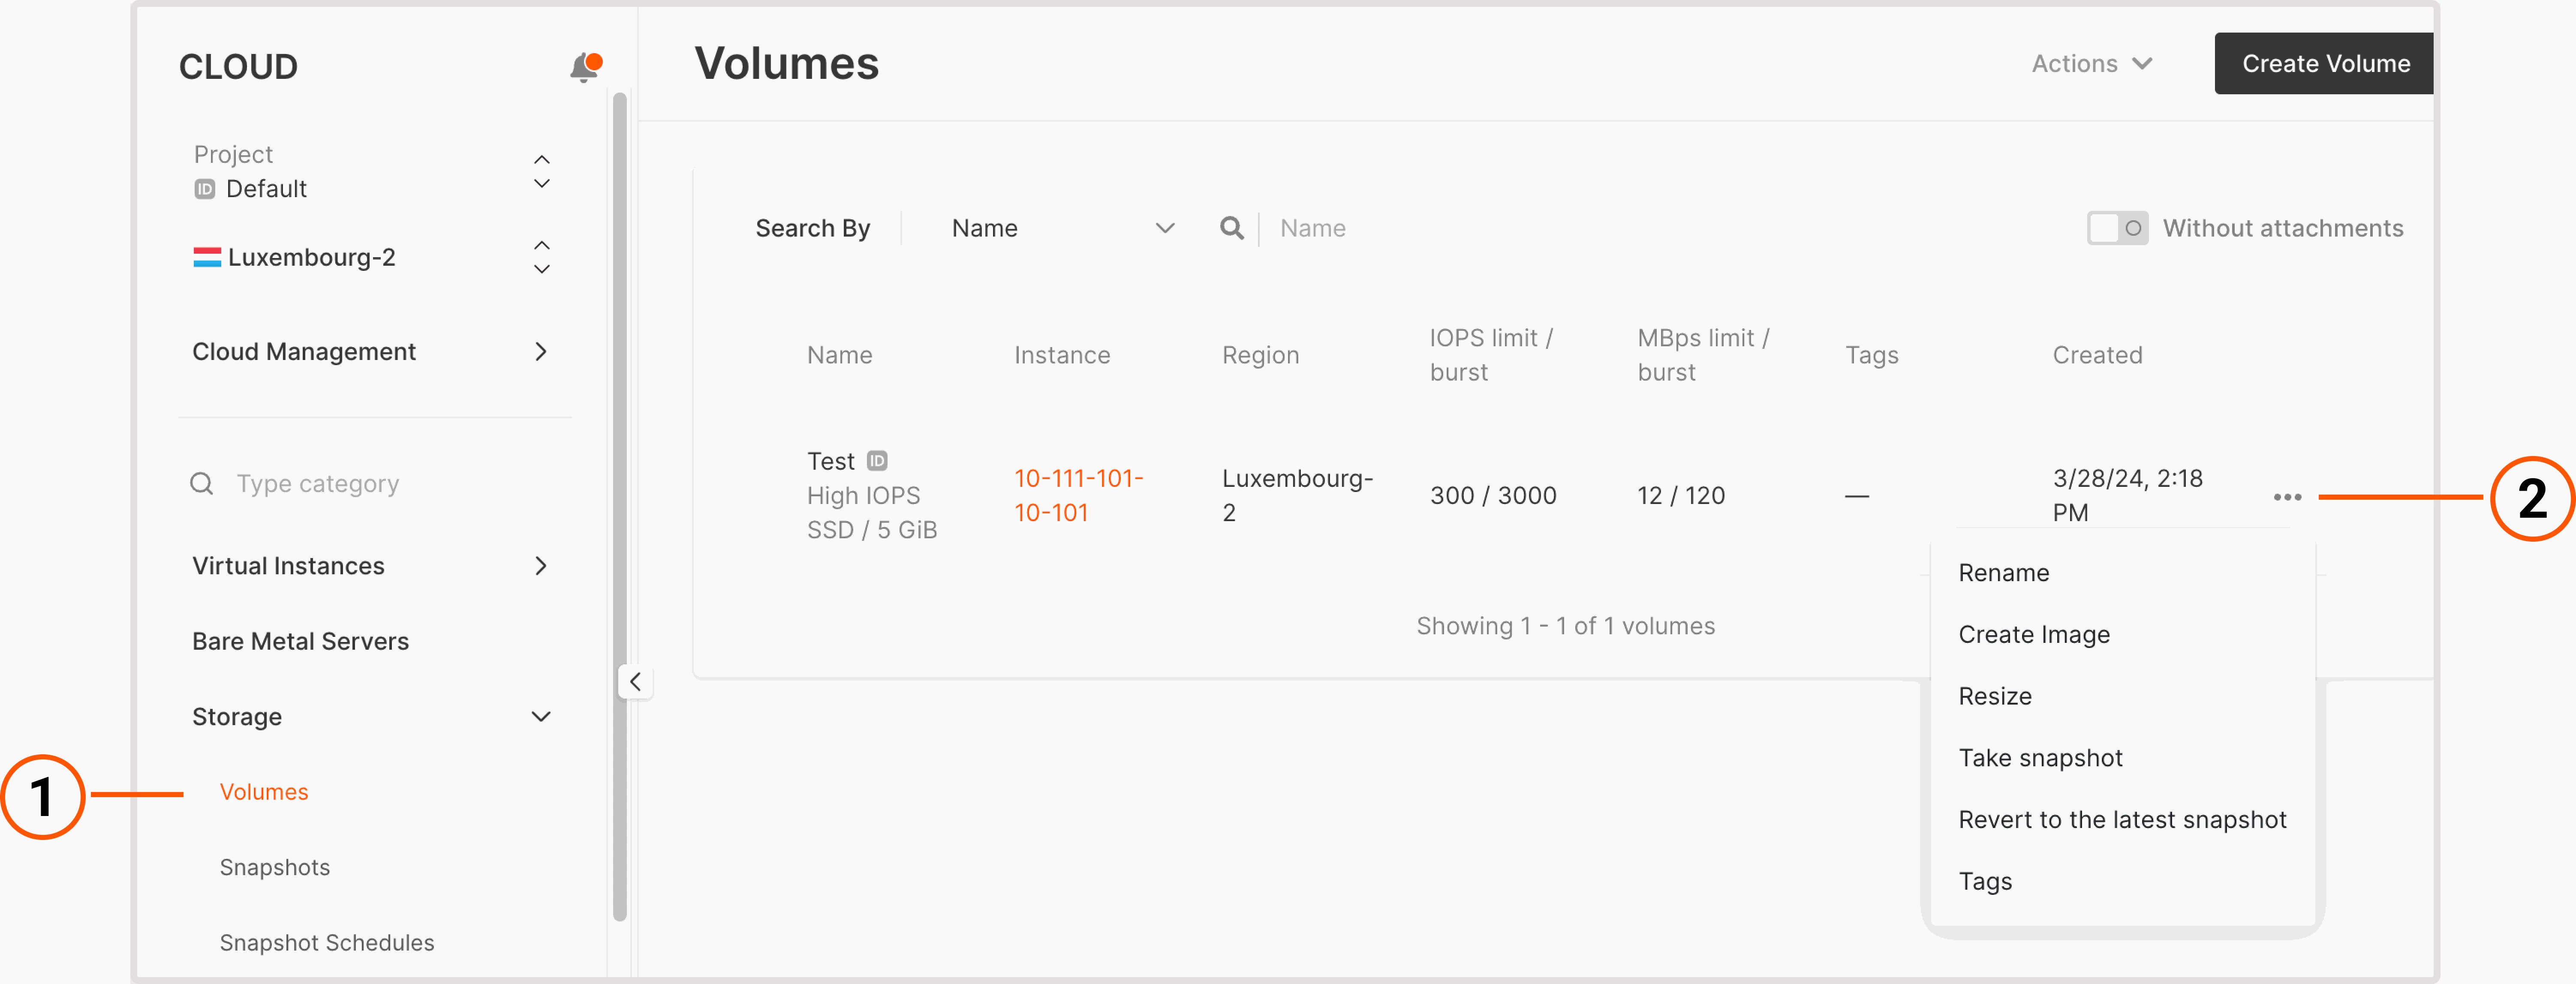
You can view, create, and manage volumes in the Gcore Customer Portal on the **Volumes** page. Here's how to navigate the page:</p>

    <Frame>
      <img src="https://mintcdn.com/gcore/v_yzPGVAOyKyDxn0/images/docs/cloud/virtual-instances/volumes/create-and-configure-volumes/volumes-page-annotated.png?fit=max&auto=format&n=v_yzPGVAOyKyDxn0&q=85&s=f8cc777d168fd7cb93905c2adad63bf2" alt="Volumes page with numbered UI elements" width="6152" height="2424" data-path="images/docs/cloud/virtual-instances/volumes/create-and-configure-volumes/volumes-page-annotated.png" />
    </Frame>

    <p>
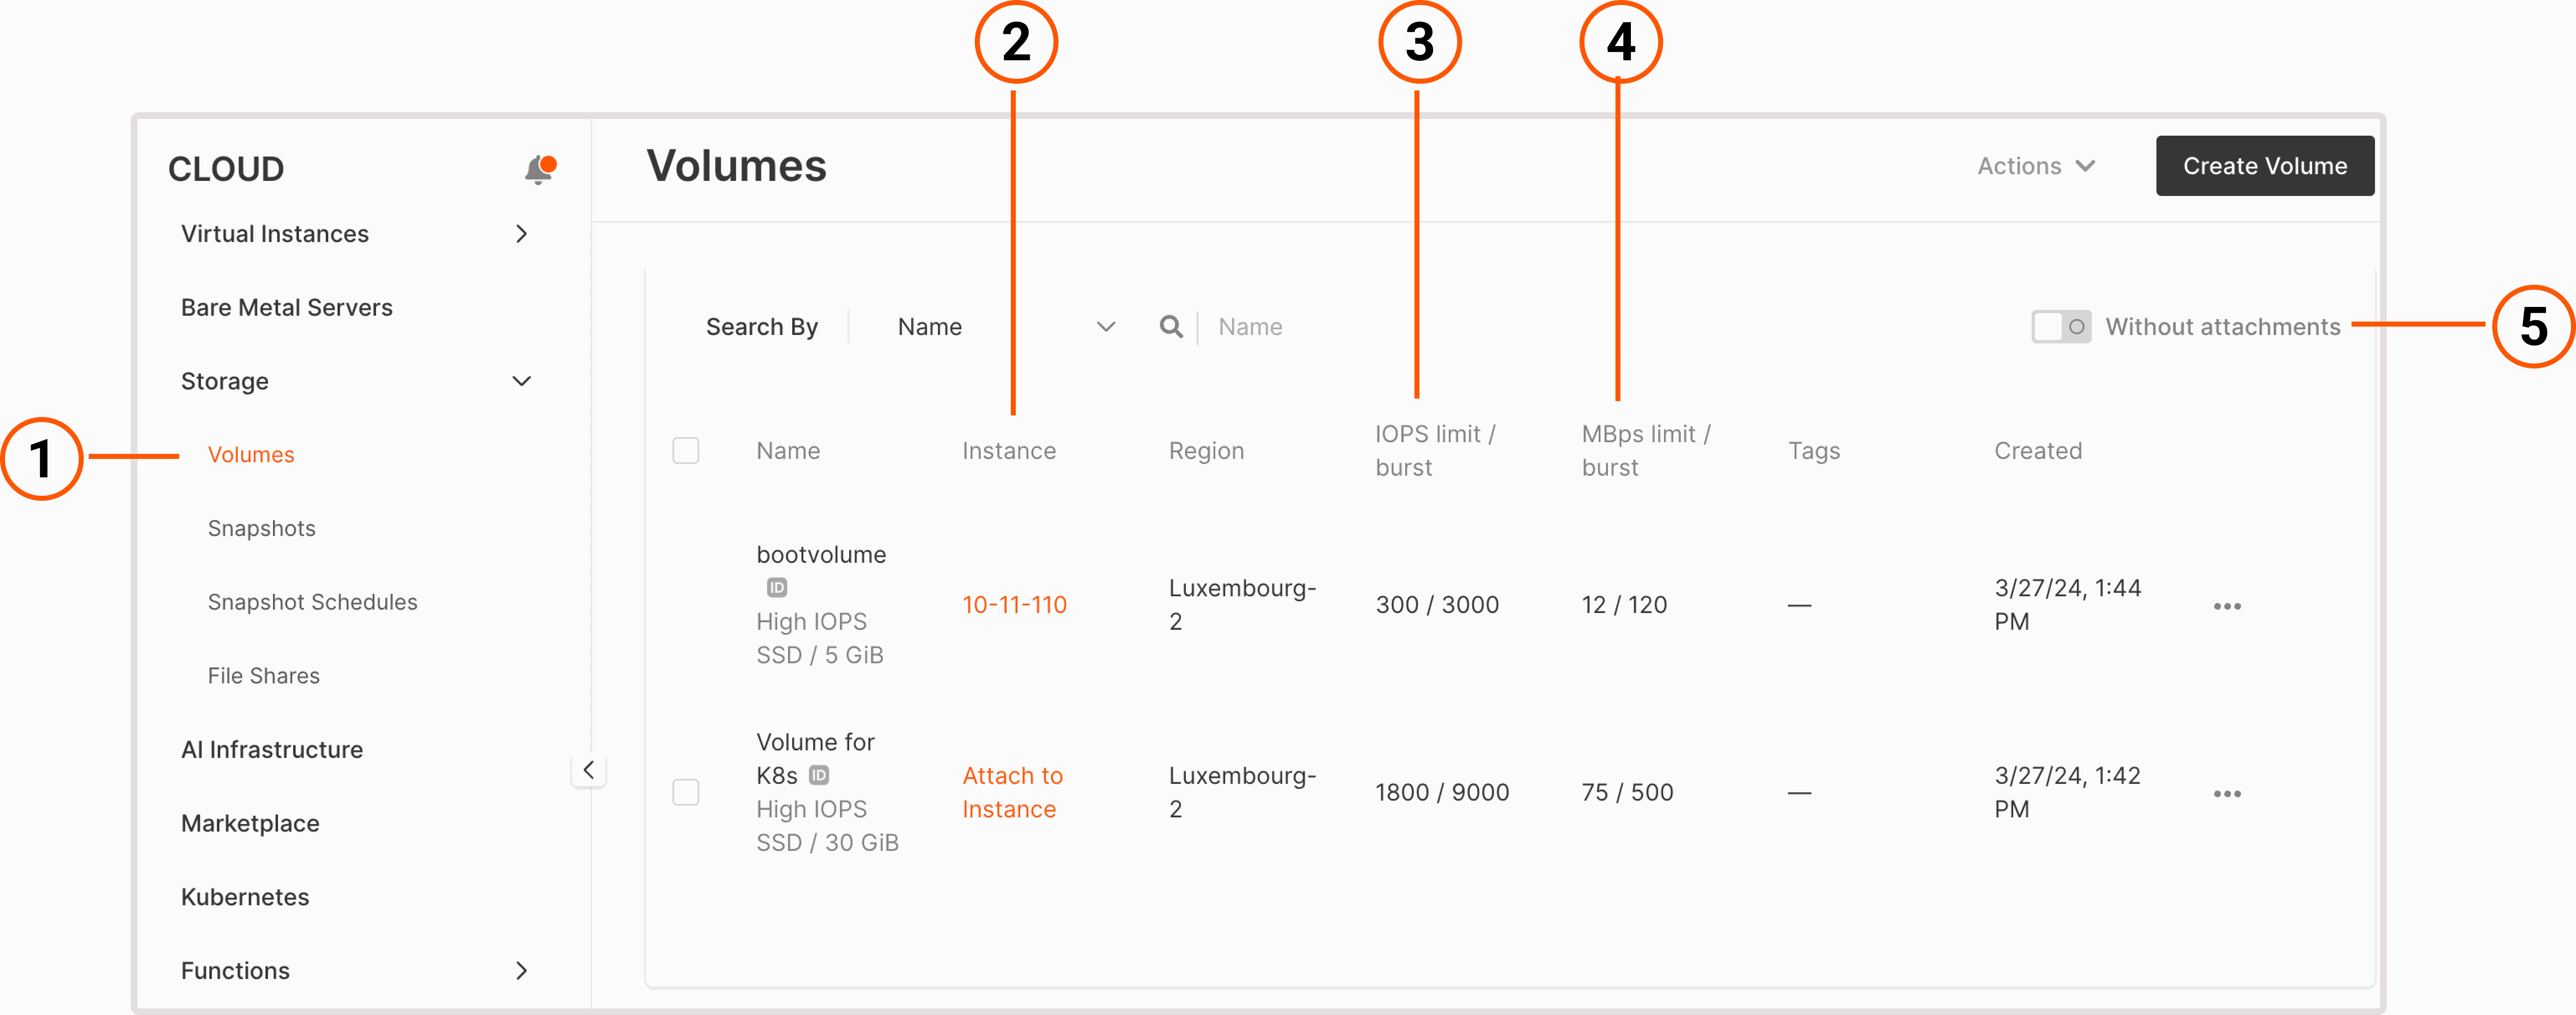
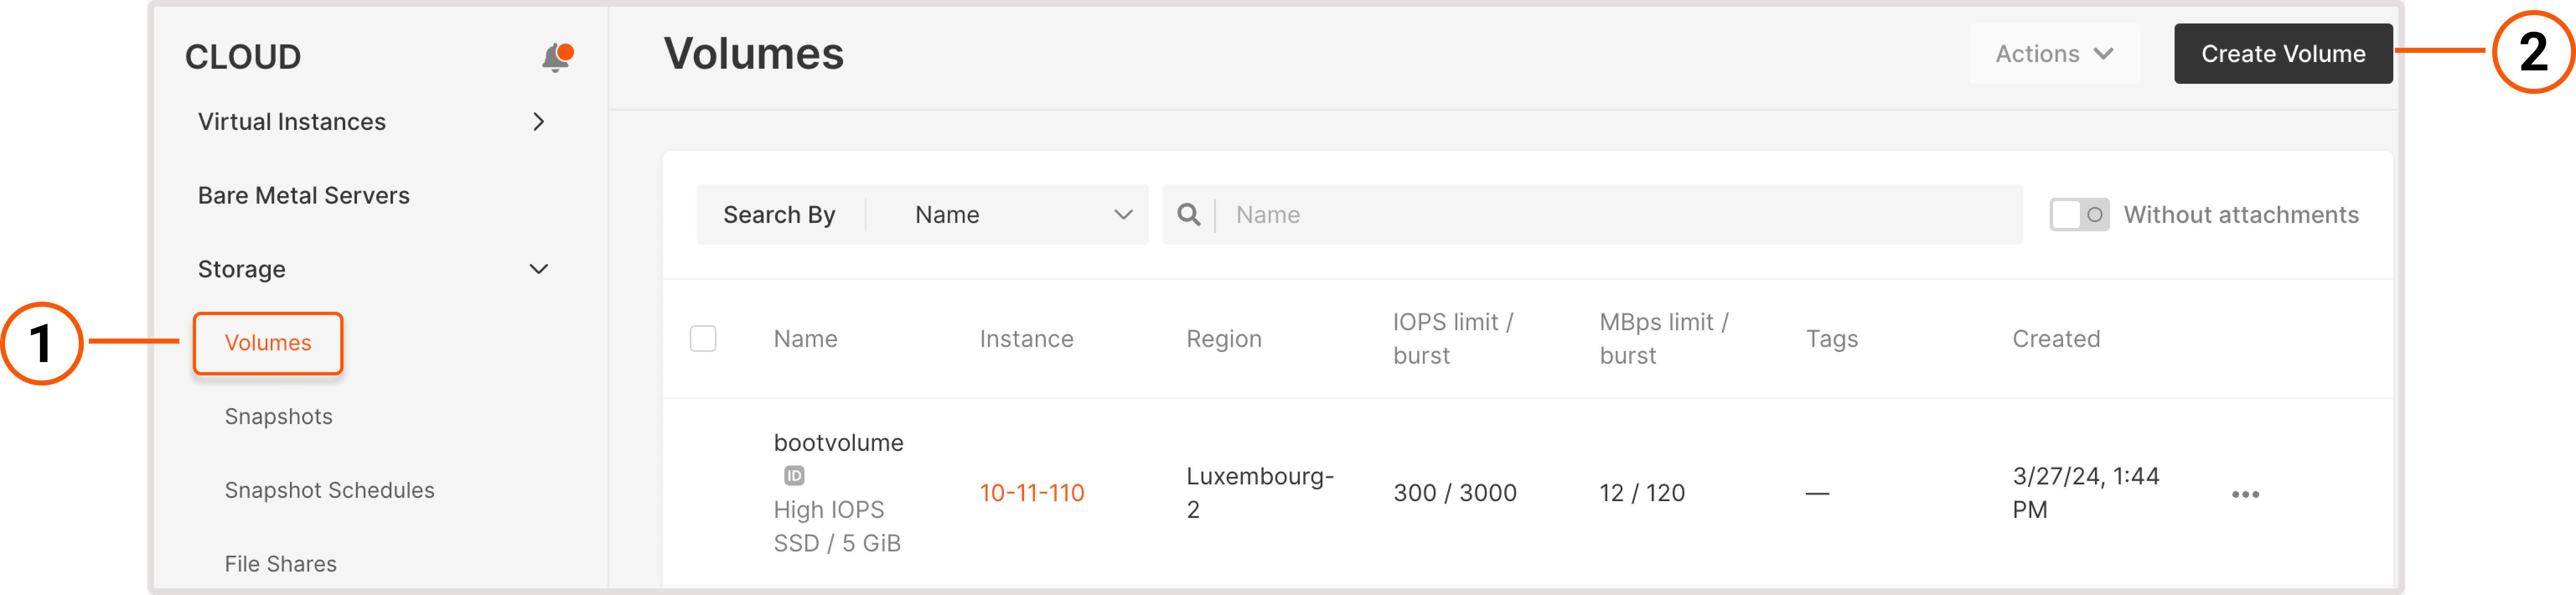
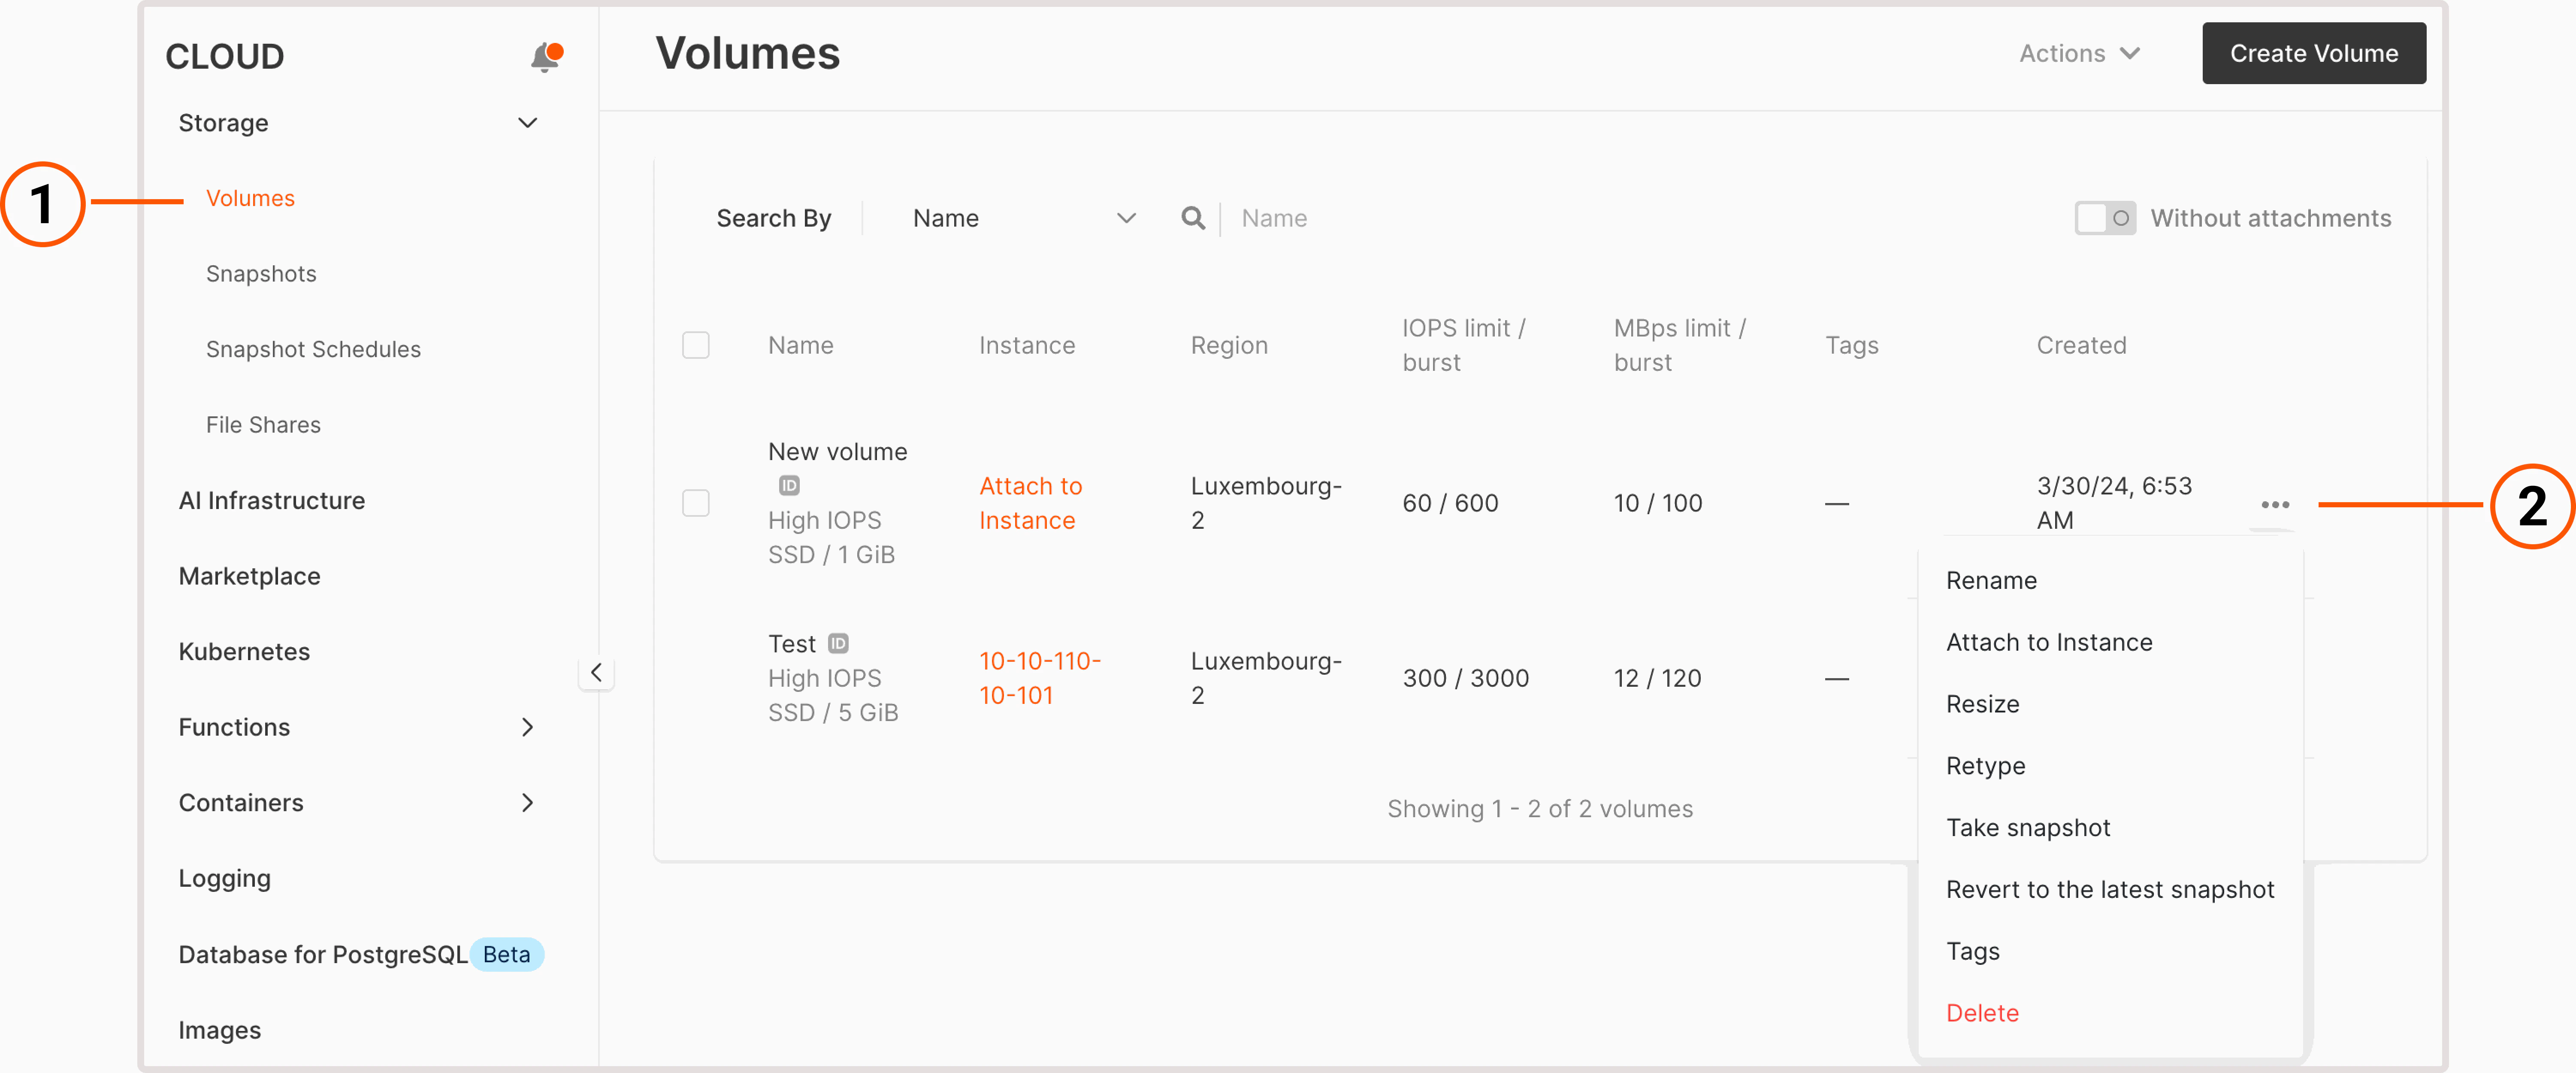
1. **Volumes**: View all volumes created in a project.</p>
    <p>2. **Instance**: Check if a volume is attached to a Virtual Machine.</p>
    <p>3. **IOPS limit/burst**: Check the maximum number of read and write operations a volume can handle in a second and when a burst traffic occurs.</p>
    <p>4. **MBps limit/burst**: Check the bandwidth limit for a volume and a max bandwidth when a burst traffic occurs.</p>
    <p>5. **Without attachments**: View all volumes that aren't attached to a Virtual Machine.</p>

    <p>In the following sections, you'll find information on how to create and manage volumes. For a general overview of volumes and available volume types, check out our [dedicated guide](/cloud/virtual-instances/volumes/about-volumes).</p>

    ## Create a volume

    <p>You can create volumes in several ways: [when creating a Virtual Machine](/cloud/virtual-instances/create-an-instance), from the **Volumes** page, or from a snapshot. The latter two approaches are described in the following sections.</p>

    <Info>
      **Info**

      You can only use a volume in the same region where a Virtual Machine is created.
    </Info>

    <Tabs>
      <Tab title="From the Volumes page">
        1\. In the Gcore Customer Portal, navigate to **Cloud** > **Storage**.

        2\. Click **Create volume**.

        <Frame>
          <img src="https://mintcdn.com/gcore/v_yzPGVAOyKyDxn0/images/docs/cloud/virtual-instances/volumes/create-and-configure-volumes/create-volume.png?fit=max&auto=format&n=v_yzPGVAOyKyDxn0&q=85&s=70cc5c371f37c640812777d2ea93c67d" alt="Volumes page with numbered storage and create volume tabs" width="6148" height="1420" data-path="images/docs/cloud/virtual-instances/volumes/create-and-configure-volumes/create-volume.png" />
        </Frame>

        3\. A new **Add volume** page will open. Here you can customize volume settings.

        <Frame>
          <img src="https://mintcdn.com/gcore/v_yzPGVAOyKyDxn0/images/docs/cloud/virtual-instances/volumes/create-and-configure-volumes/new-volume-volumes-page.png?fit=max&auto=format&n=v_yzPGVAOyKyDxn0&q=85&s=6e6e02e57319220a83b04535cbc1b18a" alt="Dialog with options for configuring new volume" width="2576" height="2340" data-path="images/docs/cloud/virtual-instances/volumes/create-and-configure-volumes/new-volume-volumes-page.png" />
        </Frame>

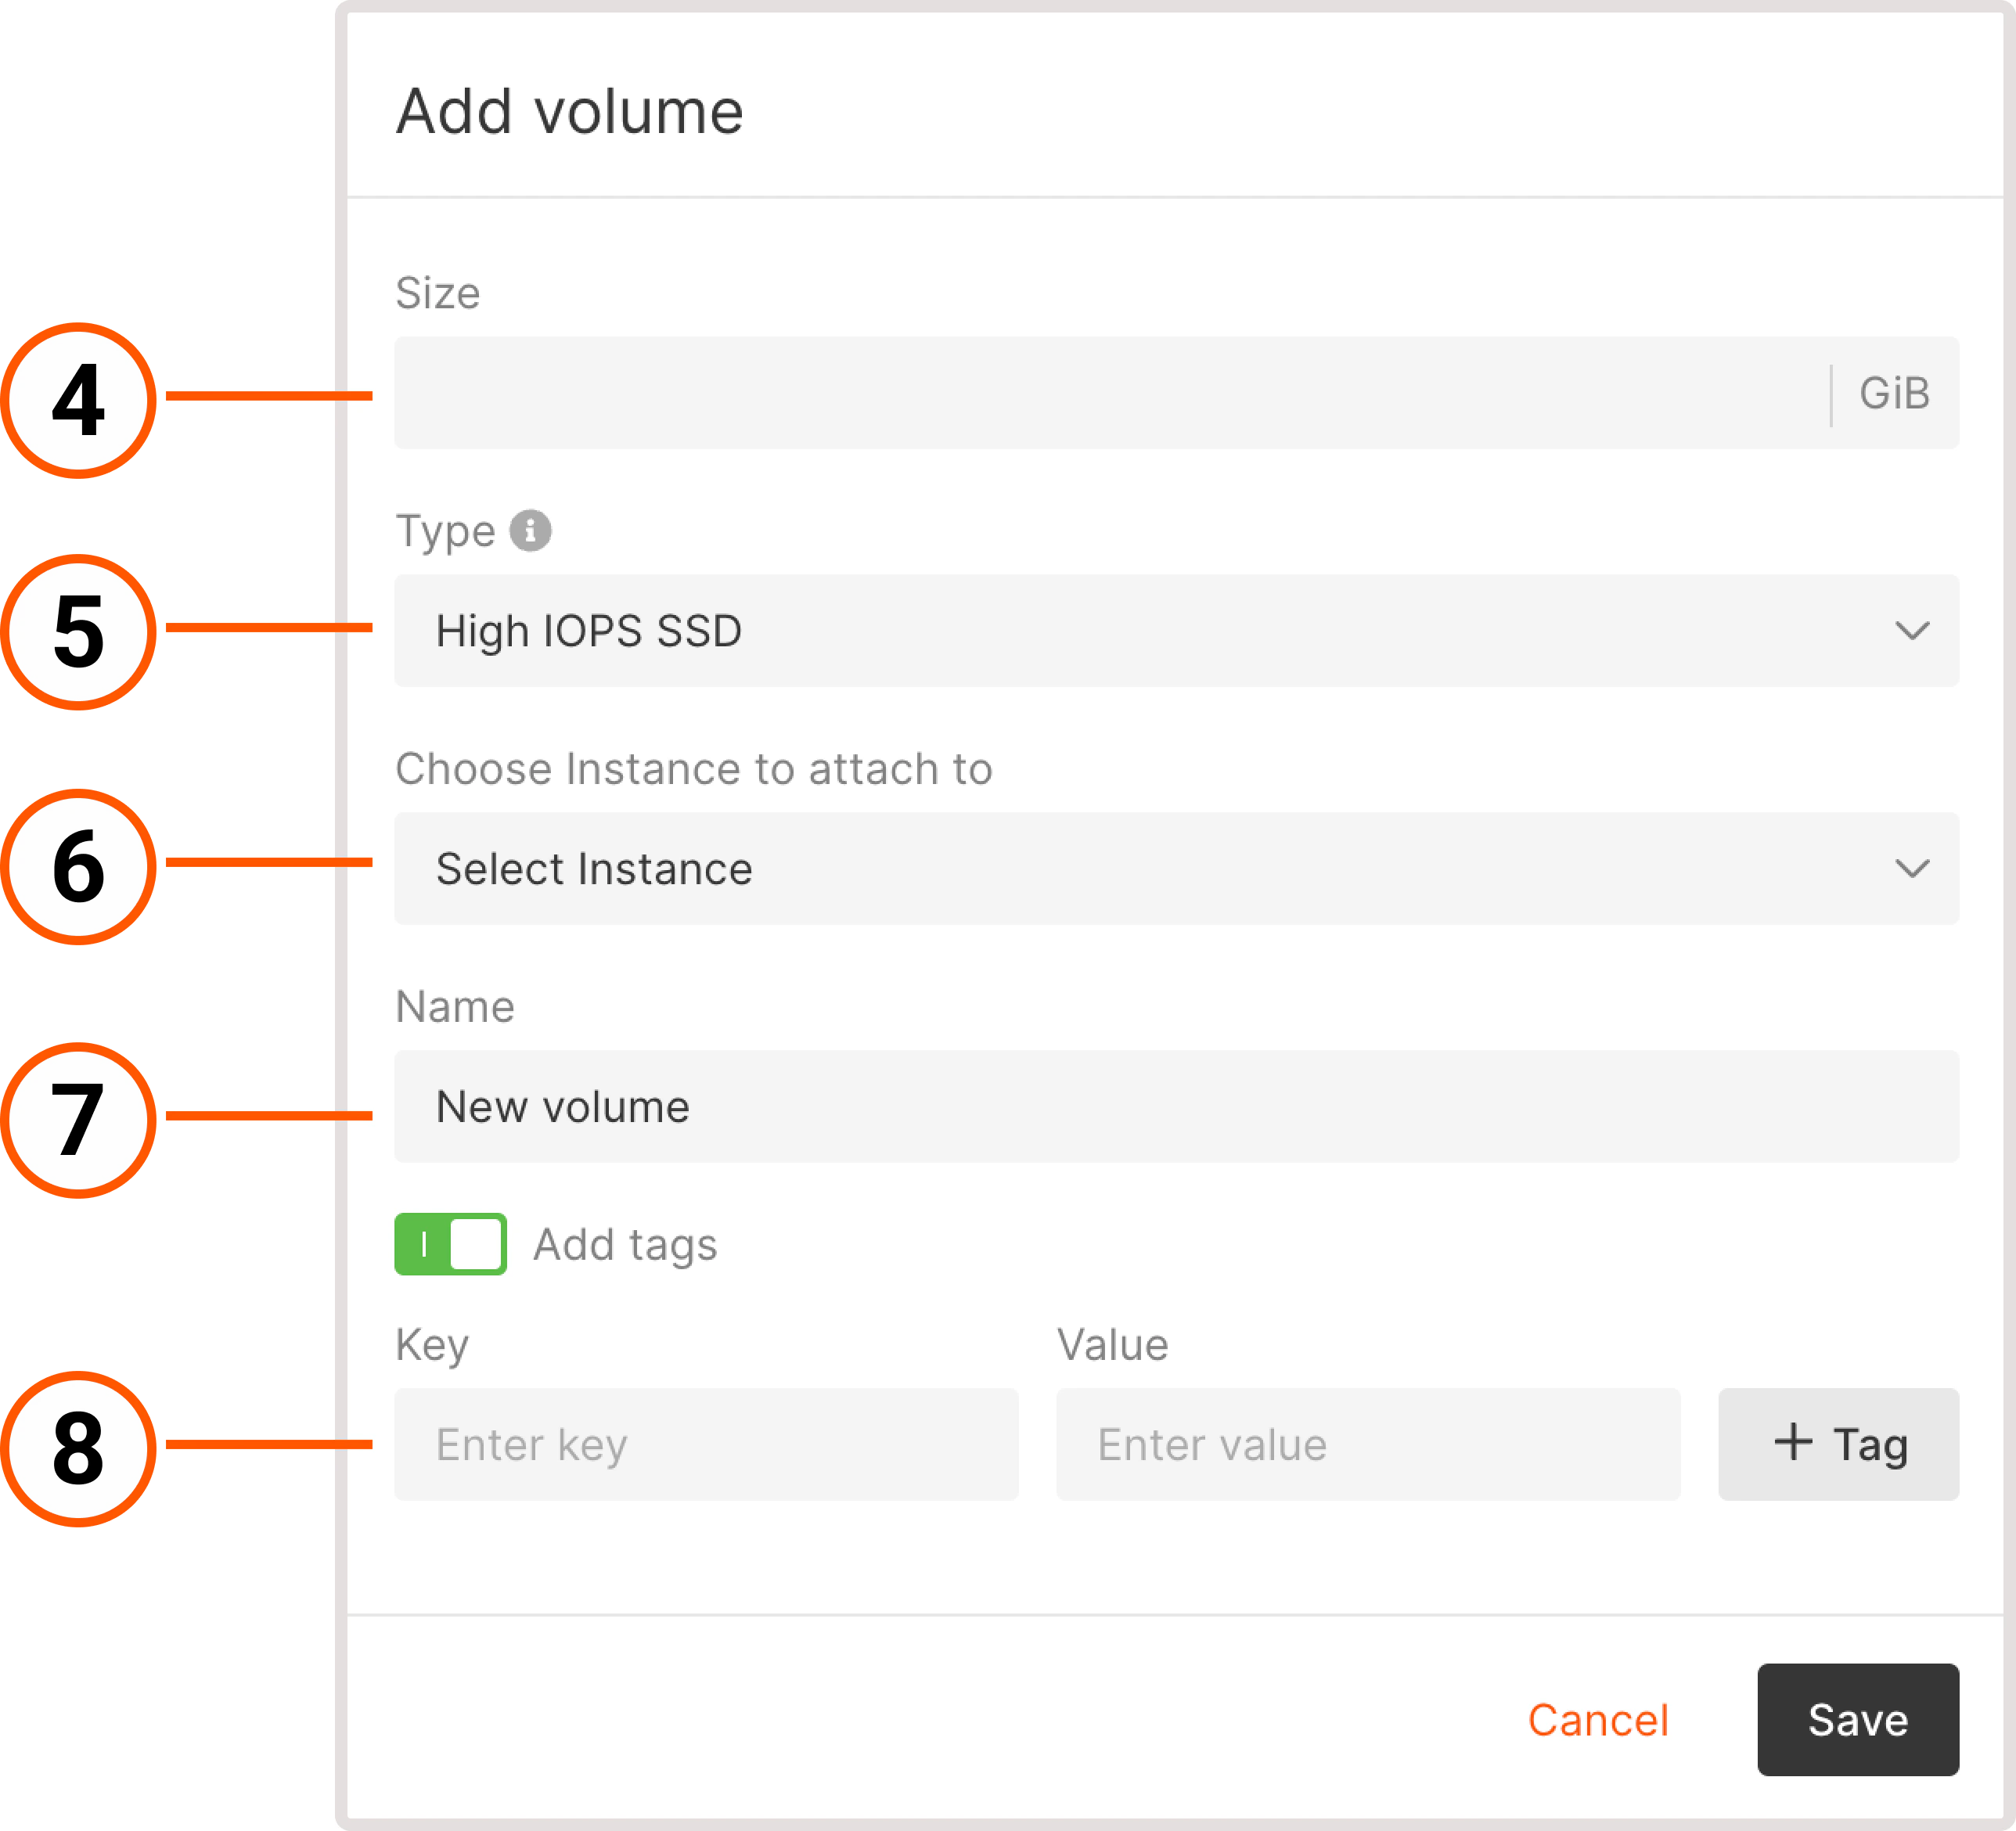
        4\. Specify how many GB of disk space you need. If it exceeds your current limit, [send a request for quota increase](/cloud/getting-started/request-a-quota-increase#how-to-send-a-request).

        5\. Select the [volume type](/cloud/virtual-instances/volumes/about-volumes#available-volume-types). Faster volume types are designed for latency-sensitive transactional operations and storing critical data. Slower volumes are more suitable for archived or non-critical data and for less frequent operations.

        6\. (Optional) Attach the volume to a Virtual Machine. A volume can only be used in the same region where a VM is created.

        7\. Create a name for the volume. You can use Latin letters, numbers, underscores, spaces, and dots. The name should be between 3 and 63 characters long.

        <Tip>
          **Tip**

          When you add volumes via the Gcore Customer Portal or API, you don't have to keep volume names consistent in the operating system (like sda, sdb, or sdc). We recommend using Universally Unique Identifiers (UUID) instead of names for OS operations.
        </Tip>

        8\. (Optional) To add metadata to a volume, specify tags as key-value pairs.

        9\. Click **Save**.

        Your volume will appear on the **Volumes** page.
      </Tab>

      <Tab title="From a volume snapshot">
        If you need to quickly duplicate or back up information on your Virtual Machine or provision new resources from pre-existing data, you can create a volume from a snapshot of an existing volume.

        To create a volume:

        1\. In the Gcore Customer Portal, navigate to **Cloud** > **Snapshots**.

        2\. Find the snapshot you want to create volume from and click on the three-dot icon to open snapshot settings.

        <Frame>
          <img src="https://mintcdn.com/gcore/v_yzPGVAOyKyDxn0/images/docs/cloud/virtual-instances/volumes/create-and-configure-volumes/new-volume-snapshot.png?fit=max&auto=format&n=v_yzPGVAOyKyDxn0&q=85&s=f14f0a88b8da323ab66f5c594fe4c5a6" alt="Snapshots tab with expanded settings menu" width="6040" height="2156" data-path="images/docs/cloud/virtual-instances/volumes/create-and-configure-volumes/new-volume-snapshot.png" />
        </Frame>

        3\. Click **Create volume**.

        4\. Select the Virtual Machine to which you want to attach a new volume.

        5\. Click **Create**.

        <Frame>
          <img src="https://mintcdn.com/gcore/v_yzPGVAOyKyDxn0/images/docs/cloud/virtual-instances/volumes/create-and-configure-volumes/create-volume-from-snapshot.png?fit=max&auto=format&n=v_yzPGVAOyKyDxn0&q=85&s=2c51a1c4a4d9864f89d0f9c728a9d00e" alt="Create volume dialog with options to select Virtual Machine and add volume name" width="2156" height="1476" data-path="images/docs/cloud/virtual-instances/volumes/create-and-configure-volumes/create-volume-from-snapshot.png" />
        </Frame>

        The volume will appear on the **Volumes** page.
      </Tab>
    </Tabs>

    ## Attach volumes to an existing Virtual Machine

    <p>If a volume is attached to a Virtual Machine, you'll see the VM name on the **Volumes** page in the **Instance** column. Otherwise, you'll see the "Attach to instance" link. You can attach more than one volume to a Virtual Machine. However, volumes can only be used in the same region where the VM is created.</p>

    <p>You can attach volumes to a Virtual Machine either from the **Volumes** page or from the VM settings.</p>

    <Tabs>
      <Tab title="From the Volumes page">
        1\. In the Gcore Customer Portal, navigate to **Cloud** > **Storage**.

        2\. Find the volume that you want to attach and click **Attach to instance**.

        <Frame>
          <img src="https://mintcdn.com/gcore/v_yzPGVAOyKyDxn0/images/docs/cloud/virtual-instances/volumes/create-and-configure-volumes/attach-volume.png?fit=max&auto=format&n=v_yzPGVAOyKyDxn0&q=85&s=55d847b1b398b7654925ff2f65fe8461" alt="Volumes page with annotated attach to Virtual Machine link" width="5772" height="1752" data-path="images/docs/cloud/virtual-instances/volumes/create-and-configure-volumes/attach-volume.png" />
        </Frame>

        3\. Select the Virtual Machine from the **Choose instance to attach to** dropdown.

        4\. (Optional) Add an attachment tag.

        <Frame>
          <img src="https://mintcdn.com/gcore/v_yzPGVAOyKyDxn0/images/docs/cloud/virtual-instances/volumes/create-and-configure-volumes/attach-volume-to-instance.png?fit=max&auto=format&n=v_yzPGVAOyKyDxn0&q=85&s=3c2a98fee5a4e19d3e27269d879021f2" alt="Attach volume dialog with options to select Virtual Machine and add a tag" width="2560" height="1252" data-path="images/docs/cloud/virtual-instances/volumes/create-and-configure-volumes/attach-volume-to-instance.png" />
        </Frame>

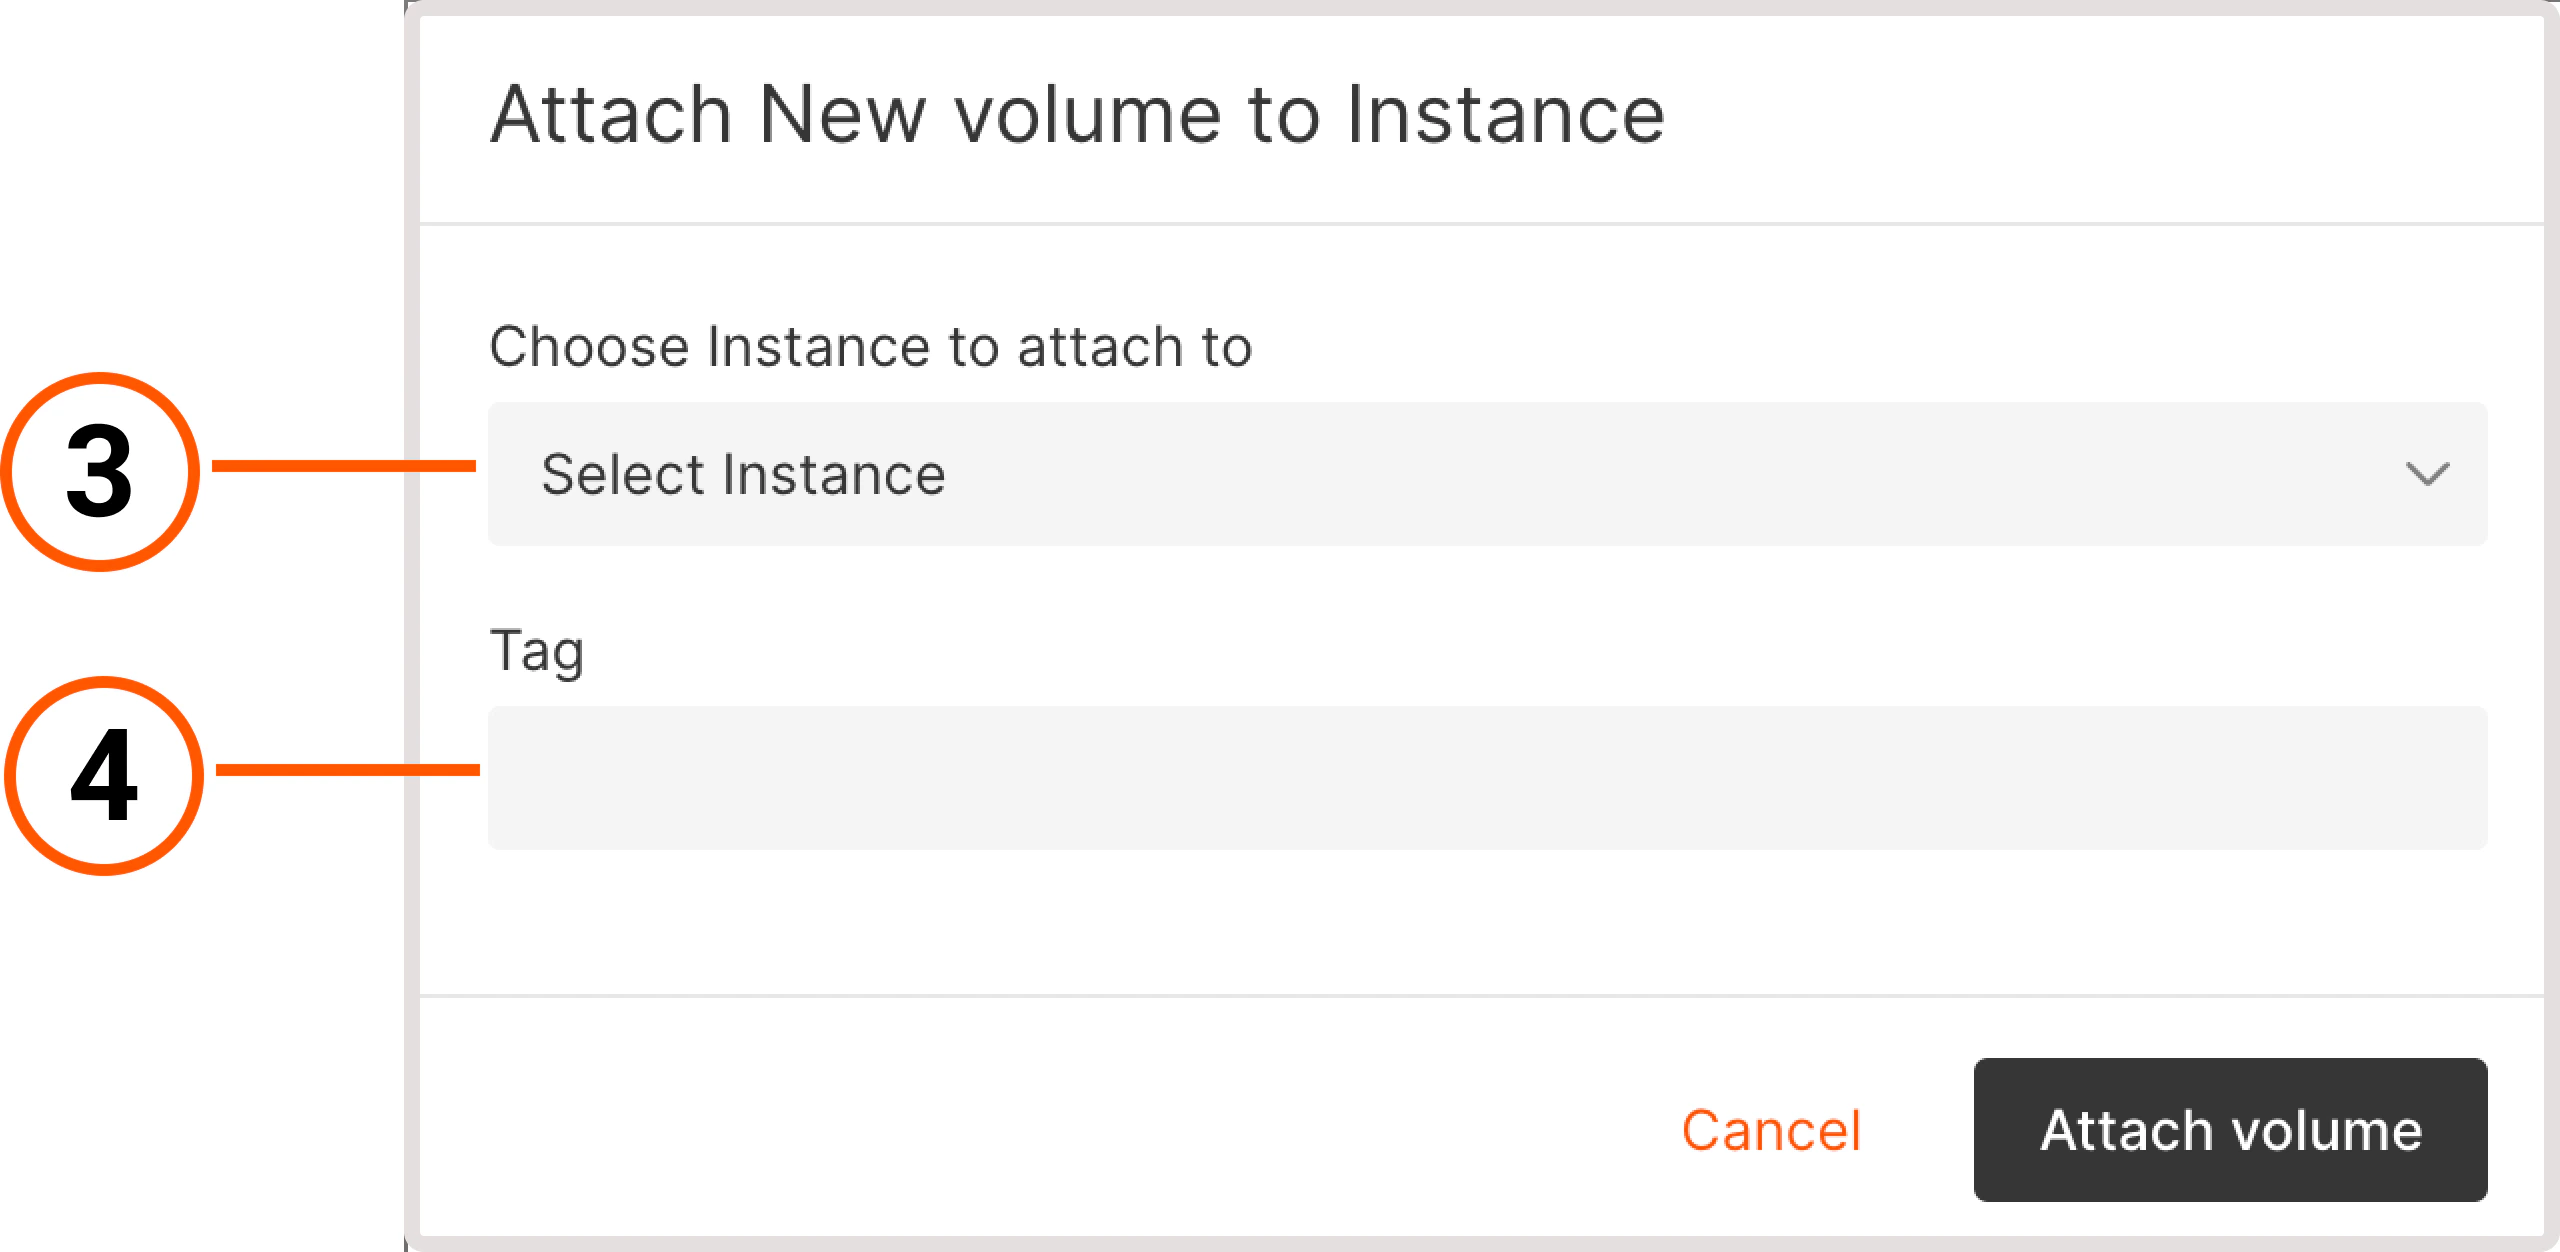
        5\. Click **Attach volume**.

        You've successfully attached a volume to the Virtual Machine.
      </Tab>

      <Tab title="From Virtual Machine settings">
        1\. In the Gcore Customer Portal, navigate to **Cloud** > **Virtual instances**.

        2\. Find the Virtual Machine you want to update and click its name to open it.

        <Frame>
          <img src="https://mintcdn.com/gcore/v_yzPGVAOyKyDxn0/images/docs/cloud/virtual-instances/volumes/create-and-configure-volumes/cloud-instances.png?fit=max&auto=format&n=v_yzPGVAOyKyDxn0&q=85&s=b0798a10c8040fa7f41facd0e85d15b4" alt="Virtual Machines tab with two created instances" width="5140" height="2008" data-path="images/docs/cloud/virtual-instances/volumes/create-and-configure-volumes/cloud-instances.png" />
        </Frame>

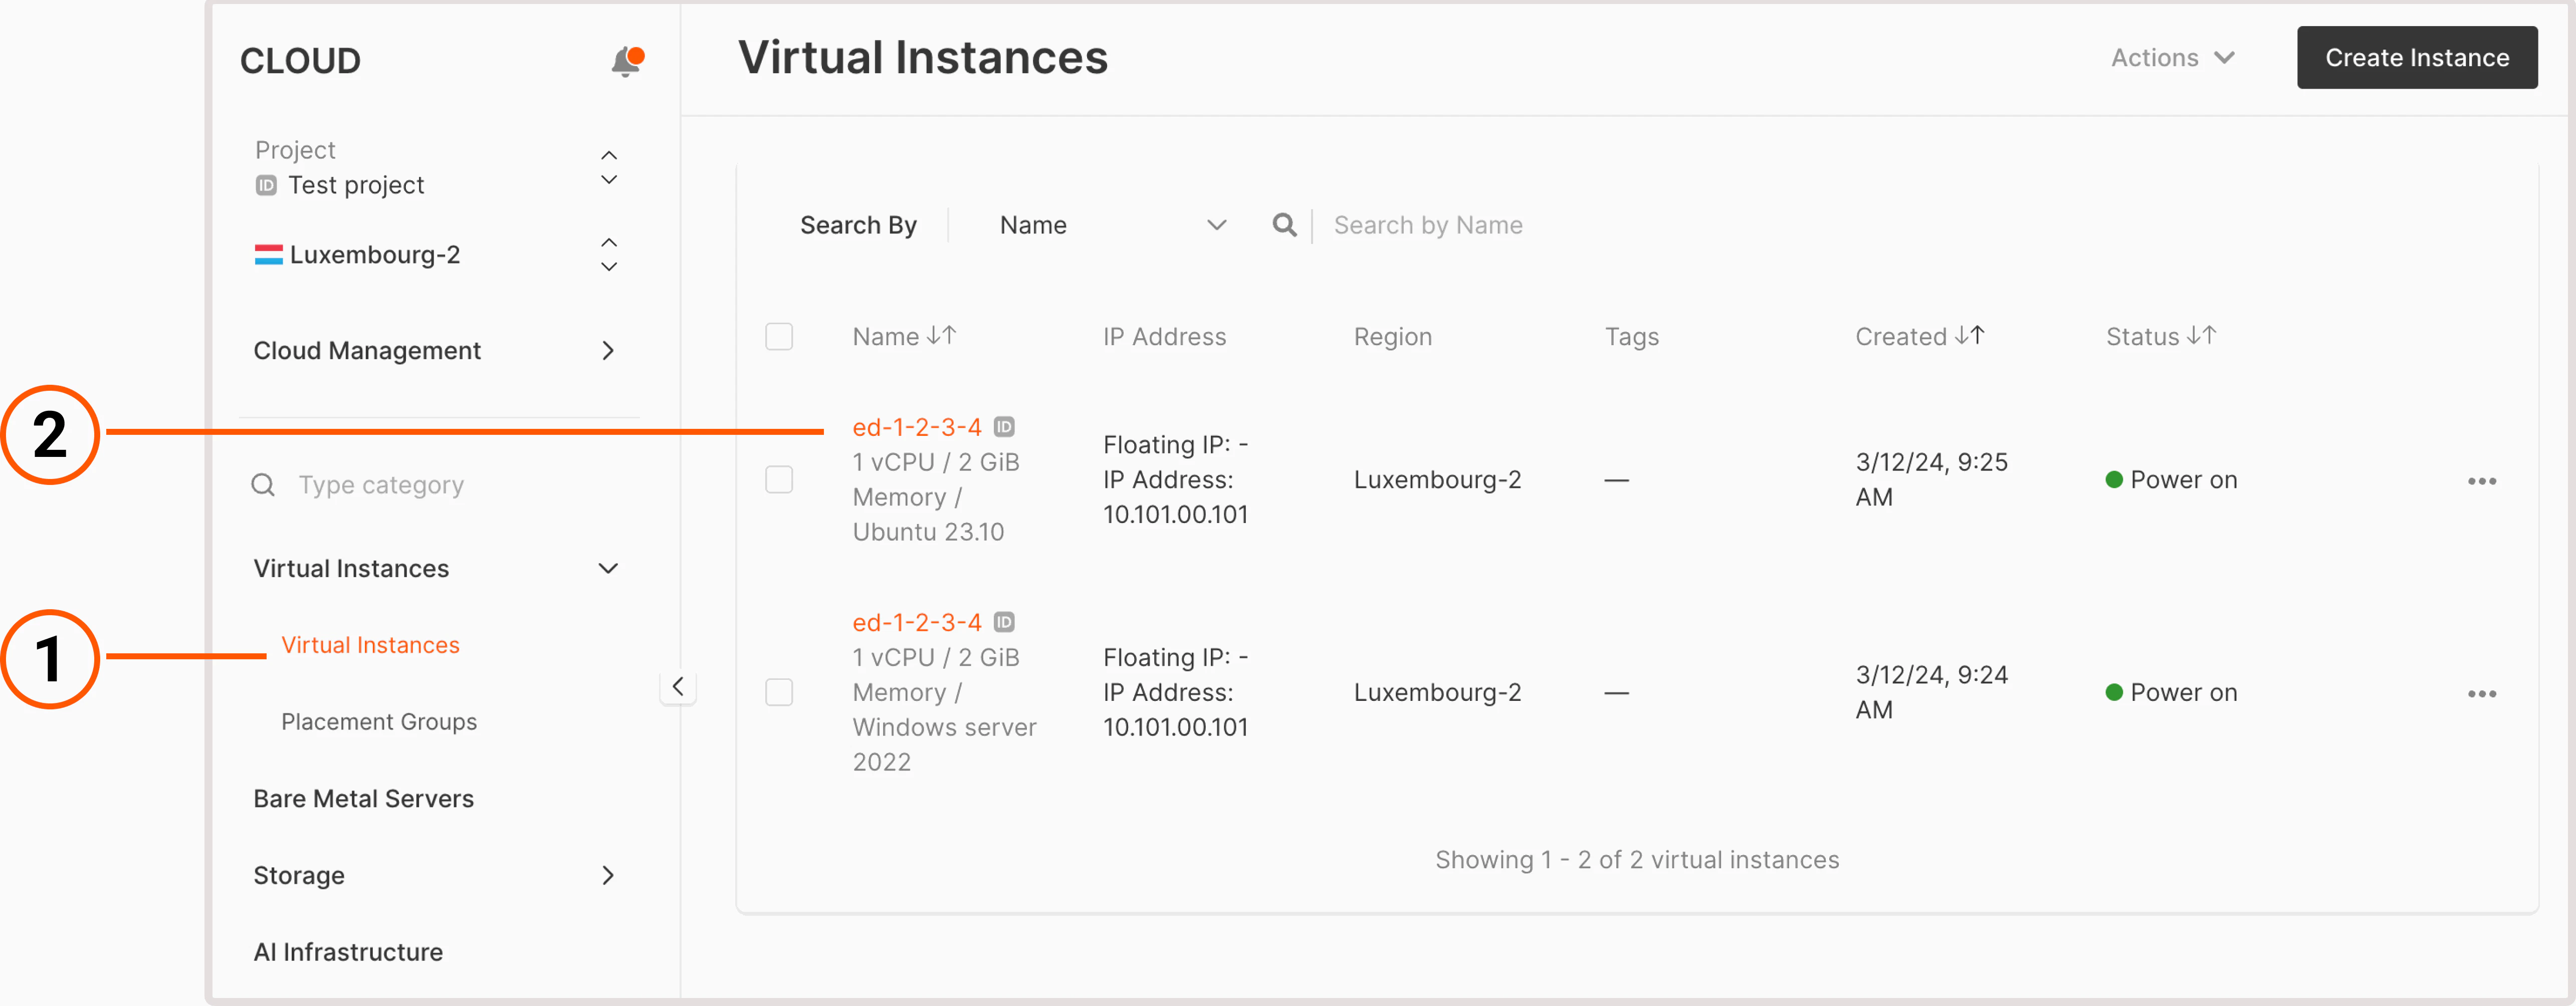
        3\. Open the **Volumes** tab.

        4\. Click **Add volume**.

        <Frame>
          <img src="https://mintcdn.com/gcore/v_yzPGVAOyKyDxn0/images/docs/cloud/virtual-instances/volumes/create-and-configure-volumes/attach-volume-instance-settings.png?fit=max&auto=format&n=v_yzPGVAOyKyDxn0&q=85&s=781845bbb783338bb74e55e31b850b89" alt="Volumes tab with Add volume button highlighted" width="4208" height="1196" data-path="images/docs/cloud/virtual-instances/volumes/create-and-configure-volumes/attach-volume-instance-settings.png" />
        </Frame>

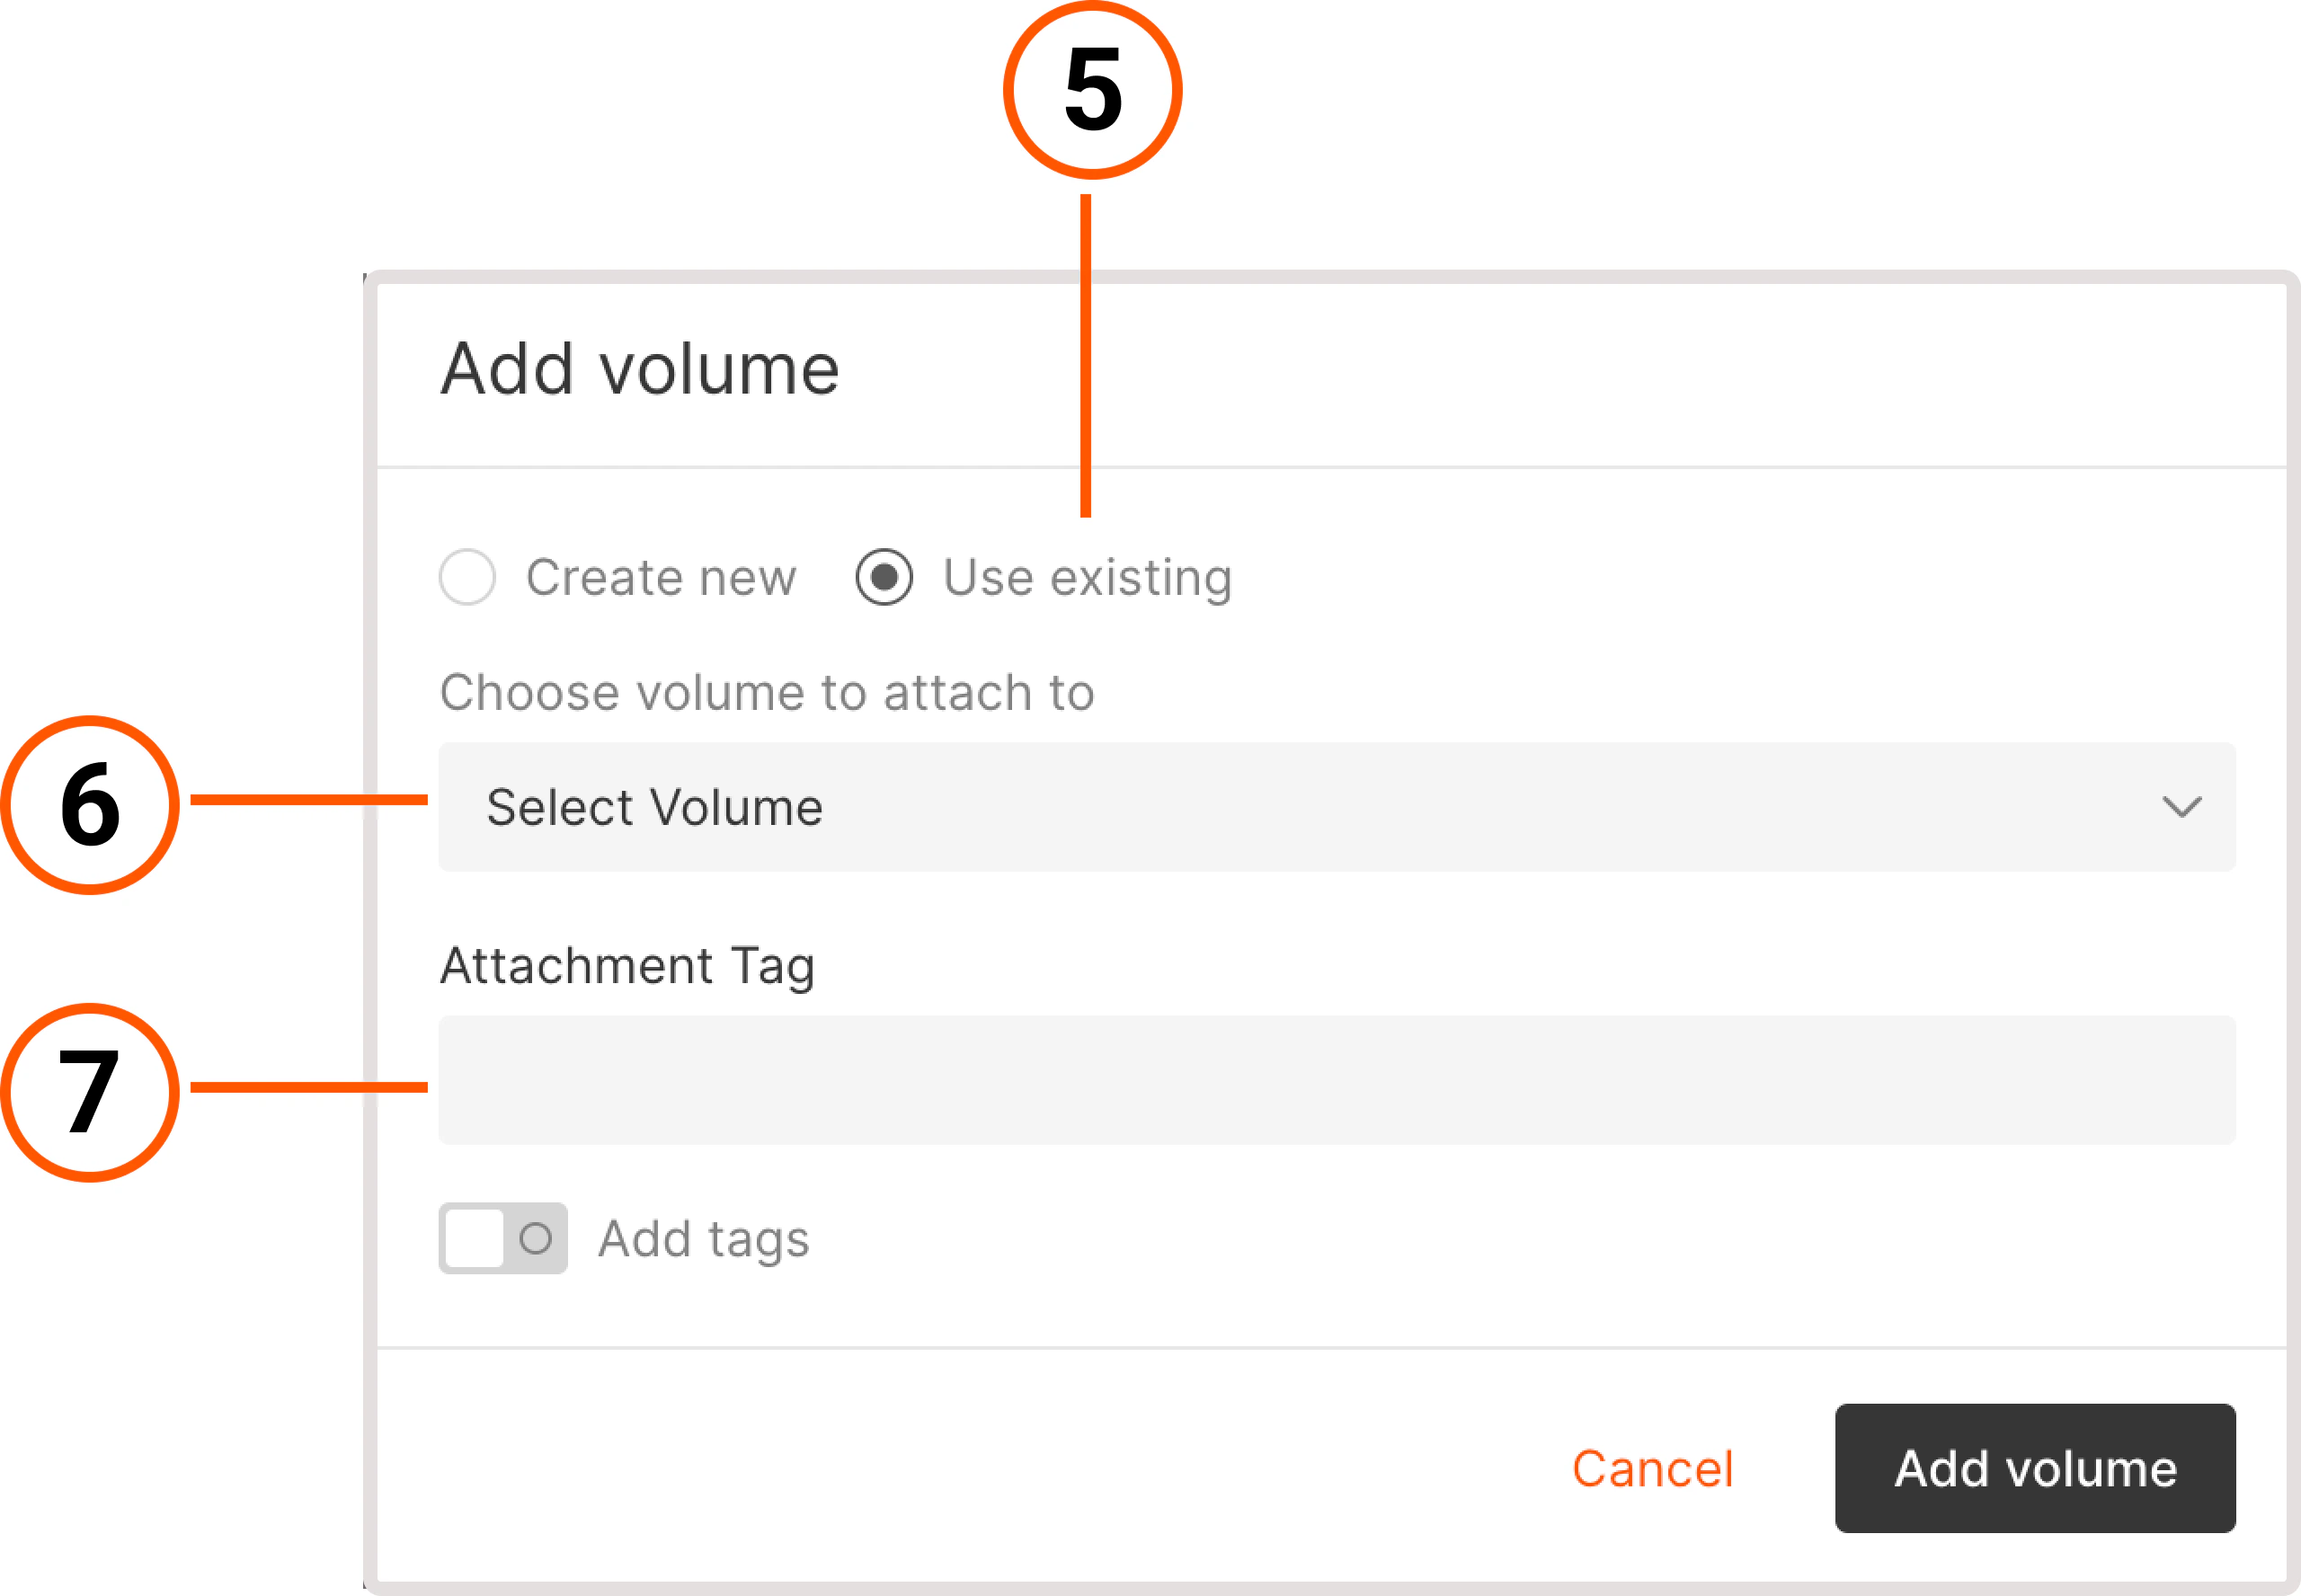
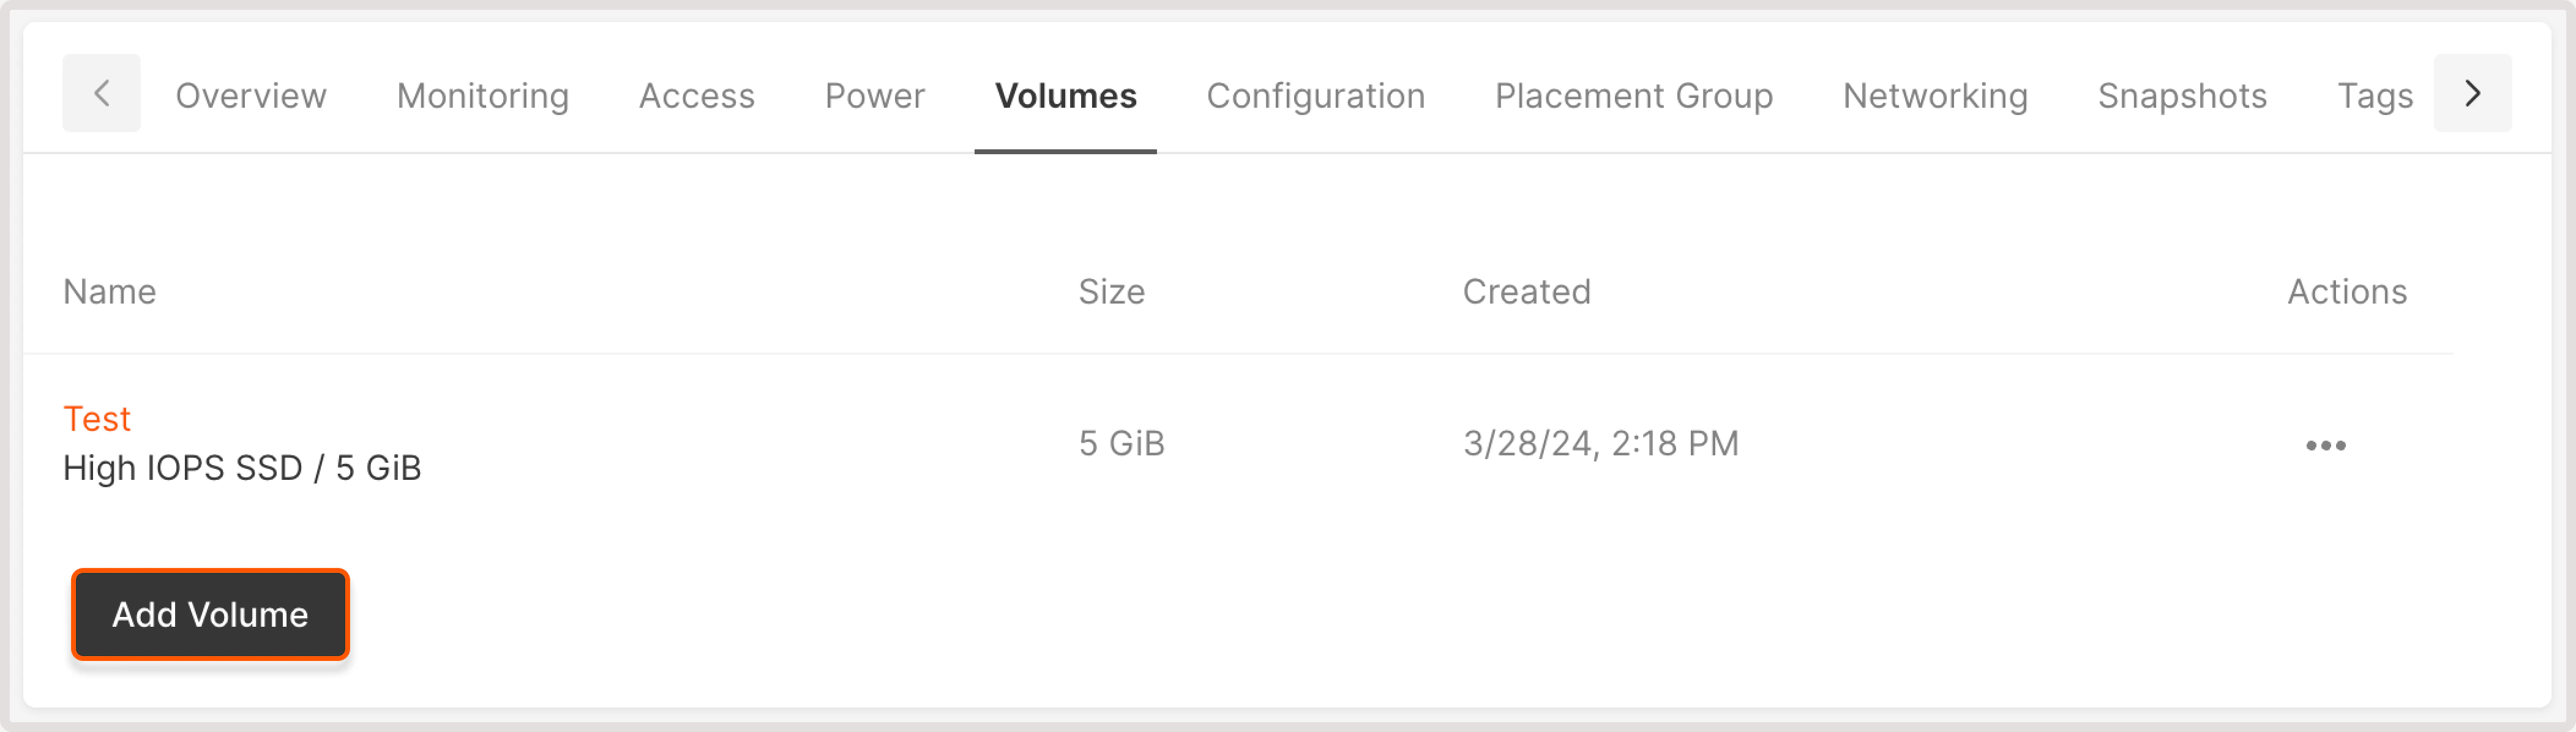
        5\. Click **Use existing** to attach an existing volume to an Virtual Machine.

        You can also create a new volume here. Click **Create new** and configure the settings as described under the [Create a volume](/cloud/virtual-instances/volumes/create-and-configure-volumes#create-a-volume) section.

        6\. Select the volume that you want to attach to the Virtual Machine.

        7\. (Optional). Add an attachment tag.

        <Frame>
          <img src="https://mintcdn.com/gcore/v_yzPGVAOyKyDxn0/images/docs/cloud/virtual-instances/volumes/create-and-configure-volumes/add-volume-to-instance.png?fit=max&auto=format&n=v_yzPGVAOyKyDxn0&q=85&s=394e5a85fc93d10e7360821f18c6a002" alt="Add volume menu with options to add Virtual Machine and tags" width="2560" height="1776" data-path="images/docs/cloud/virtual-instances/volumes/create-and-configure-volumes/add-volume-to-instance.png" />
        </Frame>

        8\. Click **Add volume**.

        You've successfully attached a volume to the Virtual Machine.
      </Tab>
    </Tabs>

    ## Manage volumes

    <p>The options for managing volumes differ depending on the volume you want to modify: boot or regular.</p>

    <p>
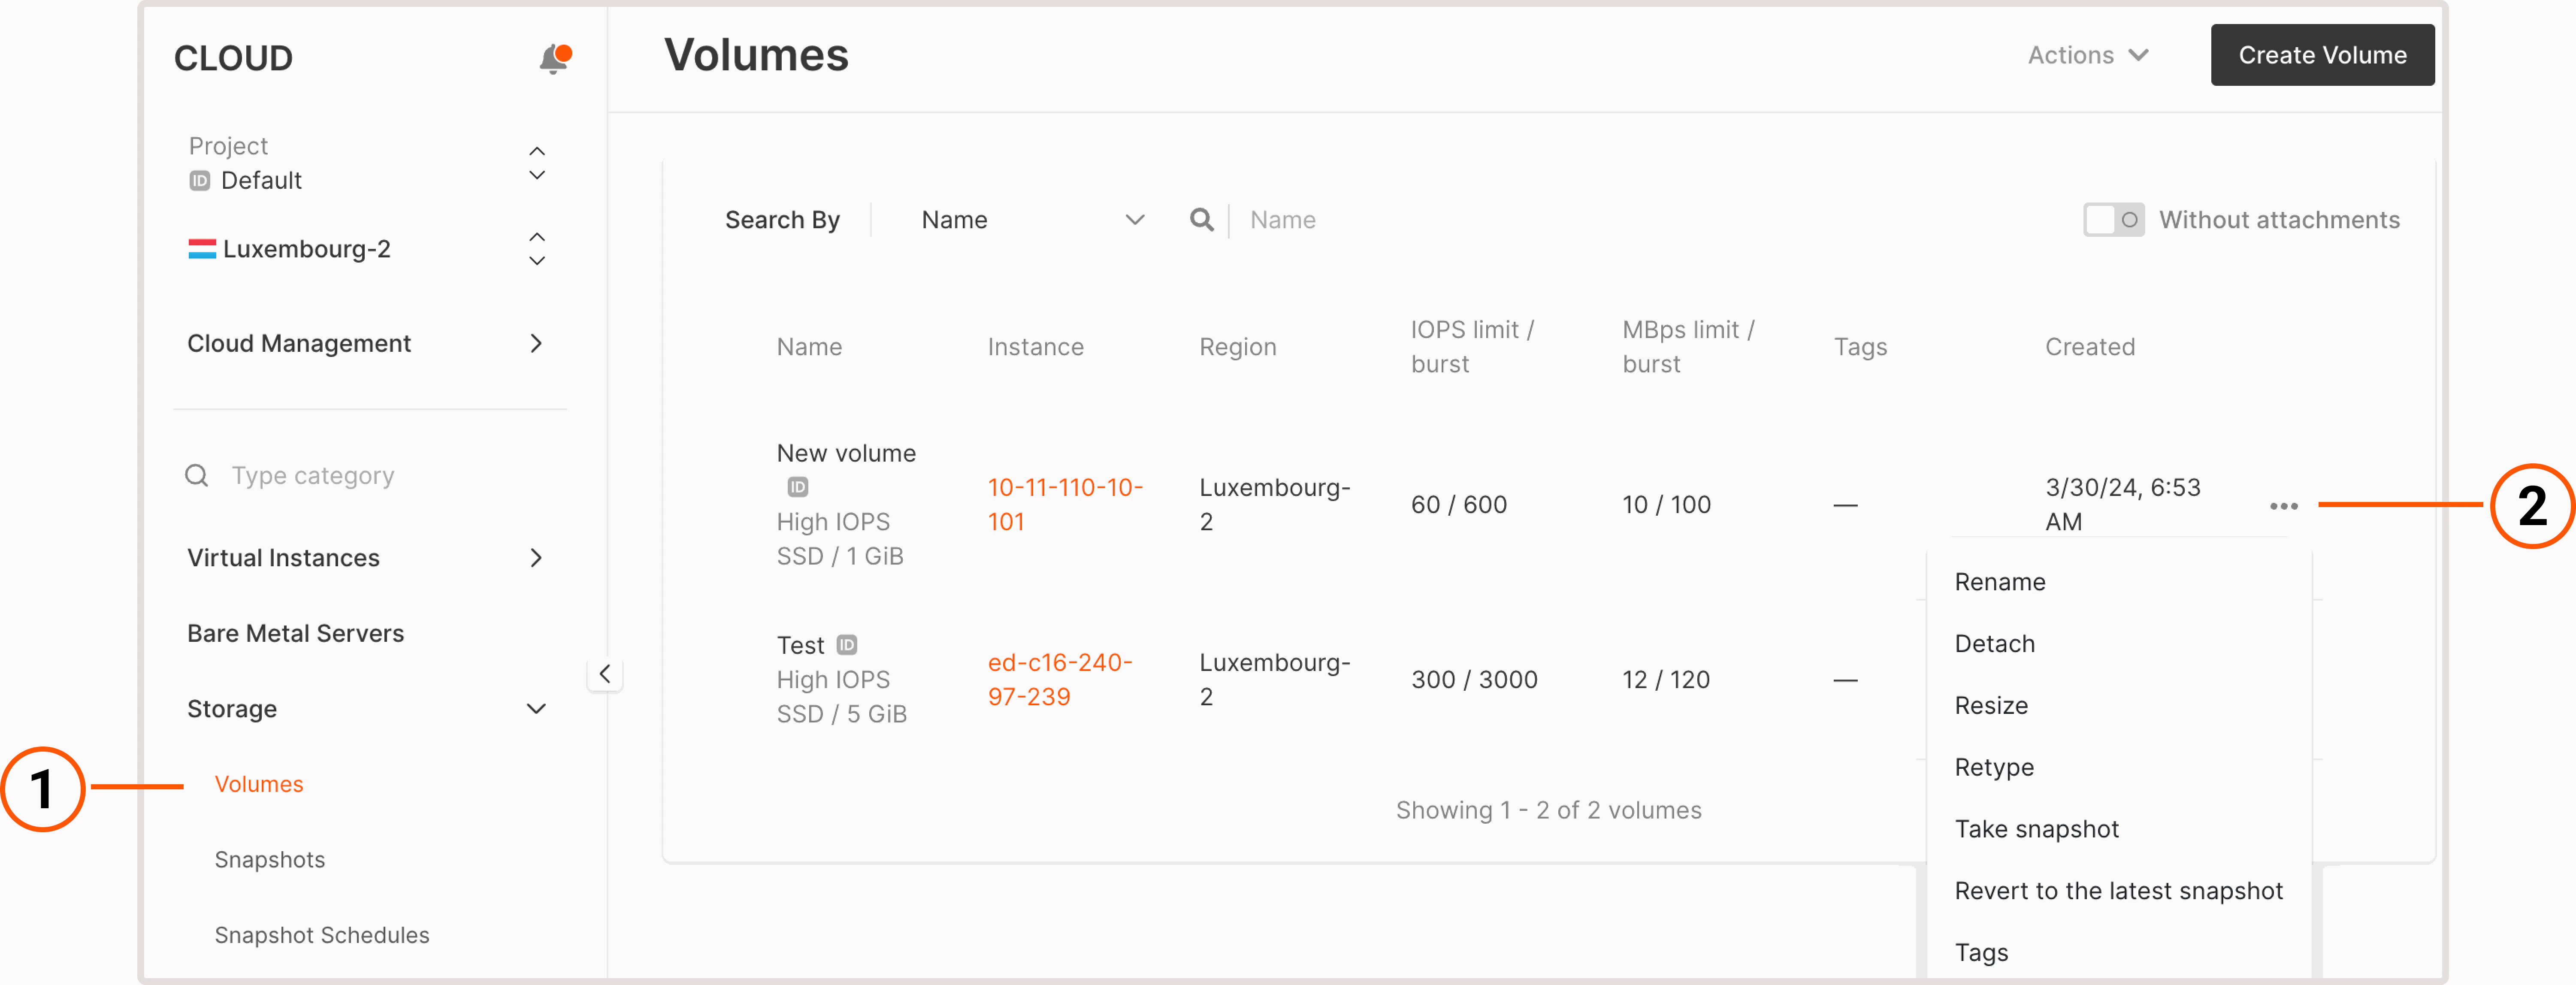
If you have a large number of volumes, you can also search for volumes by name or UUID values to find the one you need.</p>

    ### Rename a volume

    <p>You can rename both boot and regular volumes:</p>

    <p>1. In the Gcore Customer Portal, navigate to **Cloud** > **Storage**.</p>

    <p>2. Click the three-dot icon next to the volume you want to rename.</p>

    <Frame>
      <img src="https://mintcdn.com/gcore/v_yzPGVAOyKyDxn0/images/docs/cloud/virtual-instances/volumes/create-and-configure-volumes/three-dot-menu-regular.png?fit=max&auto=format&n=v_yzPGVAOyKyDxn0&q=85&s=d8ddf3afc19529465fe05f66a60b663d" alt="Volumes tab with expanded settings menu" width="6004" height="2500" data-path="images/docs/cloud/virtual-instances/volumes/create-and-configure-volumes/three-dot-menu-regular.png" />
    </Frame>

    <p>3. Click **Rename**.</p>

    <p>4. Enter a new name.</p>

    <p>5. Select **Save** to apply the changes.</p>

    <Frame>
      <img src="https://mintcdn.com/gcore/v_yzPGVAOyKyDxn0/images/docs/cloud/virtual-instances/volumes/create-and-configure-volumes/rename-volume.png?fit=max&auto=format&n=v_yzPGVAOyKyDxn0&q=85&s=2f994ebc78cfd453a7f7304618781d99" alt="Rename volume dialog" width="2140" height="940" data-path="images/docs/cloud/virtual-instances/volumes/create-and-configure-volumes/rename-volume.png" />
    </Frame>

    <p>Your volume has been renamed.</p>

    ### Detach a volume from a Virtual Machine

    <p>You can only detach regular volumes. The boot volume cannot be detached from an Virtual Machine as long as the VM exists. If you want to detach a boot volume, you need to delete the VM first.</p>

    <p>To detach a volume:</p>

    <p>1. In the Gcore Customer Portal, navigate to **Cloud** > **Storage**.</p>

    <p>2. Click the three-dot icon next to the volume you want to detach.</p>

    <Frame>
      <img src="https://mintcdn.com/gcore/v_yzPGVAOyKyDxn0/images/docs/cloud/virtual-instances/volumes/create-and-configure-volumes/three-dot-menu-attached.png?fit=max&auto=format&n=v_yzPGVAOyKyDxn0&q=85&s=a18498585c2c41f72e5a71c581be1a0d" alt="Volumes tab with expanded settings menu" width="6004" height="2296" data-path="images/docs/cloud/virtual-instances/volumes/create-and-configure-volumes/three-dot-menu-attached.png" />
    </Frame>

    <p>3. Choose the Virtual Machine from which you want to detach a volume.</p>

    <p>4. Select **Confirm**.</p>

    <Frame>
      <img src="https://mintcdn.com/gcore/v_yzPGVAOyKyDxn0/images/docs/cloud/virtual-instances/volumes/create-and-configure-volumes/detach-volume-dialog.png?fit=max&auto=format&n=v_yzPGVAOyKyDxn0&q=85&s=38ebc7bb00a08bfc6b86f9f50787ab92" alt="Dialog asking to select a VM to detach the volume from" width="2140" height="1584" data-path="images/docs/cloud/virtual-instances/volumes/create-and-configure-volumes/detach-volume-dialog.png" />
    </Frame>

    <p>
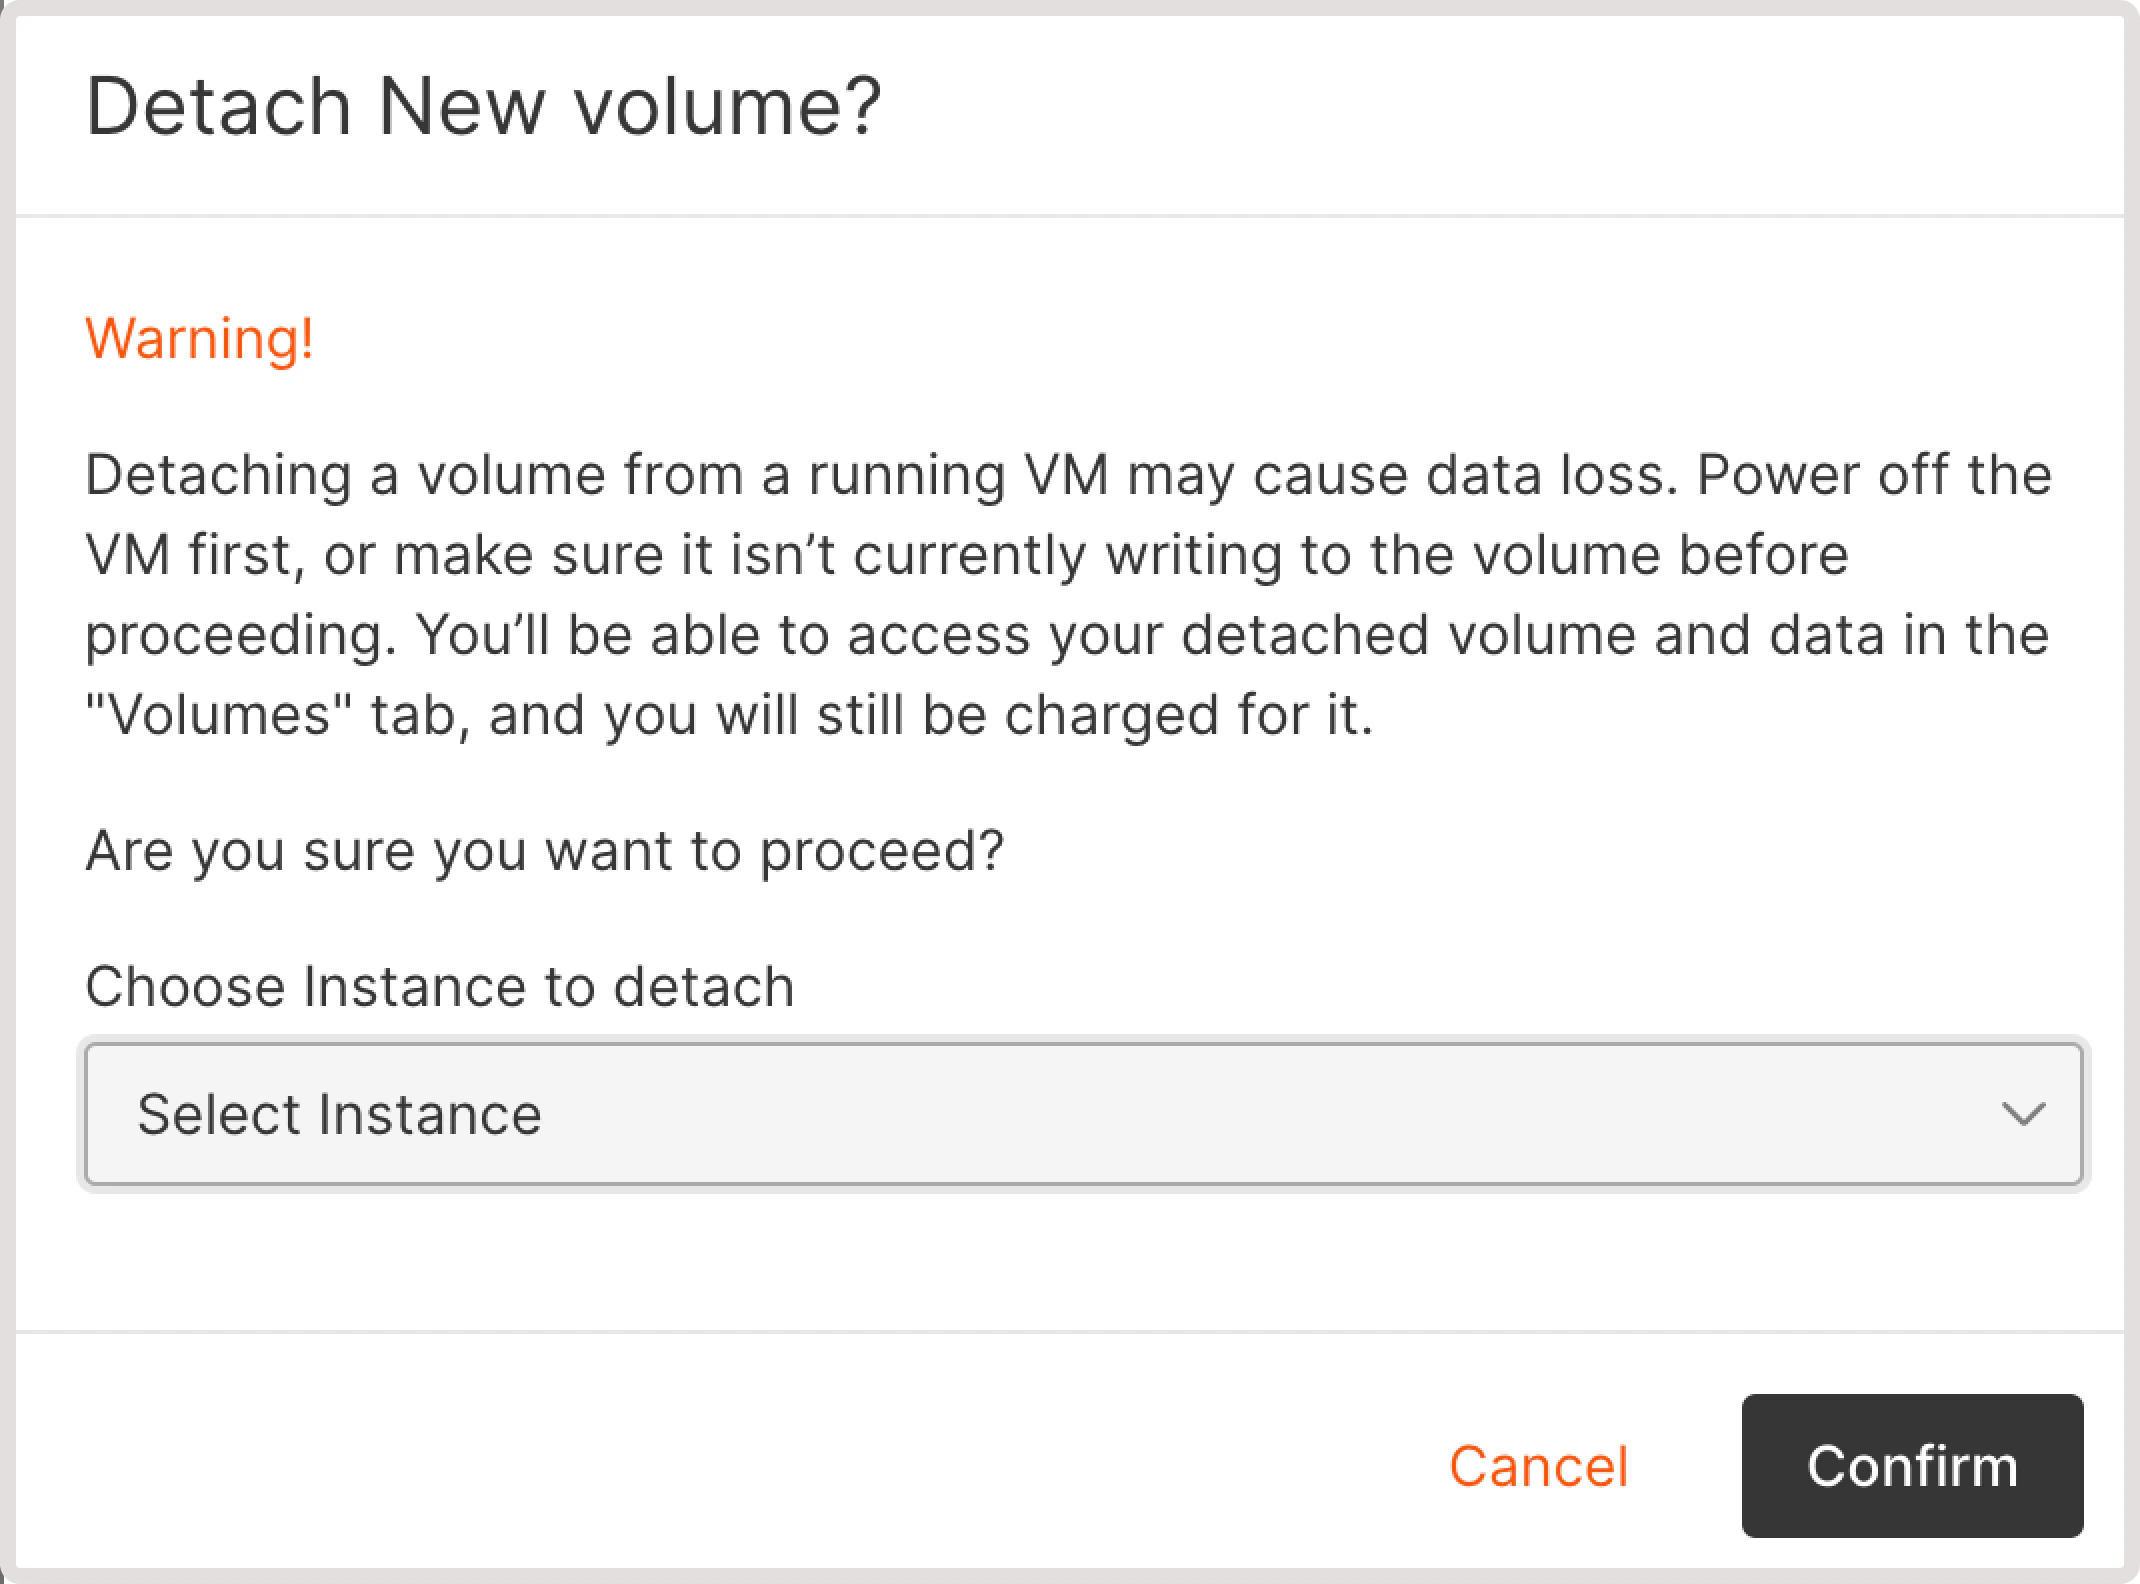
You've detached a volume from the Virtual Machine.</p>

    <Warning>
      **Warning**

      Detaching a volume will not cancel your payment unless you delete the volume. You can also add a detached volume to any Virtual Machine at any time.
    </Warning>

    ### Resize a volume

    <p>You can resize both boot and regular volumes:</p>

    <p>1. In the Gcore Customer Portal, navigate to **Cloud** > **Storage**.</p>

    <p>2. Click the three-dot icon next to the volume you want to resize.</p>

    <Frame>
      <img src="https://mintcdn.com/gcore/v_yzPGVAOyKyDxn0/images/docs/cloud/virtual-instances/volumes/create-and-configure-volumes/three-dot-menu-regular.png?fit=max&auto=format&n=v_yzPGVAOyKyDxn0&q=85&s=d8ddf3afc19529465fe05f66a60b663d" alt="Volumes tab with expanded settings menu" width="6004" height="2500" data-path="images/docs/cloud/virtual-instances/volumes/create-and-configure-volumes/three-dot-menu-regular.png" />
    </Frame>

    <p>
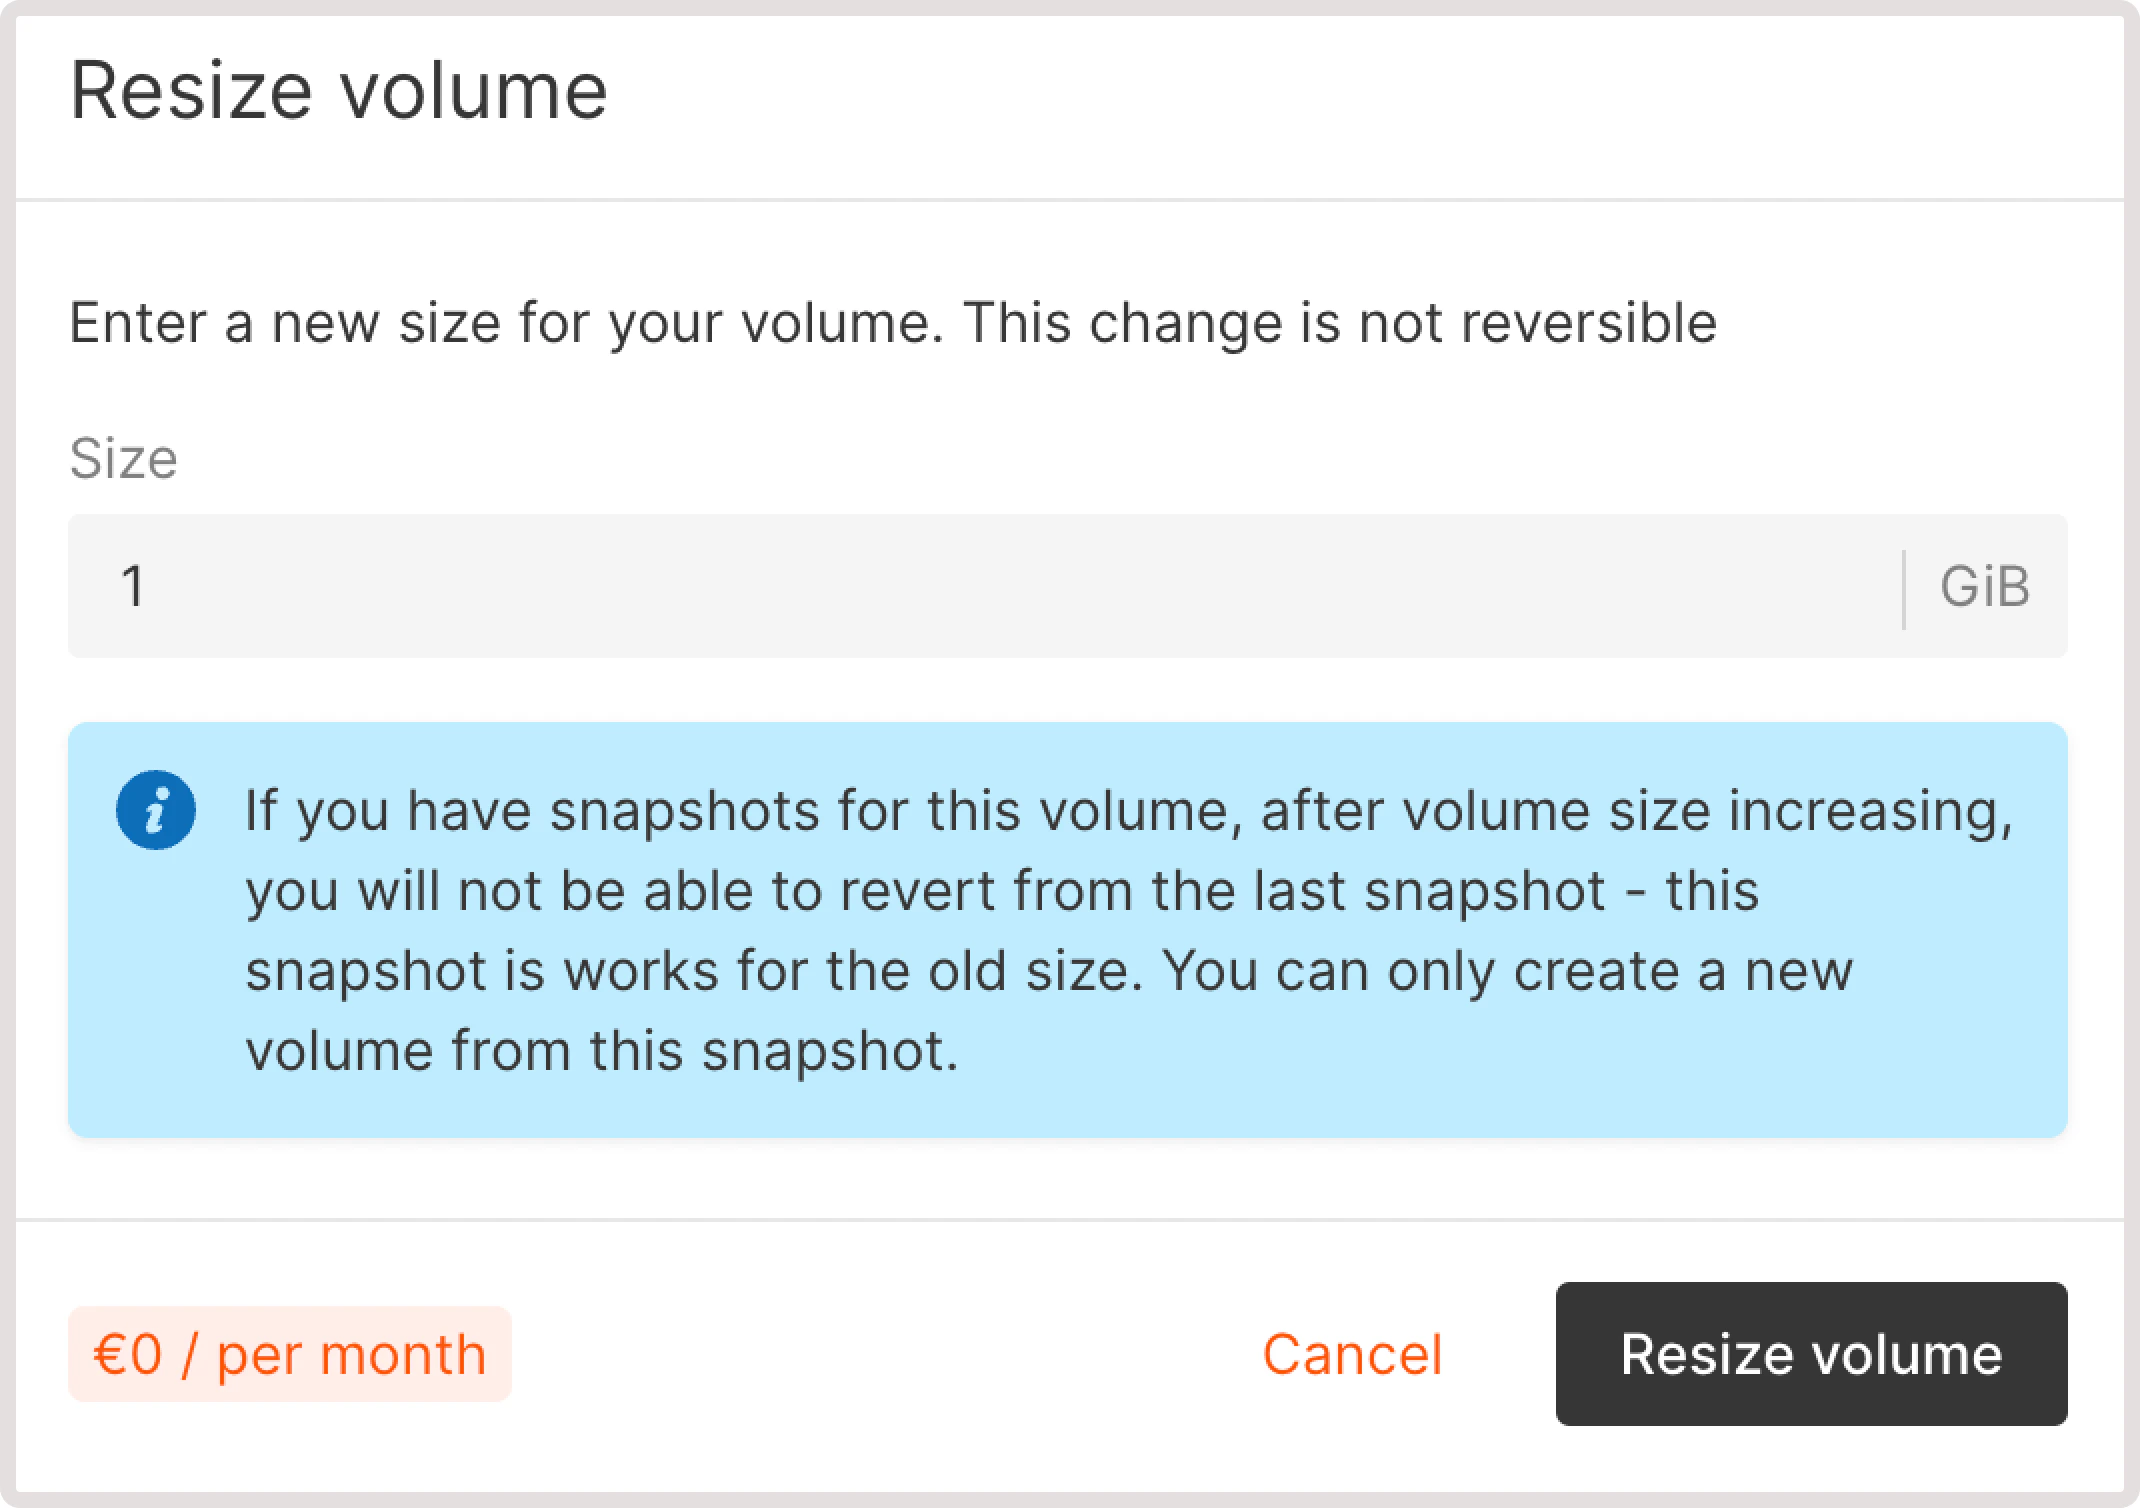
3. In the **Resize volume** dialog that opens, you can see your current volume size in GB. Enter the new volume size.</p>

    <p>4. Click **Resize volume** to apply the changes.</p>

    <Frame>
      <img src="https://mintcdn.com/gcore/v_yzPGVAOyKyDxn0/images/docs/cloud/virtual-instances/volumes/create-and-configure-volumes/resize-volume.png?fit=max&auto=format&n=v_yzPGVAOyKyDxn0&q=85&s=e4d0cc68b32859365fd97183cb2ef2e3" alt="Dialog asking for a new volume size" width="2140" height="1508" data-path="images/docs/cloud/virtual-instances/volumes/create-and-configure-volumes/resize-volume.png" />
    </Frame>

    <p>You've changed your volume size.</p>

    <Warning>
      **Warning**

      If you have snapshots for this volume, after you increase the size, you won't be able to [revert from the last snapshot](/cloud/virtual-instances/volumes/create-and-configure-volumes#revert-volume-from-snapshot). You can only create a new volume from this volume's snapshot.
    </Warning>

    ### Change volume type

    <p>This option is available for regular volumes of High IOPS and Standard types. You can't change the type of boot volume. However, you can create a new volume from a volume snapshot with the required type.</p>

    <Info>
      **Info**

      Before proceeding with the following instructions, make sure that a volume is detached from a Virtual Machine. Otherwise, the **Retype** button won't appear in your settings list.
    </Info>

    <p>To retype a volume:</p>

    <p>1. In the Gcore Customer Portal, navigate to **Cloud** > **Storage**.</p>

    <p>2. Click the three-dot icon next to the volume you want to retype.</p>

    <Frame>
      <img src="https://mintcdn.com/gcore/v_yzPGVAOyKyDxn0/images/docs/cloud/virtual-instances/volumes/create-and-configure-volumes/three-dot-menu-regular.png?fit=max&auto=format&n=v_yzPGVAOyKyDxn0&q=85&s=d8ddf3afc19529465fe05f66a60b663d" alt="Volumes tab with expanded settings menu" width="6004" height="2500" data-path="images/docs/cloud/virtual-instances/volumes/create-and-configure-volumes/three-dot-menu-regular.png" />
    </Frame>

    <p>
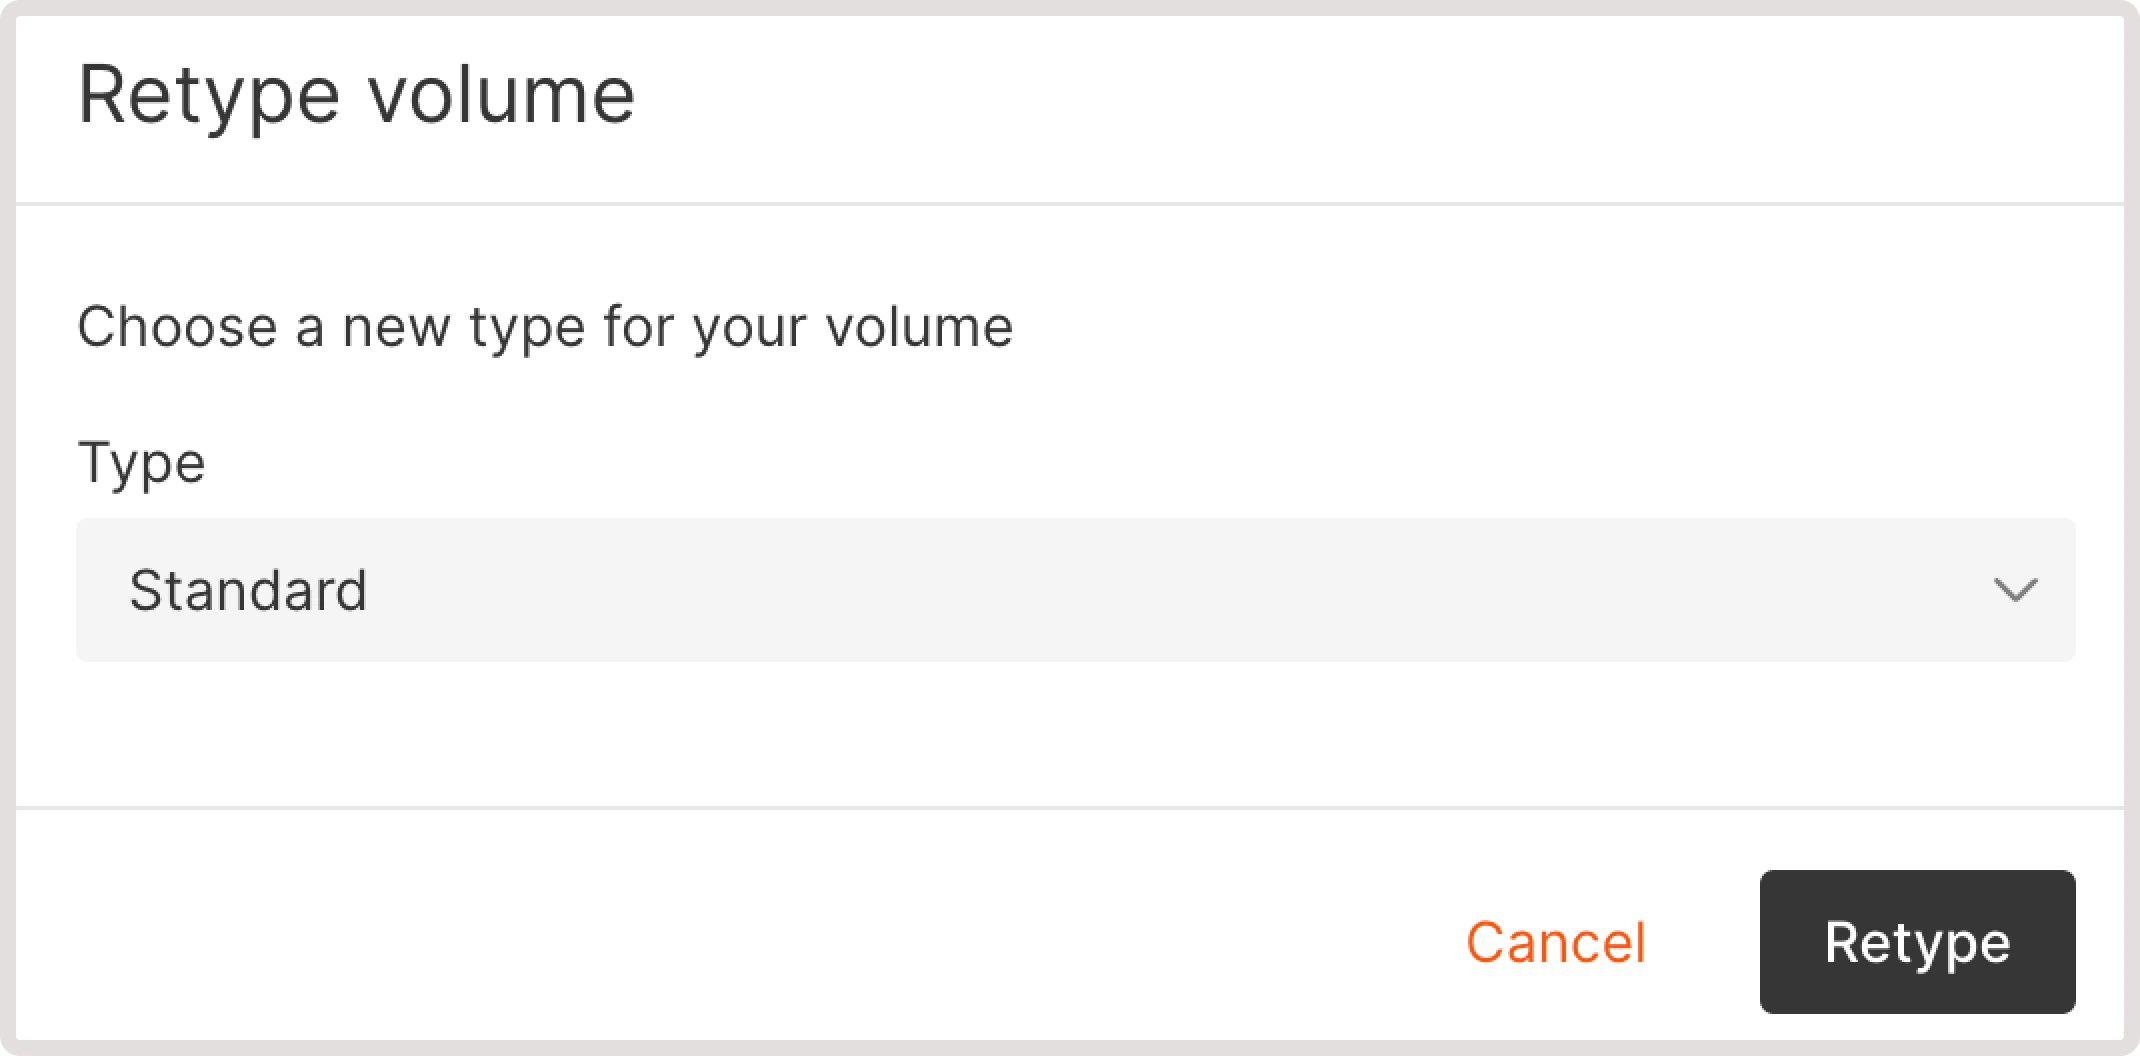
3. Click **Retype**.</p>

    <p>4. Select the desired volume type and then click **Retype** to apply the updates.</p>

    <Frame>
      <img src="https://mintcdn.com/gcore/v_yzPGVAOyKyDxn0/images/docs/cloud/virtual-instances/volumes/create-and-configure-volumes/retype-volume.png?fit=max&auto=format&n=v_yzPGVAOyKyDxn0&q=85&s=bae06f83732b18a0e0f1a8e8933f13d7" alt="Dialog asking to select a new volume type" width="2140" height="1056" data-path="images/docs/cloud/virtual-instances/volumes/create-and-configure-volumes/retype-volume.png" />
    </Frame>

    <p>You've successfully changed the volume type.</p>

    <p>If you have multiple volumes attached to one Virtual Machine, you can use the `rsync` and `cp` utilities to migrate data between volumes within an operating system.</p>

    ### Take a volume snapshot

    <p>You can create a volume snapshot and use it later for backup, further recovery, and deploying new Virtual Machines from snapshots of boot volumes.</p>

    <p>To take a snapshot:</p>

    <p>1. In the Gcore Customer Portal, navigate to **Cloud** > **Storage**.</p>

    <p>2. Click the three-dot icon next to the needed volume.</p>

    <Frame>
      <img src="https://mintcdn.com/gcore/v_yzPGVAOyKyDxn0/images/docs/cloud/virtual-instances/volumes/create-and-configure-volumes/three-dot-menu-regular.png?fit=max&auto=format&n=v_yzPGVAOyKyDxn0&q=85&s=d8ddf3afc19529465fe05f66a60b663d" alt="Volumes tab with expanded settings menu" width="6004" height="2500" data-path="images/docs/cloud/virtual-instances/volumes/create-and-configure-volumes/three-dot-menu-regular.png" />
    </Frame>

    <p>
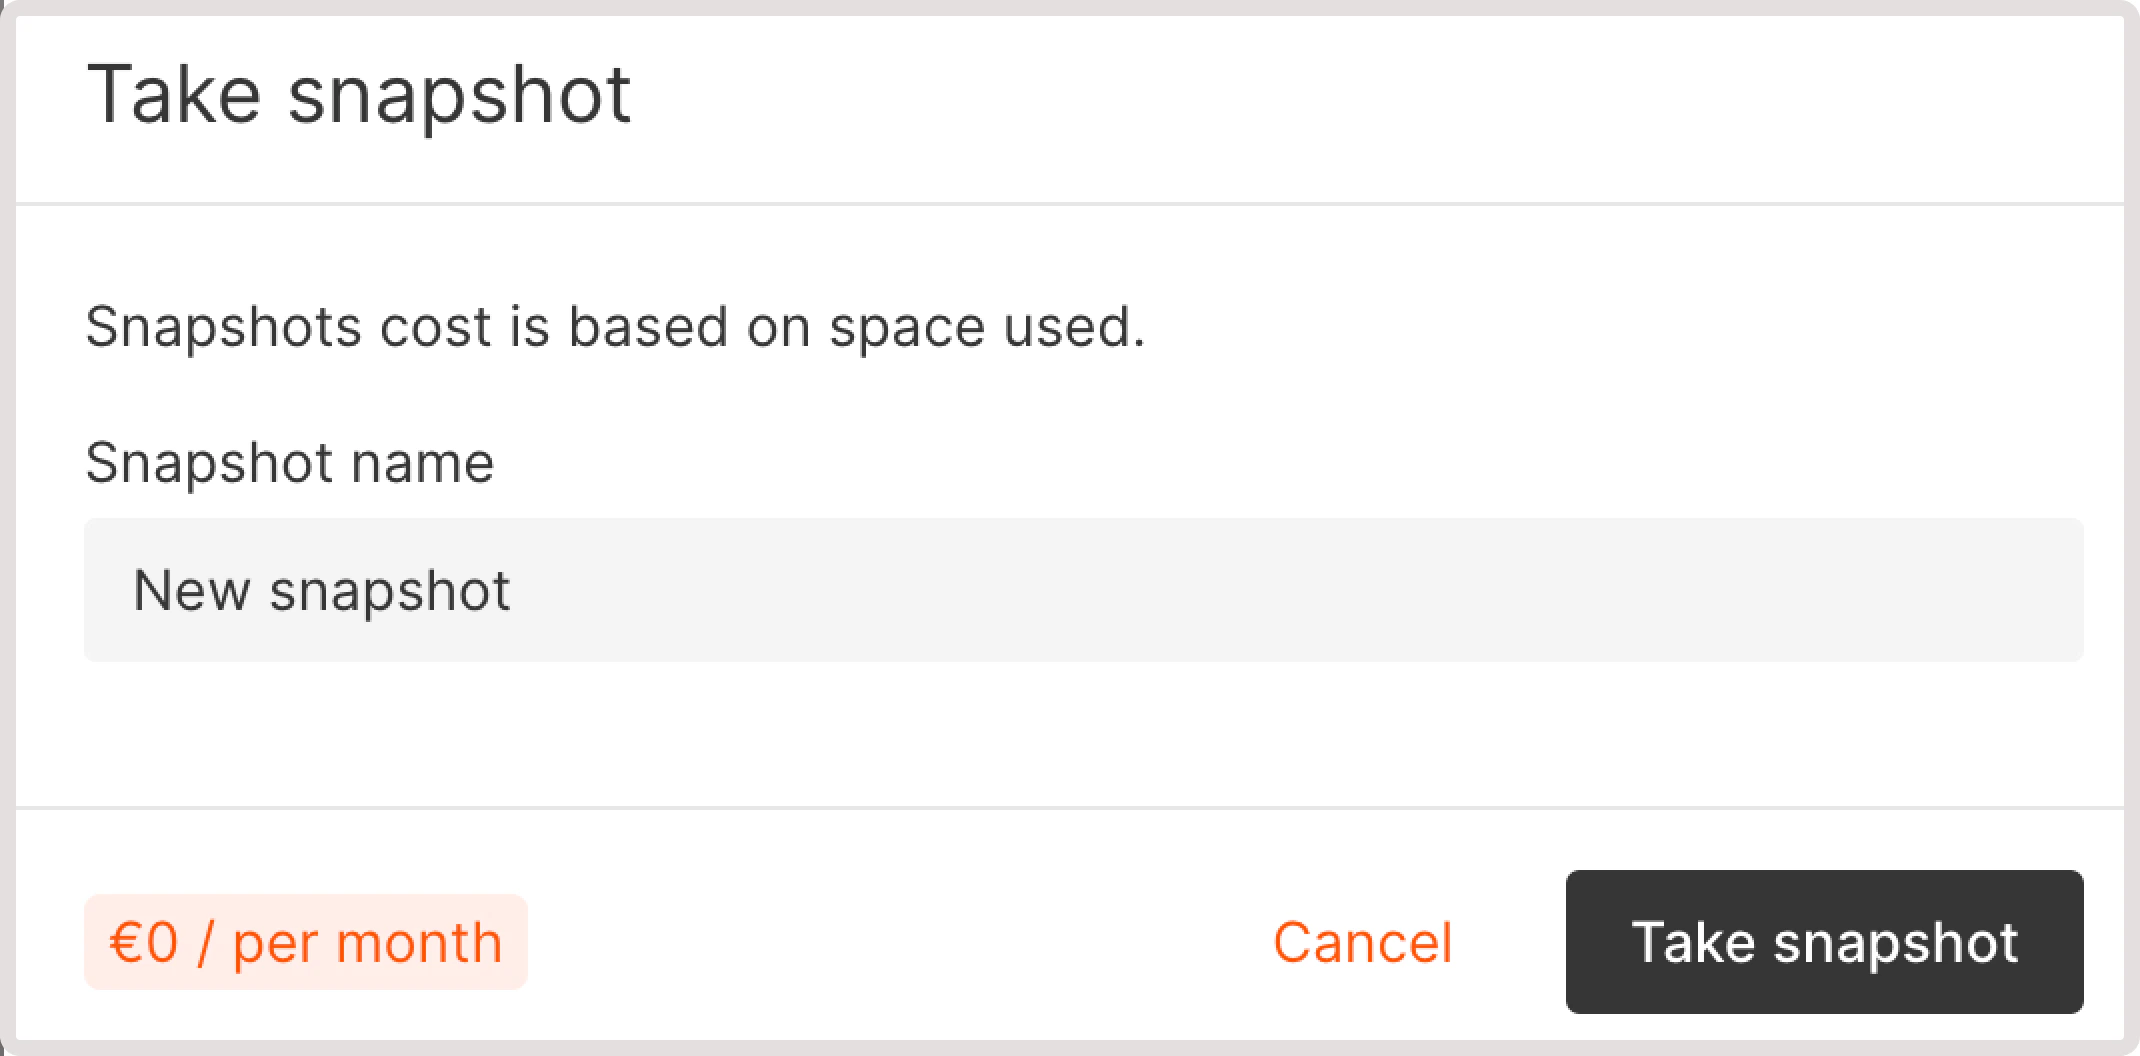
3. Click **Take snapshot**.</p>

    <p>4. Enter snapshot name.</p>

    <p>5. Click **Take snapshot**.</p>

    <Frame>
      <img src="https://mintcdn.com/gcore/v_yzPGVAOyKyDxn0/images/docs/cloud/virtual-instances/volumes/create-and-configure-volumes/take-snapshot.png?fit=max&auto=format&n=v_yzPGVAOyKyDxn0&q=85&s=8509635ffd5ffac83ebc7611457077bd" alt="Dialog asking to add a snapshot name" width="2140" height="1056" data-path="images/docs/cloud/virtual-instances/volumes/create-and-configure-volumes/take-snapshot.png" />
    </Frame>

    <p>
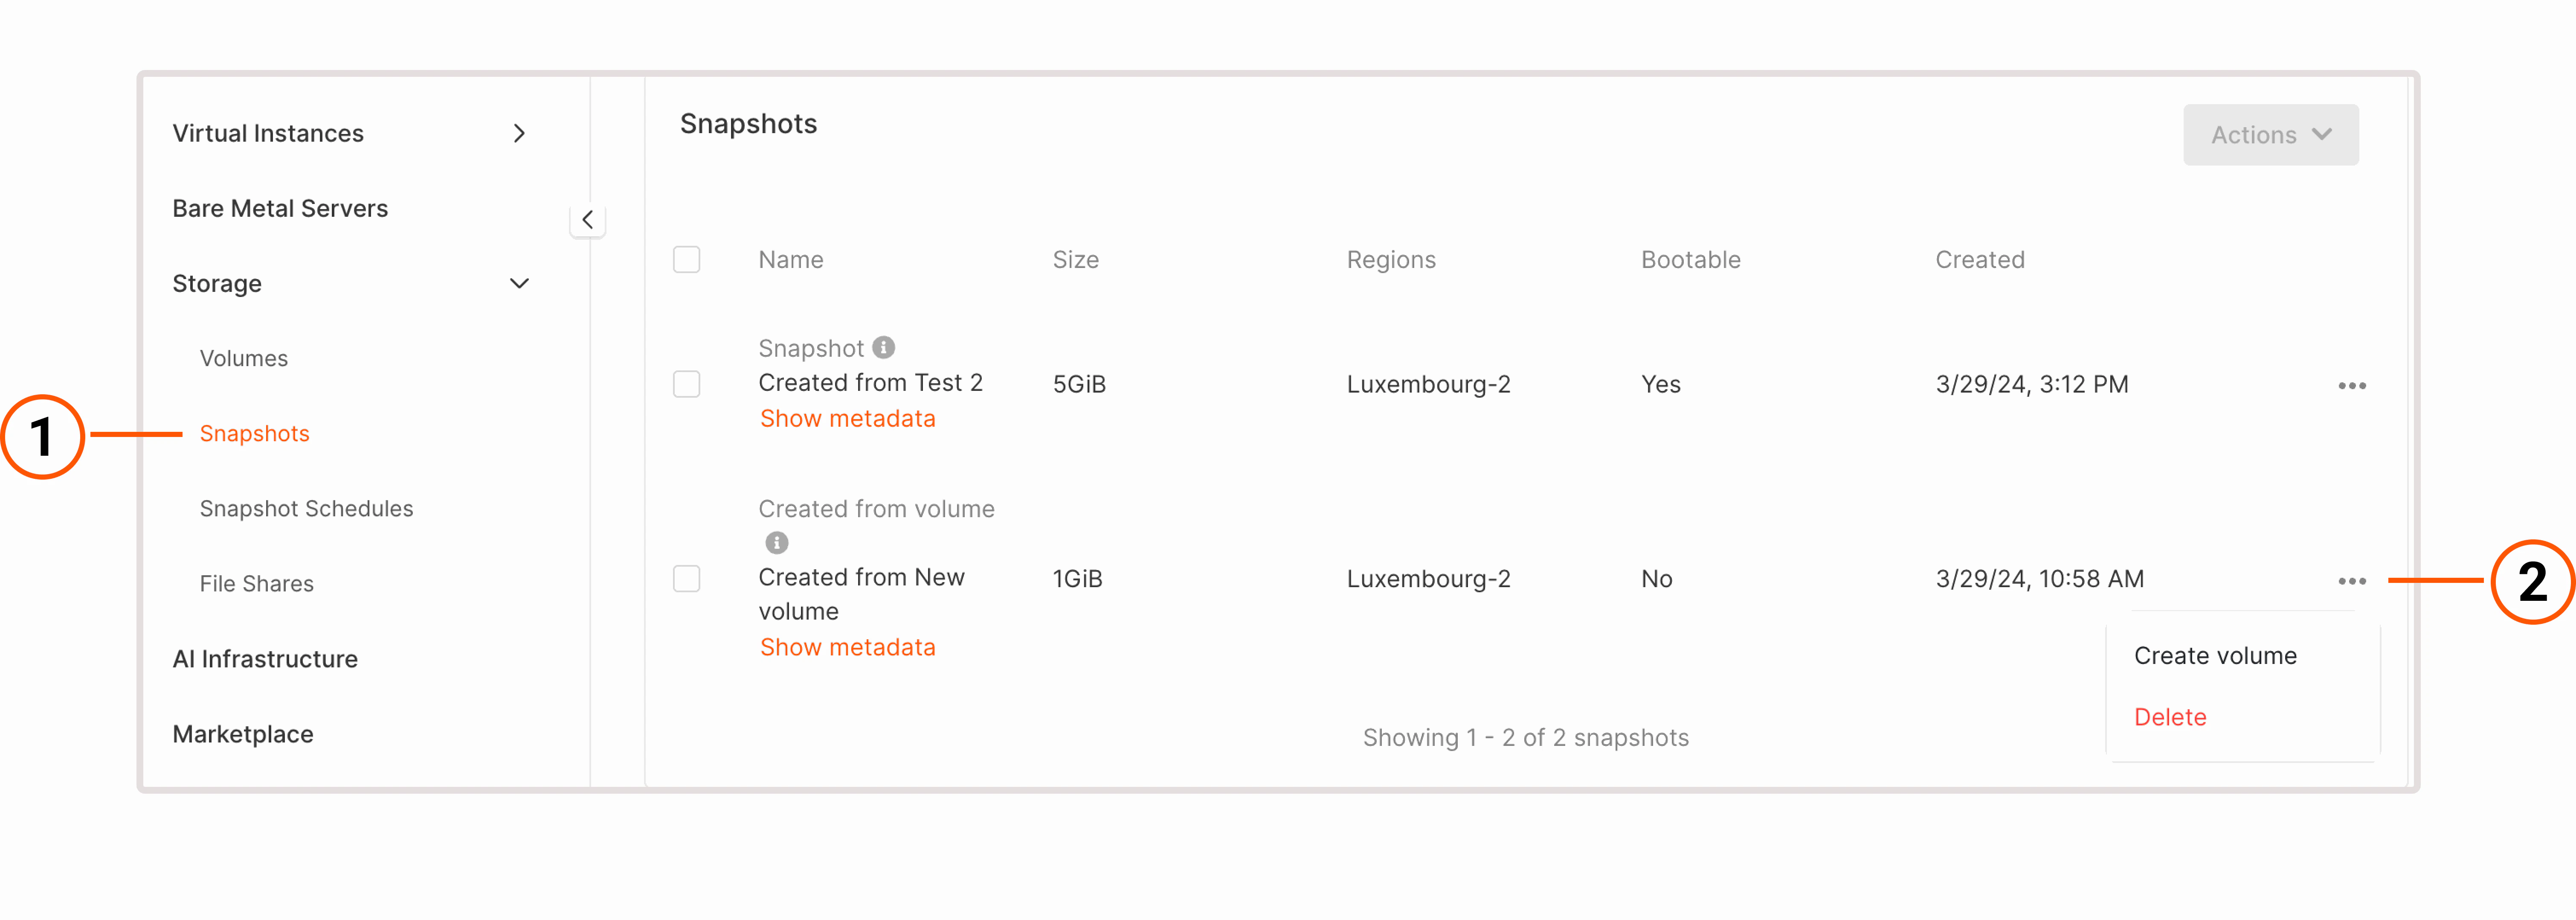
The snapshot will appear on the **Snapshots** page, along with the other created snapshots.</p>

    ### Revert volume to the latest snapshot

    <p>In case of an accidental data loss or data corruption, you might need to restore a volume to its previous state. If you [made a snapshot of that volume](/cloud/virtual-instances/volumes/create-and-configure-volumes#take-volume-snapshot), you can roll your volume back to the state when that snapshot was taken.</p>

    <Info>
      **Info**

      Before proceeding with the following instructions, make sure that the volume is [detached from an instance](/cloud/virtual-instances/volumes/create-and-configure-volumes#detach-a-volume-from-an-instance) and that you have the volume's snapshot. Otherwise, you'll get an error when trying to revert the volume to its previous state.
    </Info>

    <p>To revert a volume:</p>

    <p>1. In the Gcore Customer Portal, navigate to **Cloud** > **Storage**.</p>

    <p>2. Click the three-dot icon next to the volume you want to revert.</p>

    <Frame>
      <img src="https://mintcdn.com/gcore/v_yzPGVAOyKyDxn0/images/docs/cloud/virtual-instances/volumes/create-and-configure-volumes/three-dot-menu-regular.png?fit=max&auto=format&n=v_yzPGVAOyKyDxn0&q=85&s=d8ddf3afc19529465fe05f66a60b663d" alt="Volumes tab with expanded settings menu" width="6004" height="2500" data-path="images/docs/cloud/virtual-instances/volumes/create-and-configure-volumes/three-dot-menu-regular.png" />
    </Frame>

    <p>
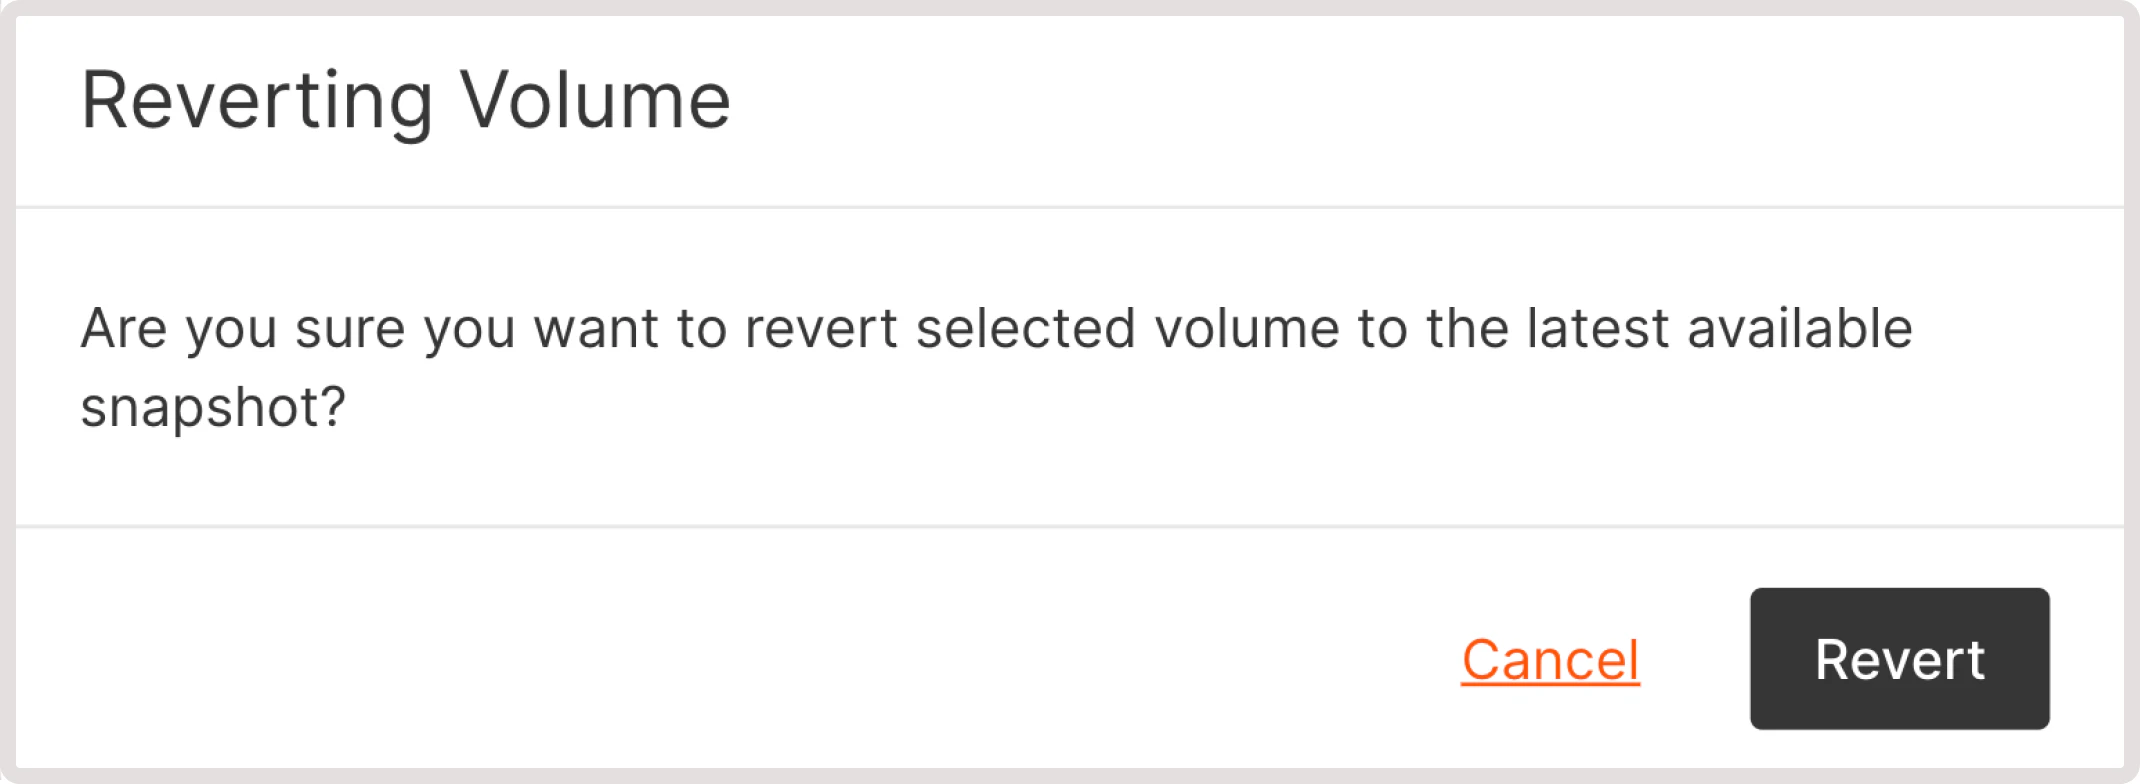
3. Click **Revert to the latest snapshot**.</p>

    <p>4. Click **Revert**.</p>

    <Frame>
      <img src="https://mintcdn.com/gcore/v_yzPGVAOyKyDxn0/images/docs/cloud/virtual-instances/volumes/create-and-configure-volumes/revert-volume.png?fit=max&auto=format&n=v_yzPGVAOyKyDxn0&q=85&s=a155bf24e2100bf1839d9996f1e92bcb" alt="Dialog asking to confirm volume reverting" width="2140" height="784" data-path="images/docs/cloud/virtual-instances/volumes/create-and-configure-volumes/revert-volume.png" />
    </Frame>

    <Info>
      **Info**

      After resizing a volume, reversion is unavailable because the latest snapshot is taken for the old size. You can only create a new volume. For the new size, create a new snapshot.
    </Info>

    ### Create an image from a bootable volume

    <p>You can create an image from a boot volume and use that image to create a new Virtual Machine.</p>

    <p>1. In the Gcore Customer Portal, navigate to **Cloud** > **Storage**.</p>

    <p>2. Click the three-dot icon next to the volume from which you want to create an image.</p>

    <Frame>
      <img src="https://mintcdn.com/gcore/v_yzPGVAOyKyDxn0/images/docs/cloud/virtual-instances/volumes/create-and-configure-volumes/three-dot-menu-boot.png?fit=max&auto=format&n=v_yzPGVAOyKyDxn0&q=85&s=bd251fc3bb3634d1943b26edf49b975b" alt="Volumes tab with expanded settings menu" width="6008" height="2296" data-path="images/docs/cloud/virtual-instances/volumes/create-and-configure-volumes/three-dot-menu-boot.png" />
    </Frame>

    <p>3. Select **Create image**.</p>

    <p>4. Specify the image name.</p>

    <p>5. Select architecture.</p>

    <p>6. Click **Create image**.</p>

    <Frame>
      <img src="https://mintcdn.com/gcore/v_yzPGVAOyKyDxn0/images/docs/cloud/virtual-instances/volumes/create-and-configure-volumes/create-image.png?fit=max&auto=format&n=v_yzPGVAOyKyDxn0&q=85&s=ee709680ee1e94ce9486268afa5d98bb" alt="Dialog to select image and and architecture" width="2140" height="1276" data-path="images/docs/cloud/virtual-instances/volumes/create-and-configure-volumes/create-image.png" />
    </Frame>

    <p>
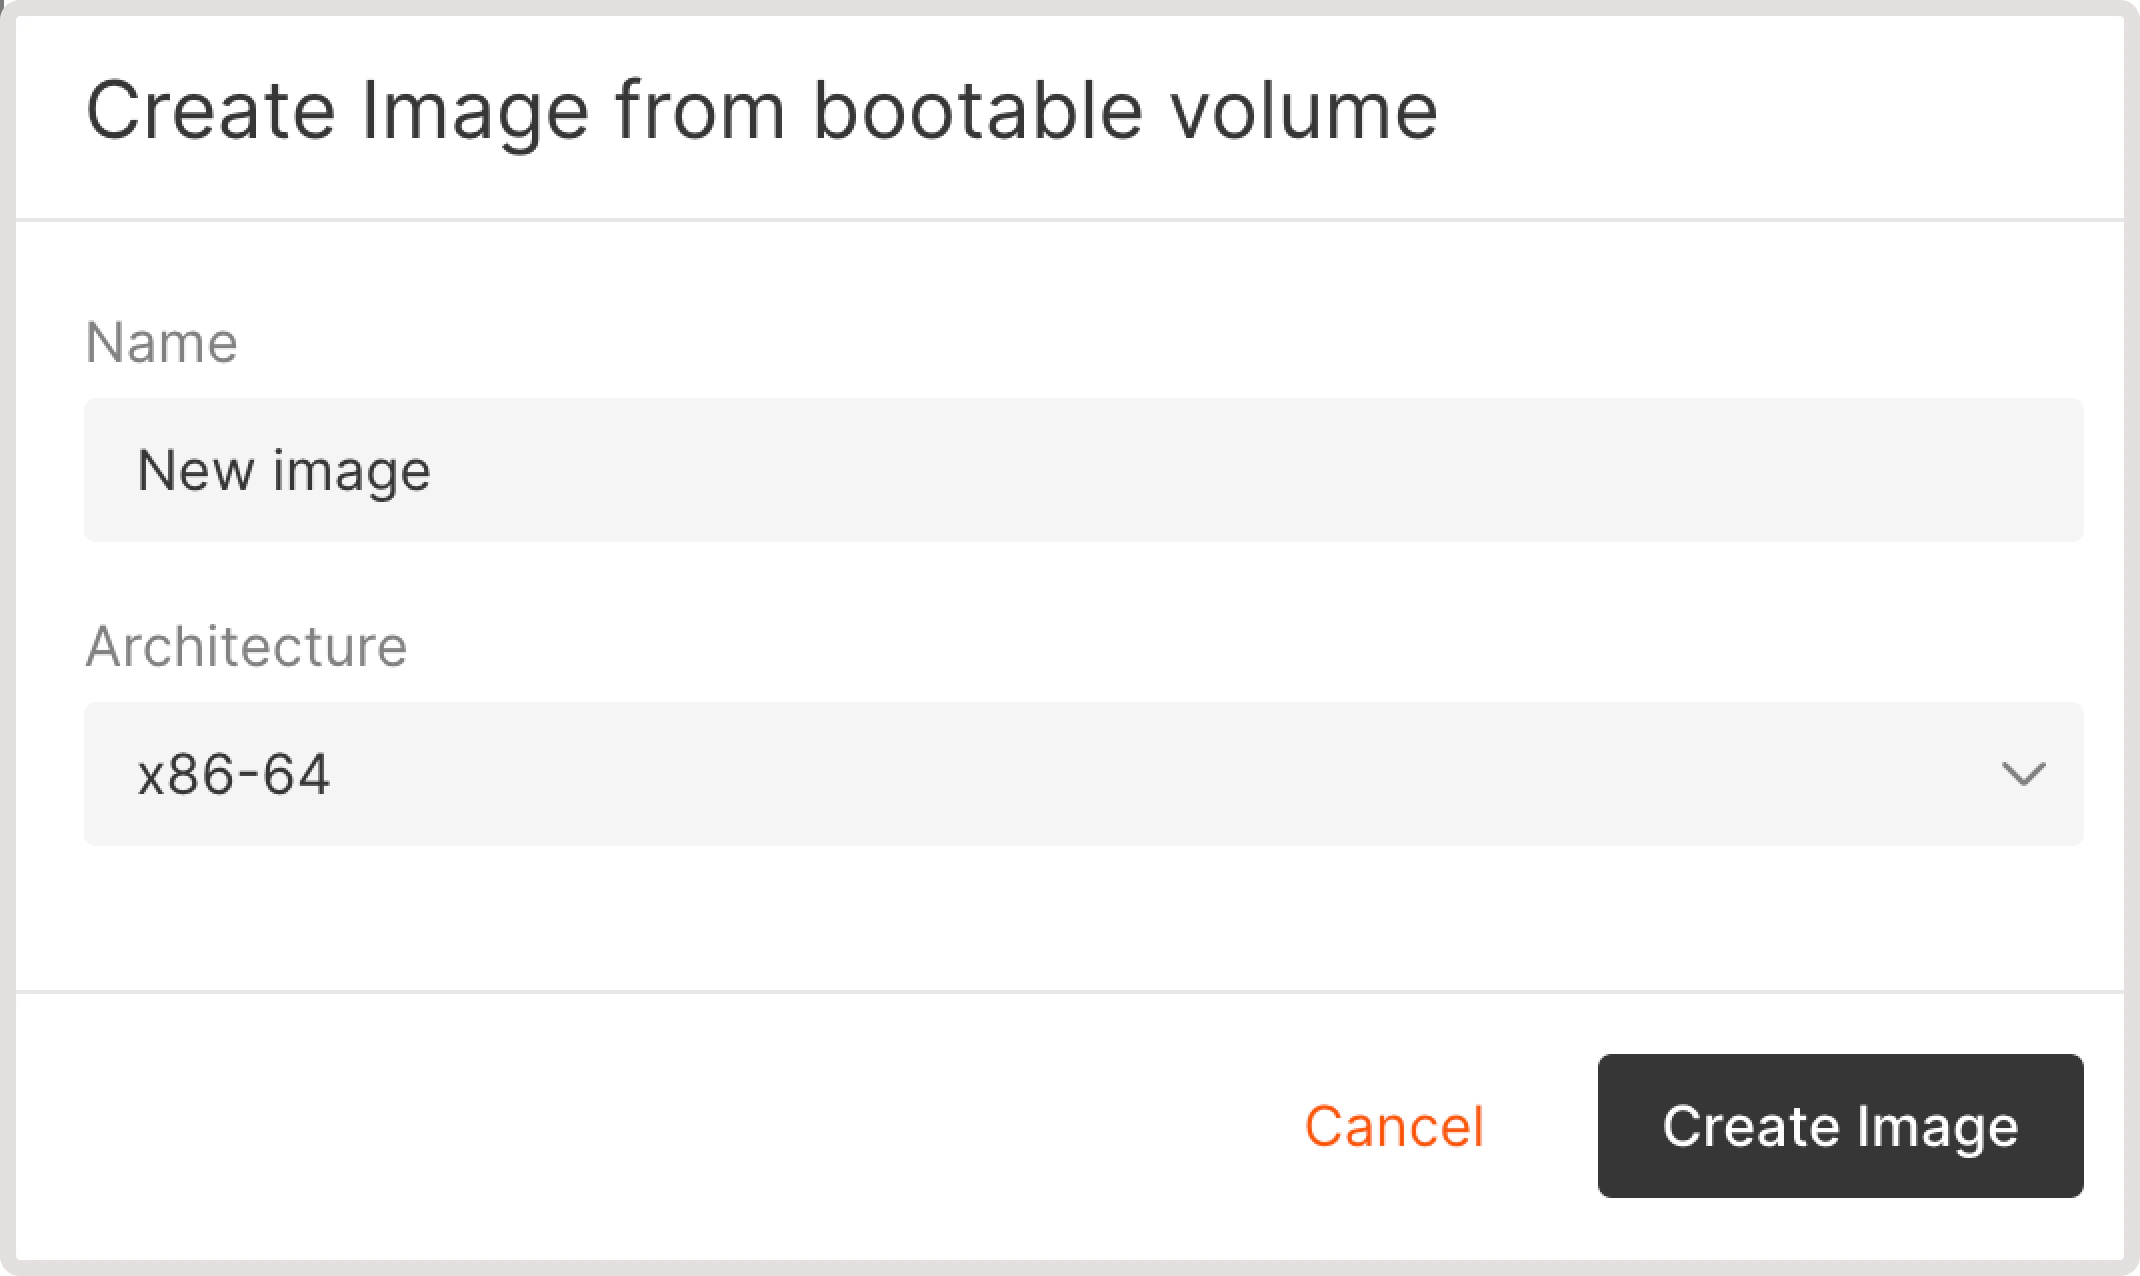
Within a few minutes, the image will be created and available on the **Images** page.</p>

    ### Delete volume

    <p>You can delete a regular volume that's not attached to a Virtual Machine. Boot volumes can only be deleted together with the VM.</p>

    <p>To delete a volume:</p>

    <p>1. In the Gcore Customer Portal, navigate to **Cloud** > **Storage**.</p>

    <p>2. Click the three-dot icon next to the volume you want to remove.</p>

    <Frame>
      <img src="https://mintcdn.com/gcore/v_yzPGVAOyKyDxn0/images/docs/cloud/virtual-instances/volumes/create-and-configure-volumes/three-dot-menu-regular.png?fit=max&auto=format&n=v_yzPGVAOyKyDxn0&q=85&s=d8ddf3afc19529465fe05f66a60b663d" alt="Volumes tab with expanded settings menu" width="6004" height="2500" data-path="images/docs/cloud/virtual-instances/volumes/create-and-configure-volumes/three-dot-menu-regular.png" />
    </Frame>

    <p>3. Click **Delete**.</p>

    <p>4. Confirm your action by typing "Delete" in the text field.</p>

    <p>5. Click **Delete volume.**</p>

    <Frame>
      <img src="https://mintcdn.com/gcore/v_yzPGVAOyKyDxn0/images/docs/cloud/virtual-instances/volumes/create-and-configure-volumes/delete-volume.png?fit=max&auto=format&n=v_yzPGVAOyKyDxn0&q=85&s=f94aa48a1363b50b25b722cdf7895c44" alt="Dialog asking to confirm volume deletion" width="2140" height="988" data-path="images/docs/cloud/virtual-instances/volumes/create-and-configure-volumes/delete-volume.png" />
    </Frame>

    <p>
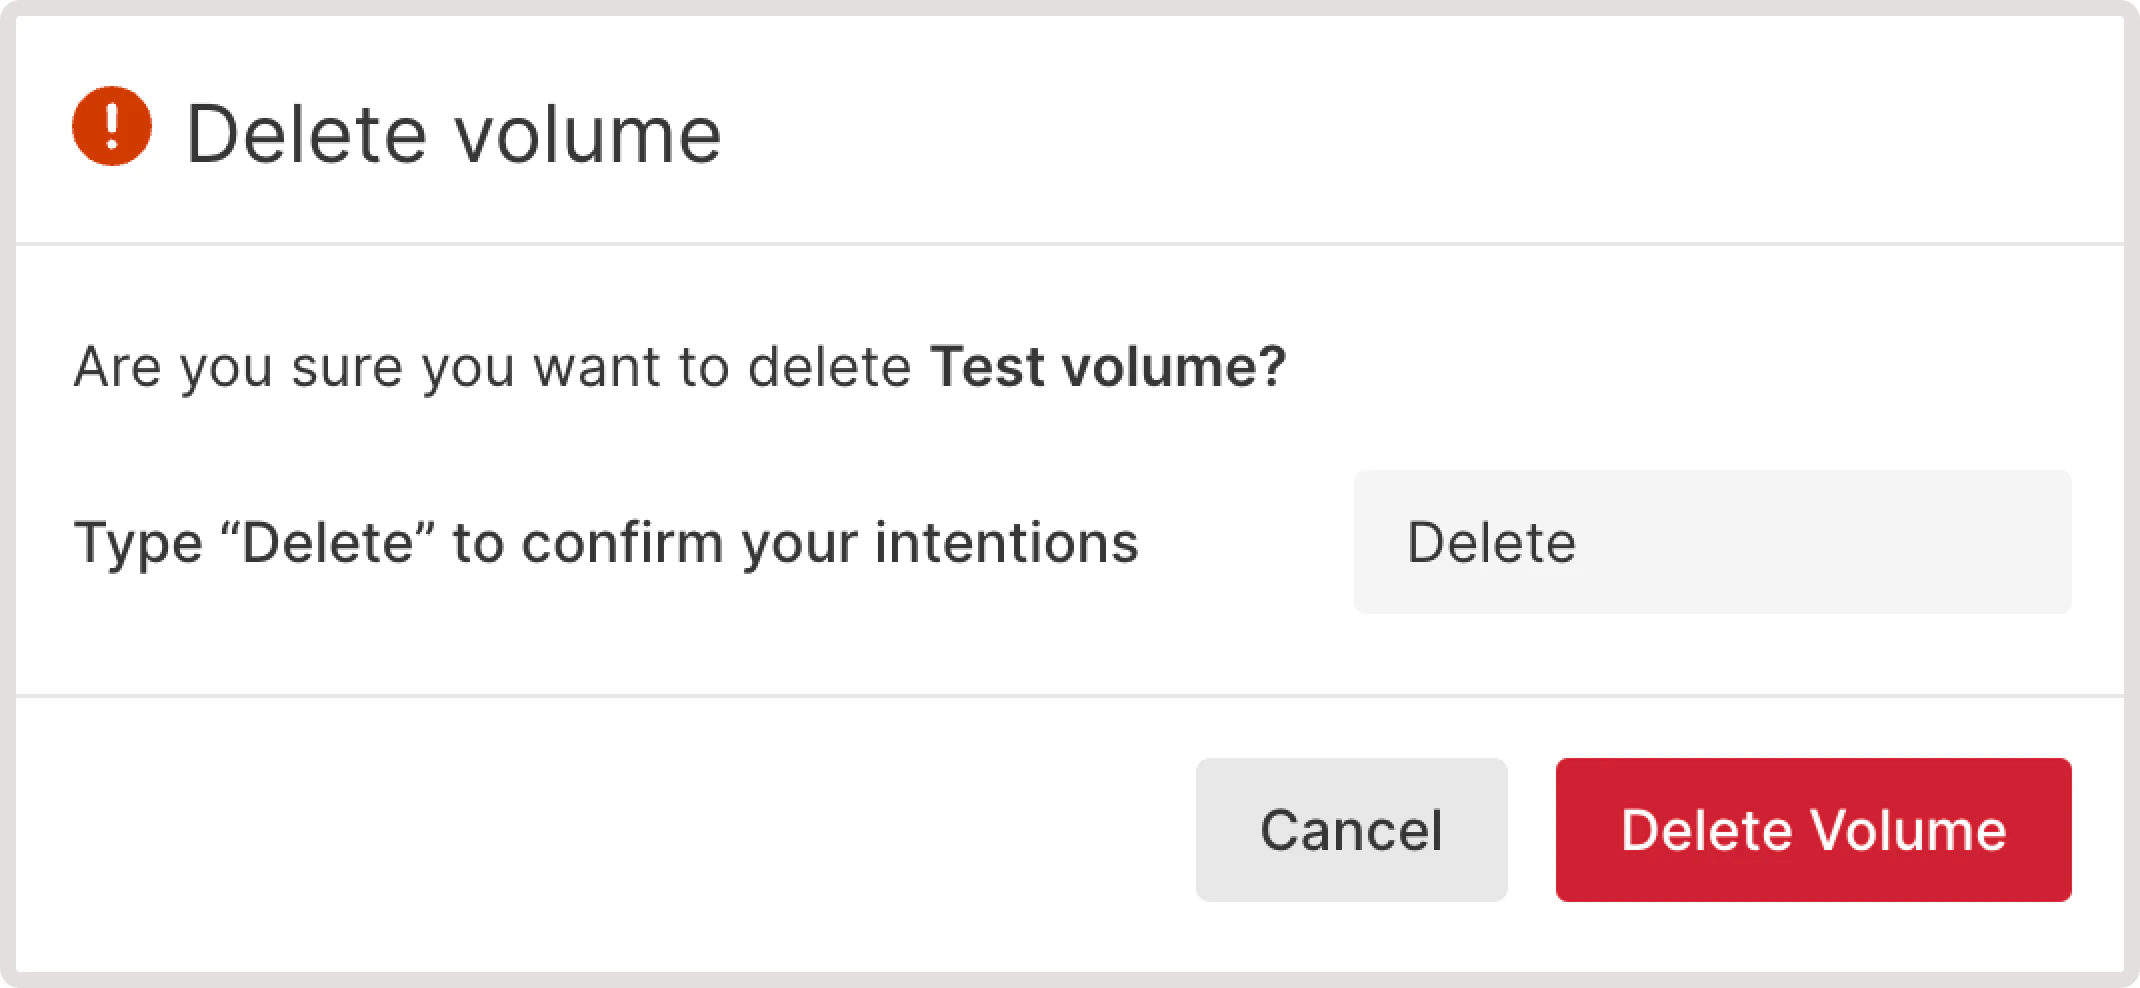
The volume has been removed from the Gcore Customer Portal.</p>

    <Tip>
      **Tip**

      You can also use the **Actions** dropdown to delete multiple volumes at once. For this option to be active, you must have at least one regular volume that is not attached to any Virtual Machine.
    </Tip>
  </MethodSection>

  <MethodSection id="api" label="REST API">
    <p>Volumes are persistent network-attached disks for Virtual Machines. Data survives VM reboots, and a volume can be detached from one VM and re-attached to another in the same region.</p>

    <Info>
      An [API token](/account-settings/api-tokens) is required, along with a [project ID](/api-reference/cloud/projects/list-projects) and [region ID](/api-reference/cloud/regions/list-regions).
    </Info>

    <p>Open a bash terminal and set these as environment variables before running the examples:</p>

    ```bash theme={null}
    export GCORE_API_KEY="{YOUR_API_KEY}"
    export GCORE_CLOUD_PROJECT_ID="{YOUR_PROJECT_ID}"
    export GCORE_CLOUD_REGION_ID="{YOUR_REGION_ID}"
    export INSTANCE_ID="{YOUR_INSTANCE_ID}"
    ```

    <Info>
      **INSTANCE\_ID** is the UUID of a virtual machine in the same region. It is required only for the attach and detach steps. To create a VM, see [Create a virtual machine](/cloud/virtual-instances/create-an-instance).
    </Info>

    ## Quickstart

    <p>The scripts below create a 10 GiB standard volume, attach it to the VM identified by `INSTANCE_ID`, resize it to 20 GiB, then detach and delete it.</p>

    <Tabs>
      <Tab title="Python SDK">
        ```python theme={null}
        import os
        from gcore import Gcore

        # Step 1. Initialize the client.
        client = Gcore()

        # Step 2. Create a 10 GiB standard volume.
        volume = client.cloud.volumes.create_and_poll(
            name="data-volume",
            source="new-volume",
            size=10,
            type_name="standard",
        )
        volume_id = volume.id
        print(f"Volume: {volume_id}")

        # Step 3. Attach the volume to an existing VM.
        instance_id = os.environ["INSTANCE_ID"]
        client.cloud.volumes.attach_to_instance_and_poll(
            volume_id,
            instance_id=instance_id,
        )
        print(f"Attached to {instance_id}")

        # Step 4. Resize the volume to 20 GiB (works while attached).
        volume = client.cloud.volumes.resize_and_poll(volume_id, size=20)
        print(f"Resized to {volume.size} GiB")

        # Step 5. Detach the volume from the VM.
        client.cloud.volumes.detach_from_instance_and_poll(
            volume_id,
            instance_id=instance_id,
        )
        print("Detached")

        # Step 6. Delete the volume.
        client.cloud.volumes.delete_and_poll(volume_id)
        print("Deleted")
        ```
      </Tab>

      <Tab title="Go SDK">
        ```go theme={null}
        package main

        import (
            "context"
            "fmt"
            "log"

            gcore "github.com/G-Core/gcore-go"
            "github.com/G-Core/gcore-go/cloud"
        )

        func main() {
            // Step 1. Initialize the client.
            client := gcore.NewClient()
            ctx := context.Background()

            // Step 2. Create a 10 GiB standard volume.
            volume, err := client.Cloud.Volumes.NewAndPoll(ctx, cloud.VolumeNewParams{
                OfNewVolume: &cloud.VolumeNewParamsBodyNewVolume{
                    Name:     "data-volume",
                    Size:     10,
                    TypeName: "standard",
                },
            })
            if err != nil {
                log.Fatalf("create volume: %v", err)
            }
            volumeID := volume.ID
            fmt.Printf("Volume: %s\n", volumeID)

            // Step 3. Attach the volume to an existing VM.
            instanceID := os.Getenv("INSTANCE_ID")
            if err = client.Cloud.Volumes.AttachToInstanceAndPoll(ctx, volumeID, cloud.VolumeAttachToInstanceParams{
                InstanceID: instanceID,
            }); err != nil {
                log.Fatalf("attach volume: %v", err)
            }
            fmt.Printf("Attached to %s\n", instanceID)

            // Step 4. Resize the volume to 20 GiB (works while attached).
            resized, err := client.Cloud.Volumes.ResizeAndPoll(ctx, volumeID, cloud.VolumeResizeParams{
                Size: 20,
            })
            if err != nil {
                log.Fatalf("resize volume: %v", err)
            }
            fmt.Printf("Resized to %d GiB\n", resized.Size)

            // Step 5. Detach the volume from the VM.
            if err = client.Cloud.Volumes.DetachFromInstanceAndPoll(ctx, volumeID, cloud.VolumeDetachFromInstanceParams{
                InstanceID: instanceID,
            }); err != nil {
                log.Fatalf("detach volume: %v", err)
            }
            fmt.Println("Detached")

            // Step 6. Delete the volume.
            if err = client.Cloud.Volumes.DeleteAndPoll(ctx, volumeID, cloud.VolumeDeleteParams{}); err != nil {
                log.Fatalf("delete volume: %v", err)
            }
            fmt.Println("Deleted")
        }
        ```
      </Tab>
    </Tabs>

    ## Step-by-step

    <p>Each step below explains what the call does, which parameters matter, and what the response looks like. Use this section to understand the flow or to debug a specific step.</p>

    <Accordion title="Show all steps">
      ### Step 1. Create a volume

      A [volume](/api-reference/cloud#tag/Volumes/operation/VolumeCreate.post) must be in the same region as the VM it will attach to. Use `source: "new-volume"` for blank storage, or `"snapshot"` to restore from an existing [snapshot](/cloud/virtual-instances/snapshots/take-a-snapshot-of-your-file-system).

      | Parameter   | Required | Description                                                                                     |
      | ----------- | -------- | ----------------------------------------------------------------------------------------------- |
      | `name`      | Yes      | Display name. Latin letters, numbers, underscores, spaces, dots. 3-63 characters.               |
      | `source`    | Yes      | `"new-volume"` for blank storage, `"snapshot"` to create from a snapshot.                       |
      | `size`      | Yes      | Volume size in GiB. Minimum 1.                                                                  |
      | `type_name` | No       | `"standard"` (default), `"ssd_hiiops"`, `"cold"`, or `"ultra"`. Available types vary by region. |

      <Tabs>
        <Tab title="Python SDK">
          ```python theme={null}
          import os
          from gcore import Gcore

          client = Gcore()
          volume = client.cloud.volumes.create_and_poll(
              name="data-volume",
              source="new-volume",
              size=10,
              type_name="standard",
          )
          volume_id = volume.id
          ```
        </Tab>

        <Tab title="Go SDK">
          ```go theme={null}
          package main

          import (
              "context"
              "fmt"
              "log"
              "os"

              gcore "github.com/G-Core/gcore-go"
              "github.com/G-Core/gcore-go/cloud"
          )

          func main() {
              client := gcore.NewClient()
              ctx := context.Background()

              volume, err := client.Cloud.Volumes.NewAndPoll(ctx, cloud.VolumeNewParams{
                  OfNewVolume: &cloud.VolumeNewParamsBodyNewVolume{
                      Name:     "data-volume",
                      Size:     10,
                      TypeName: "standard",
                  },
              })
              if err != nil {
                  log.Fatalf("create volume: %v", err)
              }
              volumeID := volume.ID
              fmt.Printf("Volume: %s\n", volumeID)
          }
          ```
        </Tab>

        <Tab title="curl">
          ```bash theme={null}
          curl -X POST "https://api.gcore.com/cloud/v1/volumes/$GCORE_CLOUD_PROJECT_ID/$GCORE_CLOUD_REGION_ID" \
            -H "Authorization: APIKey $GCORE_API_KEY" \
            -H "Content-Type: application/json" \
            -d '{
              "name": "data-volume",
              "source": "new-volume",
              "size": 10,
              "type_name": "standard"
            }'
          ```

          Response:

          ```json theme={null}
          {"tasks": ["278b11f6-e93b-48b6-b6fc-d045cb00156c"]}
          ```

          Poll <code>GET /cloud/v1/tasks/{task_id}</code> every 5 seconds until `state` is `FINISHED`:

          ```json theme={null}
          {
            "state": "FINISHED",
            "created_resources": {
              "volumes": ["3298c2d7-aed9-4000-a784-9f066b0843b2"]
            }
          }
          ```

          Save the volume ID and export it:

          ```bash theme={null}
          export VOLUME_ID="{VOLUME_ID}"
          ```
        </Tab>
      </Tabs>

      The SDK methods poll automatically and return the created volume object; read the ID from `volume.id`.

      ### Step 2. Attach to a Virtual Machine

      A volume can be attached to one VM at a time; both must be in the same region. Once attached, the OS sees the volume as a new block device, such as `/dev/sdb`.

      | Parameter     | Required | Description            |
      | ------------- | -------- | ---------------------- |
      | `instance_id` | Yes      | UUID of the target VM. |

      <Tabs>
        <Tab title="Python SDK">
          ```python theme={null}
          # client initialized in Step 1
          client.cloud.volumes.attach_to_instance_and_poll(
              volume_id,
              instance_id=os.environ["INSTANCE_ID"],
          )
          ```
        </Tab>

        <Tab title="Go SDK">
          ```go theme={null}
          // client and ctx initialized in Step 1
          err := client.Cloud.Volumes.AttachToInstanceAndPoll(ctx, volumeID, cloud.VolumeAttachToInstanceParams{
              InstanceID: os.Getenv("INSTANCE_ID"),
          })
          if err != nil {
              log.Fatalf("attach volume: %v", err)
          }
          ```
        </Tab>

        <Tab title="curl">
          ```bash theme={null}
          curl -X POST \
            "https://api.gcore.com/cloud/v2/volumes/$GCORE_CLOUD_PROJECT_ID/$GCORE_CLOUD_REGION_ID/$VOLUME_ID/attach" \
            -H "Authorization: APIKey $GCORE_API_KEY" \
            -H "Content-Type: application/json" \
            -d '{"instance_id": "'"$INSTANCE_ID"'"}'
          ```

          Response:

          ```json theme={null}
          {"tasks": ["c74f1abc-6d3e-4f2a-9b1e-7a83c2d15f4e"]}
          ```

          Poll <code>GET /cloud/v1/tasks/{task_id}</code> every 5 seconds until `state` is `FINISHED`. The volume `status` changes to `"in-use"` once attached.
        </Tab>
      </Tabs>

      ### Step 3. Resize a volume

      Volume size can only be increased, not decreased. Resizing works while the volume is attached to a running VM - no downtime required.

      | Parameter | Required | Description                                             |
      | --------- | -------- | ------------------------------------------------------- |
      | `size`    | Yes      | New size in GiB. Must be greater than the current size. |

      <Tabs>
        <Tab title="Python SDK">
          ```python theme={null}
          # client initialized in Step 1
          volume = client.cloud.volumes.resize_and_poll(volume_id, size=20)
          print(f"New size: {volume.size} GiB")
          ```
        </Tab>

        <Tab title="Go SDK">
          ```go theme={null}
          // client and ctx initialized in Step 1
          resized, err := client.Cloud.Volumes.ResizeAndPoll(ctx, volumeID, cloud.VolumeResizeParams{
              Size: 20,
          })
          if err != nil {
              log.Fatalf("resize volume: %v", err)
          }
          fmt.Printf("New size: %d GiB\n", resized.Size)
          ```
        </Tab>

        <Tab title="curl">
          ```bash theme={null}
          curl -X POST \
            "https://api.gcore.com/cloud/v1/volumes/$GCORE_CLOUD_PROJECT_ID/$GCORE_CLOUD_REGION_ID/$VOLUME_ID/extend" \
            -H "Authorization: APIKey $GCORE_API_KEY" \
            -H "Content-Type: application/json" \
            -d '{"size": 20}'
          ```

          Response:

          ```json theme={null}
          {"tasks": ["e91f3abc-7d4e-5c2f-9a3b-8b85c4d37f6e"]}
          ```

          Poll <code>GET /cloud/v1/tasks/{task_id}</code> every 5 seconds until `state` is `FINISHED`.
        </Tab>
      </Tabs>

      After resizing, extend the filesystem inside the OS to claim the new space - for example, `resize2fs` for ext4 or `xfs_growfs` for XFS.

      <Warning>
        If the volume has snapshots, resizing it prevents reverting to those snapshots. Only snapshots taken after the resize can be used for reversion.
      </Warning>

      ### Step 4. Detach from a Virtual Machine

      Only non-boot volumes can be detached. Detaching preserves all data; the volume reverts to `"available"` status and can be re-attached to any VM in the same region.

      <Tabs>
        <Tab title="Python SDK">
          ```python theme={null}
          # client initialized in Step 1
          client.cloud.volumes.detach_from_instance_and_poll(
              volume_id,
              instance_id=os.environ["INSTANCE_ID"],
          )
          ```
        </Tab>

        <Tab title="Go SDK">
          ```go theme={null}
          // client and ctx initialized in Step 1
          err := client.Cloud.Volumes.DetachFromInstanceAndPoll(ctx, volumeID, cloud.VolumeDetachFromInstanceParams{
              InstanceID: os.Getenv("INSTANCE_ID"),
          })
          if err != nil {
              log.Fatalf("detach volume: %v", err)
          }
          ```
        </Tab>

        <Tab title="curl">
          ```bash theme={null}
          curl -X POST \
            "https://api.gcore.com/cloud/v2/volumes/$GCORE_CLOUD_PROJECT_ID/$GCORE_CLOUD_REGION_ID/$VOLUME_ID/detach" \
            -H "Authorization: APIKey $GCORE_API_KEY" \
            -H "Content-Type: application/json" \
            -d '{"instance_id": "'"$INSTANCE_ID"'"}'
          ```

          Response:

          ```json theme={null}
          {"tasks": ["d85e2cde-4f3a-5b1c-8d2e-9c74f3a26e5d"]}
          ```

          Poll <code>GET /cloud/v1/tasks/{task_id}</code> every 5 seconds until `state` is `FINISHED`.
        </Tab>
      </Tabs>
    </Accordion>

    ## Clean up

    <p>Only detached volumes can be deleted. Boot volumes are deleted together with the VM when the instance delete call is issued.</p>

    <Tabs>
      <Tab title="Python SDK">
        ```python theme={null}
        # client initialized in Step 1
        client.cloud.volumes.delete_and_poll(volume_id)
        ```
      </Tab>

      <Tab title="Go SDK">
        ```go theme={null}
        // client and ctx initialized in Step 1
        err := client.Cloud.Volumes.DeleteAndPoll(ctx, volumeID, cloud.VolumeDeleteParams{})
        if err != nil {
            log.Fatalf("delete volume: %v", err)
        }
        ```
      </Tab>

      <Tab title="curl">
        ```bash theme={null}
        curl -X DELETE \
          "https://api.gcore.com/cloud/v1/volumes/$GCORE_CLOUD_PROJECT_ID/$GCORE_CLOUD_REGION_ID/$VOLUME_ID" \
          -H "Authorization: APIKey $GCORE_API_KEY"
        ```

        Response:

        ```json theme={null}
        {"tasks": ["f02g4bcd-8e5f-6d3a-0b4c-9c96d5e48g7f"]}
        ```

        Poll <code>GET /cloud/v1/tasks/{task_id}</code> every 5 seconds until `state` is `FINISHED`. Billing for the volume stops immediately after deletion.
      </Tab>
    </Tabs>
  </MethodSection>

  <MethodSection id="terraform" label="Terraform">
    <p>Provision block storage — boot volumes from an OS image, blank data disks, or restored snapshots. The full attribute reference is on the [`gcore_cloud_volume`](https://registry.terraform.io/providers/G-Core/gcore/latest/docs/resources/cloud_volume) resource page.</p>

    ## Create a volume

    <p>The most common use case is `source = "image"` — this creates a boot volume from an OS image and is required when provisioning a Virtual Machine. Use `"new-volume"` for a blank data volume, or `"snapshot"` to restore from an existing snapshot.</p>

    <p>For a boot volume, pass the image UUID via a variable. To find the UUID, open the Gcore Customer Portal, navigate to **Cloud** > **Images**, and copy the ID from the image details. IDs are region-specific — use the ID from the region where you are creating the volume.</p>

    ```hcl theme={null}
    variable "image_id" {
      type        = string
      description = "OS image UUID (region-specific). Find it in Cloud > Images."
    }

    resource "gcore_cloud_volume" "boot" {
      project_id = var.project_id
      region_id  = var.region_id
      name       = "boot-volume"
      source     = "image"
      image_id   = var.image_id
      size       = 20
      type_name  = "standard"
    }

    output "boot_volume_id" {
      value = gcore_cloud_volume.boot.id
    }
    ```

    <p>For a blank data volume:</p>

    ```hcl theme={null}
    resource "gcore_cloud_volume" "example" {
      project_id = var.project_id
      region_id  = var.region_id
      name       = "data-volume"
      source     = "new-volume"
      size       = 10
      type_name  = "standard"
    }

    output "volume_id" {
      value = gcore_cloud_volume.example.id
    }
    ```

    ## Attach to a VM

    <p>Set `instance_id_to_attach_to` to attach the volume to a [Virtual Machine](/cloud/virtual-instances/create-an-instance). Both the volume and the VM must be in the same region.</p>

    ```hcl theme={null}
    resource "gcore_cloud_volume" "example" {
      project_id               = var.project_id
      region_id                = var.region_id
      name                     = "data-volume"
      source                   = "new-volume"
      size                     = 10
      type_name                = "standard"
      instance_id_to_attach_to = var.instance_id
    }
    ```

    <p>To detach, remove the `instance_id_to_attach_to` attribute and run `terraform apply`.</p>

    ## Resize a volume

    <p>Increase `size` and run `terraform apply` — volume size can only be increased.</p>

    ```hcl theme={null}
    resource "gcore_cloud_volume" "example" {
      project_id = var.project_id
      region_id  = var.region_id
      name       = "data-volume"
      source     = "new-volume"
      size       = 20  # increased from 10
      type_name  = "standard"
    }
    ```

    ```bash theme={null}
    terraform apply
    ```

    ## Change volume type

    <p>Change `type_name` and run `terraform apply`.</p>

    <Warning>
      Changing `type_name` recreates the volume — the existing volume is deleted and a new one is created with a new ID. Detach the volume from any Virtual Machine before making this change.
    </Warning>

    ```hcl theme={null}
    resource "gcore_cloud_volume" "example" {
      project_id = var.project_id
      region_id  = var.region_id
      name       = "data-volume"
      source     = "new-volume"
      size       = 20
      type_name  = "ssd_hiiops"  # changed from "standard"
    }
    ```

    ```bash theme={null}
    terraform apply
    ```

    ## Delete a volume

    <p>Remove the resource block — Terraform detects the missing declaration and deletes the volume on the next `terraform apply`.</p>

    ```hcl theme={null}
    # Remove or comment out this block:
    # resource "gcore_cloud_volume" "example" {
    #   name      = "data-volume"
    #   source    = "new-volume"
    #   size      = 20
    #   type_name = "ssd_hiiops"
    #   ...
    # }
    ```

    ```bash theme={null}
    terraform apply
    ```

    ## Import a volume

    <p>Use when a volume was created outside Terraform and needs to be managed as code.</p>

    ```hcl theme={null}
    resource "gcore_cloud_volume" "example" {
      project_id = var.project_id
      region_id  = var.region_id
      name       = "data-volume"
      source     = "new-volume"
      size       = 20
      type_name  = "standard"
    }
    ```

    ```bash theme={null}
    terraform import gcore_cloud_volume.example '<project_id>/<region_id>/<volume_id>'
    ```
  </MethodSection>
</MethodSwitch>
