

Gremlin is a leading software company focusing on chaos-test in the market. It also has a tool similar to Chaos Monkey which belongs to Netflix, but is more customized to test the system with random loads or scheduled shutdowns. In the article below we will be testing a simple Kubernetes cluster with Chaos Test.
Why is Chaos Test Important?
Chaos Engineering is used to improve system resilience. Gremlin’s “Failure as a Service” helps to find weaknesses in the system before problems occur.
Overview
To successfully experience Chaos Engineering with Gremlin, firstly we have two requirements: a running EKS cluster and two applications deployed to EKS. This tutorial helps to produce the requirements and create a scenario to ‘simulate an attack with Gremlin’.
- Step 1: Prepare Cloud9 IDE
- Step 2: Create an EKS cluster using eksctl
- Step 3: Deploy Kubernetes Dashboard
- Step 4: Install Gremlin using Helm
- Step 5: Deploy a Microservice Demo Application
- Step 6: Run a Shutdown Container Attack using Gremlin
Prerequsities
1. An AWS account
2. A Gremlin account which can be registered from here
Step 1: Prepare Cloud9 IDE
Firstly, let’s start to create the Cloud9 environment. Login to your AWS account and navigate Cloud9 to service page. Click on Get Started and type the name with anything, in this example we have chosen chaous gremlin. Keep all default settings as they are stated since it is needed only to reach EKS resources.
Wait for a while for the new console to build. Then close all terminals to open a new one.

To start creating the cluster, firstly check whether AWS CLI is installed or not with the command below:
Administrator:~/environment $ aws --versionaws-cli/1.17.5 Python/2.7.16 Linux/4.14.158-101.185.amzn1.x86_64 botocore/1.14.5Administrator:~/environment $ Step 2: Creating an EKS cluster using eksctl
- We will use
eksctlto create our EKS clusters.
curl --silent --location "https://github.com/weaveworks/eksctl/releases/download/latest_release/eksctl_$(uname -s)_amd64.tar.gz" | tar xz -C /tmpsudo mv -v /tmp/eksctl /usr/local/bin - Making
eksctlexecutable
Administrator:~/environment $ sudo chmod +x /usr/local/bin/eksctlAdministrator:~/environment $ - Confirming whether the
eksctlcommand works:
Administrator:~ $ eksctl version[ℹ] version.Info{BuiltAt:"", GitCommit:"", GitTag:"0.13.0"}Administrator:~ $ - Below we are creating the cluster named gremlin-eksctl with three EC2 nodes. Just a word of warning – EKS can cost a lot so please do not forget to delete your resources after you have done with your failure test.
eksctl create cluster --name=gremlin-eksctll --nodes=3 --managed --alb-ingress-access --region=${AWS_REGION}It might take around 15-30 minutes to get ready which you can cluster on the EKS service page.
Quit Tip: Fee of EKS is 0,20$/h and fee of EC2 with a m5.large instance type that EKS runs on is 0.096$/h. Estimation of total cost per day will be around 11-12$.

- Checking the cluster whether it is working and getting its status. As expected, there is only one cluster created.
Administrator:~/environment $ eksctl get clustersNAME REGIONgremlin-eksctl us-east-1Administrator:~/environment $- Updating the
kubeconfigfile by giving the cluster name and region via AWS CLI tool.
Administrator:~/environment $ sudo aws eks --region us-east-1 update-kubeconfig --name gremlin-eksctlUpdated context arn:aws:eks:us-east-1:312867154612:cluster/gremlin-eksctl in /root/.kube/configAdministrator:~/environment $- On checking we see 3 nodes in the cluster. Two of them are worker-nodes while the third is cluster management master-node.
Administrator:~/environment $ kubectl get nodesNAME STATUS ROLES AGE VERSIONip-192-168-14-59.ec2.internal Ready 59m v1.14.7-eks-1861c5ip-192-168-33-12.ec2.internal Ready 58m v1.14.7-eks-1861c5ip-192-168-49-55.ec2.internal Ready 58m v1.14.7-eks-1861c5Administrator:~/environment $ Step 3: Deploying Kubernetes Dashboard
Next we would deploy the Kubernetes dashboard to Kubernetes cluster by using Heapster and InfluxDB. These two tools will help our sample application to be shown in the dashboard. We will start with deploying our Kubernetes dashboard as the first step.
Heapster
Heapster is a performance monitoring and metrics collection system compatible with Kubernetes (versions 1.0.6 and above). It allows for the collection of not only performance metrics about your workloads, pods, and containers, but also events and other signals generated by your cluster. The great thing about Heapster is that it is fully open source as part of the Kubernetes project, and supports a multitude of backends for persisting the data, including but not limited to, Influxdb, Elasticsearch, and Graphite.
InfluxDB
InfluxDB is a time series database designed to handle high volume of writing and query loads.
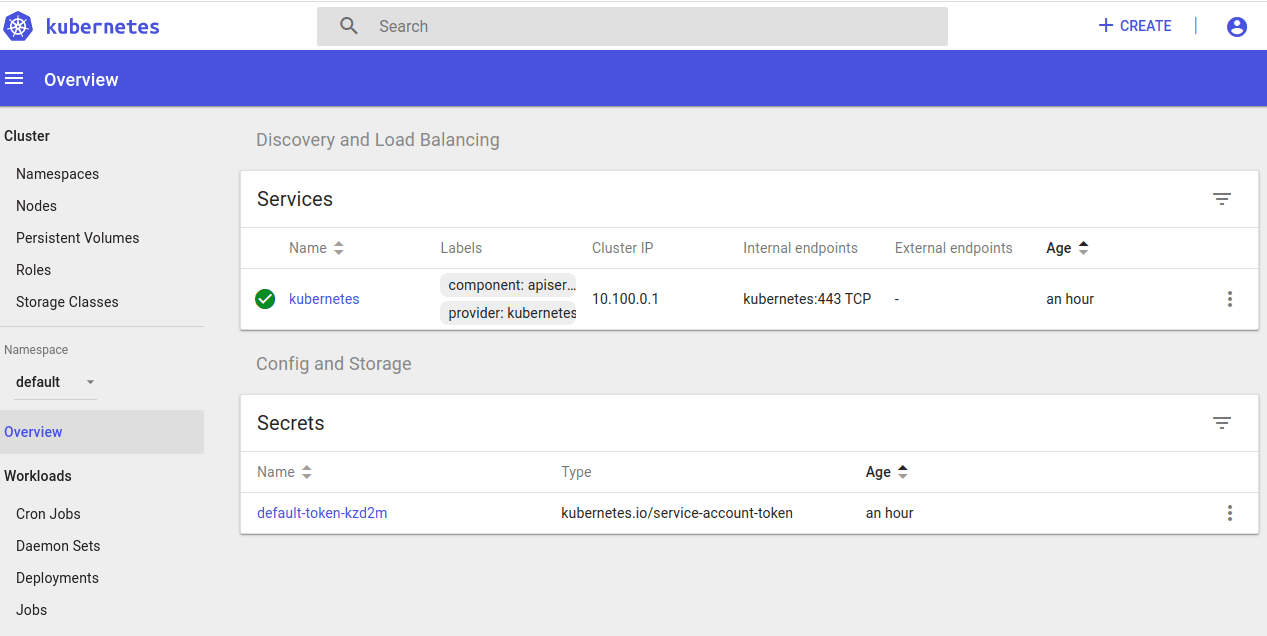
- Deploying the Kubernetes Dashboard to your EKS cluster:
Administrator:~/environment $ kubectl apply -f https://raw.githubusercontent.com/kubernetes/dashboard/v1.10.1/src/deploy/recommended/kubernetes-dashboard.yamlsecret/kubernetes-dashboard-certs createdserviceaccount/kubernetes-dashboard createdrole.rbac.authorization.k8s.io/kubernetes-dashboard-minimal createdrolebinding.rbac.authorization.k8s.io/kubernetes-dashboard-minimal createddeployment.apps/kubernetes-dashboard createdservice/kubernetes-dashboard createdAdministrator:~/environment $- Firstly, access to cluster is given since it is deployed to our private cluster while we need to access it via a proxy. This can be done through Kube-Proxy as the preferred proxy tool. In your workspace, run the following command:
Administrator:~/environment $ kubectl proxy --port=8080 --address='0.0.0.0' --disable-filter=true &[1] 336Administrator:~/environment $ W0125 10:28:19.746961 336 proxy.go:140] Request filter disabled, your proxy is vulnerable to XSRF attacks, please be cautiousStarting to serve on [::]:8080Administrator:~/environment $- Deploying Heapster:
Administrator:~/environment $ kubectl apply -f https://raw.githubusercontent.com/kubernetes/heapster/master/deploy/kube-config/influxdb/heapster.yamlserviceaccount/heapster createddeployment.extensions/heapster createdservice/heapster createdAdministrator:~/environment $- Deploying InfluxDB:
Administrator:~/environment $ kubectl apply -f https://raw.githubusercontent.com/kubernetes/heapster/master/deploy/kube-config/influxdb/influxdb.yamldeployment.extensions/monitoring-influxdb createdservice/monitoring-influxdb createdAdministrator:~/environment $- Creating Heapster cluster role binding for the Dashboard.
Administrator:~/environment $ kubectl apply -f https://raw.githubusercontent.com/kubernetes/heapster/master/deploy/kube-config/rbac/heapster-rbac.yamlclusterrolebinding.rbac.authorization.k8s.io/heapster createdAdministrator:~/environment $- The next step is to create an
eks-adminservice account. It will let you connect to the Kubernetes Dashboard withadminpermissions.
To authenticate and use the Kubernetes Dashboard:
Administrator:~/environment $ kubectl apply -f https://raw.githubusercontent.com/tammybutow/eks-aws/master/eks-admin-service-account.yamlserviceaccount/eks-admin createdclusterrolebinding.rbac.authorization.k8s.io/eks-admin createdAdministrator:~/environment $- To access the Kubernetes Dashboard:
a- In your Cloud9 environment, click Tools > Preview > Preview Running Application to open the Dashboard URL.
b- Append the following to the end of the URL:
/api/v1/namespaces/kube-system/services/https:kubernetes-dashboard:/proxy/- Open a new Terminal tab on Cloud9 and enter the following:
aws eks get-token --cluster-name gremlin-eksctl | jq -r '.status.token'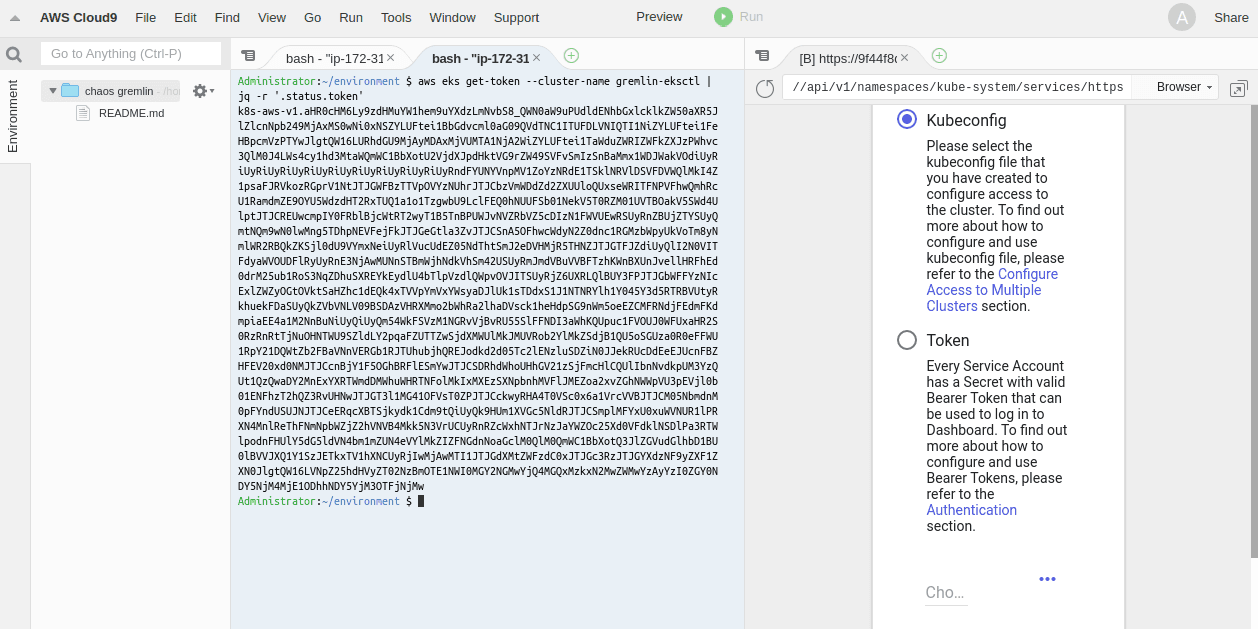
- Select Token and then copy the output of the command above and paste it to the text field as shown below:
Step 4: Installing Gremlin using Helm
- Download your Gremlin certificates:
Start by signing-in to your Gremlin account. If you don’t have one, create an account here.

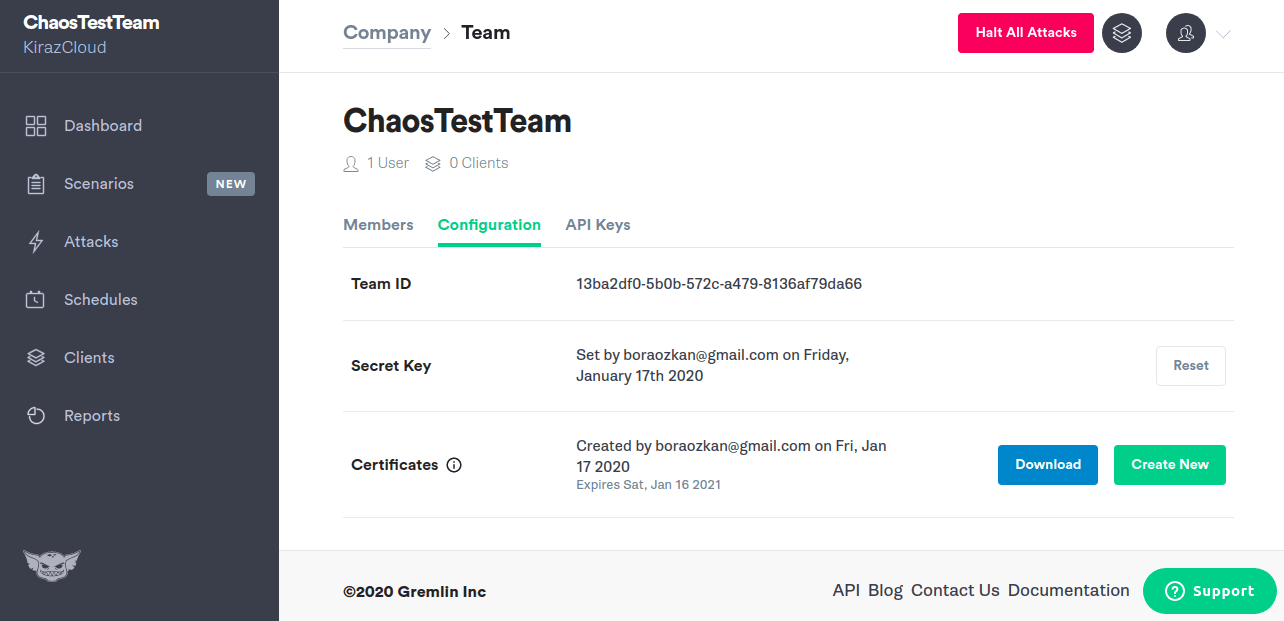
Navigate to Team Settings and click on your Team. Click the Download button to download and save certificates to your local drive. Please note that the downloaded certificate.zip contains both a public-key certificate and a matching private key.
Unzip the certificate.zip and save it to your Gremlin folder on your desktop. Rename your certificate as gremlin.cert and key files as gremlin.key.

- Creating Gremlin Namespace:
Administrator:~/environment $ kubectl create namespace gremlinnamespace/gremlin createdAdministrator:~/environment $
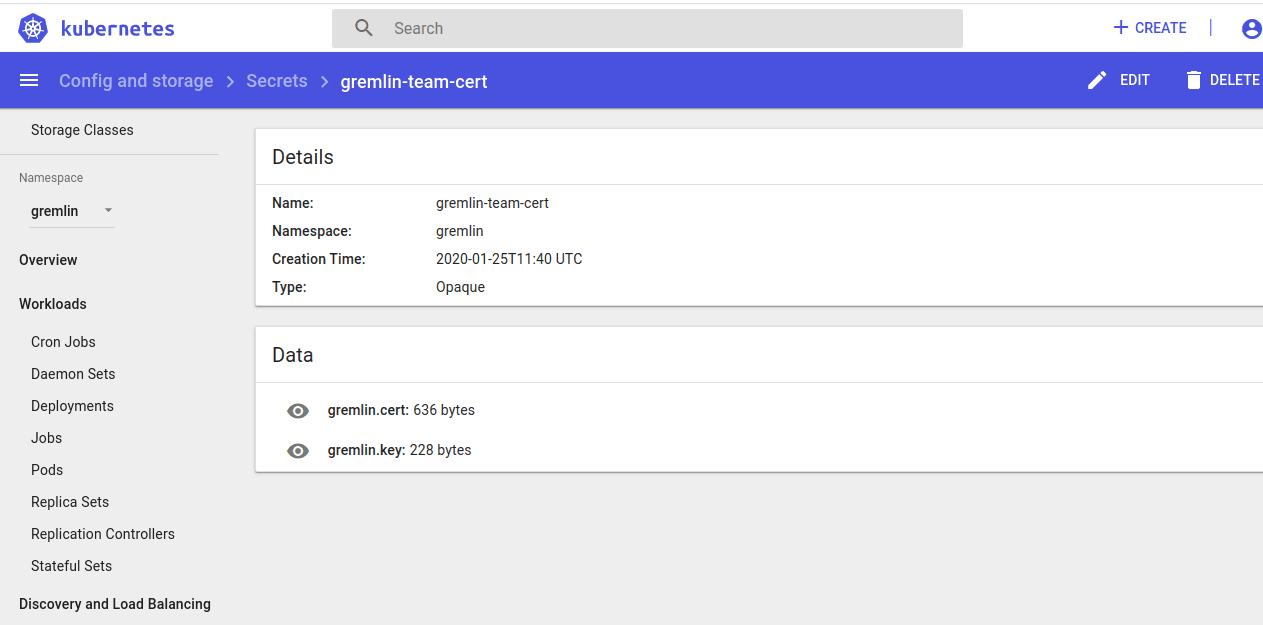
Create a Kubernetes Secret for your certificate and private key, copy gremlin.cert and gremlin.key to Cloud9. A quick tip is to create these by the Vim Editor instead of copying from your local computer.
Administrator:~/environment $ kubectl create secret generic gremlin-team-cert \> \--namespace=gremlin \> \--from-file=/home/ec2-user/environment/gremlin.cert \> \--from-file=/home/ec2-user/environment/gremlin.keysecret/gremlin-team-cert createdAdministrator:~/environment $Check the files on Dashboard whether they are deployed.
- Installation with Helm
The simplest way of installing the Gremlin client on your Kubernetes cluster is to use Helm. Once Helm is installed and configured, the next steps will be to add the Gremlin repo and to install the client.
A. Installing Helm source code and making it executable:
Administrator:~/environment $ curl https://raw.githubusercontent.com/kubernetes/helm/master/scripts/get > get_helm.sh % Total % Received % Xferd Average Speed Time Time Time Current Dload Upload Total Spent Left Speed100 7164 100 7164 0 0 45630 0 --:--:-- --:--:-- --:--:-- 45341Administrator:~/environment $ Administrator:~/environment $ chmod +x get_helm.shAdministrator:~/environment $ Administrator:~/environment $ ./get_helm.shDownloading https://get.helm.sh/helm-v2.16.1-linux-amd64.tar.gzPreparing to install helm and tiller into /usr/local/binhelm installed into /usr/local/bin/helmtiller installed into /usr/local/bin/tillerRun 'helm init' to configure helm.Administrator:~/environment $B. Configuring Helm to access with RBAC
Helm relies on a service called Tiller which requires special permission on the Kubernetes cluster, for which we will need to build a Service Account for using Tiller. Next step is to then apply this RBAC to the cluster.
C. Creating a new service account:
Administrator:~/environment $ cat < ~/environment/rbac.yaml> ---> apiVersion: v1> kind: ServiceAccount> metadata:> name: tiller> namespace: kube-system> ---> apiVersion: rbac.authorization.k8s.io/v1beta1> kind: ClusterRoleBinding> metadata:> name: tiller> roleRef:> apiGroup: rbac.authorization.k8s.io> kind: ClusterRole> name: cluster-admin> subjects:> - kind: ServiceAccount> name: tiller> namespace: kube-system> EoFAdministrator:~/environment $D. Applying configurations:
Administrator:~/environment $ kubectl apply -f ~/environment/rbac.yamlserviceaccount/tiller createdclusterrolebinding.rbac.authorization.k8s.io/tiller createdAdministrator:~/environment $E. Installing Tiller for Helm:
Tiller
A companion server component, tiller, that runs on your Kubernetes cluster, listens for commands from helm, and handles the configuration and deployment of software releases on the cluster.
Administrator:~/environment $ helm init --service-account tillerCreating /home/ec2-user/.helm Creating /home/ec2-user/.helm/repository Creating /home/ec2-user/.helm/repository/cache Creating /home/ec2-user/.helm/repository/local Creating /home/ec2-user/.helm/plugins Creating /home/ec2-user/.helm/starters Creating /home/ec2-user/.helm/cache/archive Creating /home/ec2-user/.helm/repository/repositories.yaml Adding stable repo with URL: https://kubernetes-charts.storage.googleapis.com Adding local repo with URL: http://127.0.0.1:8879/charts $HELM_HOME has been configured at /home/ec2-user/.helm.Tiller (the Helm server-side component) has been installed into your Kubernetes Cluster.Please note: by default, Tiller is deployed with an insecure 'allow unauthenticated users' policy.To prevent this, run `helm init` with the --tiller-tls-verify flag.For more information on securing your installation see: https://docs.helm.sh/using_helm/#securing-your-helm-installationAdministrator:~/environment $This will install tiller into the cluster and will give access to managed resources in your cluster. Please note the security policy alert as shown above, which you can feel free to ignore or follow as per your policy settings.
F. Activating bash-completion for Helm:
Administrator:~/environment $ helm completion bash >> ~/.bash_completionAdministrator:~/environment $ . /etc/profile.d/bash_completion.shAdministrator:~/environment $ . ~/.bash_completionAdministrator:~/environment $G. To run the Helm install, you will need your Gremlin Team ID. It can be found in the Gremlin app on the Team Settings page, where you downloaded your certificates earlier. Click on your Team in the list. The ID you’re looking for can be found under Configuration as Team ID.
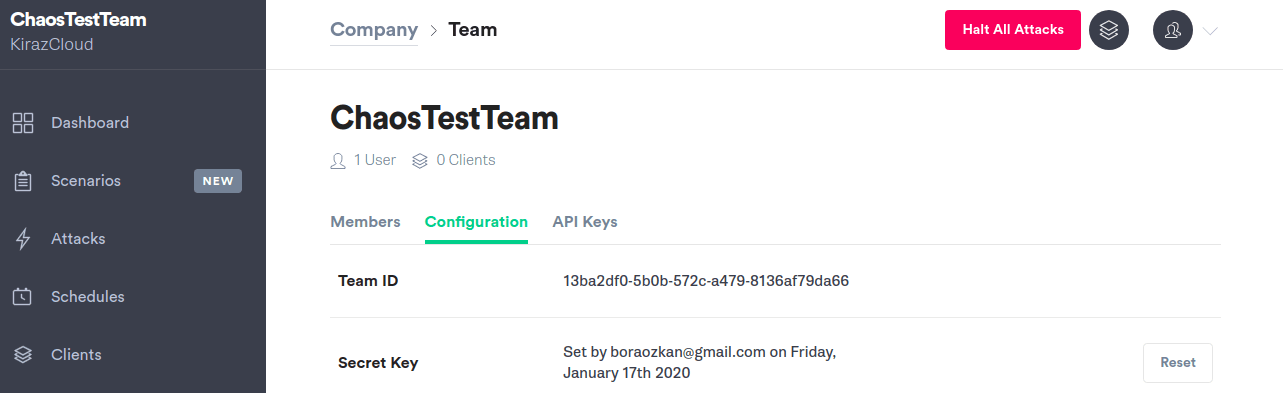
H. Export your Team ID as an environment variable:
Administrator:~/environment $ export GREMLIN_TEAM_ID=13ba2df0-5b0b-572c-a479-8136af79da66Administrator:~/environment $I. Next, export your cluster ID, by giving a name for your Kubernetes cluster.
Administrator:~/environment $ export GREMLIN_CLUSTER_ID=boraozkanchaosAdministrator:~/environment $J. Now add the Gremlin Helm repo, and install Gremlin:
Administrator:~/environment $ helm repo add gremlin https://helm.gremlin.com"gremlin" has been added to your repositoriesAdministrator:~/environment $Administrator:~/environment $ helm install gremlin/gremlin \> \--namespace gremlin \> \--name gremlin \> \--set gremlin.teamID=$GREMLIN_TEAM_ID \> \--set gremlin.clusterID=$GREMLIN_CLUSTER_IDNAME: gremlinLAST DEPLOYED: Sat Jan 25 12:37:45 2020NAMESPACE: gremlinSTATUS: DEPLOYEDRESOURCES:==> v1/ClusterRoleNAME AGEgremlin-watcher 0s==> v1/ClusterRoleBindingNAME AGEchao 0s==> v1/DaemonSetNAME AGEgremlin 0s==> v1/DeploymentNAME AGEchao 0s==> v1/Pod(related)NAME AGEchao-698b9fbfb4-5thjp 0sgremlin-425wv 0sgremlin-krdlt 0sgremlin-l252z 0s==> v1/ServiceAccountNAME AGEchao 0sAdministrator:~/environment $
Step 5: Deploying a Microservice Demo Application
The demo environment we are going to deploy on to our EKS cluster is the Hipster Shop: Cloud-Native Microservices Demo Application
- Clone repo of app source code:
Administrator:~/environment $ git clone https://github.com/GoogleCloudPlatform/microservices-demo.gitCloning into 'microservices-demo'...remote: Enumerating objects: 30, done.remote: Counting objects: 100% (30/30), done.remote: Compressing objects: 100% (21/21), done.remote: Total 2987 (delta 16), reused 16 (delta 7), pack-reused 2957Receiving objects: 100% (2987/2987), 5.08 MiB | 38.24 MiB/s, done.Resolving deltas: 100% (2039/2039), done.Administrator:~/environment $- Change directory to the one just created:
Administrator:~/environment $ cd microservices-demo/Administrator:~/environment/microservices-demo (master) $- Deploying the application:
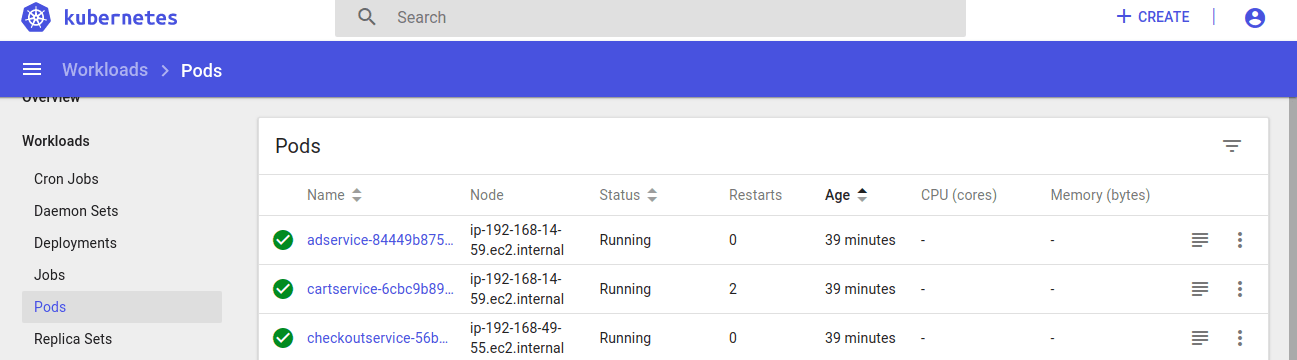
Administrator:~/environment/microservices-demo (master) $ kubectl apply -f ./release/kubernetes-manifests.yamldeployment.apps/emailservice createdservice/emailservice createddeployment.apps/checkoutservice createdservice/checkoutservice createddeployment.apps/recommendationservice createdservice/recommendationservice createddeployment.apps/frontend createdservice/frontend createdservice/frontend-external createddeployment.apps/paymentservice createdservice/paymentservice createddeployment.apps/productcatalogservice createdservice/productcatalogservice createddeployment.apps/cartservice createdservice/cartservice createddeployment.apps/loadgenerator createddeployment.apps/currencyservice createdservice/currencyservice createddeployment.apps/shippingservice createdservice/shippingservice createddeployment.apps/redis-cart createdservice/redis-cart createddeployment.apps/adservice createdservice/adservice createdAdministrator:~/environment/microservices-demo (master) $- Wait until pods are in a ready state.
Administrator:~/environment/microservices-demo (master) $ kubectl get podsNAME READY STATUS RESTARTS AGEadservice-84449b8756-qj4sp 1/1 Running 0 4m57scartservice-6cbc9b899c-ww5rf 1/1 Running 0 4m58scheckoutservice-56b48b77c8-fszpx 1/1 Running 0 4m58scurrencyservice-b9fcb4c98-hx9kq 1/1 Running 0 4m58semailservice-797cdcc76d-d257v 1/1 Running 0 4m58sfrontend-785c44fd98-zvgj4 1/1 Running 0 4m58sloadgenerator-665c4ddb74-xwm8m 1/1 Running 3 4m58spaymentservice-84d7bf956-fdgxr 1/1 Running 0 4m58sproductcatalogservice-5664f59f54-b5mk5 1/1 Running 0 4m58srecommendationservice-7f9855d7c6-b2zv6 1/1 Running 0 4m58sredis-cart-6448dcbdcc-97d55 1/1 Running 0 4m58sshippingservice-6b6f49747d-svb5f 1/1 Running 0 4m58sAdministrator:~/environment/microservices-demo (master) $- Getting the frontend IP address:
Administrator:~/environment/microservices-demo (master) $ kubectl get svc frontend-external -o wideNAME TYPE CLUSTER-IP EXTERNAL-IP PORT(S) AGE SELECTORfrontend-external LoadBalancer 10.100.226.157 a0c9bed9a3f7111eab7c912c03cd100e-265884000.us-east-1.elb.amazonaws.com 80:30461/TCP 6m31s app=frontendAdministrator:~/environment/microservices-demo (master) $- Visit the URL on your browser:

Step 6: Running a Shutdown Container Attack using Gremlin
We are going to create our first Chaos Engineering experiment where we would validate the EKS reliability. Our hypothesis is, “After shutting down my cart service container, we will not suffer from downtime and EKS will give us a new one.”
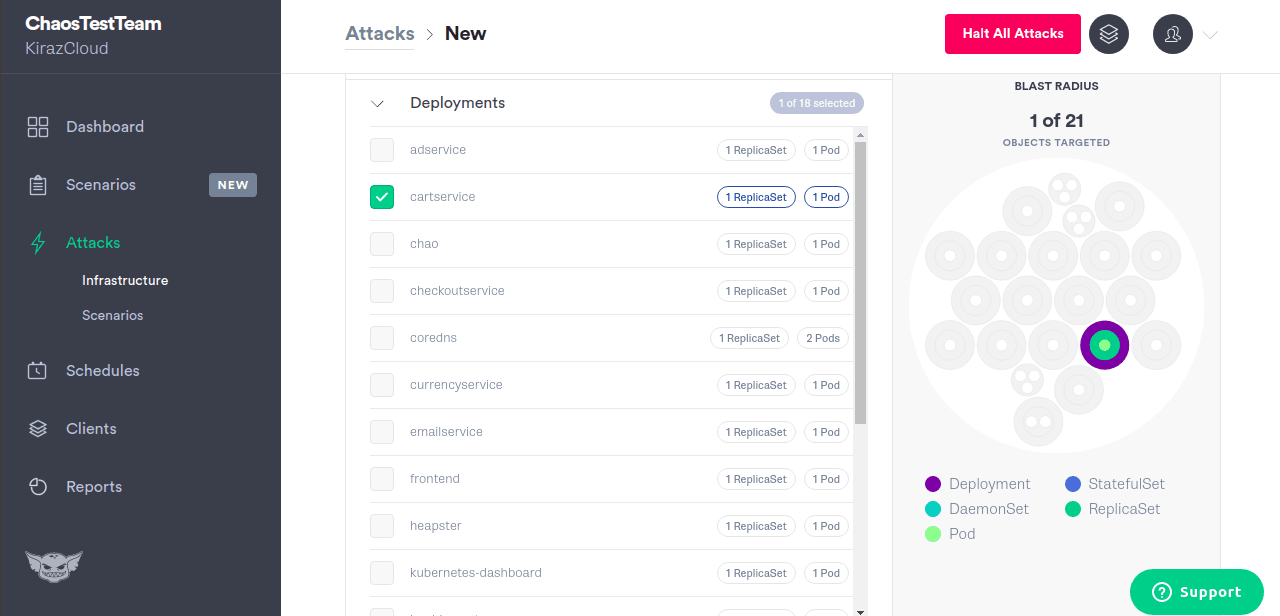
Going back to the Gremlin UI, select Attacks from the menu on the left and select New Attack. We’re going to target a Kubernetes resource, so click on Kubernetes on the upper right.

Choose cartservice:
Choose State and Shutdown:
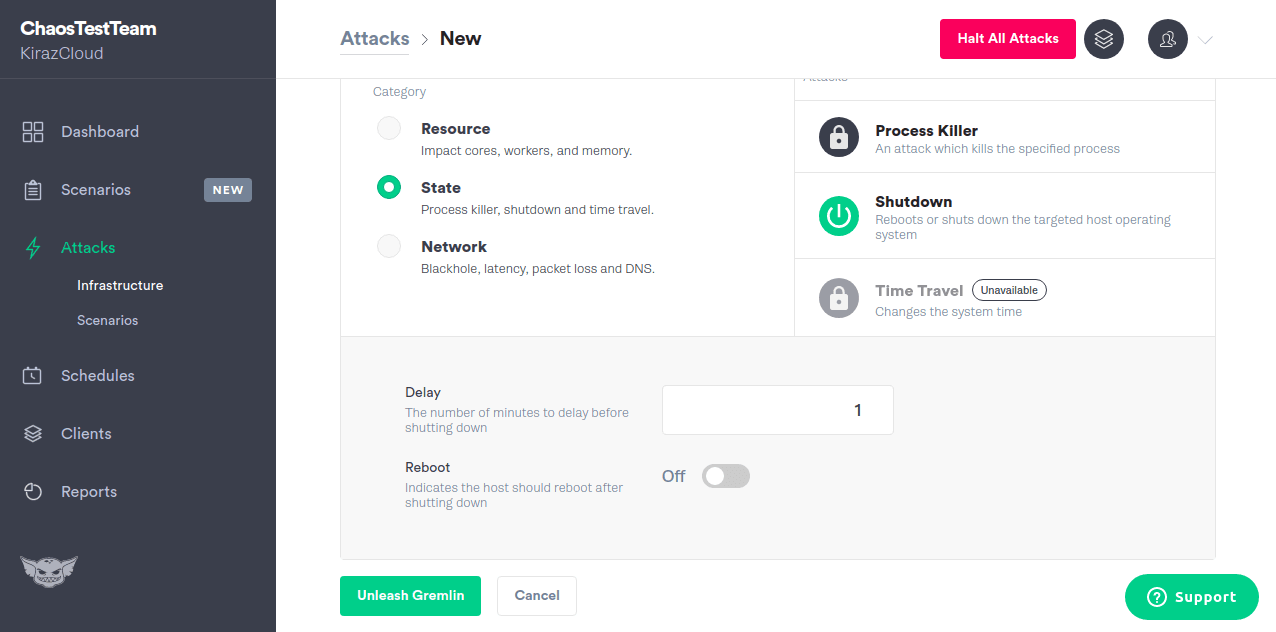
Attacking this pod with our Gremlin UI:

We will be shutting down the cartservice containers. As a test, we attacked twice and the cartservice pods restarted itself. Which signifies that it is working as expected. Note that it re-generates itself even when you attack to shut down your pods.
When we attacked our containers, the cluster resisted to failure and restarted itself, which symbolizes that our system is now resistant to failure. We have seen what happens when a failure occurs, in this example the failure is shutting down the pods. As a result, we understand that our cluster already has auto-scaling feature.
As a reminder; do not forget to delete your cluster and Cloud9 ide.
eksctl delete cluster --name=gremlin-eksctlConclusion
Congrats! You’ve installed a Kubernetes cluster, deployed the Kubernetes Dashboard, deployed a microservice demo application, installed the Gremlin agent as a daemon-set, and ran your first Chaos Engineering attack to validate Kubernetes reliability!
Related articles


Imagine discovering that migrating your company's data to a new cloud provider will cost hundreds of thousands of dollars in egress fees alone, before you've even touched the re-engineering work. Or worse, picture being in Synapse Financial

Subscribe to our newsletter
Get the latest industry trends, exclusive insights, and Gcore updates delivered straight to your inbox.