What is Telepresence?
With so many moving parts and services in the mix, it’s no wonder that any engineer who has had to debug a Kubernetes micro-service can be a major pain. That said, what if it didn’t have to be? We would like to introduce you to a CNCF Incubation product created by Datawire that has caught our interest recently.
Until now, Telepresence was a word to describe a sensation of being elsewhere, created by the use of virtual reality technology. This is why we feel like this is such a perfect name for a tool that makes you feel like you are “inside” your Kubernetes cluster while working locally.
Telepresence is an open-source tool that lets you run a single service locally while connecting that service to a remote Kubernetes cluster. This lets developers working on multi-service applications to:
- Do fast local development of a single service, even if that service depends on other services in your cluster. Make a change to your service, save, and you can immediately see the new service in action.
- Use any tool installed locally to test/debug/edit your service. For example, you can use a debugger or IDE!
- Make your local development machine operate as if it’s part of your Kubernetes cluster. If you’ve got an application on your machine that you want to run against a service in the cluster — it’s easy to do.
How it works
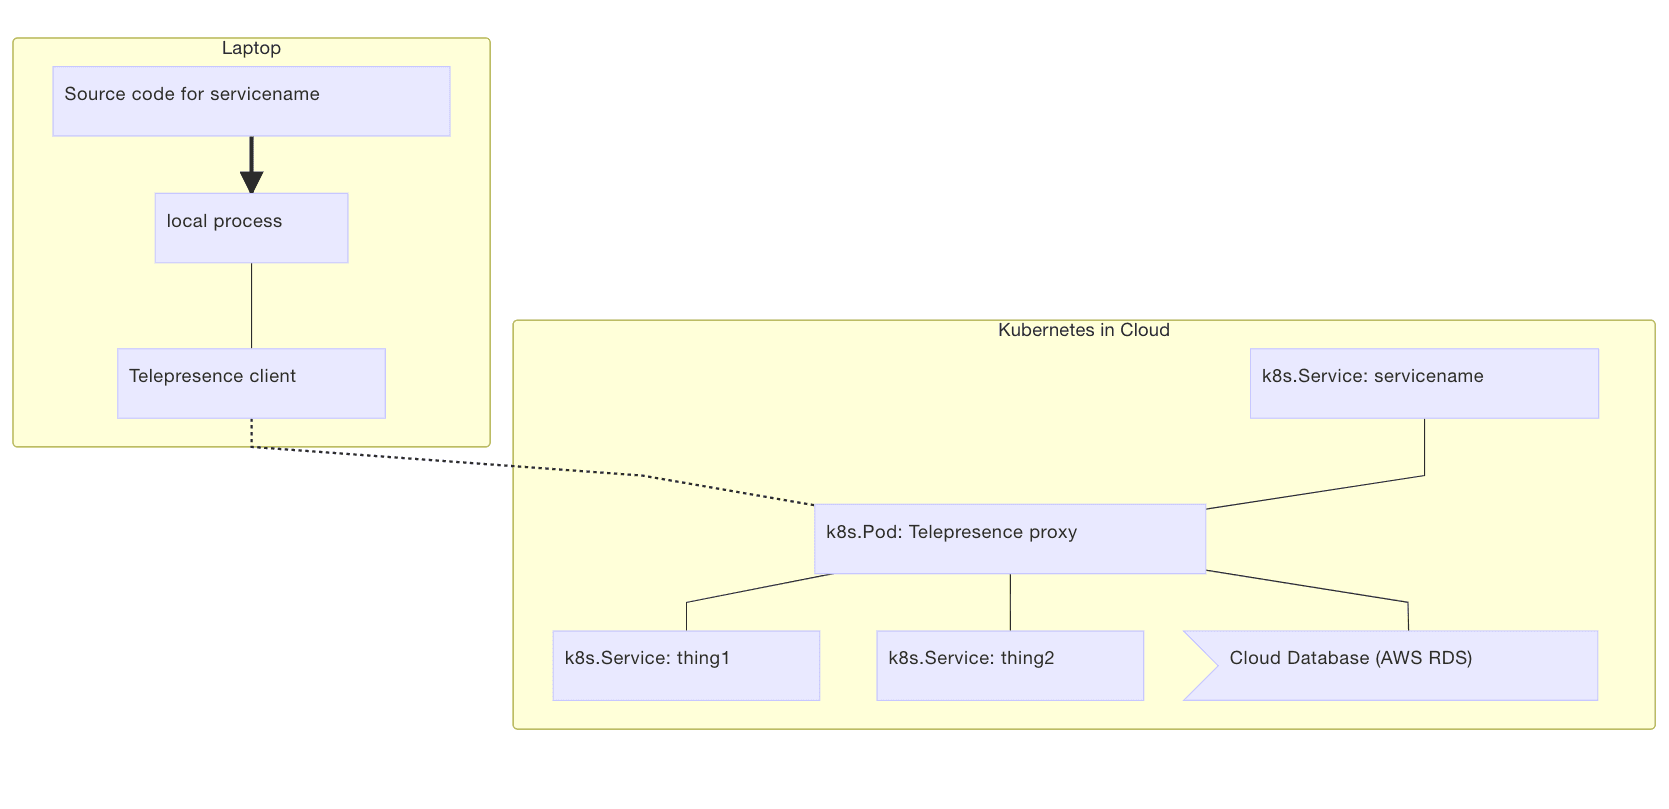
Telepresence deploys a two-way network proxy in a pod running in your Kubernetes cluster. This pod proxies data from your Kubernetes environment (e.g., TCP connections, environment variables, volumes) to the local process. The local process has its networking transparently overridden so that DNS calls and TCP connections are routed over the proxy to the remote Kubernetes cluster.

This approach gives:
- your local service full access to other services in the remote cluster
- your local service full access to Kubernetes environment variables, secrets, and ConfigMap
- your remote services full access to your local service
Installing Telepresence
OS X
On OS X you can install Telepresence by running the following:
brew cask install osxfusebrew install datawire/blackbird/telepresenceUbuntu 16.04 or later
On Ubuntu 16.04 and up, you can run the following to install Telepresence:
curl -s https://packagecloud.io/install/repositories/datawireio/telepresence/script.deb.sh | sudo bashsudo apt install --no-install-recommends telepresenceIf you are running another Debian-based distribution that has Python 3.5 installable as python3, you may be able to use the Ubuntu 16.04 (Xenial) packages. The following works on Linux Mint 18.2 (Sonya) and Debian 9 (Stretch) by forcing the PackageCloud installer to access Xenial packages:
curl -sO https://packagecloud.io/install/repositories/datawireio/telepresence/script.deb.shsudo env os=ubuntu dist=xenial bash script.deb.shsudo apt install --no-install-recommends telepresencerm script.deb.shA similar approach may work on Debian-based distributions with Python 3.6 by using the Ubuntu 17.10 (Artful) packages.
Fedora 26 or later
Run the following:
curl -s https://packagecloud.io/install/repositories/datawireio/telepresence/script.rpm.sh | sudo bashsudo dnf install telepresenceIf you are running a Fedora-based distribution that has Python 3.6 installable as python3, you may be able to use Fedora packages. See the Ubuntu section above for information on how to invoke the PackageCloud installer script to force OS and distribution.
Install from source
On systems with Python 3.5 or newer, install into /usr/local/share/telepresence and /usr/local/bin by running:
sudo env PREFIX=/usr/local ./install.shInstall the software from the list of dependencies to finish. Install into arbitrary locations by setting other environment variables before calling the install script. After installation, you can safely delete the source code.
Dependencies
If you install Telepresence using a pre-built package, dependencies other than kubectl are handled by the package manager. If you install from source, you will also need to install the following software.
kubectl(OpenShift users can useoc)- Python 3.5 or newer
- OpenSSH (the
sshcommand) sshfsto mount the pod’s filesystemconntrackandiptableson Linux for the vpn-tcp methodtorsocksfor the inject-tcp method- Docker for the container method
sudoto allow Telepresence to- modify the local network (via
sshuttleandpf/iptables) for the vpn-tcp method - run the
dockercommand in some configurations on Linux - mount the remote filesystem for access in a Docker container
Getting Started
Telepresence offers a broad set of proxying options that have different strengths and weaknesses, but for the sake of this tutorial, we are going to start with the recommended container method, which provides the most consistent environment for your code.
Now let’s learn how to use Telepresence to connect and debug out Kubernetes clusters locally by getting hands-on!
Telepresence allows you to get transparent access to a remote cluster from a local process. This allows you to use your local tools on your laptop to communicate with processes inside the cluster.
Connecting to the remote cluster
You should start by running a demo service in your cluster:
$ kubectl run myservice --image=datawire/hello-world --port=8000 --expose$ kubectl get service myserviceNAME CLUSTER-IP EXTERNAL-IP PORT(S) AGEmyservice 10.0.0.12 <none> 8000/TCP 1mIf your cluster is in the cloud, you can find the address of the resulting Service like this:
$ kubectl get service hello-worldNAME CLUSTER-IP EXTERNAL-IP PORT(S) AGEhello-world 10.3.242.226 104.197.103.123 8000:30022/TCP 5dIf you see <pending> under EXTERNAL-IP wait a few seconds and try again. In this case the Service is exposed at http://104.197.103.123:8000/.
It may take a minute or two for the pod running the server to be up and running, depending on how fast your cluster is.
Once you know the address you can store its value (don’t forget to replace this with the real address!):
$ export HELLOWORLD=http://104.197.103.13:8000You can now run a local process using Telepresence that can access that service, even though the process is local but the service is running in the Kubernetes cluster:
$ telepresence --run curl http://myservice:8000/Hello, world!(This will not work if the hello world pod hasn’t started yet… if so, try again.)
What’s going on:
- Telepresence creates a new
Deployment, which runs a proxy. - Telepresence runs
curllocally in a way that proxies networking through thatDeployment. - The DNS lookup and HTTP request done by
curlget routed through the proxy and transparently access the cluster… even thoughcurlis running locally. - When
curlexits the newDeploymentwill be cleaned up.
Setting up the proxy
To use Telepresence with a cluster (Kubernetes or OpenShift, local or remote) you need to run a proxy inside the cluster. There are three ways of doing so.
Creating a new deployment
By using the --new-deployment option telepresence can create a new deployment for you. It will be deleted when the local telepresence process exits. This is the default if no deployment option is specified.
For example, this creates a Deployment called myserver:
telepresence --new-deployment myserver --run-shellThis will create two Kubernetes objects, a Deployment and a Service, both named myserver. (On OpenShift a DeploymentConfig will be used instead of Deployment.) Or, if you don’t care what your new Deployment is called, you can do:
telepresence --run-shellRunning Telepresence manually
You can also choose to run Telepresence manually by starting a Deployment that runs the proxy in a pod.
The Deployment should only have 1 replica, and use the different Telepresence image:
apiVersion: extensions/v1beta1kind: Deploymentmetadata: name: myservicespec: replicas: 1 # only one replica template: metadata: labels: name: myservice spec: containers: - name: myservice image: datawire/telepresence-k8s:0.103 # new imageYou should apply this file to your cluster:
kubectl apply -f telepresence-deployment.yamlNext, you need to run the local Telepresence client on your machine, using --deployment to indicate the name of the Deployment object whose pod is running telepresence/datawire-k8s:
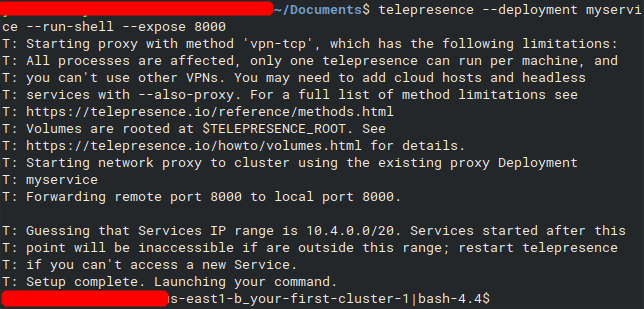
telepresence --deployment myservice --run-shellTelepresence will leave the deployment untouched when it exits. When you finish, you should see an output that looks like this:

And that’s it! You’re now ready to debug and work with your cluster locally with Telepresence! We hope you enjoyed this introduction and if you want to dive into the product more, check out the docs here.
Related articles
Subscribe to our newsletter
Get the latest industry trends, exclusive insights, and Gcore updates delivered straight to your inbox.


