Radar has landed - discover the latest DDoS attack trends. Get ahead, stay protected.Get the report
Under attack?

Products

Solutions

Resources

Partners

Why Gcore

  1. Home
  2. Developers
  3. Everything You Need to Know About Buildah

Everything You Need to Know About Buildah

  • By Gcore
  • April 7, 2023
  • 14 min read
Everything You Need to Know About Buildah

Buildah is a tool for building OCI-compatible images through a lower-level coreutils interface. Similar to Podman, Buildah doesn’t depend on a daemon such as Docker or CRI-O, and it doesn’t require root privileges. Buildah provides a command-line tool that replicates all the commands found in a Dockerfile. This allows you to issue Buildah commands from a scripting language such as Bash.

This tutorial shows you how to:

  • Use Buildah to package a web-application as a container starting from an existing image, and then run your application with Podman and Docker
  • Use Buildah to package a web-application as a container starting from scratch
  • Use Buildah to package a web-application as a container starting from a Dockerfile
  • Use Buildah to modify an existing container image
  • Push images to a public repository

Prerequisites

In this tutorial, we assume basic familiarity with Docker or Podman. To learn about Podman, see our Podman for Docker Users tutorial.

  • Buildah. Use the buildah --version command to verify if Buildah is installed:
buildah --version

The following example output shows that Buildah is installed on your computer:

buildah version 1.11.6 (image-spec 1.0.1-dev, runtime-spec 1.0.1-dev)

If Buildah is not installed, follow the instructions from the Buildah Install page.

  • Podman. Enter the following command to check if Podman is installed on your system:
podman version

The following example output shows that Podman is installed on your computer:

Version:            1.6.4RemoteAPI Version:  1Go Version:         go1.12.12OS/Arch:            linux/amd64

Refer the Podman Installation Instructions page for details on how to install Podman.

  • Docker. Use the following command to see if Docker is installed on your system:
docker --version

The following example output shows that Docker is installed on your computer:

Docker version 18.06.3-ce, build d7080c1

For details about installing Docker, refer to the Install Docker page.

Package a Web-based Application as a Container Starting  from an Existing Image

In this section, you’ll use Buildah to package a web-based application as a container, starting from the Alpine Linux image. Then, you’ll run your container image with Podman and Docker.

Alpine Linux is only 5 MB in size, and it lacks several prerequisites that are required to run ExpressJS. Thus, you’ll use apk to install these prerequisites.

  1. Enter the following command to create a new container image based on the alpine image, and store the name of your new image in an environment variable named container:
container=$(buildah from alpine)
Getting image source signaturesCopying blob c9b1b535fdd9 skipped: already existsCopying config e7d92cdc71 doneWriting manifest to image destinationStoring signatures

☞ Note that, by default, Buildah constructs the name of the container by appending -working-container to the name:

echo $container
alpine-working-container

You can override the default behavior by specifying the --name flag with the name of the working container. The following example creates a container image called example-container:

example_container=$(buildah from --name "example-container" alpine)
echo $example_container
example-container
  1. The Alpine Linux image you just pulled is only 5 MB in size and it lacks the basic utilities such as Bash. Run the following command to verify your new container image:
buildah run $container bash

The following output shows that the container image has been created, but bash is not yet installed:

ERRO[0000] container_linux.go:346: starting container process caused "exec: \"bash\": executable file not found in $PATH"container_linux.go:346: starting container process caused "exec: \"bash\": executable file not found in $PATH"error running container: error creating container for [bash]: : exit status 1ERRO exit status 1
  1. To install Bash, enter the buildah run command and specify:
  • The name of the container ($container)
  • Two dashes. The commands after -- are passed directly to the container.
  • The command you want to execute inside the container (apk add bash)
buildah run $container -- apk add bash
fetch http://dl-cdn.alpinelinux.org/alpine/v3.11/main/x86_64/APKINDEX.tar.gzfetch http://dl-cdn.alpinelinux.org/alpine/v3.11/community/x86_64/APKINDEX.tar.gz(1/5) Installing ncurses-terminfo-base (6.1_p20191130-r0)(2/5) Installing ncurses-terminfo (6.1_p20191130-r0)(3/5) Installing ncurses-libs (6.1_p20191130-r0)(4/5) Installing readline (8.0.1-r0)(5/5) Installing bash (5.0.11-r1)Executing bash-5.0.11-r1.post-installExecuting busybox-1.31.1-r9.triggerOK: 15 MiB in 19 packages
  1. Similarly to how you’ve installed bash, run the buildah run command to install node and npm:
buildah run $container -- apk add --update nodejs nodejs-npm
fetch http://dl-cdn.alpinelinux.org/alpine/v3.11/main/x86_64/APKINDEX.tar.gzfetch http://dl-cdn.alpinelinux.org/alpine/v3.11/community/x86_64/APKINDEX.tar.gz(1/8) Installing ca-certificates (20191127-r1)(2/8) Installing c-ares (1.15.0-r0)(3/8) Installing libgcc (9.2.0-r3)(4/8) Installing nghttp2-libs (1.40.0-r0)(5/8) Installing libstdc++ (9.2.0-r3)(6/8) Installing libuv (1.34.0-r0)(7/8) Installing nodejs (12.15.0-r1)(8/8) Installing npm (12.15.0-r1)Executing busybox-1.31.1-r9.triggerExecuting ca-certificates-20191127-r1.triggerOK: 73 MiB in 27 packages
  1. You can use the the buildah config command to set the image configuration values. The following command sets the working directory to /usr/src/app/:
buildah config --workingdir /usr/src/app/ $container
  1. To initialize a new JavaScript project, run the npm init -y command inside the container:
buildah run $container -- npm init -y
Wrote to /package.json:{  "name": "",  "version": "1.0.0",  "description": "",  "main": "index.js",  "directories": {    "lib": "lib"  },  "dependencies": {},  "devDependencies": {},  "scripts": {    "test": "echo \"Error: no test specified\" && exit 1"  },  "keywords": [],  "author": "",  "license": "ISC"}
  1. Issue the following command to install Express.JS:
buildah run $container -- npm install express --save
npm WARN @1.0.0 No descriptionnpm WARN @1.0.0 No repository field.+ express@4.17.1added 1 package from 8 contributors and audited 126 packages in 1.553sfound 0 vulnerabilities
  1. Create a file named HelloWorld.js and copy in the following JavaScript source code:
const express = require('express')const app = express()const port = 3000app.get('/', (req, res) => res.send('Hello World!'))app.listen(port, () => console.log(`Example app listening on port ${port}!`))
  1. To copy the HelloWorld.js file to your container’s working directory, enter the buildah copy command specifying:
  • The name of the container ($container)
  • The name of the file you want to copy (HelloWorld.js)
buildah copy $container HelloWorld.js
c26df5d060c589bda460c34d40c3e8f47f1e401cdf41b379247d23eca24b1c1d

☞ You can copy a file to a different container by passing the name of the destination directory as an argument. The following example command copies the HelloWorld.js to the /temp directory:

buildah copy $container HelloWorld.js /temp
  1. To set the entry point for your container, enter the buildah config command with the --entrypoint argument:
buildah config --entrypoint "node HelloWorld.js" $container
  1. At this point, you’re ready to write the new image using the buildah commit command. It takes two parameters:
  • The  name of the container image ($container)
  • The name of the new image (buildah-hello-world)
buildah commit $container buildah-hello-world
Getting image source signaturesCopying blob 5216338b40a7 skipped: already existsCopying blob 821cca548ffe doneCopying config 0d9f23545e doneWriting manifest to image destinationStoring signatures0d9f23545ed69ace9be47ed081c98b4ae182801b7fe5b7ef00a49168d65cf4e5

☞ If the provided image name doesn’t begin with a registry name, Buildah defaults to adding localhost to the name of the image.

  1. The following command lists your Buildah images:
buildah images
REPOSITORY                              TAG         IMAGE ID       CREATED          SIZElocalhost/buildah-hello-world           latest      0d9f23545ed6   56 seconds ago   71.3 MB

Running Your Buildah Image with Podman

  1. To run your image with Podman, you must first make sure your image is visible in Podman:
podman images

The following example output shows the container image created in the previous steps:

REPOSITORY                              TAG         IMAGE ID       CREATED              SIZElocalhost/buildah-hello-world           latest      0d9f23545ed6   About a minute ago   71.3 MB
  1. Run the buildah-hello-world image by entering the podman run command with the following arguments:
  • dt to specify that the container should be run in the background, and that Podman should allocate a pseudo-TTY for it.
  • -p with the port on host (3000) that’ll be forwarded to the container port (3000), separated by :.
  • The name of your image (buildah-hello-world)
podman run -dt -p 3000:3000 buildah-hello-world
332d060fc0009a8088349aba672be3601b76553e5df7643d4788c917528cbd8e
  1. Use the podman ps command to see the list of running containers:
podman ps
CONTAINER ID  IMAGE                                 COMMAND  CREATED         STATUS             PORTS                   NAMES332d060fc000  localhost/buildah-hello-world:latest  /bin/sh  23 seconds ago  Up 21 seconds ago  0.0.0.0:3000->3000/tcp  cool_ritchie
  1. To see the running application, point your browser to
    http://localhost:3000
    . The application should look as shown in the following screenshot:
  1. Now that the functionality of the application has been validated, you can stop the running container:
podman kill 332d060fc000
332d060fc000

Running Your Buildah Image with Docker

The container image you’ve built in previous sections is compatible with Docker. In this section, we’ll walk you through the steps required to run the buildah-hello-world image with Docker.

  1. First, you must push the image to Docker. Enter the buildah push command specifying:
  • The name of the container
  • The destination which uses the following format <TRANSPORT>:<DETAILS>.

The following example command uses the docker-daemon transport to push the buildah-hello-world image to Docker:

buildah push buildah-hello-world docker-daemon:buildah-hello-world:latest
Getting image source signaturesCopying blob 5216338b40a7 doneCopying blob 821cca548ffe doneCopying config 0d9f23545e doneWriting manifest to image destinationStoring signatures
  1. List the Docker images stored on your local machine:
docker images
REPOSITORY            TAG                 IMAGE ID            CREATED             SIZEbuildah-hello-world   latest              0d9f23545ed6        16 minutes ago      64.5MB
  1. Run the buildah-hello-world container image with Docker:
docker run -dt -p 3000:3000 buildah-hello-worldb0f29ff964cd84bf204b3f30f615581c4bb67c4a880aa871ce9c89db48e68720
  1. After a few seconds, enter the docker ps image to display the list of running containers:
docker ps
CONTAINER ID        IMAGE                 COMMAND                  CREATED             STATUS              PORTS                    NAMESb0f29ff964cd        buildah-hello-world   "/bin/sh -c 'node He…"   16 seconds ago      Up 13 seconds       0.0.0.0:3000->3000/tcp   goofy_chandrasekhar
  1. To see the running application, point your browser to
    http://localhost:3000
    . The application should look as shown in the following screenshot:
  1. Stop the running container with:
docker kill b0f29ff964cd
b0f29ff964cd

Package a Web-application as a Container Starting from Scratch

With Buildah, you can start from an image that’s basically an empty shell, except for some container metadata. Once you create such an image, you can then add more packages to it. This is useful when you want to create small containers, with a minimum number of packages installed. In this section, you’ll build the HelloWorld application starting from scratch.

An empty container image doesn’t have bash, yum, or any other tools installed. Thus, to install Node and Express.JS on it, you’ll mount the container’s file-system to a directory on the host, and then use the host’s package management system to install the required packages.

  1. If you’re running Buildah as an unprivileged user, mounting the container’s file-system will fail unless you enter the user namespace with the following command:
buildah unshare
  1. To start building from an empty container image, enter the buildah from command, and specify scratch as an argument:
container=$(buildah from scratch)

☞ Note that the above command stores the name of your container image in the container environment variable:

echo $container
working-container-1
  1. Issue the following buildah mount command to mount the container filesystem to a directory on the host, and store the path of the directory in the mnt environment variable:
mnt=$(buildah mount $container)
  1. Use the echo command to see the name of the directory where the container filesystem is mounted:
echo $mnt
/home/vagrant/.local/share/containers/storage/overlay/e1df4ce46bb88907af45e4edb7379fac8781928ac0cafe0c1a6fc799f4f7a48b/merged
  1. You can check that the container filesystem is empty with:
ls $mnt
[root@localhost ~]#
  1. Use the hosts’ package manager to install software into the container. Enter the yum install command specifying the following arguments:
  • --installroot to configure the alternative install root directory (mnt). The packages will be installed relative to this directory.
  • --releasever to indicate the version you want to install the packages for. Our example uses centos-release-8.
  • The name of the packages you want to install (bash and coreutils).
  • The -y flag to automatically answer yes to all questions.
yum install --releasever=centos-release-8 --installroot $mnt bash coreutils  -y
shadow-utils-2:4.6-8.el8.x86_64systemd-239-18.el8_1.2.x86_64systemd-libs-239-18.el8_1.2.x86_64systemd-pam-239-18.el8_1.2.x86_64systemd-udev-239-18.el8_1.2.x86_64trousers-lib-0.3.14-4.el8.x86_64tzdata-2019c-1.el8.noarchutil-linux-2.32.1-17.el8.x86_64which-2.21-10.el8.x86_64xz-5.2.4-3.el8.x86_64xz-libs-5.2.4-3.el8.x86_64zlib-1.2.11-10.el8.x86_64Complete!

Note that the above output was truncated for brevity.

  1. Clean up the temporary files that yum created as follows:
yum clean --installroot $mnt all
24 files removed
  1. Validate the functionality of your container image. Enter the following buildah run command to run bash inside of the container:
buildah run $container bash
bash-4.4#
  1. You can issue a few commands to make sure everything works as expected. Once you’re done, enter the exit command to terminate the bash session:
exit
  1. Enter the following commands to move into the directory where you mounted the container’s filesystem, and then download the Node.JS installer:
cd $mnt && wget https://nodejs.org/dist/v12.16.1/node-v12.16.1-linux-x64.tar.xz
--2020-02-24 13:50:07--  https://nodejs.org/dist/v12.16.1/node-v12.16.1-linux-x64.tar.xzResolving nodejs.org (nodejs.org)... 104.20.22.46, 104.20.23.46, 2606:4700:10::6814:162e, ...Connecting to nodejs.org (nodejs.org)|104.20.22.46|:443... connected.HTTP request sent, awaiting response... 200 OKLength: 14591852 (14M) [application/x-xz]Saving to: 'node-v12.16.1-linux-x64.tar.xz'node-v12.16.1-linux-x 100%[=======================>]  13.92M  7.25MB/s    in 1.9s2020-02-24 13:50:09 (7.25 MB/s) - 'node-v12.16.1-linux-x64.tar.xz' saved [14591852/14591852]
  1. To extract the files from the archive file and remove the first component from the file names, run the tar xf command with --strip-commponents=1:
tar xf node-v12.16.1-linux-x64.tar.xz --strip-components=1
  1. Delete the archive:
rm -f node-v12.16.1-linux-x64.tar.xz
  1. To make sure everything works as expected, use the buildah run command to run node inside of the container:
buildah run $container node
Welcome to Node.js v12.16.1.Type ".help" for more information.>
  1. Type .exit to exit the Node.JS interactive shell.
  1. Now that everything is set up, you can install Express.JS and create the HelloWorld project. Follow the steps from 4 to 9 from the “Build an Express.JS based Image from an Existing Image” section.
  2. Once you’ve finished the above steps, unmount the container filesystem:
buildah unmount $container
  1. Execute the buildah commit command to create a new image called buildah-demo-from-scratch:
buildah commit $container buildah-demo-from-scratch
Getting image source signaturesCopying blob a9a2ac73e013 doneCopying config ec14304d59 doneWriting manifest to image destinationStoring signaturesec14304d5906c7b8fb9a485ff959e4a6c337115245a827858bf6ba808f5f4e0e
  1. To see the list of your Buildah images, run the buildah images command:
buildah images
REPOSITORY                            TAG      IMAGE ID       CREATED          SIZElocalhost/buildah-demo-from-scratch   latest   ec14304d5906   3 minutes ago    582 MB
  1. You can use the buildah inspect command to retrieve more details about the buildah-demo-from-scratch container image:
buildah inspect $container
{    "Type": "buildah 0.0.1",    "FromImage": "",    "FromImageID": "",    "FromImageDigest": "",    "Config": "",    "Manifest": "",    "Container": "working-container",    "ContainerID": "f974b8b06921a57edddb5735ee7fc0c7176051ff1b76d0523bf2879d7865afba",    "MountPoint": "",    "ProcessLabel": "system_u:system_r:container_t:s0:c435,c738",    "MountLabel": "system_u:object_r:container_file_t:s0:c435,c738",    "ImageAnnotations": null,    "ImageCreatedBy": "",    "OCIv1": {        "created": "2020-02-27T14:46:38.379626079Z",        "architecture": "amd64",        "os": "linux",        "config": {            "Entrypoint": [                "/bin/sh",                "-c",                "node HelloWorld.js"            ],            "WorkingDir": "/usr/src/app/"        },        "rootfs": {            "type": "",            "diff_ids": null        }    },    "Docker": {        "created": "2020-02-27T14:46:38.379626079Z",        "container_config": {            "Hostname": "",            "Domainname": "",            "User": "",            "AttachStdin": false,            "AttachStdout": false,            "AttachStderr": false,            "Tty": false,            "OpenStdin": false,            "StdinOnce": false,            "Env": null,            "Cmd": null,            "Image": "",            "Volumes": null,            "WorkingDir": "/usr/src/app/",            "Entrypoint": [                "/bin/sh",                "-c",                "node HelloWorld.js"            ],            "OnBuild": [],            "Labels": null        },        "config": {            "Hostname": "",            "Domainname": "",            "User": "",            "AttachStdin": false,            "AttachStdout": false,            "AttachStderr": false,            "Tty": false,            "OpenStdin": false,            "StdinOnce": false,            "Env": null,            "Cmd": null,            "Image": "",            "Volumes": null,            "WorkingDir": "/usr/src/app/",            "Entrypoint": [                "/bin/sh",                "-c",                "node HelloWorld.js"            ],            "OnBuild": [],            "Labels": null        },        "architecture": "amd64",        "os": "linux"    },    "DefaultMountsFilePath": "",    "Isolation": "IsolationOCIRootless",    "NamespaceOptions": [        {            "Name": "cgroup",            "Host": true,            "Path": ""        },        {            "Name": "ipc",            "Host": false,            "Path": ""        },        {            "Name": "mount",            "Host": false,            "Path": ""        },        {            "Name": "network",            "Host": true,            "Path": ""        },        {            "Name": "pid",            "Host": false,            "Path": ""        },        {            "Name": "user",            "Host": true,            "Path": ""        },        {            "Name": "uts",            "Host": false,            "Path": ""        }    ],    "ConfigureNetwork": "NetworkDefault",    "CNIPluginPath": "/usr/libexec/cni:/opt/cni/bin",    "CNIConfigDir": "/etc/cni/net.d",    "IDMappingOptions": {        "HostUIDMapping": true,        "HostGIDMapping": true,        "UIDMap": [],        "GIDMap": []    },    "DefaultCapabilities": [        "CAP_AUDIT_WRITE",        "CAP_CHOWN",        "CAP_DAC_OVERRIDE",        "CAP_FOWNER",        "CAP_FSETID",        "CAP_KILL",        "CAP_MKNOD",        "CAP_NET_BIND_SERVICE",        "CAP_SETFCAP",        "CAP_SETGID",        "CAP_SETPCAP",        "CAP_SETUID",        "CAP_SYS_CHROOT"    ],    "AddCapabilities": [],    "DropCapabilities": [],    "History": [        {            "created": "2020-02-27T14:56:04.319174231Z"        }    ],    "Devices": []}
  1. The steps for running the image are similar to the ones from the “Running your Buildah Image with Podman”. For the sake of brevity, those steps are not repeated here.

Package a Web-application as a Container Starting from a Dockerfile

  1. Create a directory called from-dockerfile and then move into it:
mkdir from-dockerfile && cd from-dockerfile/
  1. Use a plain-text editor to create a file called Dockerfile, and copy in the following snippet:
FROM node:10WORKDIR /usr/src/appRUN npm init -yRUN npm install express --saveCOPY HelloWorld.js .CMD [ "node", "HelloWorld.js" ]
  1. Create a file named HelloWorld.js with the following content:
const express = require('express')const app = express()const port = 3000app.get('/', (req, res) => res.send('Hello World!'))app.listen(port, () => console.log(`Example app listening on port ${port}!`))
  1. Build the container image. Enter the buildah bud command specifying the -t flag with the name Buildah should apply to the built image, and the build context directory (.):
buildah bud -t buildah-from-dockerfile .
STEP 1: FROM node:10STEP 2: WORKDIR /usr/src/appSTEP 3: RUN npm init -yWrote to /usr/src/app/package.json:{  "name": "app",  "version": "1.0.0",  "description": "",  "main": "index.js",  "scripts": {    "test": "echo \"Error: no test specified\" && exit 1"  },  "keywords": [],  "author": "",  "license": "ISC"}STEP 4: RUN npm install express --savenpm notice created a lockfile as package-lock.json. You should commit this file.npm WARN app@1.0.0 No descriptionnpm WARN app@1.0.0 No repository field.+ express@4.17.1added 50 packages from 37 contributors and audited 126 packages in 4.989sfound 0 vulnerabilitiesSTEP 5: COPY HelloWorld.js .STEP 6: CMD [ "node", "HelloWorld.js" ]STEP 7: COMMIT buildah-from-dockerfileGetting image source signaturesCopying blob 7948c3e5790c skipped: already existsCopying blob 4d1ab3827f6b skipped: already existsCopying blob 69dfa7bd7a92 skipped: already existsCopying blob 01727b1a72df skipped: already existsCopying blob 1d7382716a27 skipped: already existsCopying blob 03dc1830d2d5 skipped: already existsCopying blob 1e1795dd2c10 skipped: already existsCopying blob c8a8d3d42bc1 skipped: already existsCopying blob 072dcfd76a1e skipped: already existsCopying blob fc67e152fd86 doneCopying config 7619bf0e33 doneWriting manifest to image destinationStoring signatures7619bf0e33165f5c3dc6da00cb101f2195484bff3e59f4c6f57a41c07647d4077619bf0e33165f5c3dc6da00cb101f2195484bff3e59f4c6f57a41c07647d407
  1. The following command lists your Buildah images:
buildah images
REPOSITORY                          TAG      IMAGE ID       CREATED             SIZElocalhost/buildah-from-dockerfile   latest   7619bf0e3316   52 seconds ago      944 MB
  1. Enter the podman run command to run un the buildah-from-dockerfile image:
podman run -dt -p 3000:3000 buildah-from-dockerfile
dbbae173dca0ca5b602c0b9a70055886381cb7df5ae25fbb4bd81c75a4bcb50d[vagrant@localhost buildah-hello-world]$ 
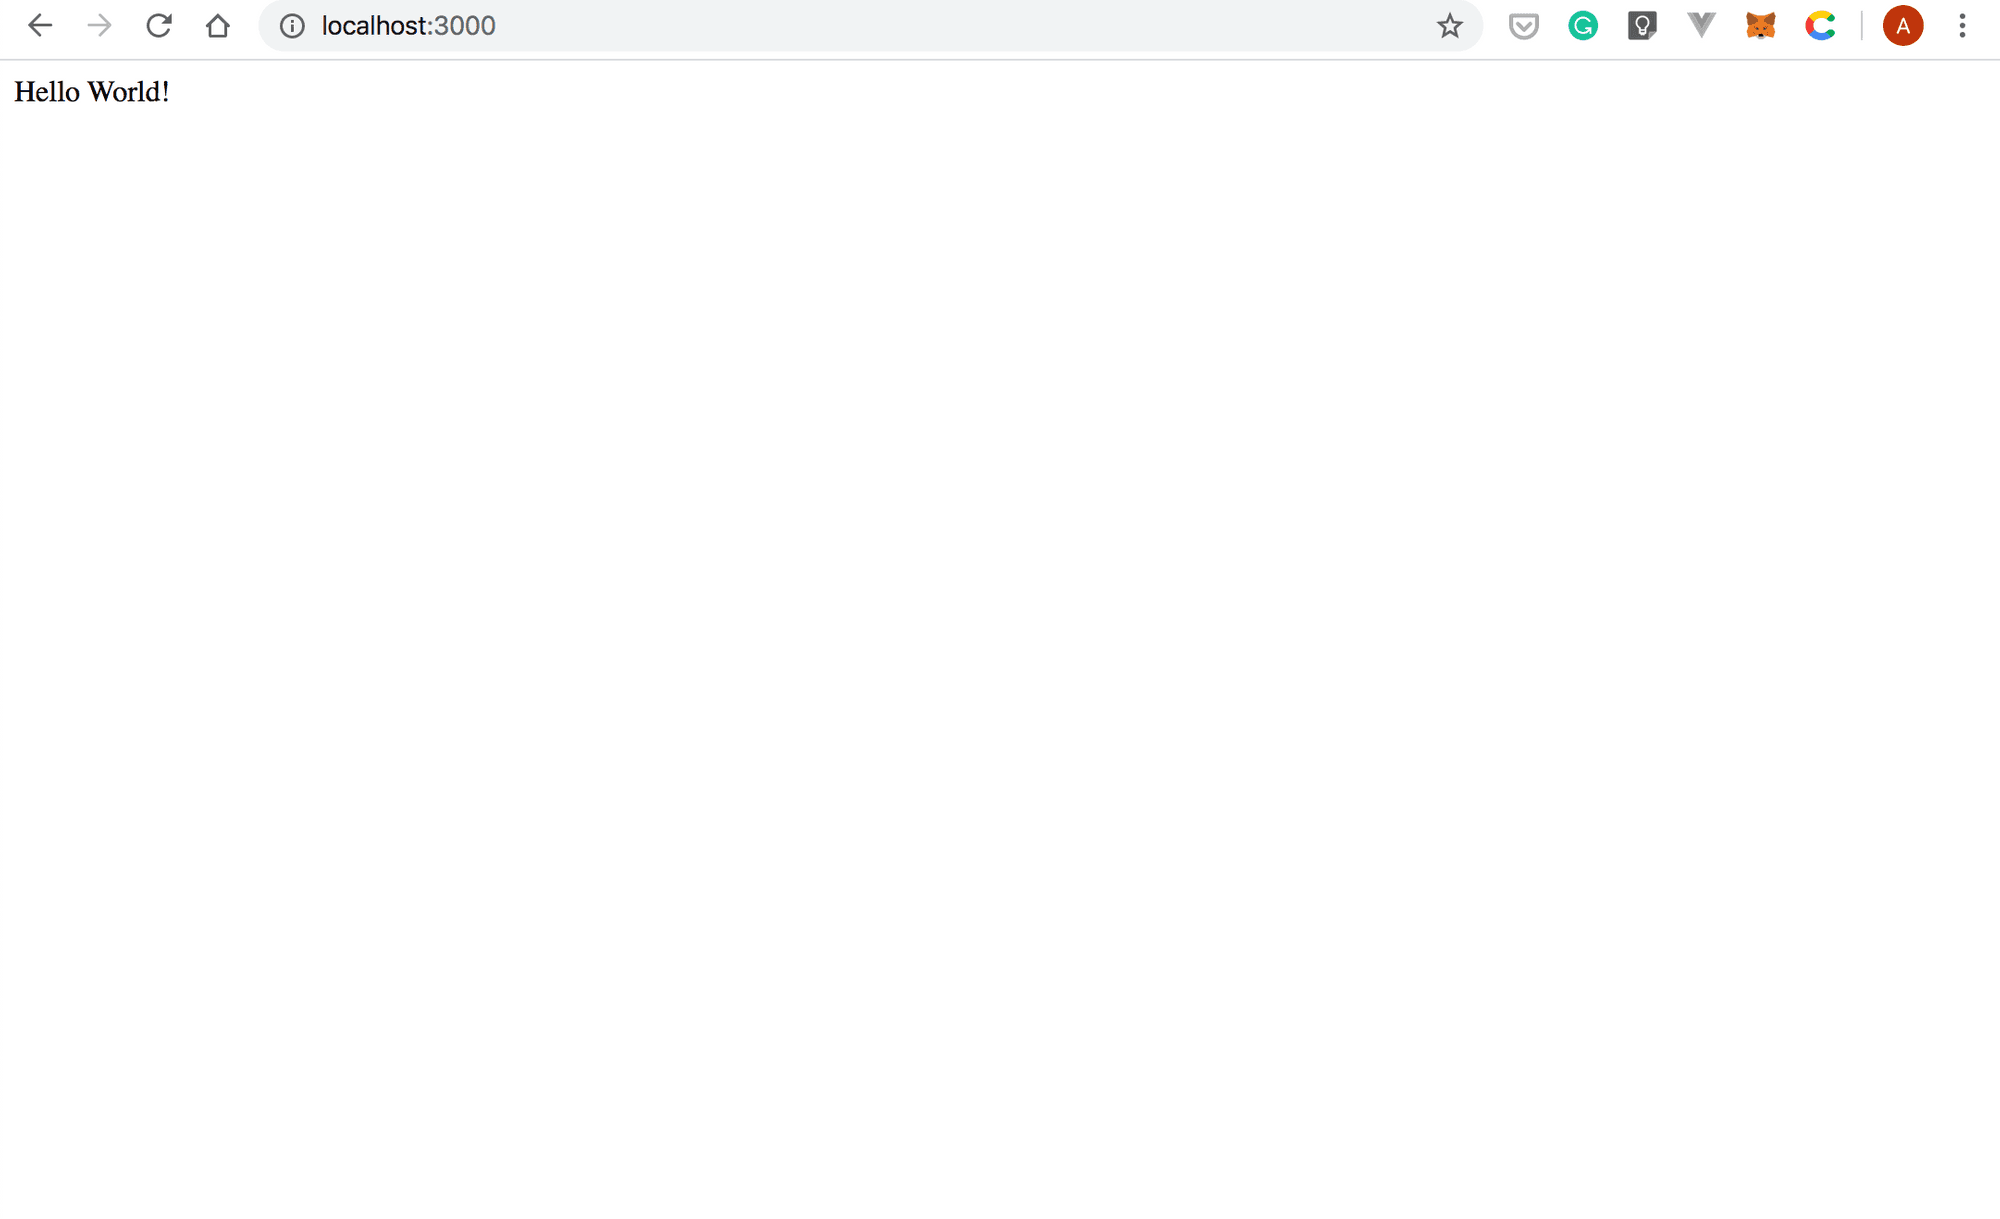
podman psCONTAINER ID  IMAGE                                     COMMAND               CREATED        STATUS            PORTS                   NAMESdbbae173dca0  localhost/buildah-from-dockerfile:latest  node HelloWorld.j...  4 seconds ago  Up 3 seconds ago  0.0.0.0:3000->3000/tcp  priceless_cartwright
  1. Point your browser to
    http://localhost:3000
    , and you should see something similar to the following screenshot:
  1. Stop the container by entering the podman kill command followed by the identifier of the buildah-from-dockerfile container (dbbae173dca0):
podman kill dbbae173dca0
dbbae173dca0ca5b602c0b9a70055886381cb7df5ae25fbb4bd81c75a4bcb50d

Use Buildah to Modify a Container Image

With Buidah, you can modify a container in the following ways:

  • Mount the container and copy files to it
  • Using the buildah config command
  • Using the buildah copy command

Mount the Container and Copy Files to It

  1. Run the following command to create a new container using the buildah-from-dockerfile image as a starting point:
buildah from buildah-from-dockerfile

The above command prints the name of your new container:

buildah-from-dockerfile-working-container
  1. Use the buildah list command to see the list of your working containers:
buildah containers
CONTAINER ID  BUILDER  IMAGE ID     IMAGE NAME                       CONTAINER NAME78c4225c8c37     *     7619bf0e3316 localhost/buildah-from-docker... buildah-from-dockerfile-working-container
  1. If you’re running Buildah as an unprivileged user, enter the user namespace with:
buildah unshare
  1. Mount the container filesystem to a directory on the host, and save the name of that directory in an environment variable called mount by entering the following command:
mount=$(buildah mount buildah-from-dockerfile-working-container)
  1. You can use the echo command to print the path of the folder where the container filesystem is mounted:
echo $mount
/home/vagrant/.local/share/containers/storage/overlay/83b2d731b920653a569795cf75f4902a1e148dab61f4cb41bcc37bae0f5d6655/merged
  1. Move into the /usr/src/app folder:
cd $mount/usr/src/app/
  1. Open the HelloWorld.js file in a plain-text editor, and edit the line that prints the Hello World! message to:
app.get('/', (req, res) => res.send('Hello World (modified with Buildah)!'))

Your HelloWorld.js file should look similar to the listing below:

cat HelloWorld.jsconst express = require('express')const app = express()const port = 3000app.get('/', (req, res) => res.send('Hello World (modified with Buildah)!'))app.listen(port, () => console.log(`Example app listening on port ${port}!`))
  1. Save the changes to a new container image called modified-container:
buildah commit buildah-from-dockerfile-working-container modified-container
Getting image source signaturesCopying blob 7948c3e5790c skipped: already existsCopying blob 4d1ab3827f6b skipped: already existsCopying blob 69dfa7bd7a92 skipped: already existsCopying blob 01727b1a72df skipped: already existsCopying blob 1d7382716a27 skipped: already existsCopying blob 03dc1830d2d5 skipped: already existsCopying blob 1e1795dd2c10 skipped: already existsCopying blob c8a8d3d42bc1 skipped: already existsCopying blob 072dcfd76a1e skipped: already existsCopying blob fc67e152fd86 skipped: already existsCopying blob a546faf200ff doneCopying config d3ac43ac8d doneWriting manifest to image destinationStoring signaturesd3ac43ac8da20aef987367353e56e22a1a2330176c08e255c72670b3b08c1e14
  1. If you run the buildah images command, you should see both images:
buildah images
REPOSITORY                          TAG      IMAGE ID       CREATED             SIZElocalhost/modified-container        latest   d3ac43ac8da2   46 seconds ago      944 MBlocalhost/buildah-from-dockerfile   latest   7619bf0e3316   14 minutes ago      944 MB
  1. Unmount the root filesystem of your container by entering the following buildah unmount command:
buildah unmount buildah-from-dockerfile-working-container
78c4225c8c377d8a018583586e2f76932204f20b4f3621fedb1ab3d41f8a3240
  1. Run the modified-container image with Podman:
podman run -dt -p 3000:3000 modified-container
70105ac094b672c98f56290d25fa5406a7c51bf401cff586c7a356b4f19f1320
  1. Enter the podman ps command to print the list of running containers:
podman ps
CONTAINER ID  IMAGE                                COMMAND               CREATED        STATUS            PORTS                   NAMES70105ac094b6  localhost/modified-container:latest  node HelloWorld.j...  4 seconds ago  Up 4 seconds ago  0.0.0.0:3000->3000/tcp  pedantic_rhodes
  1. To see the modified application in action, point your browser to
    http://localhost:3000
    :

Modify a Container with the buildah config Command

  1. To see the list of your local container images, use the buildah images command:
buildah containers
CONTAINER ID  BUILDER  IMAGE ID     IMAGE NAME                       CONTAINER NAME305591a5116c     *     7619bf0e3316 localhost/buildah-from-docker... buildah-from-dockerfile-working-container
  1. In this example, you’ll modify the configuration value for the author field. Run the buildah config command specifying the following parameters:
  • --author with the name of the author.
  • The identifier of the container (305591a5116c)
buildah config --author='Andrei Popescu' 305591a5116c
  1. Enter the buildah inspect command to display detailed information about your container:
buildah inspect 305591a5116c
{        "Docker": {        "created": "2020-02-24T14:41:01.41295511Z",        "container_config": {            "Hostname": "",            "Domainname": "",            "User": "",            "AttachStdin": false,            "AttachStdout": false,            "AttachStderr": false,            "Tty": false,            "OpenStdin": false,            "StdinOnce": false,            "Env": [                "PATH=/usr/local/sbin:/usr/local/bin:/usr/sbin:/usr/bin:/sbin:/bin",                "NODE_VERSION=10.19.0",                "YARN_VERSION=1.21.1"            ],            "Cmd": [                "node",                "HelloWorld.js"            ],            "Image": "",            "Volumes": null,            "WorkingDir": "/usr/src/app",            "Entrypoint": [                "docker-entrypoint.sh"            ],            "OnBuild": [],            "Labels": null        },        "author": "Andrei Popescu",        "config": {            "Hostname": "",            "Domainname": "",            "User": "",            "AttachStdin": false,            "AttachStdout": false,            "AttachStderr": false,            "Tty": false,            "OpenStdin": false,            "StdinOnce": false,            "Env": [                "PATH=/usr/local/sbin:/usr/local/bin:/usr/sbin:/usr/bin:/sbin:/bin",                "NODE_VERSION=10.19.0",                "YARN_VERSION=1.21.1"            ],            "Cmd": [                "node",                "HelloWorld.js"            ],            "Image": "",            "Volumes": null,            "WorkingDir": "/usr/src/app",            "Entrypoint": [                "docker-entrypoint.sh"            ],            "OnBuild": [],            "Labels": null        },

Note that that the above output was truncated for brevity.

As you can see, the author field has been updated:

"author": "Andrei Popescu",

Modifying a Container with the buildah copy Command

  1. List your Buildah images with:
buildah images
REPOSITORY                          TAG      IMAGE ID       CREATED          SIZElocalhost/buildah-from-dockerfile   latest   4c4c1019785e   19 seconds ago   944 MBdocker.io/library/node              10       aa6432763c11   5 days ago       940 MB
  1. Create a new working container using buildah-from-dockerfile as the starting image:
container=$(buildah from buildah-from-dockerfile)
  1. The above command saves the name of your new working container into an environment variable called container. Use the echo command to see the name of your new container:
echo $container
buildah-from-dockerfile-working-container
  1. Use a plain-text editor to open the 
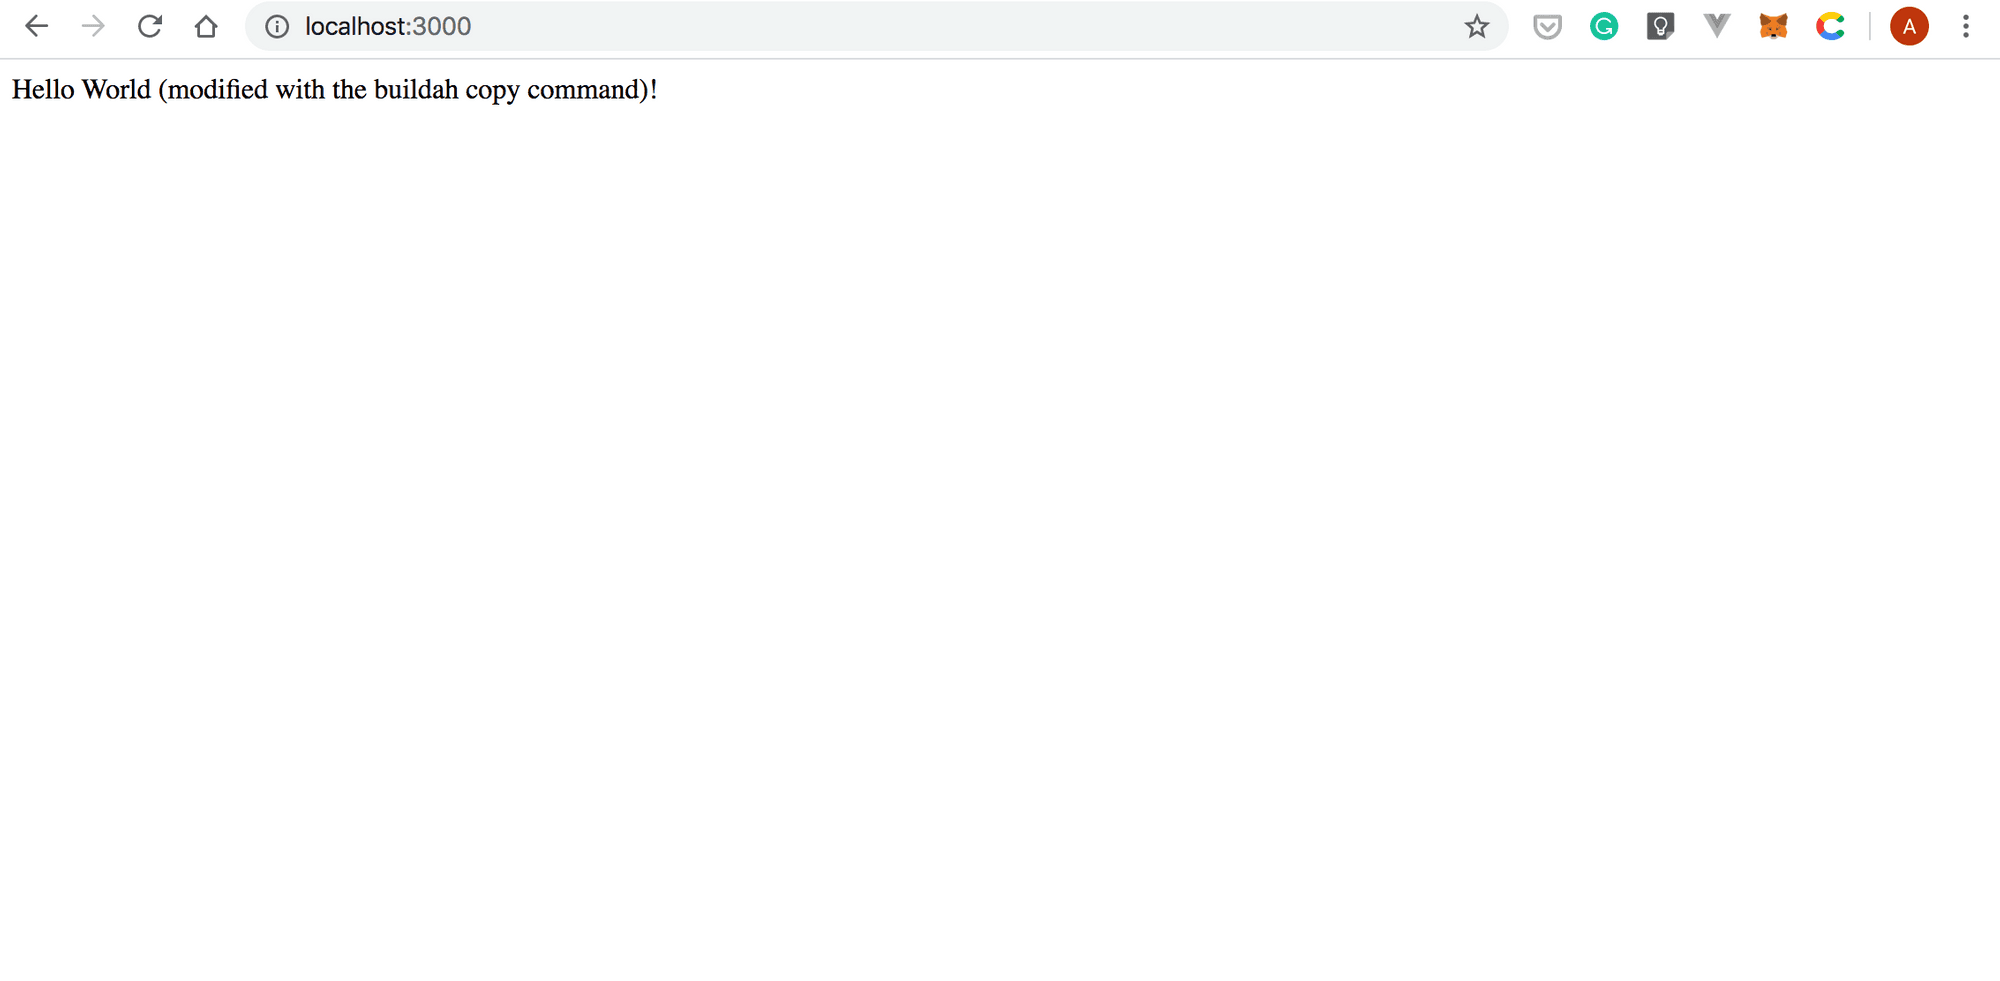
HelloWorld.js. Next, modify the line of code that prints the Hello World! message to the following:
app.get('/', (req, res) => res.send('Hello World (modified with the buildah copy command)!'))

Your HelloWorld.js file should look similar to the following listing:

const express = require('express')const app = express()const port = 3000app.get('/', (req, res) => res.send('Hello World (modified with the buildah copy command)!'))app.listen(port, () => console.log(`Example app listening on port ${port}!`))
  1. Enter the following buildah copy command to copy the content of the HelloWorld.js file into the container’s /usr/src/app/ directory:
buildah copy buildah-from-dockerfile-working-container HelloWorld.js /usr/src/app/
bf36dd7b6ba5d3f520835f5e850e4303bd830bd0934d1cb8a11c4c45cf3ebcb8
  1. The buildah run is different from the podman run command. Since Buildah is a tool aimed at building images, you can’t use buildah run to map ports or mount volumes. You can think of it as similar to the RUN command from a Dockerfile. Thus, to test the changes before saving them to a new image, you must run a shell inside of the container:
buildah run $container -- bash
  1. Use the cat command to list the contents of the HelloWorld.js file:
cat HelloWorld.js
const express = require('express')const app = express()const port = 3000app.get('/', (req, res) => res.send('Hello World (modified with the buildah copy command)!'))app.listen(port, () => console.log(`Example app listening on port ${port}!`))
  1. Type exit to return to the host:
exit
  1. Save your changes to a new container image named modified-with-copy. Enter the buildah commit command passing it the following parameters:
  • The name of your working container ($container)
  • The name of your new container (modified-with-copy)
buildah commit $container modified-with-copy
Getting image source signaturesCopying blob 2c995a2087c1 skipped: already existsCopying blob 00adafc8e77b skipped: already existsCopying blob d040e6423b7a skipped: already existsCopying blob 162804eaaa1e skipped: already existsCopying blob 91daf9fc6311 skipped: already existsCopying blob 236d3097407d skipped: already existsCopying blob 92086f81cd8d skipped: already existsCopying blob 90aa9e20811b skipped: already existsCopying blob cea8dd7dcda1 skipped: already existsCopying blob 490adad7924f skipped: already existsCopying blob fc29e33720c1 doneCopying config c6df996bc7 doneWriting manifest to image destinationStoring signaturesc6df996bc740c9670c87470f65124f8a8a3b74ecde3dc38038530a98209e5148
  1. Enter the podman images command to list the images available on your system:
podman images
podman imagesREPOSITORY                          TAG      IMAGE ID       CREATED              SIZElocalhost/modified-with-copy        latest   c6df996bc740   About a minute ago   944 MBlocalhost/buildah-from-dockerfile   latest   efd9caedf198   24 minutes ago       944 MBdocker.io/library/node              10       aa6432763c11   5 days ago           940 MB
  1. Run the modified image with Podman:
podman run -dt -p 3000:3000 modified-with-copy
f2bf06e4d6010adab6acf92db063a4c11f821fb96c2912266ac9900752f53bc4
  1. Make sure that the modified container works as expected by pointing your browser to
    http://localhost:3000
    :

Use Buildah to Push an Image to a Public Repository

In this section, we’ll show how you can push a Buildah image to Quay.io. Then, you’ll use Docker to pull and run it on your system.

  1. Login to Quay.io with the following command:
buildah login quay.io

Buildah will prompt you to enter your username and password:

Username:Password:Login Succeeded!
  1. Use the buildah images command to see the list of Buildah images available on your system:
buildah imagesREPOSITORY                          TAG      IMAGE ID       CREATED          SIZElocalhost/modified-with-copy        latest   c6df996bc740   31 minutes ago   944 MBlocalhost/buildah-from-dockerfile   latest   efd9caedf198   54 minutes ago   944 MBdocker.io/library/node              10       aa6432763c11   5 days ago       940 MB
  1. To push an image to Quay.io, enter the buildah push command specifying:
  • The source.
  • The destination. This uses the following format <transport>:<destination>.

The following example command pushes the modified-with-copy to the andreipope/modified-with-copy repository:

buildah push modified-with-copy docker://quay.io/andreipope/modified-with-copy:latest
Getting image source signaturesCopying blob d040e6423b7a doneCopying blob 236d3097407d doneCopying blob 2c995a2087c1 doneCopying blob 00adafc8e77b skipped: already existsCopying blob 91daf9fc6311 doneCopying blob 162804eaaa1e doneCopying blob 92086f81cd8d skipped: already existsCopying blob 90aa9e20811b skipped: already existsCopying blob cea8dd7dcda1 skipped: already existsCopying blob 490adad7924f skipped: already existsCopying blob fc29e33720c1 skipped: already existsCopying config c6df996bc7 doneWriting manifest to image destinationCopying config c6df996bc7 doneWriting manifest to image destinationWriting manifest to image destinationStoring signatures
  1. Pull the image from Quay.io using the docker pull command:
docker pull quay.io/andreipope/modified-with-copy:latest
latest: Pulling from andreipope/modified-with-copy571444490ac9: Pull completea8c44c6007c2: Pull complete78082700aa2c: Pull completec3a1a87b600e: Pull complete307b97780b43: Pull completee6bc907e1abd: Pull completef7d60f9c5e35: Pull complete6d95f9b81e1b: Pull complete3fc72998ebc8: Pull complete632905c48be3: Pull complete29b4e1262307: Pull completeDigest: sha256:a57849f1f639b5f4e01af33fdf4b86238dead6ddaf8f95b4e658863dfcf22700Status: Downloaded newer image for quay.io/andreipope/modified-with-copy:latest
  1. List your Docker images:
docker images
REPOSITORY                              TAG                 IMAGE ID            CREATED             SIZEquay.io/andreipope/modified-with-copy   latest              05b3081ac594        About an hour ago   914MB
  1. Issue the following docker run command to run the modified-with-copy image:
docker run -dt -p 3000:3000 quay.io/andreipope/modified-with-copy
6394d8a8b60106125a062504d3764fcd0034b06947cfe303f9be0e87b82fee88
  1. Point your browser to
    http://localhost:3000
    and you should see something similar to the screenshot below:

In this tutorial, you learned how to:

  • Use Buildah to build an image from an existing image
  • Build an image from Scratch
  • Build an image from a Dockerfile
  • Use Buildah to modify an existing container
  • Run your Buildah images with Podman and Docker
  • Push images to a public repository

We hope this blog post has been helpful and that now you know how to build container images with Buildah.

Thanks for reading!

Explore Gcore Container as a Service

Related articles

Pre-configure your dev environment with Gcore VM init scripts

Provisioning new cloud instances can be repetitive and time-consuming if you’re doing everything manually: installing packages, configuring environments, copying SSH keys, and more. With cloud-init, you can automate these tasks and launch development-ready instances from the start.Gcore Edge Cloud VMs support cloud-init out of the box. With a simple YAML script, you can automatically set up a development-ready instance at boot, whether you’re launching a single machine or spinning up a fleet.In this guide, we’ll walk through how to use cloud-init on Gcore Edge Cloud to:Set a passwordInstall packages and system updatesAdd users and SSH keysMount disks and write filesRegister services or install tooling like Docker or Node.jsLet’s get started.What is cloud-init?cloud-init is a widely used tool for customizing cloud instances during the first boot. It reads user-provided configuration data—usually YAML—and uses it to run commands, install packages, and configure the system. In this article, we will focus on Linux-based virtual machines.How to use cloud-init on GcoreFor Gcore Cloud VMs, cloud-init scripts are added during instance creation using the User data field in the UI or API.Step 1: Create a basic scriptStart with a simple YAML script. Here’s one that updates packages and installs htop:#cloud-config package_update: true packages: - htop Step 2: Launch a new VM with your scriptGo to the Gcore Customer Portal, navigate to VMs, and start creating a new instance (or just click here). When you reach the Additional options section, enable the User data option. Then, paste in your YAML cloud-init script.Once the VM boots, it will automatically run the script. This works the same way for all supported Linux distributions available through Gcore.3 real-world examplesLet’s look at three examples of how you can use this.Example 1: Add a password for a specific userThe below script sets the for the default user of the selected operating system:#cloud-config password: <password> chpasswd: {expire: False} ssh_pwauth: True Example 2: Dev environment with Docker and GitThe following script does the following:Installs Docker and GitAdds a new user devuser with sudo privilegesAuthorizes an SSH keyStarts Docker at boot#cloud-config package_update: true packages: - docker.io - git users: - default - name: devuser sudo: ALL=(ALL) NOPASSWD:ALL groups: docker shell: /bin/bash ssh-authorized-keys: - ssh-rsa AAAAB3Nza...your-key-here runcmd: - systemctl enable docker - systemctl start docker Example 3: Install Node.js and clone a repoThis script installs Node.js and clones a GitHub repo to your Gcore VM at launch:#cloud-config packages: - curl runcmd: - curl -fsSL https://deb.nodesource.com/setup_18.x | bash - - apt-get install -y nodejs - git clone https://github.com/example-user/dev-project.git /home/devuser/project Reusing and versioning your scriptsTo avoid reinventing the wheel, keep your cloud-init scripts:In version control (e.g., Git)Templated for different environments (e.g., dev vs staging)Modular so you can reuse base blocks across projectsYou can also use tools like Ansible or Terraform with cloud-init blocks to standardize provisioning across your team or multiple Gcore VM environments.Debugging cloud-initIf your script doesn’t behave as expected, SSH into the instance and check the cloud-init logs:sudo cat /var/log/cloud-init-output.log This file shows each command as it ran and any errors that occurred.Other helpful logs:/var/log/cloud-init.log /var/lib/cloud/instance/user-data.txt Pro tip: Echo commands or write log files in your script to help debug tricky setups—especially useful if you’re automating multi-node workflows across Gcore Cloud.Tips and best practicesIndentation matters! YAML is picky. Use spaces, not tabs.Always start the file with #cloud-config.runcmd is for commands that run at the end of boot.Use write_files to write configs, env variables, or secrets.Cloud-init scripts only run on the first boot. To re-run, you’ll need to manually trigger cloud-init or re-create the VM.Automate it all with GcoreIf you're provisioning manually, you're doing it wrong. Cloud-init lets you treat your VM setup as code: portable, repeatable, and testable. Whether you’re spinning up ephemeral dev boxes or preparing staging environments, Gcore’s support for cloud-init means you can automate it all.For more on managing virtual machines with Gcore, check out our product documentation.Explore Gcore VM product docs

How to cut egress costs and speed up delivery using Gcore CDN and Object Storage

If you’re serving static assets (images, videos, scripts, downloads) from object storage, you’re probably paying more than you need to, and your users may be waiting longer than they should.In this guide, we explain how to front your bucket with Gcore CDN to cache static assets, cut egress bandwidth costs, and get faster TTFB globally. We’ll walk through setup (public or private buckets), signed URL support, cache control best practices, debugging tips, and automation with the Gcore API or Terraform.Why bother?Serving directly from object storage hits your origin for every request and racks up egress charges. With a CDN in front, cached files are served from edge—faster for users, and cheaper for you.Lower TTFB, better UXWhen content is cached at the edge, it doesn’t have to travel across the planet to get to your user. Gcore CDN caches your assets at PoPs close to end users, so requests don’t hit origin unless necessary. Once cached, assets are delivered in a few milliseconds.Lower billsMost object storage providers charge $80–$120 per TB in egress fees. By fronting your storage with a CDN, you only pay egress once per edge location—then it’s all cache hits after that. If you’re using Gcore Storage and Gcore CDN, there’s zero egress fee between the two.Caching isn’t the only way you save. Gcore CDN can also compress eligible file types (like HTML, CSS, JavaScript, and JSON) on the fly, further shrinking bandwidth usage and speeding up file delivery—all without any changes to your storage setup.Less origin traffic and less data to transfer means smaller bills. And your storage bucket doesn’t get slammed under load during traffic spikes.Simple scaling, globallyThe CDN takes the hit, not your bucket. That means fewer rate-limit issues, smoother traffic spikes, and more reliable performance globally. Gcore CDN spans the globe, so you’re good whether your users are in Tokyo, Toronto, or Tel Aviv.Setup guide: Gcore CDN + Gcore Object StorageLet’s walk through configuring Gcore CDN to cache content from a storage bucket. This works with Gcore Object Storage and other S3-compatible services.Step 1: Prep your bucketPublic? Check files are publicly readable (via ACL or bucket policy).Private? Use Gcore’s AWS Signature V4 support—have your access key, secret, region, and bucket name ready.Gcore Object Storage URL format: https://<bucket-name>.<region>.cloud.gcore.lu/<object> Step 2: Create CDN resource (UI or API)In the Gcore Customer Portal:Go to CDN > Create CDN ResourceChoose "Accelerate and protect static assets"Set a CNAME (e.g. cdn.yoursite.com) if you want to use your domainConfigure origin:Public bucket: Choose None for authPrivate bucket: Choose AWS Signature V4, and enter credentialsChoose HTTPS as the origin protocolGcore will assign a *.gcdn.co domain. If you’re using a custom domain, add a CNAME: cdn.yoursite.com CNAME .gcdn.co Here’s how it works via Terraform: resource "gcore_cdn_resource" "cdn" { cname = "cdn.yoursite.com" origin_group_id = gcore_cdn_origingroup.origin.id origin_protocol = "HTTPS" } resource "gcore_cdn_origingroup" "origin" { name = "my-origin-group" origin { source = "mybucket.eu-west.cloud.gcore.lu" enabled = true } } Step 3: Set caching behaviorSet Cache-Control headers in your object metadata: Cache-Control: public, max-age=2592000 Too messy to handle in storage? Override cache logic in Gcore:Force TTLs by path or extensionIgnore or forward query strings in cache keyStrip cookies (if unnecessary for cache decisions)Pro tip: Use versioned file paths (/img/logo.v3.png) to bust cache safely.Secure access with signed URLsWant your assets to be private, but still edge-cacheable? Use Gcore’s Secure Token feature:Enable Secure Token in CDN settingsSet a secret keyGenerate time-limited tokens in your appPython example: import base64, hashlib, time secret = 'your_secret' path = '/videos/demo.mp4' expires = int(time.time()) + 3600 string = f"{expires}{path} {secret}" token = base64.urlsafe_b64encode(hashlib.md5(string.encode()).digest()).decode().strip('=') url = f"https://cdn.yoursite.com{path}?md5={token}&expires={expires}" Signed URLs are verified at the CDN edge. Invalid or expired? Blocked before origin is touched.Optional: Bind the token to an IP to prevent link sharing.Debug and cache tuneUse curl or browser devtools: curl -I https://cdn.yoursite.com/img/logo.png Look for:Cache: HIT or MISSCache-ControlX-Cached-SinceCache not working? Check for the following errors:Origin doesn’t return Cache-ControlCDN override TTL not appliedCache key includes query strings unintentionallyYou can trigger purges from the Gcore Customer Portal or automate them via the API using POST /cdn/purge. Choose one of three ways:Purge all: Clear the entire domain’s cache at once.Purge by URL: Target a specific full path (e.g., /images/logo.png).Purge by pattern: Target a set of files using a wildcard at the end of the pattern (e.g., /videos/*).Monitor and optimize at scaleAfter rollout:Watch origin bandwidth dropCheck hit ratio (aim for >90%)Audit latency (TTFB on HIT vs MISS)Consider logging using Gcore’s CDN logs uploader to analyze cache behavior, top requested paths, or cache churn rates.For maximum savings, combine Gcore Object Storage with Gcore CDN: egress traffic between them is 100% free. That means you can serve cached assets globally without paying a cent in bandwidth fees.Using external storage? You’ll still slash egress costs by caching at the edge and cutting direct origin traffic—but you’ll unlock the biggest savings when you stay inside the Gcore ecosystem.Save money and boost performance with GcoreStill serving assets direct from storage? You’re probably wasting money and compromising performance on the table. Front your bucket with Gcore CDN. Set smart cache headers or use overrides. Enable signed URLs if you need control. Monitor cache HITs and purge when needed. Automate the setup with Terraform. Done.Next steps:Create your CDN resourceUse private object storage with Signature V4Secure your CDN with signed URLsCreate a free CDN resource now

Bare metal vs. virtual machines: performance, cost, and use case comparison

Choosing the right type of server infrastructure is critical to how your application performs, scales, and fits your budget. For most workloads, the decision comes down to two core options: bare metal servers and virtual machines (VMs). Both can be deployed in the cloud, but they differ significantly in terms of performance, control, scalability, and cost.In this article, we break down the core differences between bare metal and virtual servers, highlight when to choose each, and explain how Gcore can help you deploy the right infrastructure for your needs. If you want to learn about either BM or VMs in detail, we’ve got articles for those: here’s the one for bare metal, and here’s a deep dive into virtual machines.Bare metal vs. virtual machines at a glanceWhen evaluating whether bare metal or virtual machines are right for your company, consider your specific workload requirements, performance priorities, and business objectives. Here’s a quick breakdown to help you decide what works best for you.FactorBare metal serversVirtual machinesPerformanceDedicated resources; ideal for high-performance workloadsShared resources; suitable for moderate or variable workloadsScalabilityOften requires manual scaling; less flexibleHighly elastic; easy to scale up or downCustomizationFull control over hardware, OS, and configurationLimited by hypervisor and provider’s environmentSecurityIsolated by default; no hypervisor layerShared environment with strong isolation protocolsCostHigher upfront cost; dedicated hardwarePay-as-you-go pricing; cost-effective for flexible workloadsBest forHPC, AI/ML, compliance-heavy workloadsStartups, dev/test, fast-scaling applicationsAll about bare metal serversA bare metal server is a single-tenant physical server rented from a cloud provider. Unlike virtual servers, the hardware is not shared with other users, giving you full access to all resources and deeper control over configurations. You get exclusive access and control over the hardware via the cloud provider, which offers the stability and security needed for high-demand applications.The benefits of bare metal serversHere are some of the business advantages of opting for a bare metal server:Maximized performance: Because they are dedicated resources, bare metal servers provide top-tier performance without sharing processing power, memory, or storage with other users. This makes them ideal for resource-intensive applications like high-performance computing (HPC), big data processing, and game hosting.Greater control: Since you have direct access to the hardware, you can customize the server to meet your specific requirements. This is especially important for businesses with complex, specialized needs that require fine-tuned configurations.High security: Bare metal servers offer a higher level of security than their alternatives due to the absence of virtualization. With no shared resources or hypervisor layer, there’s less risk of vulnerabilities that come with multi-tenant environments.Dedicated resources: Because you aren’t sharing the server with other users, all server resources are dedicated to your application so that you consistently get the performance you need.Who should use bare metal servers?Here are examples of instances where bare metal servers are the best option for a business:High-performance computing (HPC)Big data processing and analyticsResource-intensive applications, such as AI/ML workloadsGame and video streaming serversBusinesses requiring enhanced security and complianceAll about virtual machinesA virtual server (or virtual machine) runs on top of a physical server that’s been partitioned by a cloud provider using a hypervisor. This allows multiple VMs to share the same hardware while remaining isolated from each other.Unlike bare metal servers, virtual machines share the underlying hardware with other cloud provider customers. That means you’re using (and paying for) part of one server, providing cost efficiency and flexibility.The benefits of virtual machinesHere are some advantages of using a shared virtual machine:Scalability: Virtual machines are ideal for businesses that need to scale quickly and are starting at a small scale. With cloud-based virtualization, you can adjust your server resources (CPU, memory, storage) on demand to match changing workloads.Cost efficiency: You pay only for the resources you use with VMs, making them cost-effective for companies with fluctuating resource needs, as there is no need to pay for unused capacity.Faster deployment: VMs can be provisioned quickly and easily, which makes them ideal for anyone who wants to deploy new services or applications fast.Who should use virtual machines?VMs are a great fit for the following:Web hosting and application hostingDevelopment and testing environmentsRunning multiple apps with varying demandsStartups and growing businesses requiring scalabilityBusinesses seeking cost-effective, flexible solutionsWhich should you choose?There’s no one-size-fits-all answer. Your choice should depend on the needs of your workload:Choose bare metal if you need dedicated performance, low-latency access to hardware, or tighter control over security and compliance.Choose virtual servers if your priority is flexible scaling, faster deployment, and optimized cost.If your application uses GPU-based inference or AI training, check out our dedicated guide to VM vs. BM for AI workloads.Get started with Gcore BM or VMs todayAt Gcore, we provide both bare metal and virtual machine solutions, offering flexibility, performance, and reliability to meet your business needs. Gcore Bare Metal has the power and reliability needed for demanding workloads, while Gcore Virtual Machines offers customizable configurations, free egress traffic, and flexibility.Compare Gcore BM and VM pricing now

Optimize your workload: a guide to selecting the best virtual machine configuration

Virtual machines (VMs) offer the flexibility, scalability, and cost-efficiency that businesses need to optimize workloads. However, choosing the wrong setup can lead to poor performance, wasted resources, and unnecessary costs.In this guide, we’ll walk you through the essential factors to consider when selecting the best virtual machine configuration for your specific workload needs.﹟1 Understand your workload requirementsThe first step in choosing the right virtual machine configuration is understanding the nature of your workload. Workloads can range from light, everyday tasks to resource-intensive applications. When making your decision, consider the following:Compute-intensive workloads: Applications like video rendering, scientific simulations, and data analysis require a higher number of CPU cores. Opt for VMs with multiple processors or CPUs for smoother performance.Memory-intensive workloads: Databases, big data analytics, and high-performance computing (HPC) jobs often need more RAM. Choose a VM configuration that provides sufficient memory to avoid memory bottlenecks.Storage-intensive workloads: If your workload relies heavily on storage, such as file servers or applications requiring frequent read/write operations, prioritize VM configurations that offer high-speed storage options, such as SSDs or NVMe.I/O-intensive workloads: Applications that require frequent network or disk I/O, such as cloud services and distributed applications, benefit from VMs with high-bandwidth and low-latency network interfaces.﹟2 Consider VM size and scalabilityOnce you understand your workload’s requirements, the next step is to choose the right VM size. VM sizes are typically categorized by the amount of CPU, memory, and storage they offer.Start with a baseline: Select a VM configuration that offers a balanced ratio of CPU, RAM, and storage based on your workload type.Scalability: Choose a VM size that allows you to easily scale up or down as your needs change. Many cloud providers offer auto-scaling capabilities that adjust your VM’s resources based on real-time demand, providing flexibility and cost savings.Overprovisioning vs. underprovisioning: Avoid overprovisioning (allocating excessive resources) unless your workload demands peak capacity at all times, as this can lead to unnecessary costs. Similarly, underprovisioning can affect performance, so finding the right balance is essential.﹟3 Evaluate CPU and memory considerationsThe central processing unit (CPU) and memory (RAM) are the heart of a virtual machine. The configuration of both plays a significant role in performance. Workloads that need high processing power, such as video encoding, machine learning, or simulations, will benefit from VMs with multiple CPU cores. However, be mindful of CPU architecture—look for VMs that offer the latest processors (e.g., Intel Xeon, AMD EPYC) for better performance per core.It’s also important that the VM has enough memory to avoid paging, which occurs when the system uses disk space as virtual memory, significantly slowing down performance. Consider a configuration with more RAM and support for faster memory types like DDR4 for memory-heavy applications.﹟4 Assess storage performance and capacityStorage performance and capacity can significantly impact the performance of your virtual machine, especially for applications requiring large data volumes. Key considerations include:Disk type: For faster read/write operations, opt for solid-state drives (SSDs) over traditional hard disk drives (HDDs). Some cloud providers also offer NVMe storage, which can provide even greater speed for highly demanding workloads.Disk size: Choose the right size based on the amount of data you need to store and process. Over-allocating storage space might seem like a safe bet, but it can also increase costs unnecessarily. You can always resize disks later, so avoid over-allocating them upfront.IOPS and throughput: Some workloads require high input/output operations per second (IOPS). If this is a priority for your workload (e.g., databases), make sure that your VM configuration includes high IOPS storage options.﹟5 Weigh up your network requirementsWhen working with cloud-based VMs, network performance is a critical consideration. High-speed and low-latency networking can make a difference for applications such as online gaming, video conferencing, and real-time analytics.Bandwidth: Check whether the VM configuration offers the necessary bandwidth for your workload. For applications that handle large data transfers, such as cloud backup or file servers, make sure that the network interface provides high throughput.Network latency: Low latency is crucial for applications where real-time performance is key (e.g., trading systems, gaming). Choose VMs with low-latency networking options to minimize delays and improve the user experience.Network isolation and security: Check if your VM configuration provides the necessary network isolation and security features, especially when handling sensitive data or operating in multi-tenant environments.﹟6 Factor in cost considerationsWhile it’s essential that your VM has the right configuration, cost is always an important factor to consider. Cloud providers typically charge based on the resources allocated, so optimizing for cost efficiency can significantly impact your budget.Consider whether a pay-as-you-go or reserved model (which offers discounted rates in exchange for a long-term commitment) fits your usage pattern. The reserved option can provide significant savings if your workload runs continuously. You can also use monitoring tools to track your VM’s performance and resource usage over time. This data will help you make informed decisions about scaling up or down so you’re not paying for unused resources.﹟7 Evaluate security featuresSecurity is a primary concern when selecting a VM configuration, especially for workloads handling sensitive data. Consider the following:Built-in security: Look for VMs that offer integrated security features such as DDoS protection, web application firewall (WAF), and encryption.Compliance: Check that the VM configuration meets industry standards and regulations, such as GDPR, ISO 27001, and PCI DSS.Network security: Evaluate the VM's network isolation capabilities and the availability of cloud firewalls to manage incoming and outgoing traffic.﹟8 Consider geographic locationThe geographic location of your VM can impact latency and compliance. Therefore, it’s a good idea to choose VM locations that are geographically close to your end users to minimize latency and improve performance. In addition, it’s essential to select VM locations that comply with local data sovereignty laws and regulations.﹟9 Assess backup and recovery optionsBackup and recovery are critical for maintaining data integrity and availability. Look for VMs that offer automated backup solutions so that data is regularly saved. You should also evaluate disaster recovery capabilities, including the ability to quickly restore data and applications in case of failure.﹟10 Test and iterateFinally, once you've chosen a VM configuration, testing its performance under real-world conditions is essential. Most cloud providers offer performance monitoring tools that allow you to assess how well your VM is meeting your workload requirements.If you notice any performance bottlenecks, be prepared to adjust the configuration. This could involve increasing CPU cores, adding more memory, or upgrading storage. Regular testing and fine-tuning means that your VM is always optimized.Choosing a virtual machine that suits your requirementsSelecting the best virtual machine configuration is a key step toward optimizing your workloads efficiently, cost-effectively, and without unnecessary performance bottlenecks. By understanding your workload’s needs, considering factors like CPU, memory, storage, and network performance, and continuously monitoring resource usage, you can make informed decisions that lead to better outcomes and savings.Whether you're running a small application or large-scale enterprise software, the right VM configuration can significantly improve performance and cost. Gcore offers a wide range of virtual machine options that can meet your unique requirements. Our virtual machines are designed to meet diverse workload requirements, providing dedicated vCPUs, high-speed storage, and low-latency networking across 30+ global regions. You can scale compute resources on demand, benefit from free egress traffic, and enjoy flexible pricing models by paying only for the resources in use, maximizing the value of your cloud investments.Contact us to discuss your VM needs

How to get the size of a directory in Linux

Understanding how to check directory size in Linux is critical for managing storage space efficiently. Understanding this process is essential whether you’re assessing specific folder space or preventing storage issues.This comprehensive guide covers commands and tools so you can easily calculate and analyze directory sizes in a Linux environment. We will guide you step-by-step through three methods: du, ncdu, and ls -la. They’re all effective and each offers different benefits.What is a Linux directory?A Linux directory is a special type of file that functions as a container for storing files and subdirectories. It plays a key role in organizing the Linux file system by creating a hierarchical structure. This arrangement simplifies file management, making it easier to locate, access, and organize related files. Directories are fundamental components that help ensure smooth system operations by maintaining order and facilitating seamless file access in Linux environments.#1 Get Linux directory size using the du commandUsing the du command, you can easily determine a directory’s size by displaying the disk space used by files and directories. The output can be customized to be presented in human-readable formats like kilobytes (KB), megabytes (MB), or gigabytes (GB).Check the size of a specific directory in LinuxTo get the size of a specific directory, open your terminal and type the following command:du -sh /path/to/directoryIn this command, replace /path/to/directory with the actual path of the directory you want to assess. The -s flag stands for “summary” and will only display the total size of the specified directory. The -h flag makes the output human-readable, showing sizes in a more understandable format.Example: Here, we used the path /home/ubuntu/, where ubuntu is the name of our username directory. We used the du command to retrieve an output of 32K for this directory, indicating a size of 32 KB.Check the size of all directories in LinuxTo get the size of all files and directories within the current directory, use the following command:sudo du -h /path/to/directoryExample: In this instance, we again used the path /home/ubuntu/, with ubuntu representing our username directory. Using the command du -h, we obtained an output listing all files and directories within that particular path.#2 Get Linux directory size using ncduIf you’re looking for a more interactive and feature-rich approach to exploring directory sizes, consider using the ncdu (NCurses Disk Usage) tool. ncdu provides a visual representation of disk usage and allows you to navigate through directories, view size details, and identify large files with ease.For Debian or Ubuntu, use this command:sudo apt-get install ncduOnce installed, run ncdu followed by the path to the directory you want to analyze:ncdu /path/to/directoryThis will launch the ncdu interface, which shows a breakdown of file and subdirectory sizes. Use the arrow keys to navigate and explore various folders, and press q to exit the tool.Example: Here’s a sample output of using the ncdu command to analyze the home directory. Simply enter the ncdu command and press Enter. The displayed output will look something like this:#3 Get Linux directory size using 1s -1aYou can alternatively opt to use the ls command to list the files and directories within a directory. The options -l and -a modify the default behavior of ls as follows:-l (long listing format)Displays the detailed information for each file and directoryShows file permissions, the number of links, owner, group, file size, the timestamp of the last modification, and the file/directory name-a (all files)Instructs ls to include all files, including hidden files and directoriesIncludes hidden files on Linux that typically have names beginning with a . (dot)ls -la lists all files (including hidden ones) in long format, providing detailed information such as permissions, owner, group, size, and last modification time. This command is especially useful when you want to inspect file attributes or see hidden files and directories.Example: When you enter ls -la command and press Enter, you will see an output similar to this:Each line includes:File type and permissions (e.g., drwxr-xr-x):The first character indicates the file type- for a regular filed for a directoryl for a symbolic linkThe next nine characters are permissions in groups of three (rwx):r = readw = writex = executePermissions are shown for three classes of users: owner, group, and others.Number of links (e.g., 2):For regular files, this usually indicates the number of hard linksFor directories, it often reflects subdirectory links (e.g., the . and .. entries)Owner and group (e.g., user group)File size (e.g., 4096 or 1045 bytes)Modification date and time (e.g., Jan 7 09:34)File name (e.g., .bashrc, notes.txt, Documents):Files or directories that begin with a dot (.) are hidden (e.g., .bashrc)ConclusionThat’s it! You can now determine the size of a directory in Linux. Measuring directory sizes is a crucial skill for efficient storage management. Whether you choose the straightforward du command, use the visual advantages of the ncdu tool, or opt for the versatility of ls -la, this expertise enhances your ability to uphold an organized and efficient Linux environment.Looking to deploy Linux in the cloud? With Gcore Edge Cloud, you can choose from a wide range of pre-configured virtual machines suitable for Linux:Affordable shared compute resources starting from €3.2 per monthDeploy across 50+ cloud regions with dedicated servers for low-latency applicationsSecure apps and data with DDoS protection, WAF, and encryption at no additional costGet started today

How to Run Hugging Face Spaces on Gcore Inference at the Edge

Running machine learning models, especially large-scale models like GPT 3 or BERT, requires a lot of computing power and comes with a lot of latency. This makes real-time applications resource-intensive and challenging to deliver. Running ML models at the edge is a lightweight approach offering significant advantages for latency, privacy, and resource optimization.  Gcore Inference at the Edge makes it simple to deploy and manage custom models efficiently, giving you the ability to deploy and scale your favorite Hugging Face models globally in just a few clicks. In this guide, we’ll walk you through how easy it is to harness the power of Gcore’s edge AI infrastructure to deploy a Hugging Face Space model. Whether you’re developing NLP solutions or cutting-edge computer vision applications, deploying at the edge has never been simpler—or more powerful. Step 1: Log In to the Gcore Customer PortalGo to gcore.com and log in to the Gcore Customer Portal. If you don’t yet have an account, go ahead and create one—it’s free. Step 2: Go to Inference at the EdgeIn the Gcore Customer Portal, click Inference at the Edge from the left navigation menu. Then click Deploy custom model. Step 3: Choose a Hugging Face ModelOpen huggingface.com and browse the available models. Select the model you want to deploy. Navigate to the corresponding Hugging Face Space for the model. Click on Files in the Space and locate the Docker option. Copy the Docker image link and startup command from Hugging Face Space. Step 4: Deploy the Model on GcoreReturn to the Gcore Customer Portal deployment page and enter the following details: Model image URL: registry.hf.space/ethux-mistral-pixtral-demo:latest Startup command: python app.py Container port: 7860 Configure the pod as follows: GPU-optimized: 1x L40S vCPUs: 16 RAM: 232GiB For optimal performance, choose any available region for routing placement. Name your deployment and click Deploy.Step 5: Interact with Your ModelOnce the model is up and running, you’ll be provided with an endpoint. You can now interact with the model via this endpoint to test and use your deployed model at the edge.Powerful, Simple AI Deployment with GcoreGcore Inference at the Edge is the future of AI deployment, combining the ease of Hugging Face integration with the robust infrastructure needed for real-time, scalable, and global solutions. By leveraging edge computing, you can optimize model performance and simultaneously futureproof your business in a world that increasingly demands fast, secure, and localized AI applications. Deploying models to the edge allows you to capitalize on real-time insights, improve customer experiences, and outpace your competitors. Whether you’re leading a team of developers or spearheading a new AI initiative, Gcore Inference at the Edge offers the tools you need to innovate at the speed of tomorrow. Explore Gcore Inference at the Edge

Subscribe to our newsletter

Get the latest industry trends, exclusive insights, and Gcore updates delivered straight to your inbox.