Radar has landed - discover the latest DDoS attack trends. Get ahead, stay protected.Get the report
Under attack?

Products

Solutions

Resources

Partners

Why Gcore

  1. Home
  2. Developers
  3. Integrating Ansible and Docker for a CI/CD Pipeline Using Jenkins

Integrating Ansible and Docker for a CI/CD Pipeline Using Jenkins

  • By Gcore
  • April 12, 2023
  • 10 min read
Integrating Ansible and Docker for a CI/CD Pipeline Using Jenkins

In this guide, we will use Ansible as a Deployment tool in a Continuous Integration/Continuous Deployment process using Jenkins Job.

In the world of CI/CD process, Jenkins is a popular tool for provisioning development/production environments as well as application deployment through pipeline flow. Still, sometimes, it gets overwhelming to maintain the application’s status, and script reusability becomes harder as the project grows.

To overcome this limitation, Ansible plays an integral part as a shell script executor, which enables Jenkins to execute the workflow of a process.

Let us begin the guide by installing Ansible on our Control node.

Install and Configure Ansible

Installing Ansible:
Here we are using CentOS 8 as our Ansible Control Node. To install Ansible, we are going to use python2-pip, and to do so, first, we have to install python2. Use the below-mentioned command to do so:

# sudo yum update# sudo yum install python2

After Python is installed on the system, use pip2 command to install Ansible on the Control Node:

# sudo pip2 install ansible# sudo pip2 install docker

It might take a minute or two to complete the installation, so sit tight. Once the installation is complete, verify:

# ansible --version ansible 2.9.4  config file = None  configured module search path = [u'/root/.ansible/plugins/modules', u'/usr/share/ansible/plugins/modules']  ansible python module location = /usr/lib/python2.7/site-packages/ansible  executable location = /usr/bin/ansible  python version = 2.7.16 (default, Nov 17 2019, 00:07:27) [GCC 8.3.1 20190507 (Red Hat 8.3.1-4)]

Through the above command, we notice that the config file path is missing, which we will create and configure later. For now, let’s move to the next section.

Configuring Ansible Control Node User:
The first thing we are going to do is create a user named ansadmin, as it is considered the best practice. So let’s create a user, by using the command adduser, which will create a new user to our system:

# useradd ansadmin

Now, use the passwd command to update the ansadmin user’s password. Make sure that you use a strong password.

# passwd ansadminChanging password for user ansadmin.New password: Retype new password: passwd: all authentication tokens updated successfully.

Copy the password for user ansadmin and save it somewhere safe.

Once we have created the user, it’s time to grant sudo access to it, so it doesn’t ask for a password when we log in as root. To do so, follow the below-mentioned steps:

# nano /etc/sudoers

Go to the end of the file and paste the below-mentioned line as it is:

...ansadmin ALL=(ALL)       NOPASSWD: ALL...

Before moving forward, we have one last thing to do. By default, SSH password authentication is disabled in our instance. To enable it, follow the below-mentioned steps:

# nano /etc/ssh/sshd_config

Find PasswordAuthentication, uncomment it and replace no with yes, as shown below:

...PasswordAuthentication yes...

You will see why we are doing this in the next few steps. To reflect changes, reload the ssh service:

# service sshd reload

Now, log in as an ansadmin user on your Control Node and generate ssh key, which we will use to connect with our remote or managed host. To generate the private and public key, follow the below-mentioned commands:

# su - ansadmin

Use ssh-keygen command to generate key:

# ssh-keygenEnter file in which to save the key (/home/ansadmin/.ssh/id_rsa): ansible-CN   Enter passphrase (empty for no passphrase): Enter same passphrase again: Your identification has been saved in ansible-CN.Your public key has been saved in ansible-CN.pub.The key fingerprint is:SHA256:6G0xzIrIsmsBwCakACI8CVr8AOuRR8v5F1p2+CsB6EY ansadmin@ansible-hostThe key's randomart image is:+---[RSA 3072]----+|&+o.             ||OO* +   .        ||Bo.E . = .       ||o = o =++        ||.. o o.oS.       || o.. o.o.o.      ||. + . o.o.       || +     ..        ||+.               |+----[SHA256]-----+

Usually, keys are generated in the .ssh/ directory. In our case, you can find keys at /home/ansadmin/.ssh/. Now let us configure our Managed Host for Ansible.

Configuring Ansible Managed Host User:
First, we will create a user on our managed host, so log in to your host and create a user with the same name and password.

As our managed host is an Ubuntu machine, therefore here we have to use the adduser command. Please make sure that the password for the username ansadmin is the same for Control and Managed Host.

# adduser ansadmin# su - ansadmin

Other than this, it is also an excellent thing to cross-check if password authentication is enabled on the Managed Host as we need to copy the ssh public key from the control node to the Managed Host.

Switch to Control Node machine; to copy the public key to our Managed Host machine, we will use the command ssh-copy-id:

$ su - ansadmin$ ssh-copy-id -i .ssh/ansible-CN.pub ansadmin@managed-host-ip-here

For the first time, it will ask for the password. Enter the password for ansadmin, and you are done. Now, if you wish, you can disable Password Authentication on both machines.

Setting Ansible Inventory:
Ansible allows us to manage multiple nodes or hosts at the same time. The default location for the inventory resides in /etc/ansible/hosts. In this file, we can define groups and sub-groups.

If you remember, earlier, the hosts’ file was not created automatically for our Ansible. So let’s create one:

# cd /etc/ansible# touch hosts && nano hosts

Add the following lines in your hosts’ file and save it:

[docker_group]docker_host ansible_host=your-managed-host-ip ansible_user=ansadmin ansible_ssh_private_key_file=/home/ansadmin/.ssh/ansible-CN ansible_python_interpreter=/usr/bin/python3ansible_CN ansible_connection=local

Make sure that you replace your-managed-host-ip with your host IP address.

Let’s break down the basic INI format:

  • docker_group – Heading in brackets is your designated group name.
  • docker_host & ansible_CN – The first hostname is docker_host, which points to our Managed Host. While the second hostname is ansible_CN, which is pointing towards our localhost, to be used in Ad-Hoc commands and Playbooks.
  • ansible_host – Here, you need to specify the IP address of our Managed Host.
  • ansible_user – We mentioned our Ansible user here.
  • ansible_ssh_private_key_file – Add the location of your private key.
  • ansible_python_interpreter – You can specify which Python version you want to use; by default, it will be Python2.
  • ansible_connection – This variable helps Ansible to understand that we are connecting the local machine. It also helps to avoid the SSH error.

It is time to test our Ansible Inventory, which can be done through the following command. Here we are going to use a simple Ansible module PING:

# ansible all -m pingansible_CN | SUCCESS => {    "ansible_facts": {        "discovered_interpreter_python": "/usr/libexec/platform-python"    },     "changed": false,     "ping": "pong"}docker_host | SUCCESS => {    "ansible_facts": {        "discovered_interpreter_python": "/usr/bin/python3"    },     "changed": false,     "ping": "pong"}

It looks like the Ansible system can now communicate with our Managed Host as well as with the localhost.

Install Docker:

We need a Docker ready system to manage our process; for this, we have to install Docker on both systems. So follow the below-mentioned steps:

For CentOS (Control Node):
Run the following command on your Control Node:

# sudo yum install -y yum-utils device-mapper-persistent-data lvm2 # sudo yum-config-manager --add-repo \  https://download.docker.com/linux/centos/docker-ce.repo # sudo yum install docker-ce docker-ce-cli containerd.io

In case you encounter the below-mentioned error during installation:

Error:  Problem: package docker-ce-3:19.03.5-3.el7.x86_64 requires containerd.io >= 1.2.2-3, but none of the providers can be installed

Next, run the following command:

# sudo yum install docker-ce docker-ce-cli containerd.io --nobest

For Ubuntu OS (Managed Host):
Run the following command on your Managed Host, which is a Ubuntu-based machine:

$ sudo apt-get remove docker docker-engine docker.io containerd runc $ sudo apt-get update && sudo apt-get install apt-transport-https ca-certificates curl gnupg-agent software-properties-common$ curl -fsSL https://download.docker.com/linux/ubuntu/gpg | sudo apt-key add -$ sudo apt-get update && sudo apt-get install docker-ce docker-ce-cli containerd.io

That’s it for this section. Next, we are going to cover how to integrate Ansible with Jenkins.

Integrating Ansible with Jenkins:

In this section, we will integrate Ansible with Jenkins. Fire up your Jenkins, go to Dashboard > Manage Jenkins > Manage Plugins > Available and then search for Publish Over SSH as shown in the image below:

Now, go to Configure System and find Publish over SSH; under this section, go to SSH Servers and click on the Add button. Here we are going to add our Docker Server as well as Ansible Server, as shown in the image:

SSH server setting for Docker:

SSH server setting for Ansible:

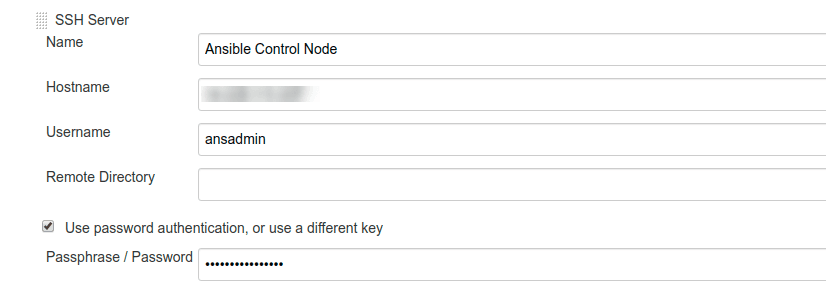
In the Hostname field, add your IP address or domain name of Docker and Ansible server. Before saving the setting, make sure that you test the connection before saving the configuration, by clicking on the Test Configuration button as shown in the image below:
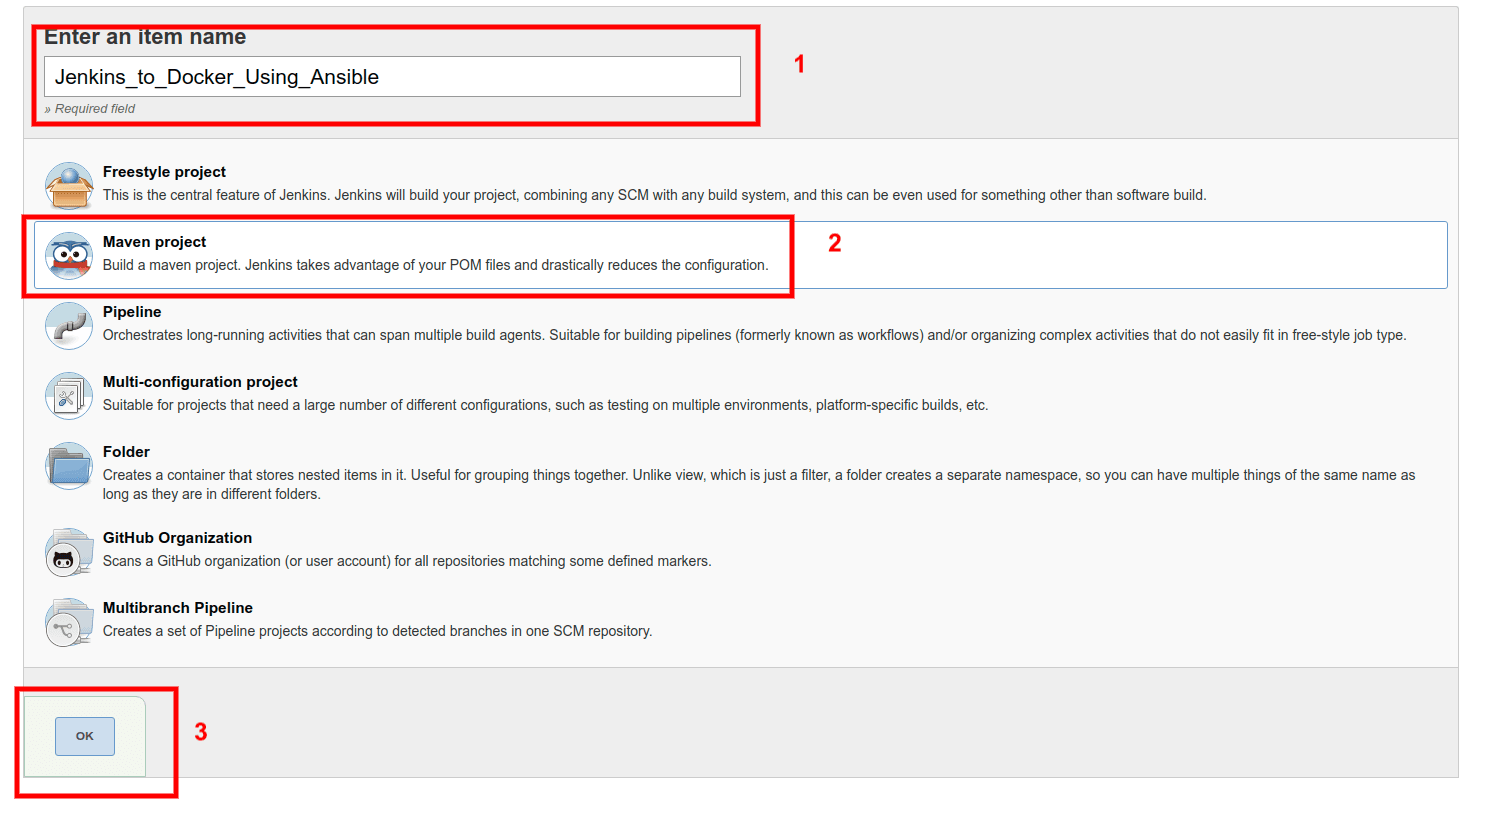
Create Jenkins Job

The next step is to create Jenkins jobs. The sole propose of this Job is to build, test, and upload the artifact to our Ansible Server. Here we are going to create Job as a Maven Project, as shown in the image below:

Next in Job setting page, go to the Source Code Management section and add your Maven project repo URL, as shown in the image below:

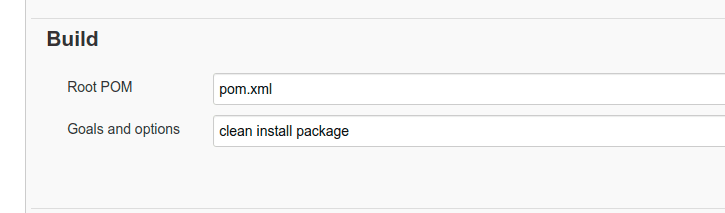
Find the Build section, and in Root POM field enter your pom.xml file name. Additionally in the Goals and options field enter clean install package:

After successful build completion, your goal is to send the war file to the specified directory to your Ansible server with the right permissions so that it doesn’t give us the writing permission by assigning ansadmin to the directory.

Right now, we don’t have such a directory, so let us create one. Follow the below-mentioned steps:

# sudo su# mkdir /opt/docker# chown ansadmin:ansadmin /opt/docker -R# ls -al /opt/docker/total 0drwxr-xr-x. 2 ansadmin ansadmin  6 Jan 31 16:57 .drwxr-xr-x. 4 root     root     38 Jan 31 17:10 ..

Directory /opt/docker will be used as our workspace, where Jenkins will upload the artifacts to Ansible Server.

Now, go to the Post-build Actions section and from the drop-down menu, select Send build artifacts over SSH, as shown in the image below:

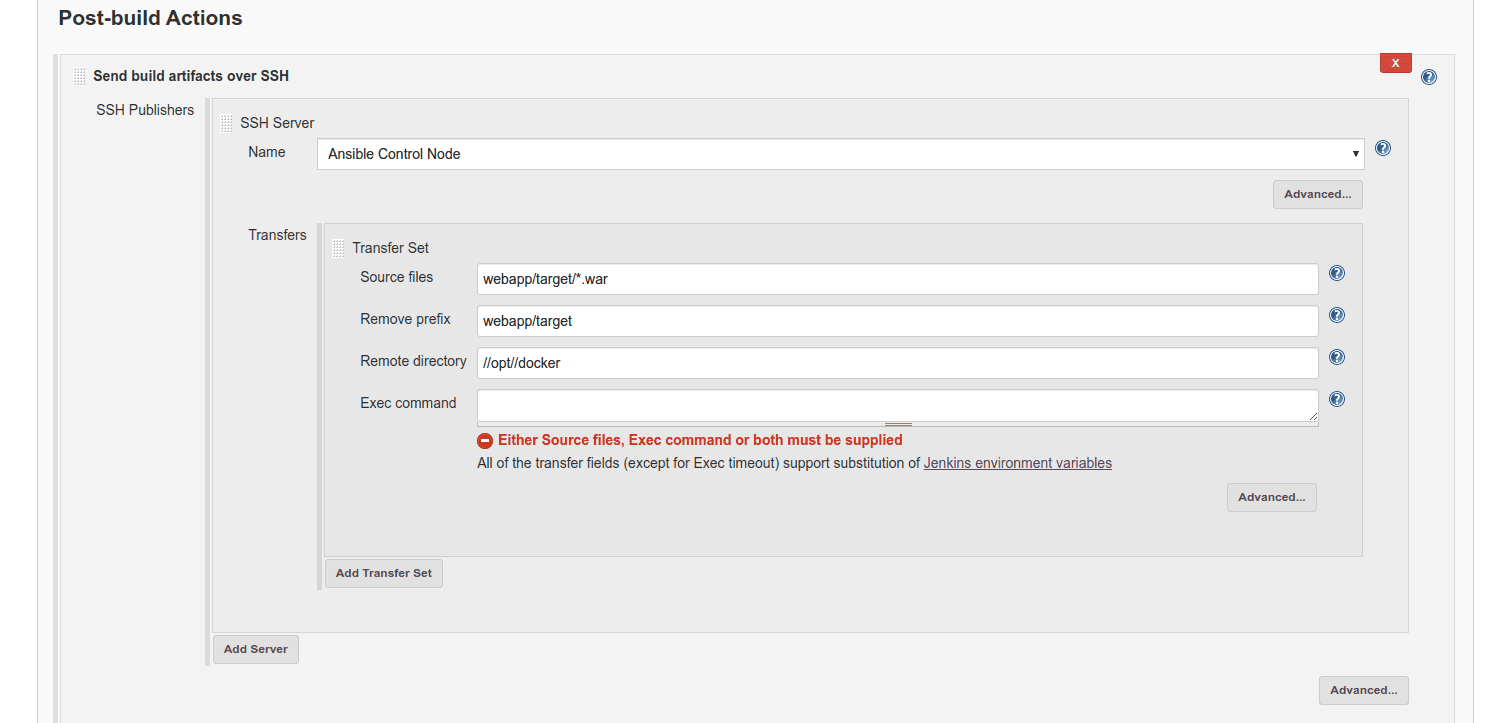
Make sure that in the Remote Directory field, you enter the pattern //opt//docker as it doesn’t support special characters. Apart from this, for now, we are going to leave the Exec Command field empty so that we can test whether our existing configuration works or not.

Now Build the project, and you will see the following output in your Jenkins’s console output:

Go to your Ansible Server terminal and see if the artifact was sent with right user privileges:

# ls -al /opt/docker/total 4drwxr-xr-x. 2 ansadmin ansadmin   24 Feb  3 10:54 .drwxr-xr-x. 4 root     root       38 Jan 31 17:10 ..-rw-rw-r--. 1 ansadmin ansadmin 2531 Feb  3 10:54 webapp.war

It looks like our webapp.war file was transferred successfully. In the following step, we will create an Ansible Playbook and Dockerfile.

Creating Dockerfile and Ansible Playbook:

To create a Docker Image with the webapp.war file, first, we will create a DockerFile. Follow the below-mentioned steps:

First, log in to your Ansible Server and go to directory /opt/docker and create a file named as Dockerfile:

# cd /opt/docker/# touch Dockerfile

Now open the Dockerfile in your preferred editor, and copy the below-mentioned lines and save it:

FROM tomcat:8.5.50-jdk8-openjdkMAINTAINER Your-Name-HereCOPY ./webapp.war /usr/local/tomcat/webapps

Here instructions are to pull a Tomcat image with tag 8.5.50-jdk8-openjdk and copying the webapp.war file to Tomcat default webapp directory., which is /usr/local/tomcat/webapps

With the help of this Dockerfile, we will create a Docker container. So let us create the Ansible Playbook, which will enable us to automate the Docker image build process and later run the Docker container out of it.

We are creating a Ansible Playbook, which does two tasks for us:

  1. Pull Tomcat’s latest version and build an image using webapp.war file.
  2. Run the built image on the desired host.

For this, we are going to create a new YAML format file for your Ansible Playbook:

# nano simple-ansible.yaml

Now copy the below-mentioned line into your simple-ansible.yaml file:

---#Simple Ansible Playbook to build and run a Docker containers - name: Playbook to build and run Docker  hosts: all  become: true  gather_facts: false   tasks:    - name: Build a Docker image using webapp.war file      docker_image:        name: simple-docker-image        build:          path: /opt/docker          pull: false        source: build     - name: Run Docker container using simple-docker-image      docker_container:        name: simple-docker-container        image: simple-docker-image:latest        state: started        recreate: yes        detach: true        ports:          - "8888:8080"

You can get more help here: docker_image and docker_container. Now, as our Playbook is created, we can run a test to see if it works as planned:

# cd /opt/docker# ansible-playbook simple-ansible-playbook.yaml --limit ansible_CN

Here we have used the --limit flag, which means it will only run on our Ansible Server (Control Node). You might see the following output, in your terminal window:

PLAY [Playbook to build and run Docker] *************************************************************************** TASK [Build Docker image using webapp.war file] ***************************************************************************changed: [ansible_CN] TASK [Run Docker image using simple-docker-image]***************************************************************************changed: [ansible_CN] PLAY RECAP ***************************************************************************ansible_CN                 : ok=2    changed=2    unreachable=0    failed=0    skipped=0    rescued=0    ignored=0

Look’s like Playbook ran sccessfully and no error was detected during the Ansible Playbook check, so now we can move to Jenkins to complete our CI/CD process using Ansible.

Run Ansible Playbook using Jenkins

In this step, we would execute our Ansible Playbook (i.e., simple-ansible-playbook.yaml) file, and to do so let us go back to the Project Configuration page in Jenkins and find Post-build Actions there.

In this section, copy the below-mentioned command in the Exec command field:

sudo ansible-playbook --limit ansible_CN /opt/docker/simple-ansible-playbook.yaml;

Now, let us try to build the project and see the Jenkins Job’s console output:

In the output, you can see that our Ansible playbook ran successfully. Let us verify if at Ansible Server the image is created and the container is running:

For Docker Image list:

# docker images REPOSITORY            TAG                 IMAGE ID            CREATED             SIZEsimple-docker-image   latest              d47875d99095        32 seconds ago      507MBtomcat                latest              5692d26ea179        15 hours ago        507MB

For Docker Container list:

# docker psCONTAINER ID        IMAGE                        COMMAND             CREATED             STATUS              PORTS                    NAMES5a824d0a43d5        simple-docker-image:latest   "catalina.sh run"   15 seconds ago      Up 14 seconds       0.0.0.0:8888->8080/tcp   simple-docker-container

It looks like Jenkins was able to run the Ansible Playbook successfully. Next, we are going to push Docker Image to Docker Hub.

Pushing Docker Image to Docker Hub Using Ansible

We are going to use Docker Hub public repository for this guide; in case you want to work on a live project, then you should consider using the Docker Hub private registry.

For this step, you have to create a Docker Hub account if you haven’t had one yet.

Our end goal for this step is to publish the Docker Image to Docker Hub using Ansible Playbook. So go to your Ansible Control Node and follow the below-mentioned steps:

# docker login Login with your Docker ID to push and pull images from Docker Hub. If you don't have a Docker ID, head over to https://hub.docker.com to create one.Username: your-docker-hub-userPassword: WARNING! Your password will be stored unencrypted in /root/.docker/config.json.Configure a credential helper to remove this warning. Seehttps://docs.docker.com/engine/reference/commandline/login/#credentials-store Login Succeeded

Make sure that you enter the right username and password.

Now it’s time to create a new Ansible Playbook which will build and push the Docker image to your Docker Hub account. Note that this image will be publicly available, so be cautious.

# nano build-push.yaml

Create a new Ansible Playbook, which will build a Docker image and push it to our Docker Hub account:

---#Simple Ansible Playbook to build and push Docker image to Registry - name: Playbook to build and run Docker  hosts: ansible_CN  become: true  gather_facts: false   tasks:    - name: Delete existing Docker images from the Control Node      shell: docker rmi $(docker images -q) -f       ignore_errors: yes     - name: Push Docker image to Registry      docker_image:        name: simple-docker-image        build:          path: /opt/docker          pull: true        state: present        tag: "latest"        force_tag: yes        repository: gauravsadawarte/simple-docker-image:latest        push: yes        source: build

Let us run the playbook now and see what we get:

# ansible-playbook --limit ansible_CN build-push.yaml PLAY [Playbook to build and run Docker] ***************************************************************************************** TASK [Push Docker image to Registry] *****************************************************************************************changed: [ansible_CN] PLAY RECAP *****************************************************************************************ansible_CN                 : ok=1    changed=1    unreachable=0    failed=0    skipped=0    rescued=0    ignored=0

Go to your Docker Hub account and see if the image was pushed successfully, as shown in the image below:

Next, let us modify our simple-ansible-playbook.yaml playbook, which we created earlier, as from here on, we are going to pull the Docker image from Docker Hub Account and create a container out of it.

---#Simple Ansible Playbook to pull Docker Image from the registry and run a Docker containers - import_playbook: build-push.yaml - name: Playbook to build and run Docker  hosts: docker_host  gather_facts: false   tasks:    - name: Run Docker container using simple-docker-image      docker_container:        name: simple-docker-container        image: gauravsadawarte/simple-docker-image:latest        state: started        recreate: yes        detach: true        pull: yes        ports:          - "8888:8080"

Note that we have used the import_playbook statement at the top of the existing playbook, which means that we want to run the build-push.yaml playbook first along with our main playbook, and this way, we don’t have to run multiple playbooks manually.

Let us break the whole process into steps:

  1. With the help of build-push.yaml playbook, we are asking Ansible to build an image with the artifacts sent by Jenkins to our Control Node, and later push the built image (i.e., simple-docker-image) to our Docker Hub’s account or any other private registry like AWS ECR or Google’s Container Registry.
  2. In the simple-ansible-playbook.yaml file, we have imported the build-push.yaml file, which is going to run prior to any statement present within the simple-ansible-playbook.yaml file.
  3. Once build-push.yaml playbook is executed, Ansible will launch a container into our Managed Docker Host by pulling our image from our defined registry.

Now, it’s time to build our job. So in the next step, we will deploy the artifact to our Control Node, where Ansible Playbook will build an image, push to Docker Hub and run the container in Managed Host. Let us get started!

Jenkins Jobs to Deploy Docker Container Using Ansible

To begin, go to JenkinstoDockerUsingAnsible configure page and change the Exec command in the Post-build Actions section.

Copy the below-mentioned command and add it as shown in the image below:

sudo ansible-playbook /opt/docker/simple-ansible-playbook.yaml;

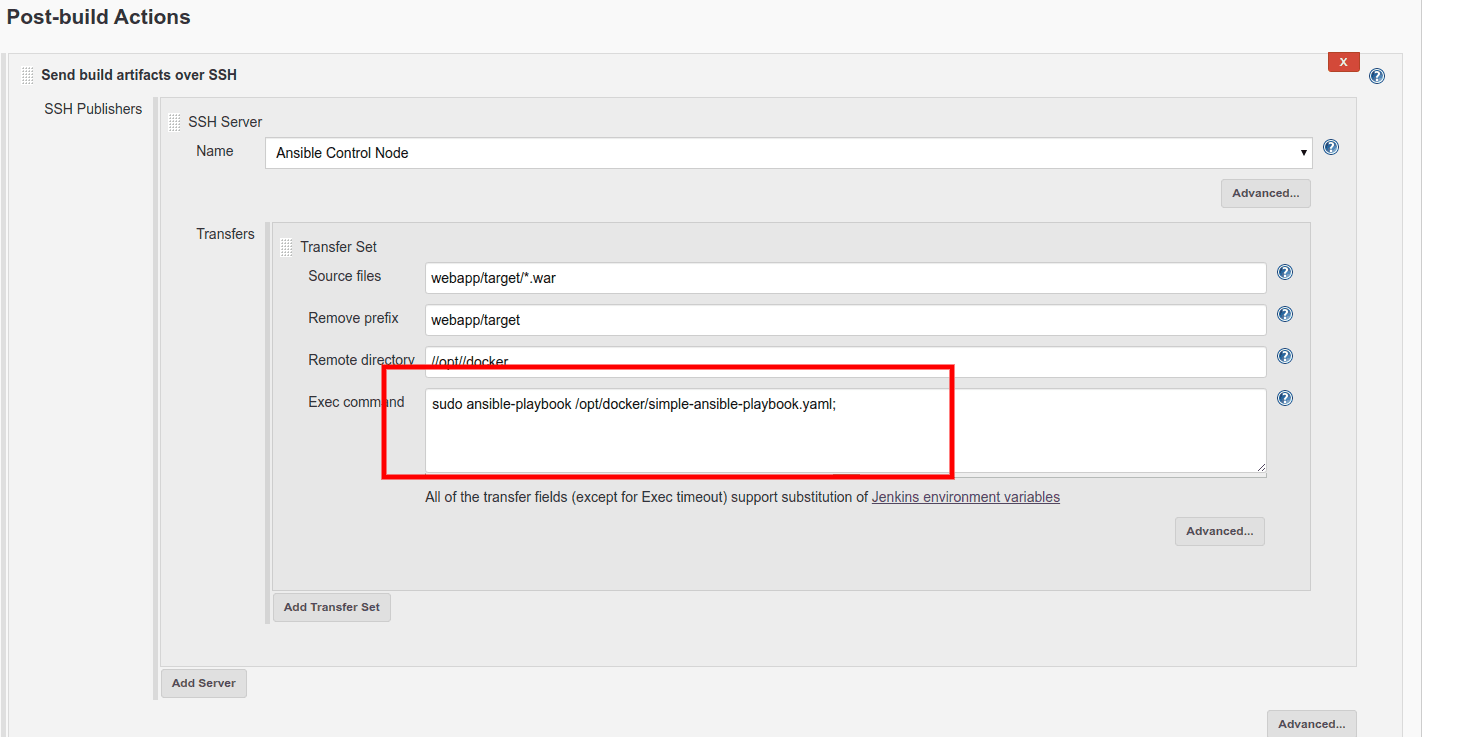
Save the configuration and start the build; you will see the following output:

Now go to your Control Node and verify if our images were built:

# docker imagesREPOSITORY                            TAG                   IMAGE ID            CREATED             SIZEgauravsadawarte/simple-docker-image   latest                9ccd91b55796        2 minutes ago       529MBsimple-docker-image                   latest                9ccd91b55796        2 minutes ago       529MBtomcat                                8.5.50-jdk8-openjdk   b56d8850aed5        5 days ago          529MB

It looks like Ansible Playbook was successfully executed on our Control Node. It’s time to verify if Ansible was able to launch containers on our Managed Host or not.

Go to your Managed Host and enter the following command:

# docker psCONTAINER ID        IMAGE                                        COMMAND                  CREATED             STATUS              PORTS                               NAMES6f5e18c20a68        gauravsadawarte/simple-docker-image:latest   "catalina.sh run"        4 minutes ago       Up 4 minutes        0.0.0.0:8888->8080/tcp              simple-docker-container

Now visit the following URL http://your-ip-addr:8888/webapp/ in your browser. Note that, Tomcat Server may take some time before you can see the output showing your project is successfully setup.

And you are done!

You successfully managed to deploy your application using Jenkins, Ansible, and Docker. Now, whenever someone from your team pushes code to the repository, Jenkins will build the artifact and send it to Ansible, from there Ansible will be responsible for publishing the application to the desired machine.

Run your containers with Gcore Container as a Service

Related articles

Pre-configure your dev environment with Gcore VM init scripts

Provisioning new cloud instances can be repetitive and time-consuming if you’re doing everything manually: installing packages, configuring environments, copying SSH keys, and more. With cloud-init, you can automate these tasks and launch development-ready instances from the start.Gcore Edge Cloud VMs support cloud-init out of the box. With a simple YAML script, you can automatically set up a development-ready instance at boot, whether you’re launching a single machine or spinning up a fleet.In this guide, we’ll walk through how to use cloud-init on Gcore Edge Cloud to:Set a passwordInstall packages and system updatesAdd users and SSH keysMount disks and write filesRegister services or install tooling like Docker or Node.jsLet’s get started.What is cloud-init?cloud-init is a widely used tool for customizing cloud instances during the first boot. It reads user-provided configuration data—usually YAML—and uses it to run commands, install packages, and configure the system. In this article, we will focus on Linux-based virtual machines.How to use cloud-init on GcoreFor Gcore Cloud VMs, cloud-init scripts are added during instance creation using the User data field in the UI or API.Step 1: Create a basic scriptStart with a simple YAML script. Here’s one that updates packages and installs htop:#cloud-config package_update: true packages: - htop Step 2: Launch a new VM with your scriptGo to the Gcore Customer Portal, navigate to VMs, and start creating a new instance (or just click here). When you reach the Additional options section, enable the User data option. Then, paste in your YAML cloud-init script.Once the VM boots, it will automatically run the script. This works the same way for all supported Linux distributions available through Gcore.3 real-world examplesLet’s look at three examples of how you can use this.Example 1: Add a password for a specific userThe below script sets the for the default user of the selected operating system:#cloud-config password: <password> chpasswd: {expire: False} ssh_pwauth: True Example 2: Dev environment with Docker and GitThe following script does the following:Installs Docker and GitAdds a new user devuser with sudo privilegesAuthorizes an SSH keyStarts Docker at boot#cloud-config package_update: true packages: - docker.io - git users: - default - name: devuser sudo: ALL=(ALL) NOPASSWD:ALL groups: docker shell: /bin/bash ssh-authorized-keys: - ssh-rsa AAAAB3Nza...your-key-here runcmd: - systemctl enable docker - systemctl start docker Example 3: Install Node.js and clone a repoThis script installs Node.js and clones a GitHub repo to your Gcore VM at launch:#cloud-config packages: - curl runcmd: - curl -fsSL https://deb.nodesource.com/setup_18.x | bash - - apt-get install -y nodejs - git clone https://github.com/example-user/dev-project.git /home/devuser/project Reusing and versioning your scriptsTo avoid reinventing the wheel, keep your cloud-init scripts:In version control (e.g., Git)Templated for different environments (e.g., dev vs staging)Modular so you can reuse base blocks across projectsYou can also use tools like Ansible or Terraform with cloud-init blocks to standardize provisioning across your team or multiple Gcore VM environments.Debugging cloud-initIf your script doesn’t behave as expected, SSH into the instance and check the cloud-init logs:sudo cat /var/log/cloud-init-output.log This file shows each command as it ran and any errors that occurred.Other helpful logs:/var/log/cloud-init.log /var/lib/cloud/instance/user-data.txt Pro tip: Echo commands or write log files in your script to help debug tricky setups—especially useful if you’re automating multi-node workflows across Gcore Cloud.Tips and best practicesIndentation matters! YAML is picky. Use spaces, not tabs.Always start the file with #cloud-config.runcmd is for commands that run at the end of boot.Use write_files to write configs, env variables, or secrets.Cloud-init scripts only run on the first boot. To re-run, you’ll need to manually trigger cloud-init or re-create the VM.Automate it all with GcoreIf you're provisioning manually, you're doing it wrong. Cloud-init lets you treat your VM setup as code: portable, repeatable, and testable. Whether you’re spinning up ephemeral dev boxes or preparing staging environments, Gcore’s support for cloud-init means you can automate it all.For more on managing virtual machines with Gcore, check out our product documentation.Explore Gcore VM product docs

How to cut egress costs and speed up delivery using Gcore CDN and Object Storage

If you’re serving static assets (images, videos, scripts, downloads) from object storage, you’re probably paying more than you need to, and your users may be waiting longer than they should.In this guide, we explain how to front your bucket with Gcore CDN to cache static assets, cut egress bandwidth costs, and get faster TTFB globally. We’ll walk through setup (public or private buckets), signed URL support, cache control best practices, debugging tips, and automation with the Gcore API or Terraform.Why bother?Serving directly from object storage hits your origin for every request and racks up egress charges. With a CDN in front, cached files are served from edge—faster for users, and cheaper for you.Lower TTFB, better UXWhen content is cached at the edge, it doesn’t have to travel across the planet to get to your user. Gcore CDN caches your assets at PoPs close to end users, so requests don’t hit origin unless necessary. Once cached, assets are delivered in a few milliseconds.Lower billsMost object storage providers charge $80–$120 per TB in egress fees. By fronting your storage with a CDN, you only pay egress once per edge location—then it’s all cache hits after that. If you’re using Gcore Storage and Gcore CDN, there’s zero egress fee between the two.Caching isn’t the only way you save. Gcore CDN can also compress eligible file types (like HTML, CSS, JavaScript, and JSON) on the fly, further shrinking bandwidth usage and speeding up file delivery—all without any changes to your storage setup.Less origin traffic and less data to transfer means smaller bills. And your storage bucket doesn’t get slammed under load during traffic spikes.Simple scaling, globallyThe CDN takes the hit, not your bucket. That means fewer rate-limit issues, smoother traffic spikes, and more reliable performance globally. Gcore CDN spans the globe, so you’re good whether your users are in Tokyo, Toronto, or Tel Aviv.Setup guide: Gcore CDN + Gcore Object StorageLet’s walk through configuring Gcore CDN to cache content from a storage bucket. This works with Gcore Object Storage and other S3-compatible services.Step 1: Prep your bucketPublic? Check files are publicly readable (via ACL or bucket policy).Private? Use Gcore’s AWS Signature V4 support—have your access key, secret, region, and bucket name ready.Gcore Object Storage URL format: https://<bucket-name>.<region>.cloud.gcore.lu/<object> Step 2: Create CDN resource (UI or API)In the Gcore Customer Portal:Go to CDN > Create CDN ResourceChoose "Accelerate and protect static assets"Set a CNAME (e.g. cdn.yoursite.com) if you want to use your domainConfigure origin:Public bucket: Choose None for authPrivate bucket: Choose AWS Signature V4, and enter credentialsChoose HTTPS as the origin protocolGcore will assign a *.gcdn.co domain. If you’re using a custom domain, add a CNAME: cdn.yoursite.com CNAME .gcdn.co Here’s how it works via Terraform: resource "gcore_cdn_resource" "cdn" { cname = "cdn.yoursite.com" origin_group_id = gcore_cdn_origingroup.origin.id origin_protocol = "HTTPS" } resource "gcore_cdn_origingroup" "origin" { name = "my-origin-group" origin { source = "mybucket.eu-west.cloud.gcore.lu" enabled = true } } Step 3: Set caching behaviorSet Cache-Control headers in your object metadata: Cache-Control: public, max-age=2592000 Too messy to handle in storage? Override cache logic in Gcore:Force TTLs by path or extensionIgnore or forward query strings in cache keyStrip cookies (if unnecessary for cache decisions)Pro tip: Use versioned file paths (/img/logo.v3.png) to bust cache safely.Secure access with signed URLsWant your assets to be private, but still edge-cacheable? Use Gcore’s Secure Token feature:Enable Secure Token in CDN settingsSet a secret keyGenerate time-limited tokens in your appPython example: import base64, hashlib, time secret = 'your_secret' path = '/videos/demo.mp4' expires = int(time.time()) + 3600 string = f"{expires}{path} {secret}" token = base64.urlsafe_b64encode(hashlib.md5(string.encode()).digest()).decode().strip('=') url = f"https://cdn.yoursite.com{path}?md5={token}&expires={expires}" Signed URLs are verified at the CDN edge. Invalid or expired? Blocked before origin is touched.Optional: Bind the token to an IP to prevent link sharing.Debug and cache tuneUse curl or browser devtools: curl -I https://cdn.yoursite.com/img/logo.png Look for:Cache: HIT or MISSCache-ControlX-Cached-SinceCache not working? Check for the following errors:Origin doesn’t return Cache-ControlCDN override TTL not appliedCache key includes query strings unintentionallyYou can trigger purges from the Gcore Customer Portal or automate them via the API using POST /cdn/purge. Choose one of three ways:Purge all: Clear the entire domain’s cache at once.Purge by URL: Target a specific full path (e.g., /images/logo.png).Purge by pattern: Target a set of files using a wildcard at the end of the pattern (e.g., /videos/*).Monitor and optimize at scaleAfter rollout:Watch origin bandwidth dropCheck hit ratio (aim for >90%)Audit latency (TTFB on HIT vs MISS)Consider logging using Gcore’s CDN logs uploader to analyze cache behavior, top requested paths, or cache churn rates.For maximum savings, combine Gcore Object Storage with Gcore CDN: egress traffic between them is 100% free. That means you can serve cached assets globally without paying a cent in bandwidth fees.Using external storage? You’ll still slash egress costs by caching at the edge and cutting direct origin traffic—but you’ll unlock the biggest savings when you stay inside the Gcore ecosystem.Save money and boost performance with GcoreStill serving assets direct from storage? You’re probably wasting money and compromising performance on the table. Front your bucket with Gcore CDN. Set smart cache headers or use overrides. Enable signed URLs if you need control. Monitor cache HITs and purge when needed. Automate the setup with Terraform. Done.Next steps:Create your CDN resourceUse private object storage with Signature V4Secure your CDN with signed URLsCreate a free CDN resource now

Bare metal vs. virtual machines: performance, cost, and use case comparison

Choosing the right type of server infrastructure is critical to how your application performs, scales, and fits your budget. For most workloads, the decision comes down to two core options: bare metal servers and virtual machines (VMs). Both can be deployed in the cloud, but they differ significantly in terms of performance, control, scalability, and cost.In this article, we break down the core differences between bare metal and virtual servers, highlight when to choose each, and explain how Gcore can help you deploy the right infrastructure for your needs. If you want to learn about either BM or VMs in detail, we’ve got articles for those: here’s the one for bare metal, and here’s a deep dive into virtual machines.Bare metal vs. virtual machines at a glanceWhen evaluating whether bare metal or virtual machines are right for your company, consider your specific workload requirements, performance priorities, and business objectives. Here’s a quick breakdown to help you decide what works best for you.FactorBare metal serversVirtual machinesPerformanceDedicated resources; ideal for high-performance workloadsShared resources; suitable for moderate or variable workloadsScalabilityOften requires manual scaling; less flexibleHighly elastic; easy to scale up or downCustomizationFull control over hardware, OS, and configurationLimited by hypervisor and provider’s environmentSecurityIsolated by default; no hypervisor layerShared environment with strong isolation protocolsCostHigher upfront cost; dedicated hardwarePay-as-you-go pricing; cost-effective for flexible workloadsBest forHPC, AI/ML, compliance-heavy workloadsStartups, dev/test, fast-scaling applicationsAll about bare metal serversA bare metal server is a single-tenant physical server rented from a cloud provider. Unlike virtual servers, the hardware is not shared with other users, giving you full access to all resources and deeper control over configurations. You get exclusive access and control over the hardware via the cloud provider, which offers the stability and security needed for high-demand applications.The benefits of bare metal serversHere are some of the business advantages of opting for a bare metal server:Maximized performance: Because they are dedicated resources, bare metal servers provide top-tier performance without sharing processing power, memory, or storage with other users. This makes them ideal for resource-intensive applications like high-performance computing (HPC), big data processing, and game hosting.Greater control: Since you have direct access to the hardware, you can customize the server to meet your specific requirements. This is especially important for businesses with complex, specialized needs that require fine-tuned configurations.High security: Bare metal servers offer a higher level of security than their alternatives due to the absence of virtualization. With no shared resources or hypervisor layer, there’s less risk of vulnerabilities that come with multi-tenant environments.Dedicated resources: Because you aren’t sharing the server with other users, all server resources are dedicated to your application so that you consistently get the performance you need.Who should use bare metal servers?Here are examples of instances where bare metal servers are the best option for a business:High-performance computing (HPC)Big data processing and analyticsResource-intensive applications, such as AI/ML workloadsGame and video streaming serversBusinesses requiring enhanced security and complianceAll about virtual machinesA virtual server (or virtual machine) runs on top of a physical server that’s been partitioned by a cloud provider using a hypervisor. This allows multiple VMs to share the same hardware while remaining isolated from each other.Unlike bare metal servers, virtual machines share the underlying hardware with other cloud provider customers. That means you’re using (and paying for) part of one server, providing cost efficiency and flexibility.The benefits of virtual machinesHere are some advantages of using a shared virtual machine:Scalability: Virtual machines are ideal for businesses that need to scale quickly and are starting at a small scale. With cloud-based virtualization, you can adjust your server resources (CPU, memory, storage) on demand to match changing workloads.Cost efficiency: You pay only for the resources you use with VMs, making them cost-effective for companies with fluctuating resource needs, as there is no need to pay for unused capacity.Faster deployment: VMs can be provisioned quickly and easily, which makes them ideal for anyone who wants to deploy new services or applications fast.Who should use virtual machines?VMs are a great fit for the following:Web hosting and application hostingDevelopment and testing environmentsRunning multiple apps with varying demandsStartups and growing businesses requiring scalabilityBusinesses seeking cost-effective, flexible solutionsWhich should you choose?There’s no one-size-fits-all answer. Your choice should depend on the needs of your workload:Choose bare metal if you need dedicated performance, low-latency access to hardware, or tighter control over security and compliance.Choose virtual servers if your priority is flexible scaling, faster deployment, and optimized cost.If your application uses GPU-based inference or AI training, check out our dedicated guide to VM vs. BM for AI workloads.Get started with Gcore BM or VMs todayAt Gcore, we provide both bare metal and virtual machine solutions, offering flexibility, performance, and reliability to meet your business needs. Gcore Bare Metal has the power and reliability needed for demanding workloads, while Gcore Virtual Machines offers customizable configurations, free egress traffic, and flexibility.Compare Gcore BM and VM pricing now

Optimize your workload: a guide to selecting the best virtual machine configuration

Virtual machines (VMs) offer the flexibility, scalability, and cost-efficiency that businesses need to optimize workloads. However, choosing the wrong setup can lead to poor performance, wasted resources, and unnecessary costs.In this guide, we’ll walk you through the essential factors to consider when selecting the best virtual machine configuration for your specific workload needs.﹟1 Understand your workload requirementsThe first step in choosing the right virtual machine configuration is understanding the nature of your workload. Workloads can range from light, everyday tasks to resource-intensive applications. When making your decision, consider the following:Compute-intensive workloads: Applications like video rendering, scientific simulations, and data analysis require a higher number of CPU cores. Opt for VMs with multiple processors or CPUs for smoother performance.Memory-intensive workloads: Databases, big data analytics, and high-performance computing (HPC) jobs often need more RAM. Choose a VM configuration that provides sufficient memory to avoid memory bottlenecks.Storage-intensive workloads: If your workload relies heavily on storage, such as file servers or applications requiring frequent read/write operations, prioritize VM configurations that offer high-speed storage options, such as SSDs or NVMe.I/O-intensive workloads: Applications that require frequent network or disk I/O, such as cloud services and distributed applications, benefit from VMs with high-bandwidth and low-latency network interfaces.﹟2 Consider VM size and scalabilityOnce you understand your workload’s requirements, the next step is to choose the right VM size. VM sizes are typically categorized by the amount of CPU, memory, and storage they offer.Start with a baseline: Select a VM configuration that offers a balanced ratio of CPU, RAM, and storage based on your workload type.Scalability: Choose a VM size that allows you to easily scale up or down as your needs change. Many cloud providers offer auto-scaling capabilities that adjust your VM’s resources based on real-time demand, providing flexibility and cost savings.Overprovisioning vs. underprovisioning: Avoid overprovisioning (allocating excessive resources) unless your workload demands peak capacity at all times, as this can lead to unnecessary costs. Similarly, underprovisioning can affect performance, so finding the right balance is essential.﹟3 Evaluate CPU and memory considerationsThe central processing unit (CPU) and memory (RAM) are the heart of a virtual machine. The configuration of both plays a significant role in performance. Workloads that need high processing power, such as video encoding, machine learning, or simulations, will benefit from VMs with multiple CPU cores. However, be mindful of CPU architecture—look for VMs that offer the latest processors (e.g., Intel Xeon, AMD EPYC) for better performance per core.It’s also important that the VM has enough memory to avoid paging, which occurs when the system uses disk space as virtual memory, significantly slowing down performance. Consider a configuration with more RAM and support for faster memory types like DDR4 for memory-heavy applications.﹟4 Assess storage performance and capacityStorage performance and capacity can significantly impact the performance of your virtual machine, especially for applications requiring large data volumes. Key considerations include:Disk type: For faster read/write operations, opt for solid-state drives (SSDs) over traditional hard disk drives (HDDs). Some cloud providers also offer NVMe storage, which can provide even greater speed for highly demanding workloads.Disk size: Choose the right size based on the amount of data you need to store and process. Over-allocating storage space might seem like a safe bet, but it can also increase costs unnecessarily. You can always resize disks later, so avoid over-allocating them upfront.IOPS and throughput: Some workloads require high input/output operations per second (IOPS). If this is a priority for your workload (e.g., databases), make sure that your VM configuration includes high IOPS storage options.﹟5 Weigh up your network requirementsWhen working with cloud-based VMs, network performance is a critical consideration. High-speed and low-latency networking can make a difference for applications such as online gaming, video conferencing, and real-time analytics.Bandwidth: Check whether the VM configuration offers the necessary bandwidth for your workload. For applications that handle large data transfers, such as cloud backup or file servers, make sure that the network interface provides high throughput.Network latency: Low latency is crucial for applications where real-time performance is key (e.g., trading systems, gaming). Choose VMs with low-latency networking options to minimize delays and improve the user experience.Network isolation and security: Check if your VM configuration provides the necessary network isolation and security features, especially when handling sensitive data or operating in multi-tenant environments.﹟6 Factor in cost considerationsWhile it’s essential that your VM has the right configuration, cost is always an important factor to consider. Cloud providers typically charge based on the resources allocated, so optimizing for cost efficiency can significantly impact your budget.Consider whether a pay-as-you-go or reserved model (which offers discounted rates in exchange for a long-term commitment) fits your usage pattern. The reserved option can provide significant savings if your workload runs continuously. You can also use monitoring tools to track your VM’s performance and resource usage over time. This data will help you make informed decisions about scaling up or down so you’re not paying for unused resources.﹟7 Evaluate security featuresSecurity is a primary concern when selecting a VM configuration, especially for workloads handling sensitive data. Consider the following:Built-in security: Look for VMs that offer integrated security features such as DDoS protection, web application firewall (WAF), and encryption.Compliance: Check that the VM configuration meets industry standards and regulations, such as GDPR, ISO 27001, and PCI DSS.Network security: Evaluate the VM's network isolation capabilities and the availability of cloud firewalls to manage incoming and outgoing traffic.﹟8 Consider geographic locationThe geographic location of your VM can impact latency and compliance. Therefore, it’s a good idea to choose VM locations that are geographically close to your end users to minimize latency and improve performance. In addition, it’s essential to select VM locations that comply with local data sovereignty laws and regulations.﹟9 Assess backup and recovery optionsBackup and recovery are critical for maintaining data integrity and availability. Look for VMs that offer automated backup solutions so that data is regularly saved. You should also evaluate disaster recovery capabilities, including the ability to quickly restore data and applications in case of failure.﹟10 Test and iterateFinally, once you've chosen a VM configuration, testing its performance under real-world conditions is essential. Most cloud providers offer performance monitoring tools that allow you to assess how well your VM is meeting your workload requirements.If you notice any performance bottlenecks, be prepared to adjust the configuration. This could involve increasing CPU cores, adding more memory, or upgrading storage. Regular testing and fine-tuning means that your VM is always optimized.Choosing a virtual machine that suits your requirementsSelecting the best virtual machine configuration is a key step toward optimizing your workloads efficiently, cost-effectively, and without unnecessary performance bottlenecks. By understanding your workload’s needs, considering factors like CPU, memory, storage, and network performance, and continuously monitoring resource usage, you can make informed decisions that lead to better outcomes and savings.Whether you're running a small application or large-scale enterprise software, the right VM configuration can significantly improve performance and cost. Gcore offers a wide range of virtual machine options that can meet your unique requirements. Our virtual machines are designed to meet diverse workload requirements, providing dedicated vCPUs, high-speed storage, and low-latency networking across 30+ global regions. You can scale compute resources on demand, benefit from free egress traffic, and enjoy flexible pricing models by paying only for the resources in use, maximizing the value of your cloud investments.Contact us to discuss your VM needs

How to get the size of a directory in Linux

Understanding how to check directory size in Linux is critical for managing storage space efficiently. Understanding this process is essential whether you’re assessing specific folder space or preventing storage issues.This comprehensive guide covers commands and tools so you can easily calculate and analyze directory sizes in a Linux environment. We will guide you step-by-step through three methods: du, ncdu, and ls -la. They’re all effective and each offers different benefits.What is a Linux directory?A Linux directory is a special type of file that functions as a container for storing files and subdirectories. It plays a key role in organizing the Linux file system by creating a hierarchical structure. This arrangement simplifies file management, making it easier to locate, access, and organize related files. Directories are fundamental components that help ensure smooth system operations by maintaining order and facilitating seamless file access in Linux environments.#1 Get Linux directory size using the du commandUsing the du command, you can easily determine a directory’s size by displaying the disk space used by files and directories. The output can be customized to be presented in human-readable formats like kilobytes (KB), megabytes (MB), or gigabytes (GB).Check the size of a specific directory in LinuxTo get the size of a specific directory, open your terminal and type the following command:du -sh /path/to/directoryIn this command, replace /path/to/directory with the actual path of the directory you want to assess. The -s flag stands for “summary” and will only display the total size of the specified directory. The -h flag makes the output human-readable, showing sizes in a more understandable format.Example: Here, we used the path /home/ubuntu/, where ubuntu is the name of our username directory. We used the du command to retrieve an output of 32K for this directory, indicating a size of 32 KB.Check the size of all directories in LinuxTo get the size of all files and directories within the current directory, use the following command:sudo du -h /path/to/directoryExample: In this instance, we again used the path /home/ubuntu/, with ubuntu representing our username directory. Using the command du -h, we obtained an output listing all files and directories within that particular path.#2 Get Linux directory size using ncduIf you’re looking for a more interactive and feature-rich approach to exploring directory sizes, consider using the ncdu (NCurses Disk Usage) tool. ncdu provides a visual representation of disk usage and allows you to navigate through directories, view size details, and identify large files with ease.For Debian or Ubuntu, use this command:sudo apt-get install ncduOnce installed, run ncdu followed by the path to the directory you want to analyze:ncdu /path/to/directoryThis will launch the ncdu interface, which shows a breakdown of file and subdirectory sizes. Use the arrow keys to navigate and explore various folders, and press q to exit the tool.Example: Here’s a sample output of using the ncdu command to analyze the home directory. Simply enter the ncdu command and press Enter. The displayed output will look something like this:#3 Get Linux directory size using 1s -1aYou can alternatively opt to use the ls command to list the files and directories within a directory. The options -l and -a modify the default behavior of ls as follows:-l (long listing format)Displays the detailed information for each file and directoryShows file permissions, the number of links, owner, group, file size, the timestamp of the last modification, and the file/directory name-a (all files)Instructs ls to include all files, including hidden files and directoriesIncludes hidden files on Linux that typically have names beginning with a . (dot)ls -la lists all files (including hidden ones) in long format, providing detailed information such as permissions, owner, group, size, and last modification time. This command is especially useful when you want to inspect file attributes or see hidden files and directories.Example: When you enter ls -la command and press Enter, you will see an output similar to this:Each line includes:File type and permissions (e.g., drwxr-xr-x):The first character indicates the file type- for a regular filed for a directoryl for a symbolic linkThe next nine characters are permissions in groups of three (rwx):r = readw = writex = executePermissions are shown for three classes of users: owner, group, and others.Number of links (e.g., 2):For regular files, this usually indicates the number of hard linksFor directories, it often reflects subdirectory links (e.g., the . and .. entries)Owner and group (e.g., user group)File size (e.g., 4096 or 1045 bytes)Modification date and time (e.g., Jan 7 09:34)File name (e.g., .bashrc, notes.txt, Documents):Files or directories that begin with a dot (.) are hidden (e.g., .bashrc)ConclusionThat’s it! You can now determine the size of a directory in Linux. Measuring directory sizes is a crucial skill for efficient storage management. Whether you choose the straightforward du command, use the visual advantages of the ncdu tool, or opt for the versatility of ls -la, this expertise enhances your ability to uphold an organized and efficient Linux environment.Looking to deploy Linux in the cloud? With Gcore Edge Cloud, you can choose from a wide range of pre-configured virtual machines suitable for Linux:Affordable shared compute resources starting from €3.2 per monthDeploy across 50+ cloud regions with dedicated servers for low-latency applicationsSecure apps and data with DDoS protection, WAF, and encryption at no additional costGet started today

How to Run Hugging Face Spaces on Gcore Inference at the Edge

Running machine learning models, especially large-scale models like GPT 3 or BERT, requires a lot of computing power and comes with a lot of latency. This makes real-time applications resource-intensive and challenging to deliver. Running ML models at the edge is a lightweight approach offering significant advantages for latency, privacy, and resource optimization.  Gcore Inference at the Edge makes it simple to deploy and manage custom models efficiently, giving you the ability to deploy and scale your favorite Hugging Face models globally in just a few clicks. In this guide, we’ll walk you through how easy it is to harness the power of Gcore’s edge AI infrastructure to deploy a Hugging Face Space model. Whether you’re developing NLP solutions or cutting-edge computer vision applications, deploying at the edge has never been simpler—or more powerful. Step 1: Log In to the Gcore Customer PortalGo to gcore.com and log in to the Gcore Customer Portal. If you don’t yet have an account, go ahead and create one—it’s free. Step 2: Go to Inference at the EdgeIn the Gcore Customer Portal, click Inference at the Edge from the left navigation menu. Then click Deploy custom model. Step 3: Choose a Hugging Face ModelOpen huggingface.com and browse the available models. Select the model you want to deploy. Navigate to the corresponding Hugging Face Space for the model. Click on Files in the Space and locate the Docker option. Copy the Docker image link and startup command from Hugging Face Space. Step 4: Deploy the Model on GcoreReturn to the Gcore Customer Portal deployment page and enter the following details: Model image URL: registry.hf.space/ethux-mistral-pixtral-demo:latest Startup command: python app.py Container port: 7860 Configure the pod as follows: GPU-optimized: 1x L40S vCPUs: 16 RAM: 232GiB For optimal performance, choose any available region for routing placement. Name your deployment and click Deploy.Step 5: Interact with Your ModelOnce the model is up and running, you’ll be provided with an endpoint. You can now interact with the model via this endpoint to test and use your deployed model at the edge.Powerful, Simple AI Deployment with GcoreGcore Inference at the Edge is the future of AI deployment, combining the ease of Hugging Face integration with the robust infrastructure needed for real-time, scalable, and global solutions. By leveraging edge computing, you can optimize model performance and simultaneously futureproof your business in a world that increasingly demands fast, secure, and localized AI applications. Deploying models to the edge allows you to capitalize on real-time insights, improve customer experiences, and outpace your competitors. Whether you’re leading a team of developers or spearheading a new AI initiative, Gcore Inference at the Edge offers the tools you need to innovate at the speed of tomorrow. Explore Gcore Inference at the Edge

Subscribe to our newsletter

Get the latest industry trends, exclusive insights, and Gcore updates delivered straight to your inbox.