Radar has landed - discover the latest DDoS attack trends. Get ahead, stay protected.Get the report
Under attack?

Products

Solutions

Resources

Partners

Why Gcore

  1. Home
  2. Developers
  3. The Best Settings for YouTube Stream: Unleashing the Power of YouTube Studio

The Best Settings for YouTube Stream: Unleashing the Power of YouTube Studio

  • By Gcore
  • August 7, 2023
  • 9 min read
The Best Settings for YouTube Stream: Unleashing the Power of YouTube Studio

YouTube, widely acknowledged as the most popular platform for live stream video content, stands out for its exceptional capabilities and service quality. With comprehensive stream settings, it offers users the opportunity to fully customize and enhance their viewer’s experience. However, these YouTube settings can be overwhelming, even for seasoned professionals. In this article, we will explain each setting in detail and determine the optimal configuration for your video stream.

Why Choosing the Best YouTube Live Streaming Settings Matters

Before delving into the intricacies of specific YouTube settings, it is crucial to understand their importance. Why are these settings for YouTube streaming so important?

First, viewers demand exceptional video quality. Poorly optimized settings can result in subpar content that fails to meet audience expectations. However, excessively high settings across the board may lead to buffering issues or render the stream unwatchable. Choosing “the best” streaming settings is aimed at achieving optimal performance.

In addition to considerations of quality and speed, many other factors come into play when determining ideal streaming parameters, including the type of video camera used and the target devices of the intended audience. This article will help you to identify the YouTube stream settings that align with your unique requirements and circumstances.

Understanding Live Settings in Tab “Stream Settings”

The key parameters for a YouTube stream can be found in the tab “Stream Settings” in YouTube Studio’s “Stream” tab. Before exploring the specific values to input, it is important to understand how YouTube streaming works.

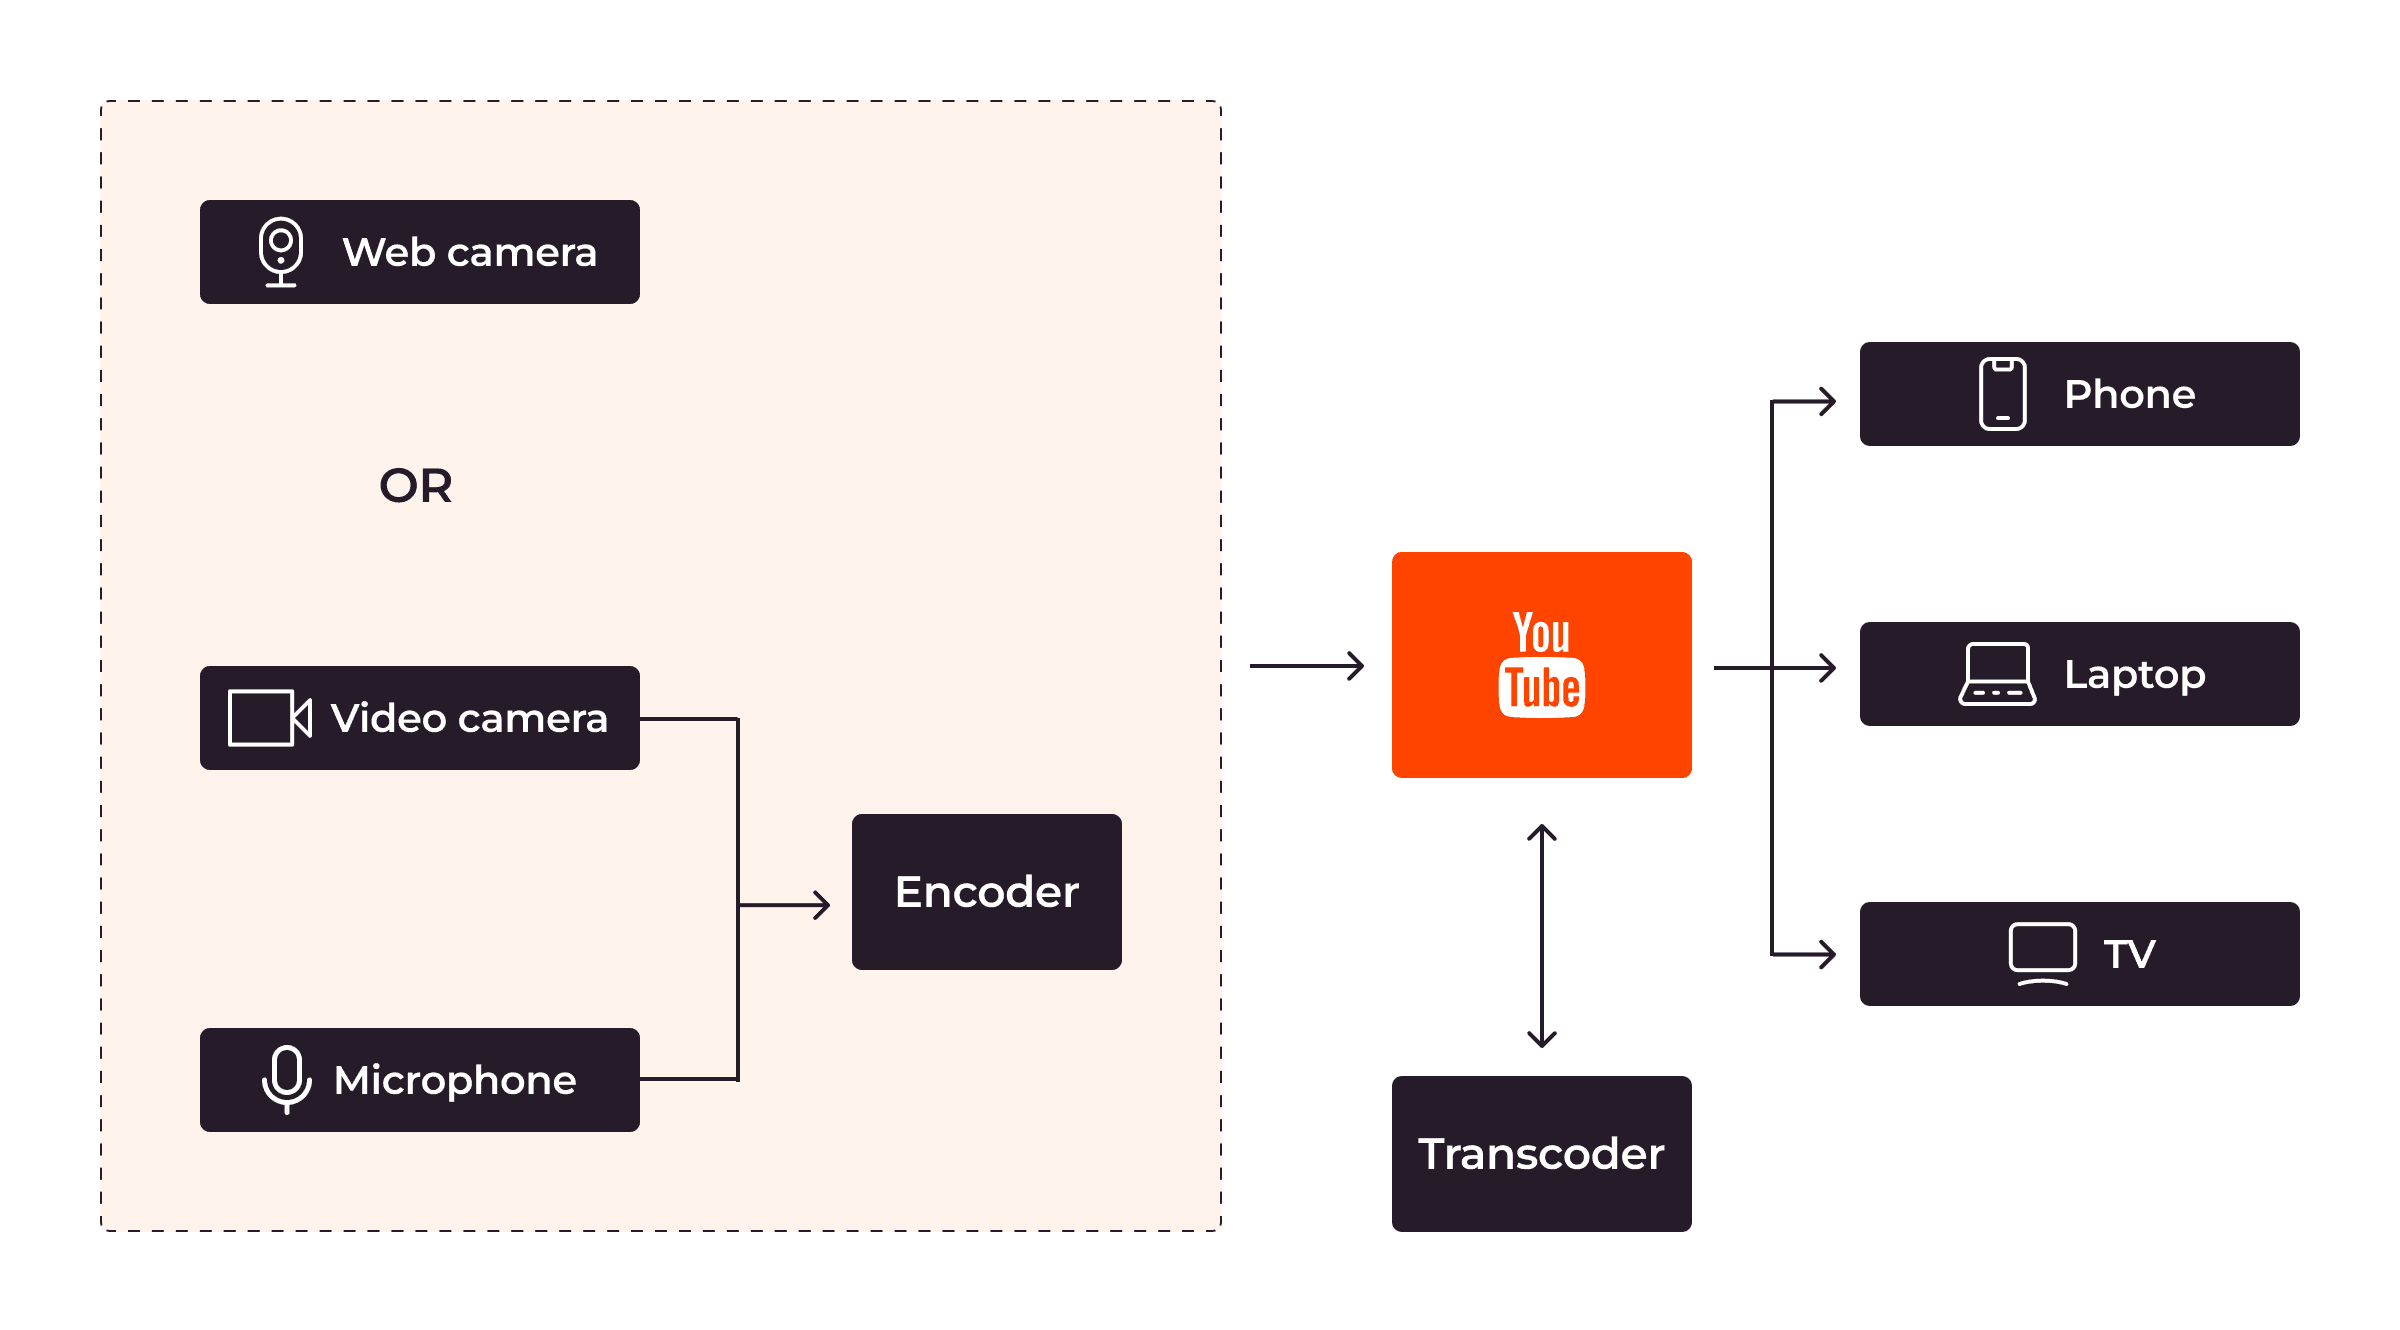
How YouTube Streaming Works

To generate video content, creators rely on dedicated video and audio capture hardware. This can range from a built-in webcam on your laptop to a cutting-edge professional video camera accompanied by a suite of high-quality microphones, enabling the creation of immersive surround audio tracks.

The media captured is transmitted to YouTube through one of two protocols: RTMP (Real-Time Messaging Protocol) or HLS (HTTP Live Streaming). While video captured with a web camera can be delivered directly to YouTube, professional-grade equipment necessitates the use of an encoder to transmit the captured media to YouTube Studio.

Once YouTube receives the video, it undergoes transcoding, a process that converts the video into various supported resolutions. The transcoded video is then disseminated to viewers, ensuring compatibility with a wide range of devices and optimizing the viewing experience.

The process of delivering a video stream to viewers through YouTube

What Is a “Stream Key”?

When it comes to more advanced streaming setups, simply relying on a built-in web camera may not suffice. In such cases, your equipment needs to be properly configured to transmit content to YouTube using a unique identifier known as a “stream key.”

The stream key, in conjunction with the stream URL, serves as your credentials, granting your encoder access to your dedicated streaming channel on YouTube. It establishes a secure and exclusive connection between your encoding hardware and YouTube’s streaming platform.

RTMP/RTMPS

By default, YouTube uses the RTMP protocol for streaming. While RTMP is suitable for video streams, it may not provide optimal security measures. Content creators can enhance security for streams by implementing encryption.

YouTube offers an extension to RTMP called RTMPS, which stands for RTMP Secure. RTMPS leverages a TLS/SSL (Transport Layer Security/Secure Sockets Layer) connection to encrypt your stream, ensuring the privacy and authenticity of the content received by your viewers.

Enabling RTMPS is a straightforward process. In your stream settings, you will find a lock icon located near the stream URL. By clicking on this icon, the URL will automatically change to one that begins with “rtmps,” indicating that your stream is now utilizing the secure RTMPS protocol.

Encoding and Video Quality

When determining the appropriate encoding parameters for your stream, it is important to consider two key factors: achieving optimal video and audio resolution while ensuring a stable streaming experience. These two factors often require trade-offs, and your goal is to find the right balance between them.

To begin, assess your hardware’s uploading capabilities through a speed test. This test will reveal the maximum upload speed your connection can reliably sustain, enabling you to select suitable encoder settings. For example, streaming a video at 1080p resolution with 60 frames per second (fps) typically requires a stable upload speed of up to 9 Mbps. Therefore, if your speed test indicates a consistent speed of 11 Mbps, you can confidently stream at 1080p 60 fps.

However, it is important to note that speed requirements are not set in stone and can vary depending on multiple factors. For example, dynamic video content may require a higher bitrate. Consequently, it is advisable to leave some headroom for bitrate fluctuations and connectivity irregularities by choosing slightly lower encoding settings than your current upload speed allows. YouTube provides bitrate ranges for each supported resolution and fps, which can aid you in making informed decisions. These ranges can be found here.

Bitrate

By default, YouTube’s settings are configured to receive a variable bitrate (VBR) stream. This recommended option allows YouTube to automatically detect the stream’s bitrate, frame rate, and resolution. VBR is particularly beneficial for dynamic videos as it adapts to the varying volume of data in each video segment, maintaining consistent visible quality throughout.

If you prefer to have more control over the bitrate and more predictability in connectivity requirements, you can create a new stream key and enable manual settings. This approach is especially relevant for static video content that doesn’t exhibit frequent fluctuations in visual complexity.

Latency

Latency refers to the time interval between capturing your content and delivering it to your viewers.

Lower latency enables enhanced synchronization between the presenter and the audience, enabling real-time interaction. However, it’s important to note that lower latency can result in increased buffering on the viewer’s side. If real-time interaction is a critical aspect of your stream, it is essential to ensure a reliable internet connection and fine-tune your encoding parameters to align with the available bandwidth. Conversely, if live interaction is not a requirement, opting for higher latency provides a more stable and consistent streaming experience.

YouTube supports three levels of latency: normal, low, and ultra-low. Choosing the appropriate latency level depends on your specific needs. Normal latency prioritizes stream reliability, while low and ultra-low latency options prioritize real-time engagement and interaction with the audience.

Digital Video Recorder (DVR) Technology

DVR allows your viewers to pause, rewind, and continue watching your stream from any moment. This feature adds an extra level of convenience for your audience, even though utilizing DVR functionality means sacrificing a portion of the real-time component of the streaming experience.

Enabling or disabling DVR functionality is a straightforward process. Simply toggle the “Enable DVR” switch in the stream settings to activate or deactivate this feature. It’s important to note that if you choose to enable DVR during the streaming session, the new settings will only apply to individuals who join the stream after the changes are made.

YouTube’s DVR functionality has certain limitations. Users are typically able to rewind a limited amount of time within your video stream, which is dependent on factors such as latency and the viewer’s device. However, these limitations are typically measured in hours, and in most cases, they provide ample flexibility for viewers. Additionally, disabling DVR is not possible for web and mobile cameras, as these devices inherently support continuous streaming without the ability to pause or rewind.

360° Video

YouTube supports providing your audience with a 360° video experience, also known as immersive or surround video. However, it is important to note that, at the time of writing, YouTube displays 360° videos in an equirectangular projection format. To enable this feature, simply toggle the “360° video” switch in stream settings.

When streaming immersive videos, it’s crucial to consider the impact on connectivity. These types of videos demand more robust and stable internet connections to ensure a seamless viewing experience. To achieve optimal results for 360° video content, it is recommended to use at least the 1440p resolution with a 16:9 aspect ratio.

Delay

In addition to managing latency, content creators can configure an artificial delay for your stream of up to one minute. This feature holds particular significance in scenarios such as live gaming streaming, where implementing a delay can make it more challenging for other players to track your presence on the game map. By configuring an artificial delay, you add an extra layer of privacy and strategic advantage to your gameplay.

Closed Captions

YouTube supports captions, which can be embedded in the video by your encoder or sent separately via HTTP by special software. In addition to these options, YouTube offers automatic caption generation or streams where sophisticated equipment is not utilized and the primary language spoken is English. This feature automatically generates closed captions for your stream, enhancing accessibility and allowing a broader audience to engage with your content. To enable automatic captions, simply select Automatic captions in the “Captions source” field within your stream settings.

Optimal Live-Streaming Settings for YouTube

Taking into account the information provided above, selecting the optimal YouTube live-streaming settings involves a systematic approach. The key considerations are:

  1. Measure connectivity: Begin by evaluating your internet connection and conducting a speed test. This will provide valuable insights into your uploading capabilities. Refer to YouTube’s recommended bitrate ranges, available on this YouTube help page, to determine the suitable settings. For example, a stable upload speed of 15 Mbps enables safe streaming at 1440p with 30 fps.
  2. Assess target devices: Understand the primary devices your audience uses. If they predominantly view content on larger screens, but your upload speed limits you to 720p resolution, it may be necessary to explore options to improve your bandwidth or consider alternative streaming resolutions.
  3. Experiment and test: Before going live, it is advisable to experiment with different combinations of settings using recorded videos. This allows you to assess the effectiveness of various configurations and identify the settings that work best for your specific case. By conducting thorough testing, you can refine and optimize your live-streaming settings.

Best Encoders and Encoder Settings to Stream RTMP Stream

It is always possible to stream content captured by a built-in or external web camera directly. However, when streaming advanced content, using an encoder becomes crucial as a webcam may not suffice. Encoders play a pivotal role in converting video content into a digital format suitable for streaming on YouTube. They can be either software applications or standalone hardware devices like video cameras and microphones.

Encoders for YouTube Stream

YouTube certifies encoders that adhere to best practices and recommendations, ensuring an optimal user experience for streamers. Some of the popular YouTube-verified software encoders include Cinamaker Director Studio and Streamlabs. Notable hardware encoders include LiveU Solo and NVIDIA GPUs equipped with NVENC, a powerful hardware encoder. The full list of certified encoders can be found on YouTube’s official website.

Encoder Settings for YouTube Stream

YouTube supports the H.264 video codec (also known as AVC or MPEG-4 Part 10) as the standard for RTMP streaming. Video bitrate and frame rate should be configured based on the recommendations discussed in previous sections.

Regarding audio, you have the option to choose between MP3 or the more advanced AAC codec for 5.1 surround sound.

Audio typeStereo5.1
CodecMP3AAC
Bitrate128 Kbps384 Kbps
Sample rate44.1 KHz38 KHz
Recommended audio encoding settings for YouTube streaming

YouTube has gathered a complete list of recommended encoder settings in the table at the end of this article.

Recommended Advanced Settings

In this section, we will explore advanced options that can elevate the quality and experience of your professional video content.

High Dynamic Range (HDR)

You can stream HDR video via YouTube. HDR technology enhances videos by making them more realistic, dynamic, and vivid.


To enable HDR streaming, ensure that your video camera and encoder support HDR output. In YouTube stream settings, create a new stream key with the “Turn on manual settings” option disabled and select the HLS protocol.

It is important to note that HDR is only supported over HLS. HLS is a different protocol than RTMP and has a higher latency. At this time, YouTube does not support HDR via RTMP.

5.1 Audio

Capturing 5.1 audio requires professional and potentially expensive equipment. However, if your aim is to target TV devices, YouTube to detect your 5.1 audio track can provide an immersive audio experience on TV surround sound systems.

To enable YouTube to detect your 5.1 audio track, create a new stream key with the “Turn on manual settings” option unchecked to allow YouTube to recognize and process the 5.1 audio track.

Noise Reduction

While not directly related to YouTube, minimizing background noise is crucial for high-quality audio. Consider the following tips:

  • Record in a quiet environment to minimize external disturbances.
  • Utilize professional high-end microphones that offer superior noise-canceling capabilities.
  • Position the microphone at the optimal distance from the sound source, as specified in the microphone’s manual.
  • Use noise suppression software or hardware to further reduce unwanted background noise.
  • Alternatively, incorporate background music to help mitigate the presence of any remaining background noise.

How To Check “Stream Health”

Once the stream has been configured and broadcasting content to viewers has commenced, YouTube provides a “Stream Health” tab where you can monitor the status and performance of your ongoing stream.

Within the “Stream Health” tab, YouTube generates log messages that provide information about the current state of your stream. If everything is functioning smoothly, you will see a message indicating that your stream is healthy. In cases where there is room for improvement, you will receive an “OK” status with recommendations on how to enhance your viewers’ experience. For example, YouTube may suggest adjusting the resolution or bitrate settings to optimize stream quality.

If issues arise during streaming, YouTube will alert you with a message highlighting the poor health of your stream in red. Accompanying log messages will provide details about the specific issue causing the poor stream health. For instance, if there is a connectivity outage or insufficient data being received by YouTube, your viewers may experience frequent buffering during playback.

Streaming to Other Platforms

While YouTube offers a fantastic platform for your video content, it is not the sole option available to reach your audience. At some point, you may wish to expand your viewership by streaming on other popular video streaming services like Twitch or Facebook. However, managing multiple streams across different platforms can quickly become complex and resource-intensive.

Gcore provides a simple solution to this challenge. By streaming to Gcore, you gain the ability to effortlessly restream your content to a variety of services without the need for complicated equipment configurations. All you have to do is provide Gcore with the necessary stream keys and URLs when setting up your streaming configuration. Gcore offers the flexibility to restream your content to an unlimited number of services, allowing you to reach a wider audience across multiple platforms simultaneously.

Conclusion

This article has provided comprehensive insights into various aspects of YouTube streaming and video streaming generally, guiding you in selecting optimal parameters to ensure a standout streaming experience. By considering factors such as connectivity, encoding settings, latency, closed captions, and advanced features like HDR and 5.1 audio, you can elevate the quality and engagement of your streams. As you continue your streaming journey, remember that optimizing your settings, leveraging advanced features, and choosing the right platform can significantly impact the success of your streams. Embrace the possibilities and deliver exceptional streaming experiences to captivate and engage your viewers.

If you’re looking to expand your streaming reach to multiple platforms or seeking an advanced platform that caters to your specific requirements, Gcore offers a solution. With Gcore, you can easily restream your content to various platforms, simplifying your workflow and reaching a broader audience. To explore Gcore’s offerings and learn more about how it can enhance your streaming endeavors, visit their website for further information.

Related Articles

How do CDNs work?

Picture this: A visitor lands on your website excited to watch a video, buy an item, or explore your content. If your page loads too slowly, they may leave before it even loads completely. Every second matters when it comes to customer retention, engagement, and purchasing patterns.This is where a content delivery network (CDN) comes in, operating in the background to help end users access digital content quickly, securely, and without interruption. In this article, we’ll explain how a CDN works to optimize the delivery of websites, applications, media, and other online content, even during high-traffic spikes and cyberattacks. If you’re new to CDNs, you might want to check out our introductory article first.Key components of a CDNA CDN is a network of interconnected servers that work together to optimize content delivery. These servers communicate to guarantee that data reaches users as quickly and efficiently as possible. The core of a CDN consists of globally distributed edge servers, also known as points of presence (PoPs):Origin server: The central server where website data is stored. Content is distributed from the origin to other servers in the CDN to improve availability and performance.Points of presence (PoPs): A globally distributed network of edge servers. PoPs store cached content—pre-saved copies of web pages, images, videos, and other assets. By serving cached content from the nearest PoP to the user, the CDN reduces the distance data needs to travel, improving load times and minimizing strain on the origin server. The more PoPs a network has, the faster content is served globally.How a CDN delivers contentCDNs rely on edge servers to store content in a cache, enabling faster delivery to end users. The delivery process differs depending on whether the content is already cached or needs to be fetched from the origin server.A cache hit occurs when the requested content is already stored on a CDN’s edge server. Here’s the process:User requests content: When a user visits a website, their device sends a request to load the necessary content.Closest edge server responds: The CDN routes the request to the nearest edge server to the user, minimizing travel time.Content delivered: The edge server delivers the cached content directly to the user. This is faster because:The distance between the user and the server is shorter.The edge server has already optimized the content for delivery.What happens during a cache miss?A cache miss occurs when the requested content is not yet stored on the edge server. In this case, the CDN fetches the content from the origin server and then updates its cache:User requests content: The process begins when a user’s device sends a request to load website content.The closest server responds: As usual, the CDN routes the request to the nearest edge server.Request to the origin server: If the content isn’t cached, the CDN fetches it from the origin server, which houses the original website data. The edge server then delivers it to the user.Content cached on edge servers: After retrieving the content, the edge server stores a copy in its cache. This ensures that future requests for the same content can be delivered quickly without returning to the origin server.Do you need a CDN?Behind every fast, reliable website is a series of split-second processes working to optimize content delivery. A CDN caches content closer to users, balances traffic across multiple servers, and intelligently routes requests to deliver smooth performance. This reduces latency, prevents downtime, and strengthens security—all critical for businesses serving global audiences.Whether you’re running an e-commerce platform, a streaming service, or a high-traffic website, a CDN ensures your content is delivered quickly, securely, and without interruption, no matter where your users are or how much demand your site experiences.Take your website’s performance to the next level with Gcore CDN. Powered by a global network of over 180+ points of presence, our CDN enables lightning-fast content delivery, robust security, and unparalleled reliability. Don’t let slow load times or security risks hold you back. Contact our team today to learn how Gcore can elevate your online presence.Discover Gcore CDN

What is a CDN?

Whether you’re running an e-commerce store, streaming videos, or managing an app, delivering content quickly and reliably is essential to keeping users satisfied. This is where a content delivery network (CDN) comes into play. A CDN is a globally distributed network of servers that work together to deliver content to users quickly, minimizing latency. Instead of relying on a single server, a CDN uses edge servers—called points of presence (PoPs)—to cache or temporarily store copies of your content closer to the user. This optimizes website performance, drastically cuts down on load times, and improves the user experience. Research suggests that a one-second lag in page loading speed can significantly decrease engagement, citing a 7% decline in conversions and an 11% decrease in page visits. CDNs considerably speed up load times by reducing latency through content caching closer to the user. By splitting up your website’s traffic over several servers, CDNs also protect it from online threats. Distributed denial-of-service (DDoS) attacks are lessened by CDNs because they spread traffic among a network of servers, improving security and availability. What Challenges Do CDNs Address?CDNs tackle two key challenges to improve website and application performance: Slow load times: Users sometimes experience frustratingly slow-loading websites and applications. This is because data must travel from a server to the end user’s device, causing latency. CDNs move servers closer to end users, reducing the distance that data has to travel and speeding up load times.  High traffic volumes: High traffic volumes during peak times or cyberattacks can overwhelm your website and lead to latency or site unavailability. Since CDNs distribute traffic across multiple servers, no single server is overwhelmed. This helps prevent crashes and delivers smooth performance for all users.Common Use Cases for CDNsCDNs are vital across a range of industries, providing measurable improvements in content delivery and user experience. E-commerce websites use CDNs to guarantee quick page loading and frictionless shopping experiences, even during periods of high traffic. Speed is crucial for online businesses. A study found that the average cost of downtime for e-commerce websites is around $500,000 per hour. This includes lost sales, operational costs, and long-term damage to brand reputation Streaming services rely on CDNs to deliver high-quality video content while minimizing buffering. Netflix states that its CDN contributes to the daily delivery of over 125 million hours of streaming content, guaranteeing a seamless experience for customers worldwide. Gaming companies use CDNs to lower latency and provide a consistent real-time user experience, especially during live multiplayer matches, where it is essential to preserve an engaging and fair gameplay experience. News outlets and blogs benefit from CDNs by ensuring their content loads quickly for readers around the world, during large-scale traffic surges, especially during major events like elections or breaking news.  The Benefits of a CDNFaster Website PerformanceEvery second counts when delivering content online. Slow websites frustrate users and harm your business. CDNs speed up content delivery by caching data closer to users, reducing page and file load times. Whether you’re delivering static content (such as CSS, HTML or JPG files) or dynamic content (like data generated by user interactions or API calls), a CDN ensures optimal performance regardless of user location. While factors like DNS settings, server configurations, and code optimization all play a role, the physical distance between your origin server and your users is a factor that only a CDN can solve. Increased Availability and ReliabilityDowntime can seriously affect online businesses. Hardware failures, traffic surges, and cyberattacks can reduce your website’s availability, harming your customers’ experience and causing financial or reputational damage. In fact, around 98% of organizations report that just one hour of downtime costs over $100,000. A CDN ensures that your website remains available, fast, and reliable by leveraging essential features such as: Load balancing: This process dynamically distributes traffic across multiple servers to optimize performance and prevent overload.Intelligent failover: Automatically redirects traffic if a server goes offline, ensuring continuity with minimal disruption.Anycast routing: Directs users to the closest or most efficient server, further reducing latency and enhancing response times.Security FeaturesAs cyber threats continue to grow in sophistication and frequency, securing your website or application is more critical than ever. According to recent statistics from Cobalt’s 2024 Cybersecurity Report, weekly attacks worldwide increased by 8% in 2023, while attackers used more sophisticated strategies to exploit vulnerabilities. Strong security measures that not only safeguard your website but also guarantee optimal performance are necessary in light of these evolving threats. CDN security features not only improve website performance but also defend against a wide range of attacks by distributing traffic across multiple servers, which mitigates DDoS attacks and filters out malicious traffic before it reaches your website. These features, from DDoS protection to safeguarding APIs, help maintain uptime, protect sensitive data, and guarantee a seamless user experience. Most modern solutions like Gcore CDN integrate robust security measures into content delivery, such as:SSL/TLS encryption facilitates secure data transmission by encrypting traffic, protecting sensitive information from being intercepted.L3/L4 DDoS protection blocks large-scale cyberattacks designed to flood your network and disrupt services.L7 DDoS protection guards your website from more complex attacks targeting how the website functions, helping it continue to operate smoothly.Web application firewall (WAF) acts as a shield, blocking harmful traffic such as hacking attempts or malicious scripts before they can affect your site.API security protects the communication between your application and other software, preventing unauthorized access or data theft.Bot protection identifies harmful automated traffic (bots), preventing activities like data scraping or login attempts with stolen credentials while allowing useful bots (like search engine crawlers) to function normally. Elevate Your Online Experience With a CDNA CDN is no longer a luxury—it’s a necessity for businesses that want to deliver fast, reliable, and secure online experiences. Whether your goal is to optimize performance, manage high traffic, or protect your site from attacks, a well-configured CDN makes all the difference.Ready to enhance your website’s performance? Our futureproof CDN runs on a global network of over 180 points of presence, so your customers get outstanding performance no matter where in the world they’re located. Get in touch with our team today to learn how our CDN can benefit your business.Discover Gcore CDN

How to Migrate Your Video Files to Gcore Video Streaming

Migrating large volumes of video files from different platforms can be daunting and time-consuming, often discouraging companies from moving to a superior provider. But it doesn’t have to be this way. We’ve created this three-step guide to help you efficiently migrate your video files to Gcore from other popular streaming platforms.Step 1: Get Links to Your VideosFirst, obtain links to your videos and download them. Look for your provider in the list below, or refer to the general SFTP/S3 storage section if applicable. After completing the steps for your provider, go straight to step 2.Google DriveShare the file: Open Google Drive and locate the MP4 file you want to download. Right-click on the file and select “Share.”Get the shareable link: In the sharing settings, click “Get link.” Ensure the link-sharing option is turned on.Set sharing permissions: Adjust the sharing permissions so “Anyone with the link” can view or download the file. Copy the generated link.Amazon S3Edit S3 block public access settings: Go to the S3 management console, select the bucket containing your MP4 file, and edit the Block Public Access settings if necessary.Add a bucket policy: Implement a bucket policy that grants public read access to your files.Get the list of objects: Navigate to the Objects tab, find your MP4 file, and click on the file to obtain the Object URL, which will be your download link.VimeoAccess the video: Log in to your Vimeo account and go to the video you wish to download.Select options: Click on the “Settings” button (gear icon) below the video player.Get video file link: In the settings menu, go to the “Video File” tab, where you can find the download link for your MP4 file.MUXEnable master access: Log in to your MUX account, navigate to the video asset, and enable master access if it’s not already enabled.Retrieve URL to master: Once master access is enabled, the URL to the master file will be available in the video asset details. Copy this URL for downloading the file.DropboxCreate a shareable link: Log in to your Dropbox account and locate the MP4 file you want to share. Click on the “Share” button next to the file.Set access permissions: In the sharing settings, create a link and set the permissions to “Anyone with the link.” Copy the generated link to download the file.General SFTP or S3 StorageAccess storage: Log in to your SFTP or S3 storage service control panel.Manage buckets/directories: Navigate to the appropriate bucket or directory containing your MP4 files.Retrieve download links: Generate HTTP/S links for the files you want to download. You can then use these links to download the files directly.Step 2: Check Availability to DownloadEnsure that your video files are available and ready for download, preventing any interruptions or issues during the migration process.Open HTTP/S link in a browser: Copy the HTTP/S link for the MP4 file and paste it into your browser’s address bar. Press Enter to navigate to the link.Check the video plays correctly in the browser: Verify that the video starts playing once the link is opened. This step ensures that the file is accessible and the link is functioning properly.Right-click to download: While the video is playing, right-click on the video player. Select “Save video as…” from the context menu. Choose a destination on your local disk to save the MP4 file.Step 3: Upload to Gcore Video StreamingNo matter which provider you’re migrating from, you need to upload your videos to Gcore Video Streaming storage. There are three primary methods to upload videos to Gcore storage:Copy from external storage: If your videos are available via public HTTPS URLs, you can directly copy the video files from external storage to Gcore. This method efficiently transfers files without downloading them to your local device first.Upload from a local device: Videos can be uploaded from your local host, backend, browser, or mobile app using the TUS resumable upload protocol. This method is resilient to interruptions, ensuring a smooth upload process by resuming from the point of failure.Batch upload: This method will soon be available to migrate extensive collections of videos, allowing you to transfer vast numbers of video files efficiently.The simplest migration option is to obtain video URLs and copy them to Gcore Video Hosting, eliminating the need to download and reupload videos.Example API Request to Copy Video from External StorageTo copy a video from another server, specify the origin_url attribute in the POST API request. The original video will be downloaded for video hosting on our server. Here is an example of the API request to set a task for copying a video from external storage:curl -L 'https://api.gcore.com/streaming/videos/' \-H 'Content-Type: application/json' \-H 'Authorization: APIKey 1234$0d16599c' \-d '{ "video": { "name": "Gcore Demo", "description": "Video copied from an external S3 Storage", "origin_url": "https://s-ed1.cloud.gcore.lu/demo-video/gcore.mp4" } }Refer to the complete documentation for detailed steps and examples of API requests. The original file must be in MP4 format or one of the following formats: 3g2, 3gp, asf, avi, dif, dv, flv, f4v, m4v, mov, mp4, mpeg, mpg, mts, m2t, m2ts, qt, wmv, vob, mkv, ogv, webm, vob, ogg, mxf, quicktime, x-ms-wmv, mpeg-tts, vnd.dlna.mpeg-tts. Streaming formats like HLS (.m3u8/.ts) and DASH (.mpd/.m4v) are intended for final video distribution and cannot be used as original file formats. Here are examples of good and bad links:Good link: https://demo-files.gvideo.io/gcore.mp4Bad link (chunked HLS format): https://demo-files.gvideo.io/hls/master.m3u8Note: Currently, only one video can be uploaded per request, so transferring your library in batches will require automation.Migrate to Gcore Video Streaming TodayGcore Video Streaming makes video migration easy with support for multiple sources and automatic transcoding. Whether you’re moving files from cloud storage, hosting platforms, or API-based services, Gcore streamlines video administration. Store, process, and distribute videos in various formats, complete with features like subtitles and timeline previews.With seamless migration and automatic transcoding, Gcore ensures your videos are optimized and ready for distribution, saving you time and effort. Simplify your video management and ensure your content is always accessible and in the best format for your audience with Gcore’s robust video streaming solutions.

5 Ways to Improve Website Speed for E-Commerce

In part 1 of this guide, we explained why site speed matters for e-commerce and how you can track your current speed.Now, speed up your page load times with these five techniques.#1 Assess Your Current Site SpeedFirst, check your site’s current performance. Use tools like Google PageSpeed Insights or real user monitoring (RUM) tools. PageSpeed Insights evaluates individual web pages for mobile and desktop performance, providing actionable insights to improve speed and user experience.Here’s an example of how your metrics might look:#2 Adopt Code and Image Optimization TechniquesE-commerce websites often have a huge number of images, videos, and/or animations, which can slow down load times. Since these media are essential, the key is to optimize all heavy components.Compress images and use lazy loading via your website host. Minimize redirects and remove broken links, consulting a technical SEO expert if required. These actions can significantly reduce page weight.#3 Adopt CDNs and Edge ComputingThe majority of online shoppers have purchased from an e-commerce store in another country and an additional 22% plan to in the future. Hosting location impacts speed. The further your servers are physically located from your customers, the higher the latency. So, having servers distributed globally improves your load speed and allows you to deliver great customer experiences, no matter where your customers are located.Imagine that your e-commerce website is hosted on a web server in the US, but you have shoppers from the EU. When shoppers from the US browse your store, they may not experience much latency. But shoppers from Germany will, because of the time it takes their browser to send requests to your US server, wait for the server to process them, and deliver a response. A reliable CDN and edge computing provider caching your website content—images, videos, payment portals and all—at the edge makes for speedy content delivery globally.In addition to shortening the distance between your servers and buyers, CDNs also enable load balancing. Say you’re running a Black Friday sale with traffic surges far beyond your normal quantities. Your CDN provider can distribute the traffic evenly between its network of available servers, preventing any one server from being overworked, thereby improving server response times. So, if your Black Friday surge comes mostly from the New York area, a CDN can push some of that traffic from the New York, NY server to the nearby Manassas, VA and Boston, CT servers. Customers won’t notice a difference since both servers are nearby, but spreading the load means all servers continue to perform optimally.#4 Use Fast Authoritative DNSDNS is like the internet’s phone book, translating human-friendly domain names (like www.example.com) into IP addresses that computers use to find each other. When this translation happens quickly, it reduces the time it takes for a user’s browser to locate your website, leading to faster page load times.#5 Rinse and RepeatSite speed optimization is continuous. The internet changes daily; technology advances and competitors emerge. Don’t get comfortable with your site speed. Continuously track speed scores and make improvements.Website Speed Solutions in One Intuitive PlatformWebsite speed is a game-changer for e-commerce success. A website that loads in under a second is the magic number to boost user experience, slash bounce rates, and skyrocket your e-commerce business’ conversion rates.Stay ahead of your e-commerce competitors by choosing tools and platforms designed with your e-commerce website speed in mind. With 180+ PoPs worldwide and a 200+ Tbps network capacity, Gcore CDN and DNS are ideal speed optimization solutions for global e-commerce sites. Contact us today to discover how we can supercharge your site speed.Explore CDN for e-commerce

What Website Speed Is and Why It Matters for E-commerce Success

Website visitors are more impatient than ever—websites that take longer than three seconds to load lose more than half their visitors. For an e-commerce business, that translates to losing half its potential sales, which is bad news for revenue. In this article, we explain what e-commerce website speed is, how it’s measured, and how you can improve it for better customer retention and higher sales.Why Does Site Speed Matter?Website speed measures the time from when visitors click your link to when they see a fully functioning page. With the surge in e-commerce businesses around the world, buyers have many choices and will quickly abandon slow-loading websites out of frustration. Most customers won’t return to a slow website, and 89% will turn to a faster competitor. Satisfied customers are more likely to recommend your website to others, making high user satisfaction an effective marketing strategy.Just a second—or less—of load time can make the difference between a potential customer purchasing from you or your competitor. Conversion rates drop markedly with every additional second of load time. If your site loads in one second or less, you’re looking at a 3% conversion rate. That almost halves when you add just one second of wait time.That’s not surprising, since churn and bounce rates increase with slower load times, meaning potential buyers either leave your site before interacting and/or don’t return.Page load times also affect search engine optimization (SEO) rankings—your spot on search engine results pages. When buyers search for your products, if you don’t appear at the top, your competitors will—and your customers are more likely to visit their site instead of yours.Evidently, optimizing page load time is a non-negotiable for any e-commerce business.Metrics and Indicators to TrackSpeed can be measured and reflected by either technical or business metrics.Technical IndicatorsGoogle Core Web Vitals are metrics that measure various features contributing to a high-quality page experience. They’re an industry-standard way to measure your technical website load speed.Largest contentful paint (LCP) is the time it takes for the largest content on your site to load. An ideal LCP value is below 2.5 seconds, while above 4 seconds signals a poor page experience.First input delay (FID) is the delay between a user’s interaction (e.g., clicking a button) and the browser’s response. Google considers any FID value below 100 ms good, and above 300 ms poor.Cumulative layout shift (CLS) measures how much your content moves around while loading. Poor CLS can cause users to accidentally click on the wrong buttons.Keep track of the following additional technical metrics:Time to first byte (TTFB) is the time between a browser requesting your webpage and the first byte of data arriving. It often triggers the “reduce initial server response time” message in page speed diagnostics.Time to interactive (TTI) measures the time it takes for your website to become fully interactive. Google considers a TTI of below 5 seconds good, and above 7.3 seconds poor.Round-trip time (RTT) is the time it takes for requests to reach the origin server, be processed, and return to the client.Business MetricsThese metrics give you insights into how your website’s speed impacts sales. Although they’re not a direct speed measurement, speed has a direct impact on them.Conversion rate measures the percentage of your website’s visitors who make a purchase.Engagement time measures how much time customers actively spend on your website, such as browsing products or making a purchase. It’s connected to bounce rate, which is the opposite—how many customers leave your site without engaging at all, often caused by slow loading.Search ranking affects your site’s visibility, traffic, and revenue. Fast load times contribute to better SEO rankings.Explore part 2 of this guide to discover 5 practical tips to speed up your e-commerce website performance.

Improve Your Privacy and Data Security with TLS Encryption on CDN

The web is a public infrastructure: Anyone can use it. Encryption is a must to ensure that communications over this public infrastructure are secure and private. You don’t want anyone to read or modify the data you send or receive, like credit card information when paying for an online service.TLS encryption is a basic yet crucial safeguard that ensures only the client (the user’s device, like a laptop) and server can read your request and response data; third parties are locked out. You can run TLS on a CDN for improved performance, caching, and TLS management. If you want to learn more about TLS and how running it on a CDN can improve your infrastructure, this is the right place to start.What Is TLS Encryption and Why Does It Matter?TLS, transport layer security, encrypts data sent via the web to prevent it from being seen or changed while it’s in transit. For that reason, it’s called encryption in-transit technology. TLS is also commonly called HTTPS when used with HTTP or SSL, as previous versions of the technology were based on it. TLS ensures high encryption performance and forward secrecy. To learn more about encryption, check out our dedicated article.TLS is a vital part of the web because it ensures trust for end users and search engines alike. End users can rest assured that their data—like online banking information or photos of their children—can’t be accessed. Search engines know that information protected by TLS is trustworthy, so they rate it higher than non-protected content.What’s the Connection Between TLS and CDN?A CDN, or content delivery network, helps improve your website’s performance by handling the delivery of your content from its own servers rather than your website’s server. When a CDN uses TLS, it ensures that your content is encrypted as it travels from your server to the CDN and from the CDN to your users.With TLS offloading, your server only needs to encrypt the content for each CDN node, not for every individual user. This reduces the workload on your server.Here’s a simple breakdown of how it works:Your server encrypts the content once and sends it to the CDN.The CDN caches this encrypted content.When a user requests the content, the CDN serves it directly to them, handling all encryption and reducing the need to repeatedly contact your server.Without a CDN, your server would have to encrypt and send content to each user individually, which can slow things down. With a CDN, your server encrypts the content once for the CDN. The CDN then takes over, encrypting and serving the content to all users, speeding up the process and reducing the load on your server.Figure 1: Comparison of how content is served with TLS on the web server (left) vs on CDN (right)Benefits of “Offloading” TLS to a CDNOffloading TLS to a CDN can improve your infrastructure with improved performance, better caching, and simplified TLS management.Increased PerformanceWhen establishing a TLS connection, the client and server must exchange information to negotiate a session key. This exchange involves four messages being sent over the network, as shown in Figure 2. The higher the latency between the two participants, the longer it takes to establish the connection. CDN nodes are typically closer to the client, resulting in lower latency and faster connection establishment.As mentioned above, CDN nodes handle all the encryption tasks. This frees up your server’s resources for other tasks and allows you to simplify its code base.Figure 2: TLS handshakeImproved CachingIf your data is encrypted, the CDN can’t cache it. A single file will look different from the CDN nodes for every new TLS connection, eliminating the CDN benefits (Figure 3). If the CDN holds the certificates, it can negotiate encryption with the clients and collect the files from your server in plaintext. This allows the CDN to cache the content efficiently and serve it faster to users.Figure 3: TLS and CDN caching comparedSimplified TLS ManagementThe CDN takes care of maintenance tasks such as certificate issuing, rotation, and auto-renewal. With the CDN managing TLS, your server’s code base can be simplified, and you no longer need to worry about potential TLS updates in the future.TLS Encryption with Gcore CDNWith the Gcore CDN we don’t just take care of your TLS encryption, but also file compression and DNS lookups. This way, you can unburden your servers from non-functional requirements, which leads to smaller, easier-to-maintain code bases, lower CPU, memory, and traffic impact, and a lower workload for the teams managing those servers.Gcore CDN offers two TLS offloading options:Free Let’s Encrypt certificates with automatic validation, an effective and efficient choice for simple security needsPaid custom certificates, ideal if your TLS setup has more complex requirementsHow to Enable HTTPS with a Free Let’s Encrypt CertificateSetting up HTTPS for your website is quick, easy, and free. First, make sure you have a Gcore CDN resource for your website. If you haven’t created one yet, you can do so in the Gcore Customer Portal by clicking Create CDN resource in the top-right of the window (Figure 4) and following the setup wizard. You’ll be asked to update your DNS records so they point to the Gcore CDN, allowing Gcore to issue the certificates later.Figure 4: Create CDN resourceNext, open the resource settings by selecting your CDN resource from the list in the center (Figure 5).Figure 5: Select the CDN resourceEnable HTTPS in the resource settings, as shown in Figure 6:Select SSL in the left navigationClick the Enable HTTPS checkboxClick Get SSL certificateFigure 6: Get an SSL certificateYour certificate will usually be issued within 30 minutes.Our Commitment to Online SecurityAt Gcore, we’re committed to making the internet secure for everyone. As part of this mission, we offer free CDN and free TLS certificates. Take advantage and protect your resources efficiently for free!Get TLS encryption on Gcore CDN free

Subscribe
to our newsletter

Get the latest industry trends, exclusive insights, and Gcore updates delivered straight to your inbox.