Radar has landed - discover the latest DDoS attack trends. Get ahead, stay protected.Get the report
Under attack?

Products

Solutions

Resources

Partners

Why Gcore

  1. Home
  2. Developers
  3. How to Reset Password in Linux

How to Reset Password in Linux

  • By Gcore
  • August 30, 2023
  • 3 min read
How to Reset Password in Linux

Forgetting a password can be a minor hiccup for most, but when it comes to Linux—a system known for its robust security features—it can feel like a daunting obstacle. Whether you’re new to the world of open-source operating systems or a seasoned Linux veteran, resetting your password doesn’t have to be a complex chore. This guide offers a concise, step-by-step approach to help you swiftly regain access to your Linux machine.

Resetting Linux Password using GRUB

Resetting a Linux password using the GRUB bootloader involves booting into single-user mode or recovery mode and then using the command line to reset the password. Here’s a step-by-step guide:

1. Access the GRUB menu. GRUB (Grand Unified Bootloader) is the default bootloader for most Linux distributions. First, restart or power on your computer.  As soon as the boot process begins, press and hold the Shift key (for some systems it might be the Esc key) to bring up the GRUB menu.

2. Enter the Edit Mode. Before booting into the system, you need to edit the boot parameters. First, highlight the default boot entry (usually the first in the list) using arrow keys. 

  • Press ‘E’ to edit the entry.

3. Modify Boot Parameters. To boot into single-user mode, you need to modify the Linux boot parameters. Here are the following steps:

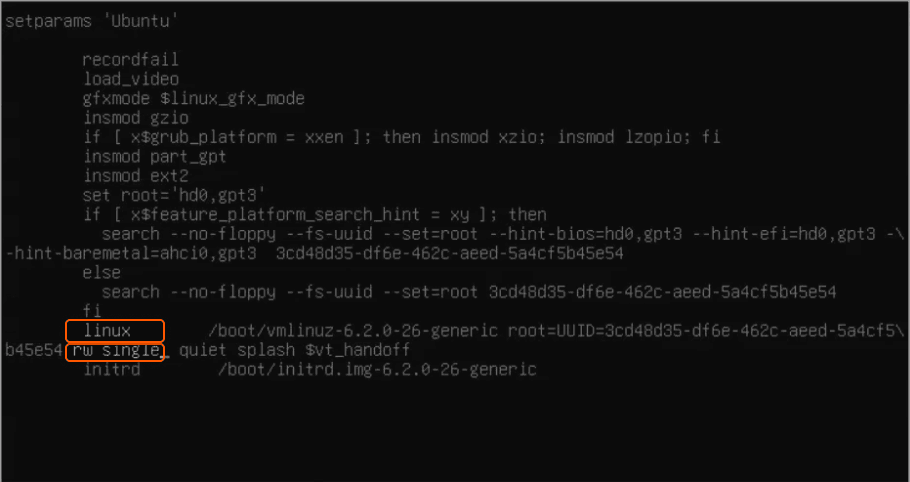
• Find the line that starts with linux or linux16. This line specifies the boot parameters.
• At this line, locate ‘ro quiet’, replace ‘ro’ to ‘rw’ then add the word single or init=/bin/bash, depending on your distribution and setup.
• Press Ctrl + X or F10 to boot with the modified parameters.

Here’s an example:

4. Remount the File System with Write Permissions. By default, the filesystem might be in read-only mode in this state. To change the password, you’ll need write permissions. Enter the following command:

mount -n -o remount,rw /

5. Reset the Password. Use the passwd command to reset the password for a user. Enter the command below, replacing ‘username’ with the actual username for which you want to reset the password:

passwd username

When prompted, enter the new password twice.

6. Reboot the System. Now that the password is reset, it’s best to reboot the system to return to normal operation. Enter the following command:

sync

Then, force a reboot with:

reboot -f

The new password should now be active, and you can test it. In the following section, we’ll explore an alternative method using a live CD or USB.

Resetting Linux Password Using Live CD/USB

Resetting a Linux password using a Live CD or USB is a useful method when you’ve forgotten the root or user password. Here are the step-by-step instructions:

1. Boot from the Live CD/USB. Insert your Live CD or USB stick. Reboot the computer and choose to boot from the CD/USB from the BIOS or UEFI boot menu.

2. Open a Terminal. Once the live environment is loaded, locate and open a terminal window.

3. Identify the System’s Root Partition. You can use tools like fdisk or lsblk to identify your system’s root partition.

sudo fdisk -l# orsudo lsblk -f

Look for partitions that are likely Linux root partitions, such as ext4, xfs, etc.

4. Mount the Root Partition. Create a mount point by running this command:

sudo mkdir /mnt/myroot

Mount the identified root partition (replace /dev/sdXY with your partition, for example, /dev/sda1):

sudo mount /dev/sdXY /mnt/myroot

5. Change Root into the System. Use chroot to change the root directory by using this command:

sudo chroot /mnt/myroot

6. Reset the Password. Now that you’ve chrooted into your system, you can use the passwd command to change the password for any user, including root.

passwd username

Replace “username” with the actual username or use root to reset the root password.

7. Exit and Unmount. Exit the chroot environment and unmount the partition.

exitsudo umount /mnt/myroot

8. Reboot. Remove the Live CD/USB and reboot your computer. Now, you should now be able to log in using the new password.

That’s it! You’re now able to reset passwords in Linux. To reset passwords, you can use either the GRUB method or a Live CD. The GRUB method is fast and doesn’t need external tools, but a Live CD is more universal and works well for complex system setups or restricted GRUB access.

Conclusion

Looking to deploy Linux in the cloud? With Gcore Cloud, you can choose from Basic VM, Virtual Instances, or VPS/VDS suitable for Linux:

Choose an instance

Related articles

How to cut egress costs and speed up delivery using Gcore CDN and Object Storage

If you’re serving static assets (images, videos, scripts, downloads) from object storage, you’re probably paying more than you need to, and your users may be waiting longer than they should.In this guide, we explain how to front your bucket with Gcore CDN to cache static assets, cut egress bandwidth costs, and get faster TTFB globally. We’ll walk through setup (public or private buckets), signed URL support, cache control best practices, debugging tips, and automation with the Gcore API or Terraform.Why bother?Serving directly from object storage hits your origin for every request and racks up egress charges. With a CDN in front, cached files are served from edge—faster for users, and cheaper for you.Lower TTFB, better UXWhen content is cached at the edge, it doesn’t have to travel across the planet to get to your user. Gcore CDN caches your assets at PoPs close to end users, so requests don’t hit origin unless necessary. Once cached, assets are delivered in a few milliseconds.Lower billsMost object storage providers charge $80–$120 per TB in egress fees. By fronting your storage with a CDN, you only pay egress once per edge location—then it’s all cache hits after that. If you’re using Gcore Storage and Gcore CDN, there’s zero egress fee between the two.Caching isn’t the only way you save. Gcore CDN can also compress eligible file types (like HTML, CSS, JavaScript, and JSON) on the fly, further shrinking bandwidth usage and speeding up file delivery—all without any changes to your storage setup.Less origin traffic and less data to transfer means smaller bills. And your storage bucket doesn’t get slammed under load during traffic spikes.Simple scaling, globallyThe CDN takes the hit, not your bucket. That means fewer rate-limit issues, smoother traffic spikes, and more reliable performance globally. Gcore CDN spans the globe, so you’re good whether your users are in Tokyo, Toronto, or Tel Aviv.Setup guide: Gcore CDN + Gcore Object StorageLet’s walk through configuring Gcore CDN to cache content from a storage bucket. This works with Gcore Object Storage and other S3-compatible services.Step 1: Prep your bucketPublic? Check files are publicly readable (via ACL or bucket policy).Private? Use Gcore’s AWS Signature V4 support—have your access key, secret, region, and bucket name ready.Gcore Object Storage URL format: https://<bucket-name>.<region>.cloud.gcore.lu/<object> Step 2: Create CDN resource (UI or API)In the Gcore Customer Portal:Go to CDN > Create CDN ResourceChoose "Accelerate and protect static assets"Set a CNAME (e.g. cdn.yoursite.com) if you want to use your domainConfigure origin:Public bucket: Choose None for authPrivate bucket: Choose AWS Signature V4, and enter credentialsChoose HTTPS as the origin protocolGcore will assign a *.gcdn.co domain. If you’re using a custom domain, add a CNAME: cdn.yoursite.com CNAME .gcdn.co Here’s how it works via Terraform: resource "gcore_cdn_resource" "cdn" { cname = "cdn.yoursite.com" origin_group_id = gcore_cdn_origingroup.origin.id origin_protocol = "HTTPS" } resource "gcore_cdn_origingroup" "origin" { name = "my-origin-group" origin { source = "mybucket.eu-west.cloud.gcore.lu" enabled = true } } Step 3: Set caching behaviorSet Cache-Control headers in your object metadata: Cache-Control: public, max-age=2592000 Too messy to handle in storage? Override cache logic in Gcore:Force TTLs by path or extensionIgnore or forward query strings in cache keyStrip cookies (if unnecessary for cache decisions)Pro tip: Use versioned file paths (/img/logo.v3.png) to bust cache safely.Secure access with signed URLsWant your assets to be private, but still edge-cacheable? Use Gcore’s Secure Token feature:Enable Secure Token in CDN settingsSet a secret keyGenerate time-limited tokens in your appPython example: import base64, hashlib, time secret = 'your_secret' path = '/videos/demo.mp4' expires = int(time.time()) + 3600 string = f"{expires}{path} {secret}" token = base64.urlsafe_b64encode(hashlib.md5(string.encode()).digest()).decode().strip('=') url = f"https://cdn.yoursite.com{path}?md5={token}&expires={expires}" Signed URLs are verified at the CDN edge. Invalid or expired? Blocked before origin is touched.Optional: Bind the token to an IP to prevent link sharing.Debug and cache tuneUse curl or browser devtools: curl -I https://cdn.yoursite.com/img/logo.png Look for:Cache: HIT or MISSCache-ControlX-Cached-SinceCache not working? Check for the following errors:Origin doesn’t return Cache-ControlCDN override TTL not appliedCache key includes query strings unintentionallyYou can trigger purges from the Gcore Customer Portal or automate them via the API using POST /cdn/purge. Choose one of three ways:Purge all: Clear the entire domain’s cache at once.Purge by URL: Target a specific full path (e.g., /images/logo.png).Purge by pattern: Target a set of files using a wildcard at the end of the pattern (e.g., /videos/*).Monitor and optimize at scaleAfter rollout:Watch origin bandwidth dropCheck hit ratio (aim for >90%)Audit latency (TTFB on HIT vs MISS)Consider logging using Gcore’s CDN logs uploader to analyze cache behavior, top requested paths, or cache churn rates.For maximum savings, combine Gcore Object Storage with Gcore CDN: egress traffic between them is 100% free. That means you can serve cached assets globally without paying a cent in bandwidth fees.Using external storage? You’ll still slash egress costs by caching at the edge and cutting direct origin traffic—but you’ll unlock the biggest savings when you stay inside the Gcore ecosystem.Save money and boost performance with GcoreStill serving assets direct from storage? You’re probably wasting money and compromising performance on the table. Front your bucket with Gcore CDN. Set smart cache headers or use overrides. Enable signed URLs if you need control. Monitor cache HITs and purge when needed. Automate the setup with Terraform. Done.Next steps:Create your CDN resourceUse private object storage with Signature V4Secure your CDN with signed URLsCreate a free CDN resource now

From reactive to proactive: how AI is transforming WAF cybersecurity solutions

While digital transformation in recent years has driven great innovation, cyber threats have changed in parallel, evolving to target the very applications businesses rely on to thrive. Traditional web application security measures, foundational as they may be, are no longer effective in combating sophisticated attacks in time. Enter the next generation of WAFs (web application firewalls) powered by artificial intelligence.Next-generation WAFs, often incorporated into WAAP solutions, do much more than respond to threats; instead, they will use AI and ML-powered techniques to predict and neutralize threats in real time. This helps businesses to stay ahead of bad actors by securing applications, keeping valuable data safe, and protecting hard-earned brand reputations against ever-present dangers in an expanding digital world.From static to AI-powered web application firewallsTraditional WAFs were relied on to protect web applications against known threats, such as SQL injection and cross-site scripting. They’ve done a great job as the first line of defense, but their reliance on static rules and signature-based detection means they struggle to keep up with today’s fast-evolving cyber threats. To understand in depth why traditional WAFs are no longer sufficient in today’s threat landscape, read our ebook.AI and ML have already revolutionized what a WAF can do. AI/ML-driven WAFs can examine vast streams of traffic data and detect patterns, including new threats, right at the emergence stage. The real-time adaptability that this allows is effective even against zero-day attacks and complex new hacking techniques.How AI-powered WAP proactively stops threatsOne of the most significant advantages of AI/ML-powered WAFs is proactive identification and prevention capabilities. Here's how this works:Traffic pattern analysis: AI systems monitor both incoming and outgoing traffic to set up baselines for normal behavior. This can then allow for the detection of anomalies that could show a zero-day attack or malicious activity.Real-time decision making: Machine learning models keep learning from live traffic and detect suspicious activities on the go sans waiting for any updates in the rule set. This proactive approach ensures that businesses are guarded from emerging threats before they escalate.Heuristic tagging and behavioral insights: Advanced heuristics used by AI-driven systems tag everything from sessionless clients to unusual request frequencies. It helps administrators classify potential bots or automated attacks much faster.Ability to counter zero-day attacks: Traditional WAF solutions can only mitigate attacks that are already in the process of accessing sensitive areas. AI/ML-powered WAFs, on the other hand, can use data to identify and detect patterns indicative of future attacks, stopping attackers in their tracks and preventing future damage.Intelligent policy management: Adaptive WAFs detect suspicious activity and alert users to misconfigured security policies accordingly. They reduce the need for manual configuration while assuring better protection.Integrated defense layers: One of the strongest features of AI/ML-powered systems is the ease with which they integrate other layers of security, including bot protection and DDoS mitigation, into a connected architecture that protects several attack surfaces.User experience and operational impactAI-driven WAFs improve the day-to-day operations of security teams by transforming how they approach threat management. With intuitive dashboards and clearly presented analytics, as offered by Gcore WAAP, these tools empower security professionals to quickly interpret complex data, streamline decision-making, and respond proactively to threats.Instead of manually analyzing vast amounts of traffic data, teams now receive immediate alerts highlighting critical security events, such as abnormal IP behaviors or unusual session activity. Each alert includes actionable recommendations, enabling rapid adjustments to security policies without guesswork or delay.By automating the identification of sophisticated threats such as credential stuffing, scraping, and DDoS attacks, AI-powered solutions significantly reduce manual workloads. Advanced behavioral profiling and heuristic tagging pinpoint genuine threats with high accuracy, allowing security teams to concentrate their efforts where they're most needed.Embracing intelligent security with Gcore’s AI-driven WAAPOur AI-powered WAAP solution provides intelligent, interrelated protection to empower companies to actively outperform even the most sophisticated, ever-changing threats by applying advanced traffic analysis, heuristic tagging, and adaptive learning. With its cross-domain functionality and actionable security insights, this solution stands out as an invaluable tool for both security architects and strategic decision-makers. It combines innovation and practicality to address the needs of modern businesses.Curious to learn more about WAAP? Check out our ebook for cybersecurity best practices, the most common threats to look out for, and how WAAP can safeguard your businesses’ digital assets. Or, get in touch with our team to learn more about Gcore WAAP.Learn why WAAP is essential for modern businesses with a free ebook

How AI helps prevent API attacks

APIs have become an integral part of modern digital infrastructure, and it can be easy to take their security for granted. But, unfortunately, APIs are a popular target for attackers. Hackers can use APIs to access crucial data and services, and breaching APIs allows attackers to bypass traditional security controls.Most companies focus on speed of development and deployment ahead of security when crafting APIs, making them vulnerable to issues like insecure authentication, poor validation, or misconfigured endpoints, which attackers can abuse. Additionally, the interconnected nature of APIs creates multiple endpoints, widening the attack surface and creating additional points of entry that attackers can exploit.As threats evolve and the attack surface grows to include more API endpoints, integrating AI threat detection and mitigation is an absolute must for businesses to take serious, deliberate action against API cyberattacks. Let’s find out why.Staying ahead of zero-day API attacksOf all the cyber attacks that commonly threaten APIs, zero-day attacks, leveraging unknown vulnerabilities, are probably the toughest to defeat. Traditional solutions rely more on the existence of preconfigured rules or signatures along with human interference to detect and block such attacks. This approach often fails against novel threats and can block legitimate traffic, leaving applications vulnerable and making APIs inaccessible to users.APIs must balance between allowing legitimate users access and maintaining security. AI and ML technologies excel at identifying zero-day attacks based on pattern and behavior analysis rather than known signatures. For instance, heuristic algorithms can detect anomalies, such as sudden spikes in unusual traffic or behaviors indicative of malicious intent.Consider the following example: A certain IP address makes an abnormally large number of requests to a rarely accessed endpoint. Even without prior knowledge of the IP or attack vector, an AI/ML-enhanced solution can flag the activity as suspicious and block it proactively. Using minimal indicators, such as frequency patterns or traffic anomalies, AI can stop attackers before they fully exploit vulnerabilities. Additionally, this means that only suspicious IPs are blocked, and legitimate users can continue to access APIs unimpeded.The risks of shadow APIsOne of the biggest risks is shadow APIs, which are endpoints that exist but aren't documented or monitored. These can arise from configuration mistakes, forgotten updates, or even rogue development practices. These unknown APIs are the ideal target for Layer 7 attacks, as they are often left undefended, making them easy targets.AI-powered API discovery tools map both known and unknown API endpoints, enabling the grouping and management of these endpoints so sensitive APIs can be properly secured. This level of visibility is critical to securing systems against API-targeting attacks; without it, businesses are left in the dark.API discovery as a critical security practiceWAAP with AI/ML capabilities excels in API security because it accurately checks and analyzes API traffic. The Gcore API discovery engine offers 97 to 99 percent accuracy, mapping APIs in users’ domains and using data to recommend policies to help secure APIs.How heuristics enhance WAAP AI capabilities to protect APIsWhile AI and ML form the backbone of modern WAAPs, heuristic methods complement them in enhancing detection accuracy. Heuristics allow the system to inspect granular behaviors, such as mouse clicks or scrolling patterns, which distinguish legitimate users from bots.For example, most scraping attacks involve automated scripts that interact with APIs in predictable and repetitive manners. In those cases, WAAP can use request patterns or user action monitoring to identify the script with high accuracy. Heuristics may define bots by checking how users interact with page elements, such as buttons or forms, and flagging those that behave unnaturally.This layered approach ensures that the most sophisticated automated attack attempts are caught in the net and mitigated without affecting legitimate traffic.Protect your APIs with the click of a button using Gcore WAAPAI offers proactive, intelligent solutions that can address the modern complexities of cybersecurity. These technologies empower organizations to secure APIs against even the most sophisticated threats, including zero-day vulnerabilities and undiscovered APIs.Interested in protecting your APIs with WAAP? Download our ebook to discover cybersecurity best practices, the most prevalent threats, and how WAAP can protect your business’s digital infrastructure, including APIs. Or, reach out to our team to learn more about Gcore WAAP.Discover why WAAP is a must-have for API protection

Bare metal vs. virtual machines: performance, cost, and use case comparison

Choosing the right type of server infrastructure is critical to how your application performs, scales, and fits your budget. For most workloads, the decision comes down to two core options: bare metal servers and virtual machines (VMs). Both can be deployed in the cloud, but they differ significantly in terms of performance, control, scalability, and cost.In this article, we break down the core differences between bare metal and virtual servers, highlight when to choose each, and explain how Gcore can help you deploy the right infrastructure for your needs. If you want to learn about either BM or VMs in detail, we’ve got articles for those: here’s the one for bare metal, and here’s a deep dive into virtual machines.Bare metal vs. virtual machines at a glanceWhen evaluating whether bare metal or virtual machines are right for your company, consider your specific workload requirements, performance priorities, and business objectives. Here’s a quick breakdown to help you decide what works best for you.FactorBare metal serversVirtual machinesPerformanceDedicated resources; ideal for high-performance workloadsShared resources; suitable for moderate or variable workloadsScalabilityOften requires manual scaling; less flexibleHighly elastic; easy to scale up or downCustomizationFull control over hardware, OS, and configurationLimited by hypervisor and provider’s environmentSecurityIsolated by default; no hypervisor layerShared environment with strong isolation protocolsCostHigher upfront cost; dedicated hardwarePay-as-you-go pricing; cost-effective for flexible workloadsBest forHPC, AI/ML, compliance-heavy workloadsStartups, dev/test, fast-scaling applicationsAll about bare metal serversA bare metal server is a single-tenant physical server rented from a cloud provider. Unlike virtual servers, the hardware is not shared with other users, giving you full access to all resources and deeper control over configurations. You get exclusive access and control over the hardware via the cloud provider, which offers the stability and security needed for high-demand applications.The benefits of bare metal serversHere are some of the business advantages of opting for a bare metal server:Maximized performance: Because they are dedicated resources, bare metal servers provide top-tier performance without sharing processing power, memory, or storage with other users. This makes them ideal for resource-intensive applications like high-performance computing (HPC), big data processing, and game hosting.Greater control: Since you have direct access to the hardware, you can customize the server to meet your specific requirements. This is especially important for businesses with complex, specialized needs that require fine-tuned configurations.High security: Bare metal servers offer a higher level of security than their alternatives due to the absence of virtualization. With no shared resources or hypervisor layer, there’s less risk of vulnerabilities that come with multi-tenant environments.Dedicated resources: Because you aren’t sharing the server with other users, all server resources are dedicated to your application so that you consistently get the performance you need.Who should use bare metal servers?Here are examples of instances where bare metal servers are the best option for a business:High-performance computing (HPC)Big data processing and analyticsResource-intensive applications, such as AI/ML workloadsGame and video streaming serversBusinesses requiring enhanced security and complianceAll about virtual machinesA virtual server (or virtual machine) runs on top of a physical server that’s been partitioned by a cloud provider using a hypervisor. This allows multiple VMs to share the same hardware while remaining isolated from each other.Unlike bare metal servers, virtual machines share the underlying hardware with other cloud provider customers. That means you’re using (and paying for) part of one server, providing cost efficiency and flexibility.The benefits of virtual machinesHere are some advantages of using a shared virtual machine:Scalability: Virtual machines are ideal for businesses that need to scale quickly and are starting at a small scale. With cloud-based virtualization, you can adjust your server resources (CPU, memory, storage) on demand to match changing workloads.Cost efficiency: You pay only for the resources you use with VMs, making them cost-effective for companies with fluctuating resource needs, as there is no need to pay for unused capacity.Faster deployment: VMs can be provisioned quickly and easily, which makes them ideal for anyone who wants to deploy new services or applications fast.Who should use virtual machines?VMs are a great fit for the following:Web hosting and application hostingDevelopment and testing environmentsRunning multiple apps with varying demandsStartups and growing businesses requiring scalabilityBusinesses seeking cost-effective, flexible solutionsWhich should you choose?There’s no one-size-fits-all answer. Your choice should depend on the needs of your workload:Choose bare metal if you need dedicated performance, low-latency access to hardware, or tighter control over security and compliance.Choose virtual servers if your priority is flexible scaling, faster deployment, and optimized cost.If your application uses GPU-based inference or AI training, check out our dedicated guide to VM vs. BM for AI workloads.Get started with Gcore BM or VMs todayAt Gcore, we provide both bare metal and virtual machine solutions, offering flexibility, performance, and reliability to meet your business needs. Gcore Bare Metal has the power and reliability needed for demanding workloads, while Gcore Virtual Machines offers customizable configurations, free egress traffic, and flexibility.Compare Gcore BM and VM pricing now

Optimize your workload: a guide to selecting the best virtual machine configuration

Virtual machines (VMs) offer the flexibility, scalability, and cost-efficiency that businesses need to optimize workloads. However, choosing the wrong setup can lead to poor performance, wasted resources, and unnecessary costs.In this guide, we’ll walk you through the essential factors to consider when selecting the best virtual machine configuration for your specific workload needs.﹟1 Understand your workload requirementsThe first step in choosing the right virtual machine configuration is understanding the nature of your workload. Workloads can range from light, everyday tasks to resource-intensive applications. When making your decision, consider the following:Compute-intensive workloads: Applications like video rendering, scientific simulations, and data analysis require a higher number of CPU cores. Opt for VMs with multiple processors or CPUs for smoother performance.Memory-intensive workloads: Databases, big data analytics, and high-performance computing (HPC) jobs often need more RAM. Choose a VM configuration that provides sufficient memory to avoid memory bottlenecks.Storage-intensive workloads: If your workload relies heavily on storage, such as file servers or applications requiring frequent read/write operations, prioritize VM configurations that offer high-speed storage options, such as SSDs or NVMe.I/O-intensive workloads: Applications that require frequent network or disk I/O, such as cloud services and distributed applications, benefit from VMs with high-bandwidth and low-latency network interfaces.﹟2 Consider VM size and scalabilityOnce you understand your workload’s requirements, the next step is to choose the right VM size. VM sizes are typically categorized by the amount of CPU, memory, and storage they offer.Start with a baseline: Select a VM configuration that offers a balanced ratio of CPU, RAM, and storage based on your workload type.Scalability: Choose a VM size that allows you to easily scale up or down as your needs change. Many cloud providers offer auto-scaling capabilities that adjust your VM’s resources based on real-time demand, providing flexibility and cost savings.Overprovisioning vs. underprovisioning: Avoid overprovisioning (allocating excessive resources) unless your workload demands peak capacity at all times, as this can lead to unnecessary costs. Similarly, underprovisioning can affect performance, so finding the right balance is essential.﹟3 Evaluate CPU and memory considerationsThe central processing unit (CPU) and memory (RAM) are the heart of a virtual machine. The configuration of both plays a significant role in performance. Workloads that need high processing power, such as video encoding, machine learning, or simulations, will benefit from VMs with multiple CPU cores. However, be mindful of CPU architecture—look for VMs that offer the latest processors (e.g., Intel Xeon, AMD EPYC) for better performance per core.It’s also important that the VM has enough memory to avoid paging, which occurs when the system uses disk space as virtual memory, significantly slowing down performance. Consider a configuration with more RAM and support for faster memory types like DDR4 for memory-heavy applications.﹟4 Assess storage performance and capacityStorage performance and capacity can significantly impact the performance of your virtual machine, especially for applications requiring large data volumes. Key considerations include:Disk type: For faster read/write operations, opt for solid-state drives (SSDs) over traditional hard disk drives (HDDs). Some cloud providers also offer NVMe storage, which can provide even greater speed for highly demanding workloads.Disk size: Choose the right size based on the amount of data you need to store and process. Over-allocating storage space might seem like a safe bet, but it can also increase costs unnecessarily. You can always resize disks later, so avoid over-allocating them upfront.IOPS and throughput: Some workloads require high input/output operations per second (IOPS). If this is a priority for your workload (e.g., databases), make sure that your VM configuration includes high IOPS storage options.﹟5 Weigh up your network requirementsWhen working with cloud-based VMs, network performance is a critical consideration. High-speed and low-latency networking can make a difference for applications such as online gaming, video conferencing, and real-time analytics.Bandwidth: Check whether the VM configuration offers the necessary bandwidth for your workload. For applications that handle large data transfers, such as cloud backup or file servers, make sure that the network interface provides high throughput.Network latency: Low latency is crucial for applications where real-time performance is key (e.g., trading systems, gaming). Choose VMs with low-latency networking options to minimize delays and improve the user experience.Network isolation and security: Check if your VM configuration provides the necessary network isolation and security features, especially when handling sensitive data or operating in multi-tenant environments.﹟6 Factor in cost considerationsWhile it’s essential that your VM has the right configuration, cost is always an important factor to consider. Cloud providers typically charge based on the resources allocated, so optimizing for cost efficiency can significantly impact your budget.Consider whether a pay-as-you-go or reserved model (which offers discounted rates in exchange for a long-term commitment) fits your usage pattern. The reserved option can provide significant savings if your workload runs continuously. You can also use monitoring tools to track your VM’s performance and resource usage over time. This data will help you make informed decisions about scaling up or down so you’re not paying for unused resources.﹟7 Evaluate security featuresSecurity is a primary concern when selecting a VM configuration, especially for workloads handling sensitive data. Consider the following:Built-in security: Look for VMs that offer integrated security features such as DDoS protection, web application firewall (WAF), and encryption.Compliance: Check that the VM configuration meets industry standards and regulations, such as GDPR, ISO 27001, and PCI DSS.Network security: Evaluate the VM's network isolation capabilities and the availability of cloud firewalls to manage incoming and outgoing traffic.﹟8 Consider geographic locationThe geographic location of your VM can impact latency and compliance. Therefore, it’s a good idea to choose VM locations that are geographically close to your end users to minimize latency and improve performance. In addition, it’s essential to select VM locations that comply with local data sovereignty laws and regulations.﹟9 Assess backup and recovery optionsBackup and recovery are critical for maintaining data integrity and availability. Look for VMs that offer automated backup solutions so that data is regularly saved. You should also evaluate disaster recovery capabilities, including the ability to quickly restore data and applications in case of failure.﹟10 Test and iterateFinally, once you've chosen a VM configuration, testing its performance under real-world conditions is essential. Most cloud providers offer performance monitoring tools that allow you to assess how well your VM is meeting your workload requirements.If you notice any performance bottlenecks, be prepared to adjust the configuration. This could involve increasing CPU cores, adding more memory, or upgrading storage. Regular testing and fine-tuning means that your VM is always optimized.Choosing a virtual machine that suits your requirementsSelecting the best virtual machine configuration is a key step toward optimizing your workloads efficiently, cost-effectively, and without unnecessary performance bottlenecks. By understanding your workload’s needs, considering factors like CPU, memory, storage, and network performance, and continuously monitoring resource usage, you can make informed decisions that lead to better outcomes and savings.Whether you're running a small application or large-scale enterprise software, the right VM configuration can significantly improve performance and cost. Gcore offers a wide range of virtual machine options that can meet your unique requirements. Our virtual machines are designed to meet diverse workload requirements, providing dedicated vCPUs, high-speed storage, and low-latency networking across 30+ global regions. You can scale compute resources on demand, benefit from free egress traffic, and enjoy flexible pricing models by paying only for the resources in use, maximizing the value of your cloud investments.Contact us to discuss your VM needs

11 simple tips for securing your APIs

A vast 84% of organizations have experienced API security incidents in the past year. APIs (application programming interfaces) are the backbone of modern technology, allowing seamless interaction between diverse software platforms. However, this increased connectivity comes with a downside: a higher risk of security breaches, which can include injection attacks, credential stuffing, and L7 DDoS attacks, as well as the ever-growing threat of AI-based attacks.Fortunately, developers and IT teams can implement DIY API protection. Mitigating vulnerabilities involves using secure coding techniques, conducting thorough testing, and applying strong security protocols and frameworks. Alternatively, you can simply use a WAAP (web application and API protection) solution for specialized, one-click, robust API protection.This article explains 11 practical tips that can help protect your APIs from security threats and hacking attempts, with examples of commands and sample outputs to provide API security.#1 Implement authentication and authorizationUse robust authentication mechanisms to verify user identity and authorization strategies like OAuth 2.0 to manage access to resources. Using OAuth 2.0, you can set up a token-based authentication system where clients request access tokens using credentials. # Requesting an access token curl -X POST https://yourapi.com/oauth/token \ -d "grant_type=client_credentials" \ -d "client_id=your_client_id" \ -d "client_secret=your_client_secret" Sample output: { "access_token": "eyJ0eXAiOiJKV1QiLCJhbGciOiJIUzI1NiJ9...", "token_type": "bearer", "expires_in": 3600 } #2 Secure communication with HTTPSEncrypting data in transit using HTTPS can help prevent eavesdropping and man-in-the-middle attacks. Enabling HTTPS may involve configuring your web server with SSL/TLS certificates, such as Let’s Encrypt with nginx. sudo certbot --nginx -d yourapi.com #3 Validate and sanitize inputValidating and sanitizing all user inputs protects against injection and other attacks. For a Node.js API, use express-validator middleware to validate incoming data. app.post('/api/user', [ body('email').isEmail(), body('password').isLength({ min: 5 }) ], (req, res) => { const errors = validationResult(req); if (!errors.isEmpty()) { return res.status(400).json({ errors: errors.array() }); } // Proceed with user registration }); #4 Use rate limitingLimit the number of requests a client can make within a specified time frame to prevent abuse. The express-rate-limit library implements rate limiting in Express.js. const rateLimit = require('express-rate-limit'); const apiLimiter = rateLimit({ windowMs: 15 * 60 * 1000, // 15 minutes max: 100 }); app.use('/api/', apiLimiter); #5 Undertake regular security auditsRegularly audit your API and its dependencies for vulnerabilities. Runnpm auditin your Node.js project to detect known vulnerabilities in your dependencies.  npm audit Sample output: found 0 vulnerabilities in 1050 scanned packages #6 Implement access controlsImplement configurations so that users can only access resources they are authorized to view or edit, typically through roles or permissions. The two more common systems are Role-Based Access Control (RBAC) and Attribute-Based Access Control (ABAC) for a more granular approach.You might also consider applying zero-trust security measures such as the principle of least privilege (PoLP), which gives users the minimal permissions necessary to perform their tasks. Multi-factor authentication (MFA) adds an extra layer of security beyond usernames and passwords.#7 Monitor and log activityMaintain comprehensive logs of API activity with a focus on both performance and security. By treating logging as a critical security measure—not just an operational tool—organizations can gain deeper visibility into potential threats, detect anomalies more effectively, and accelerate incident response.#8 Keep dependencies up-to-dateRegularly update all libraries, frameworks, and other dependencies to mitigate known vulnerabilities. For a Node.js project, updating all dependencies to their latest versions is vital. npm update #9 Secure API keysIf your API uses keys for access, we recommend that you make sure that they are securely stored and managed. Modern systems often utilize dynamic key generation techniques, leveraging algorithms to automatically produce unique and unpredictable keys. This approach enhances security by reducing the risk of brute-force attacks and improving efficiency.#10 Conduct penetration testingRegularly test your API with penetration testing to identify and fix security vulnerabilities. By simulating real-world attack scenarios, your organizations can systematically identify vulnerabilities within various API components. This proactive approach enables the timely mitigation of security risks, reducing the likelihood of discovering such issues through post-incident reports and enhancing overall cybersecurity resilience.#11 Simply implement WAAPIn addition to taking the above steps to secure your APIs, a WAAP (web application and API protection) solution can defend your system against known and unknown threats by consistently monitoring, detecting, and mitigating risks. With advanced algorithms and machine learning, WAAP safeguards your system from attacks like SQL injection, DDoS, and bot traffic, which can compromise the integrity of your APIs.Take your API protection to the next levelThese steps will help protect your APIs against common threats—but security is never one-and-done. Regular reviews and updates are essential to stay ahead of evolving vulnerabilities. To keep on top of the latest trends, we encourage you to read more of our top cybersecurity tips or download our ultimate guide to WAAP.Implementing specialized cybersecurity solutions such as WAAP, which combines web application firewall (WAF), bot management, Layer 7 DDoS protection, and API security, is the best way to protect your assets. Designed to tackle the complex challenges of API threats in the age of AI, Gcore WAAP is an advanced solution that keeps you ahead of security threats.Discover why WAAP is a non-negotiable with our free ebook

Subscribe to our newsletter

Get the latest industry trends, exclusive insights, and Gcore updates delivered straight to your inbox.