If you’re new to Linux, it’s important to understand how to manage your disks. In this guide, we’ll delve into the details of disk partition management in Linux using parted command, helping you to efficiently plan, modify, and optimize your storage. Whether you’re setting up a new system or reorganizing an existing one, knowing how to manage partitions is crucial.
Importance of Managing Disk Partitions
Managing disk partitions is a crucial aspect of system administration and overall computer management for several reasons:
- Optimal Performance. Properly managed partitions can improve the speed and responsiveness of a system. For instance, segregating operating system files from user data or placing frequently accessed data on faster sections of a disk can enhance performance.
- Data Organization. Partitioning allows users to segregate data based on types, purposes, or importance. For example, system files, personal data, and backup files can be placed in separate partitions to ensure better organization and faster data retrieval.
- Data Security. By isolating sensitive or critical data in its own partition, you reduce the risk of it being affected by system crashes, malware, or corrupted software on other partitions.
- Backup and Recovery. Partitioning makes backing up data more straightforward. Instead of backing up an entire drive, one can focus on specific partitions. This makes the recovery process faster and more targeted in the event of data loss.
- Dual Booting and System Upgrades. For those wanting to run multiple operating systems or test new software versions, separate partitions are vital. This allows users to have multiple OS versions or setups without interfering with their primary system.
In the following section, we’ll explore how to utilize the parted command for managing disk partitions.
How to Use the parted Command in Linux
Here’s a guide on managing disk partitions using the parted command in Linux, complete with descriptions and sample outputs.
#1 Launch parted on a Disk
This command opens the parted interface for the specific disk you want to work on.
sudo parted /dev/sdXReplace X with the appropriate letter for your disk, like sda.
Sample Output:

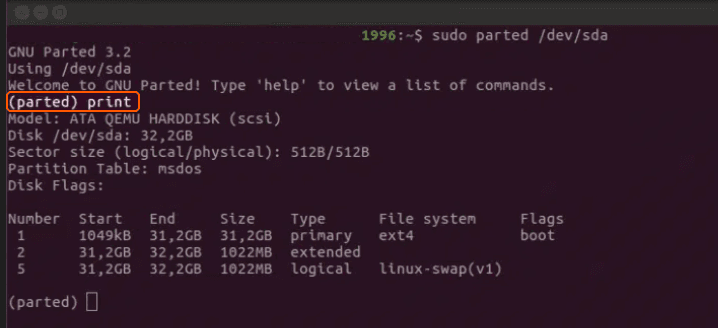
#2 Display Current Partitions
Displays the existing partitions on the disk using this command:
(parted) printSample Output:

#3 Create a New Partition
To create a new partition, use the mkpart command:
(parted) mkpart primary ext4 1GB 5GBThis command creates a primary ext4 partition that starts at 1GB and ends at 5GB.
#4 Delete a Partition
To delete a specific partition, use the rm command:
(parted) rm 1Here, 1 is the partition number. Replace it with the appropriate number for the partition you wish to delete.
#5 Resize a Partition
To resize a partition, use the resizepart command:
(parted) resizepart 1 10GBThis resizes partition number 1 to a size of 10GB.
#6 Set Partition Flags
To set flags (like bootable) for a partition, use the set command:
(parted) set 1 boot onThis makes partition number 1 bootable.
#7 Change Disk Label
To set or change the disk label type (like msdos), use the mklabel command:
(parted) mklabel msdos#8 Quitting parted tool
To exit the parted tool, simply use:
(parted) quitTips
- Always backup important data before modifying partitions.
- Make sure you’re working on the correct disk and partition to avoid data loss.
- If you’re not familiar with disk partitioning, it’s a good idea to first familiarize yourself with the basics or consult documentation.
By mastering the parted command, you can efficiently manage and organize your disk partitions on Linux. However, remember that disk operations can be destructive, so always proceed with caution and ensure you have backups of important data.
Conclusion
Looking to deploy Linux in the cloud? With Gcore Cloud, you can choose from Basic VM, Virtual Instances, or VPS/VDS suitable for Linux:
- Gcore Basic VM offers shared virtual machines from €3.2 per month
- Virtual Instances are virtual machines with a variety of configurations and an application marketplace
- Virtual Dedicated Servers provide outstanding speed of 200+ Mbps in 20+ global locations
Related articles
Subscribe to our newsletter
Get the latest industry trends, exclusive insights, and Gcore updates delivered straight to your inbox.


