Gcore named a Leader in the GigaOm Radar for AI Infrastructure!Get the report
  1. Home
  2. Developers
  3. Podman for Docker Users

Podman for Docker Users

  • By Gcore
  • March 27, 2023
  • 14 min read
Podman for Docker Users

Podman is the command-line interface tool that lets you interact with Libpod, a library for running and managing OCI-based containers. It is important to note that Podman doesn’t depend on a daemon, and it doesn’t require root privileges.

The first part of this tutorial focuses on similarities between Podman and Docker, and we’ll show how you can do the following:

  • Move a Docker image to Podman.
  • Create a bare-bones Nuxt.JS project and build a container image for it
  • Push your container image to Quay.io
  • Pull the image from Quay.io and run it with Docker.

In the second part of this tutorial, we’ll walk you through two of the most important features that differentiate Podman from Docker. In this section, you will do the following:

  • Create a Pod with Podman
  • Generate a Kubernetes Pod spec with Podman, and deploy it to a Kubernetes cluster.

Prerequisites

  1. This tutorial is intended for readers who have prior exposure to Docker. In the next sections, you will use commands such as run, build, push, commit, and tag. It is beyond the scope of this tutorial to explain how these commands work.
  2. A running Linux system with Podman and Docker installed.

You can enter the following command to check that Podman is installed on your system:

podman version
Version:            1.6.4RemoteAPI Version:  1Go Version:         go1.12.12OS/Arch:            linux/amd64

Refer Podman Installation Instructions for details on how to install Podman.

Use the following command to verify if Docker is installed:

docker --version
Docker version 18.06.3-ce, build d7080c1

See the Get Docker page for details on how to install Docker.

  1. Git. To check if Git is installed on your system enter, type the following command:
git version
git version 2.18.2

You can refer Getting Started – Installing Git on details of installing Git.

  1. Node.js 10 or higher. To check if Node.js is installed on your computer, type the following command:
node --version
v10.16.3

If Node.js is not installed, you can download the installer from the Downloads page.

  • A Kubernetes Cluster. If you don’t have a running Kubernetes cluster, refer the “Create a Kubernetes Cluster with Kind” section.
  • Additionally, you will need a Quay.io account.

Moving Images from Docker to Podman

If you’ve just installed Podman on a system on which you’ve already used Docker to pull one or more images, you’ll notice that running the podman images command doesn’t show your Docker images:

docker images
REPOSITORY          TAG                 IMAGE ID            CREATED             SIZEcassandra           latest              b571e0906e1b        10 days ago         324MB
podman images
REPOSITORY   TAG   IMAGE ID   CREATED   SIZE

The reason why you don’t see your Docker images is that Podman runs without root privileges. Thus, its repository is located in the user’s home directory – ~/.local/share/containers. However, Podman can import an image directly from the Docker daemon running on your machine, through the docker-daemon  transport.

In this section, you’ll use Docker to pull the hello-world image. Then, you’ll import it into Podman. Lastly, you’ll run the hello-world image with Podman.

  1. Download and run the hello-world image by executing the following command:
sudo docker run hello-world
Unable to find image 'hello-world:latest' locallylatest: Pulling from library/hello-world1b930d010525: Pull completeDigest: sha256:9572f7cdcee8591948c2963463447a53466950b3fc15a247fcad1917ca215a2fStatus: Downloaded newer image for hello-world:latestHello from Docker!This message shows that your installation appears to be working correctly.To generate this message, Docker took the following steps: 1. The Docker client contacted the Docker daemon. 2. The Docker daemon pulled the "hello-world" image from the Docker Hub.    (amd64) 3. The Docker daemon created a new container from that image which runs the    executable that produces the output you are currently reading. 4. The Docker daemon streamed that output to the Docker client, which sent it    to your terminal.To try something more ambitious, you can run an Ubuntu container with: $ docker run -it ubuntu bashShare images, automate workflows, and more with a free Docker ID: https://hub.docker.com/For more examples and ideas, visit: https://docs.docker.com/get-started/
  1. The following docker images command lists the Docker images on your system and pretty-prints the output:
sudo docker images --format '{{.Repository}}:{{.Tag}}'
hello-world:latest
  1. Enter the podman pull command specifying the transport (docker-daemon) and the name of the image, separated by ::
podman pull docker-daemon:hello-world:latest
Getting image source signaturesCopying blob af0b15c8625b doneCopying config fce289e99e doneWriting manifest to image destinationStoring signaturesfce289e99eb9bca977dae136fbe2a82b6b7d4c372474c9235adc1741675f587e
  1. Once you’ve imported the image, running the podman images command will display the hello-world image:
podman images
REPOSITORY                      TAG      IMAGE ID       CREATED         SIZEdocker.io/library/hello-world   latest   fce289e99eb9   13 months ago   5.94 kB
  1. To run the image, enter the following podman run command:
podman run hello-world
Hello from Docker!This message shows that your installation appears to be working correctly.To generate this message, Docker took the following steps: 1. The Docker client contacted the Docker daemon. 2. The Docker daemon pulled the "hello-world" image from the Docker Hub.    (amd64) 3. The Docker daemon created a new container from that image which runs the    executable that produces the output you are currently reading. 4. The Docker daemon streamed that output to the Docker client, which sent it    to your terminal.To try something more ambitious, you can run an Ubuntu container with: $ docker run -it ubuntu bashShare images, automate workflows, and more with a free Docker ID: https://hub.docker.com/For more examples and ideas, visit: https://docs.docker.com/get-started/

Creating a Basic Nuxt.js Project

For the scope of this tutorial, we’ll create a simple web-application using Nuxt.JS, a progressive Vue-based framework that aims to provide a great experience for developers. Then, in the next sections, you’ll use Podman to create a container image for your project and push it Quay.io. Lastly, you’ll use Docker to run the container image.

  1. Nuxt.JS is distributed as an NPM package. To install it, fire up a terminal window, and execute the following command:
npm install nuxt
+ nuxt@2.11.0added 1067 packages from 490 contributors and audited 9750 packages in 75.666sfound 0 vulnerabilities

Note that the above output was truncated for brevity.

  1. With Nuxt.JS installed on your computer, you can create a new bare-bones project:
npx create-nuxt-app podman-nuxtjs-demo

You will be prompted to answer a few questions:

create-nuxt-app v2.14.0✨  Generating Nuxt.js project in podman-nuxtjs-demo? Project name podman-nuxtjs-demo? Project description Podman Nuxt.JS demo? Author name Gcore? Choose the package manager Npm? Choose UI framework Bootstrap Vue? Choose custom server framework None (Recommended)? Choose Nuxt.js modules (Press <space> to select, <a> to toggle all, <i> to invert selection)? Choose linting tools ESLint? Choose test framework None? Choose rendering mode Universal (SSR)? Choose development tools jsconfig.json (Recommended for VS Code)

Once you answer these questions, npm will install the required dependencies:

🎉  Successfully created project podman-nuxtjs-demo  To get started:	cd podman-nuxtjs-demo	npm run dev  To build & start for production:	cd podman-nuxtjs-demo	npm run build	npm run start

Note that the above output was truncated for brevity.

  1. Enter the following commands to start your new application:
cd podman-nuxtjs-demo/ && npm run dev
> podman-nuxtjs-demo@1.0.0 dev /home/vagrant/podman-nuxtjs-demo> nuxt   ╭─────────────────────────────────────────────╮   │                                             │   │   Nuxt.js v2.11.0                           │   │   Running in development mode (universal)   │   │                                             │   │   Listening on: http://localhost:3000/      │   │                                             │   ╰─────────────────────────────────────────────╯ℹ Preparing project for development                                               14:39:30ℹ Initial build may take a while                                                  14:39:30✔ Builder initialized                                                             14:39:30✔ Nuxt files generated                                                            14:39:30✔ Client  Compiled successfully in 23.53s✔ Server  Compiled successfully in 17.82sℹ Waiting for file changes                                                        14:39:56ℹ Memory usage: 209 MB (RSS: 346 MB)                                              14:39:56
  1. Point your browser to
    http://localhost:3000
    , and you should see something similar to the screenshot below:

Building a Container Image for Your Nuxt.JS Project

In this section, we’ll look at how you can use Podman to build a container image for thepodman-nextjs-demo project.

  1. Create a file called Dockerfile and place the following content into it:
FROM node:10WORKDIR /usr/src/appCOPY package*.json ./RUN npm installCOPY . .EXPOSE 3000CMD [ "npm", "run", "dev" ]

For a quick refresher on the above Dockerfile commands, refer the Create a Docker Image section from the Debug a Node.js Application Running in a Docker Container tutorial.

  1. To avoid sending large files to the build context and speed up the process, create a file called .dockerignore with the following content:
node_modulesnpm-debug.log.nuxt

As you can see, this is just a plain-text file containing names of the files and directories that Podman should exclude from the build.

  1. Build the image. Execute the following podman build command, specifying the -t flag with the tagged name Podman will apply to the build image:
podman build -t podman-nuxtjs-demo:podman .
STEP 1: FROM node:10STEP 2: RUN mkdir -p /usr/src/nuxt-app--> Using cache c7198c4f08b90ecb5575bbce23fc095e5c65fe5dc4b4f77b23192e2eae094d6fSTEP 3: WORKDIR /usr/src/nuxt-app--> Using cache f1cc5aba3f36e122513c5ff0410f862d6099bcee886453f7fb30859f66e0ac78STEP 4: COPY . /usr/src/nuxt-app/--> Using cache fb4c322c98b41d446f5cceb88b3f9c451751d0cfe8ed9d0e6eb153919b498da3STEP 5: RUN npm install--> Using cache bb5324e79782b4522048dcc5f0f02c41b56e12198438aa59a7588a6824a435e1STEP 6: RUN npm run build> podman-nuxtjs-demo@1.0.0 build /usr/src/nuxt-app> nuxt buildℹ Production build✔ Builder initialized✔ Nuxt files generated✔ Client  Compiled successfully in 2.95m✔ Server  Compiled successfully in 10.91sHash: 7c4493c4d1c7b235dd8eVersion: webpack 4.41.6Time: 177257msBuilt at: 02/11/2020 4:48:17 PM                         Asset      Size  Chunks                                Chunk Names../server/client.manifest.json  16.1 KiB          [emitted]       7d497fe85470995d6e29.js  2.99 KiB       2  [emitted] [immutable]         pages/index       848739217655a36af267.js   671 KiB       4  [emitted] [immutable]  [big]  vendors.app       90036491716edfc3e86d.js   159 KiB       1  [emitted] [immutable]         commons.app                      LICENSES  1.95 KiB          [emitted]       b625f5fc00e8ff962762.js  2.31 KiB       3  [emitted] [immutable]         runtime       eac7116f7d28455b0958.js    36 KiB       0  [emitted] [immutable]         app + 2 hidden assetsEntrypoint app = b625f5fc00e8ff962762.js 90036491716edfc3e86d.js 848739217655a36af267.js eac7116f7d28455b0958.jsWARNING in asset size limit: The following asset(s) exceed the recommended size limit (244 KiB).This can impact web performance.Assets:  848739217655a36af267.js (671 KiB)Hash: e3d9cfd644a086dc9c5bVersion: webpack 4.41.6Time: 10916msBuilt at: 02/11/2020 4:48:29 PM                  Asset       Size  Chunks                         Chunk Namesd1d703b09adf296a453d.js   3.07 KiB       1  [emitted] [immutable]  pages/index              server.js    222 KiB       0  [emitted]              app   server.manifest.json  145 bytes          [emitted]Entrypoint app = server.js0d239b0083a60482b4b5fa60a99b96dd22045822e50fbd83b8a369d8179bf307STEP 7: EXPOSE 30001d037e041dd4a8d6c94a9f6fb8fe6578f5e00d27aab9168bad83e7ab260bbeaeSTEP 8: ENV NUXT_HOST=0.0.0.040d684a5441a8da38ed5198be722719f393be13a855a9e85cbc49e5c7155f7ccSTEP 9: ENV NUXT_PORT=30007d07961e058d66e172f4b9e01d50fb355c16060a990252c5bc7cd35d960f5f72STEP 10: CMD ["npm", "run", "dev"]STEP 11: COMMIT podman-nuxtjs-demo:podman54c55a8a44f30105371652bc2c25e0fbba200ad6c945654077151194aa0a66fe
  1. At this point, you can check that everything went well with:
podman images
REPOSITORY                     TAG      IMAGE ID       CREATED              SIZElocalhost/podman-nuxtjs-demo   podman   54c55a8a44f3   About a minute ago   1.09 GBdocker.io/library/node         10       bb78c02ca3bf   4 days ago           937 MB
  1. To run the podman-nuxtjs-demo:podman container, enter the podman run command and pass it the following arguments:
  • -dt to specify that the container should be run in the background and that Podman should allocate a pseudo-TTY
  • -p with the port on the host (3000) that’ll be forwarded to the container port (3000), separated by :.
  • The name of your image (podman-nuxtjs-demo:podman)
podman run -dt -p 3000:3000/tcp podman-nuxtjs-demo:podman

This will print out to the console the container ID:

4de08084dd1d33fcdae96cd493b3eb20406ea89ce2a3e8dbc833b38c2243ce43
  1. You can list your running containers with:
podman ps
CONTAINER ID  IMAGE                                COMMAND      CREATED        STATUS            PORTS                   NAMES4de08084dd1d  localhost/podman-nuxtjs-demo:podman  npm run dev  4 seconds ago  Up 4 seconds ago  0.0.0.0:3000->3000/tcp  objective_neumann
  1. To retrieve detailed information about your running container, enter the podman inspect command specifying the container ID:
podman inspect 4de08084dd1d33fcdae96cd493b3eb20406ea89ce2a3e8dbc833b38c2243ce43
podman inspect 4de08084dd1d33fcdae96cd493b3eb20406ea89ce2a3e8dbc833b38c2243ce43[    {        "Id": "4de08084dd1d33fcdae96cd493b3eb20406ea89ce2a3e8dbc833b38c2243ce43",        "Created": "2020-02-11T17:00:06.819669549Z",        "Path": "docker-entrypoint.sh",        "Args": [            "npm",            "run",            "dev"        ],        "State": {            "OciVersion": "1.0.1-dev",            "Status": "running",            "Running": true,            "Paused": false,            "Restarting": false,            "OOMKilled": false,            "Dead": false,            "Pid": 10637,            "ConmonPid": 10628,            "ExitCode": 0,            "Error": "",            "StartedAt": "2020-02-11T17:00:07.317812139Z",            "FinishedAt": "0001-01-01T00:00:00Z",            "Healthcheck": {                "Status": "",                "FailingStreak": 0,                "Log": null            }        },        "Image": "54c55a8a44f30105371652bc2c25e0fbba200ad6c945654077151194aa0a66fe",        "ImageName": "localhost/podman-nuxtjs-demo:podman",        "Rootfs": "",        "Pod": "",

Note that the above output was truncated for brevity.

  1. To retrieve the logs from your container, run the podman logs command specifying the container ID or the --latest flag:
podman logs --latest
> podman-nuxtjs-demo@1.0.0 dev /usr/src/nuxt-app> nuxt   ╭─────────────────────────────────────────────╮   │                                             │   │   Nuxt.js v2.11.0                           │   │   Running in development mode (universal)   │   │                                             │   │   Listening on: http://10.0.2.100:3000/     │   │                                             │   ╰─────────────────────────────────────────────╯ℹ Preparing project for developmentℹ Initial build may take a while✔ Builder initialized✔ Nuxt files generated✔ Client  Compiled successfully in 25.36s✔ Server  Compiled successfully in 19.21sℹ Waiting for file changesℹ Memory usage: 254 MB (RSS: 342 MB)
  1. Display the list of running processes inside your container:
podman top 4de08084dd1d
USER   PID   PPID   %CPU     ELAPSED           TTY     TIME   COMMANDroot   1     0      0.000    3m52.098907307s   pts/0   0s     npmroot   17    1      0.000    3m51.099829437s   pts/0   0s     sh -c nuxtroot   18    17     11.683   3m51.099997015s   pts/0   27s    node /usr/src/nuxt-app/node_modules/.bin/nuxt

Push Your Podman Image to Quay.io

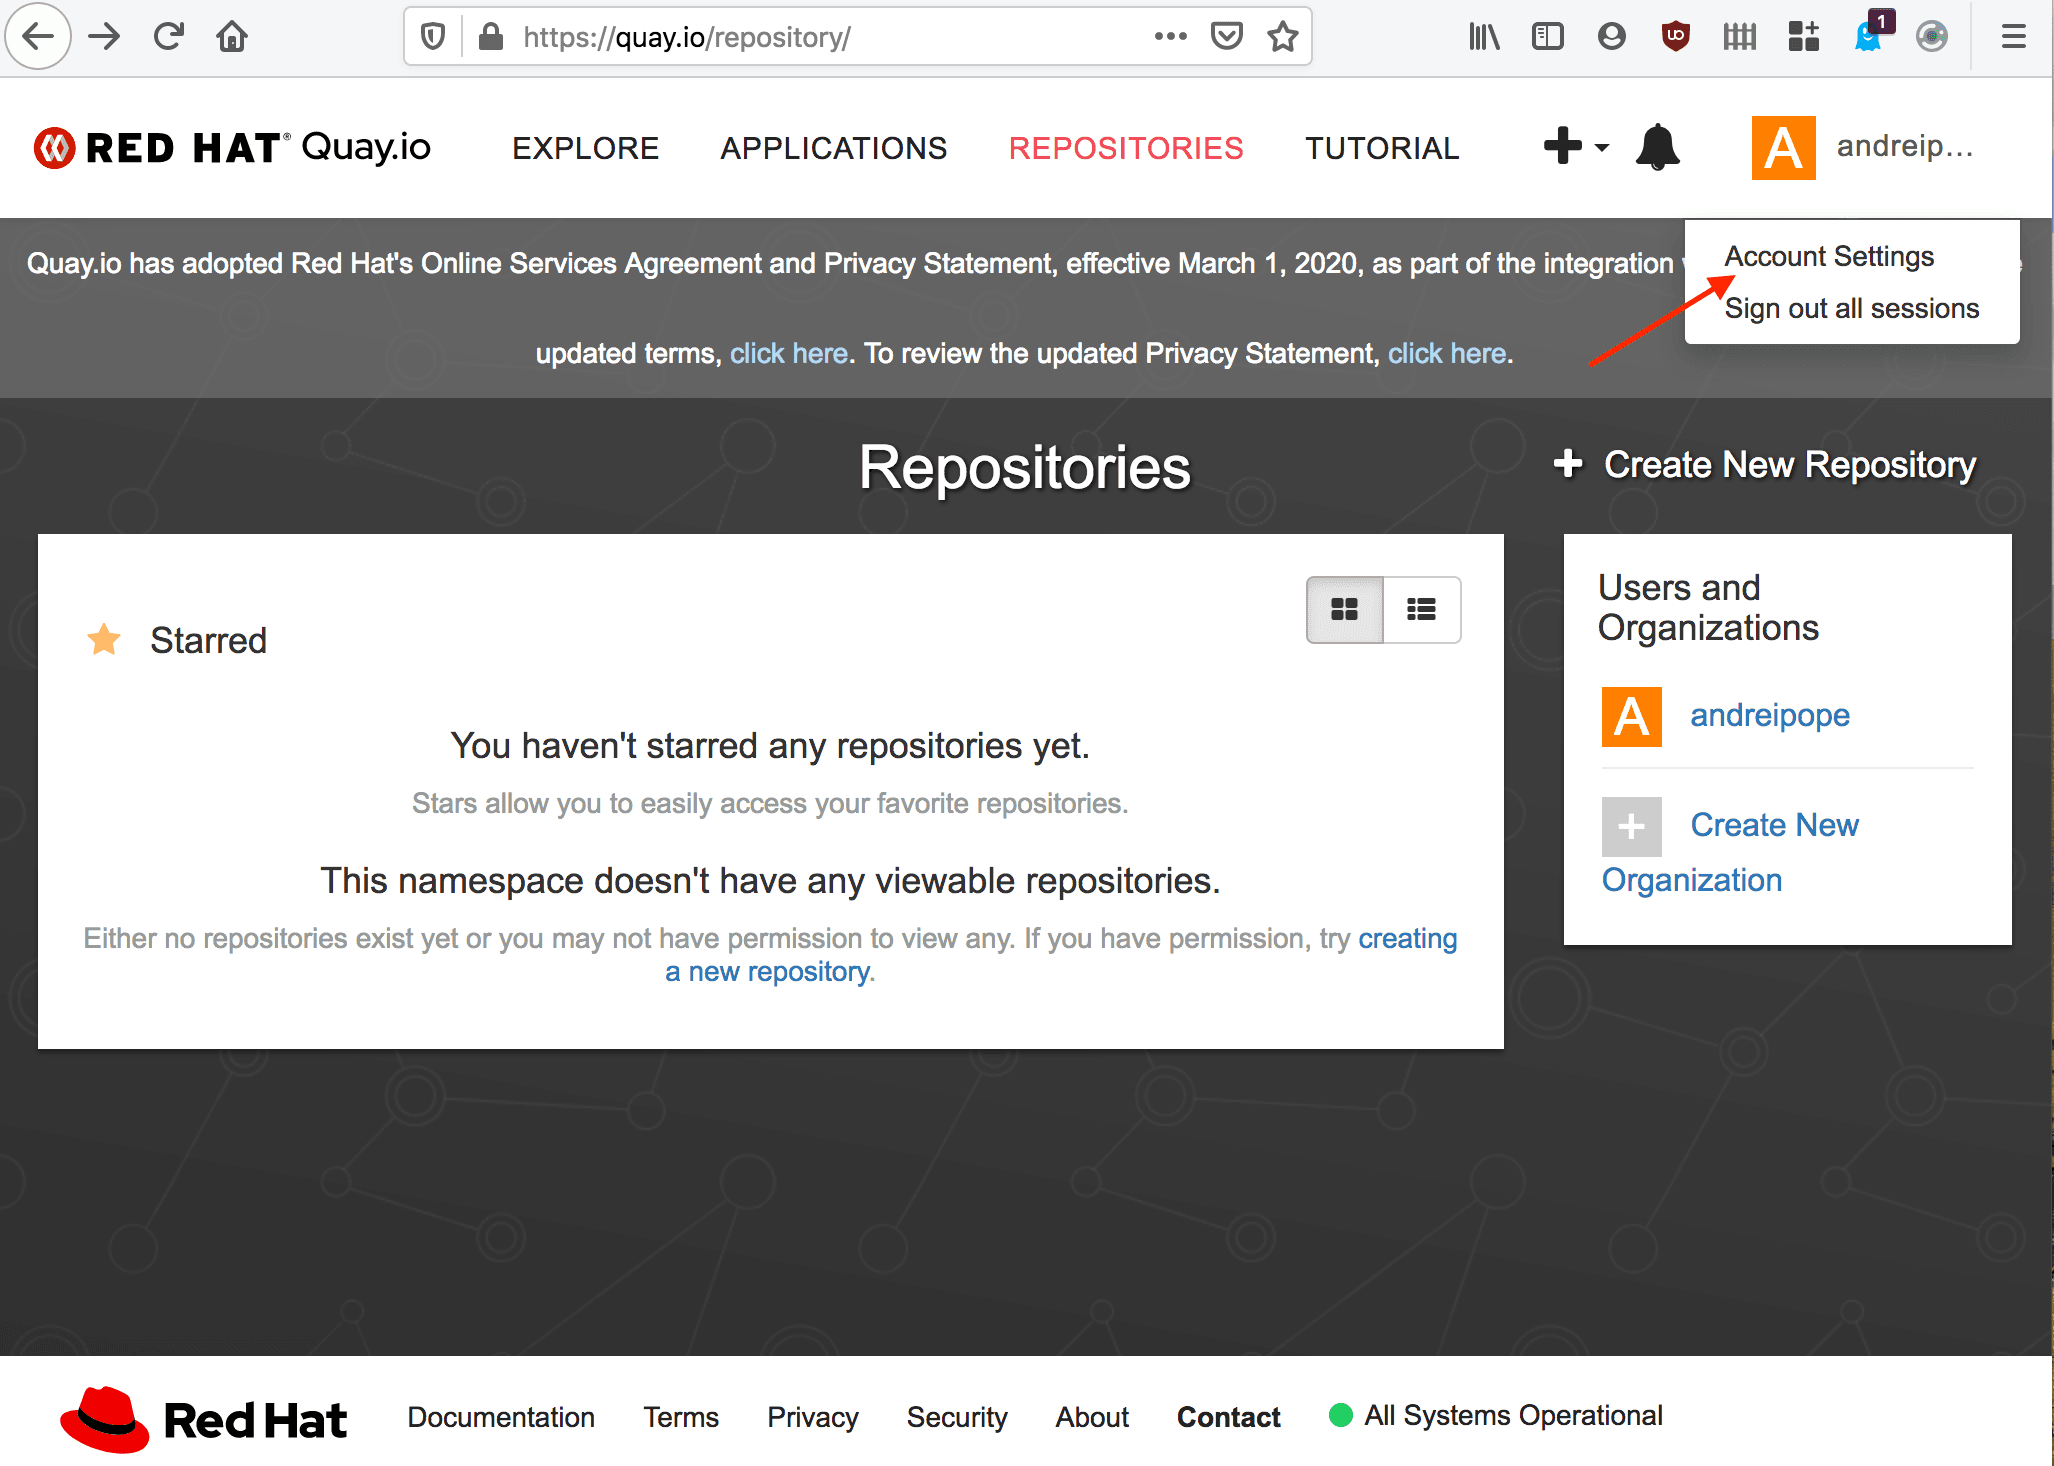
  1. First, you must generate an encrypted password. Point your browser to http://quay.io, and then navigate to the Account Settings page:
  1. On the Account Settings page, select Generate Encrypted Password:
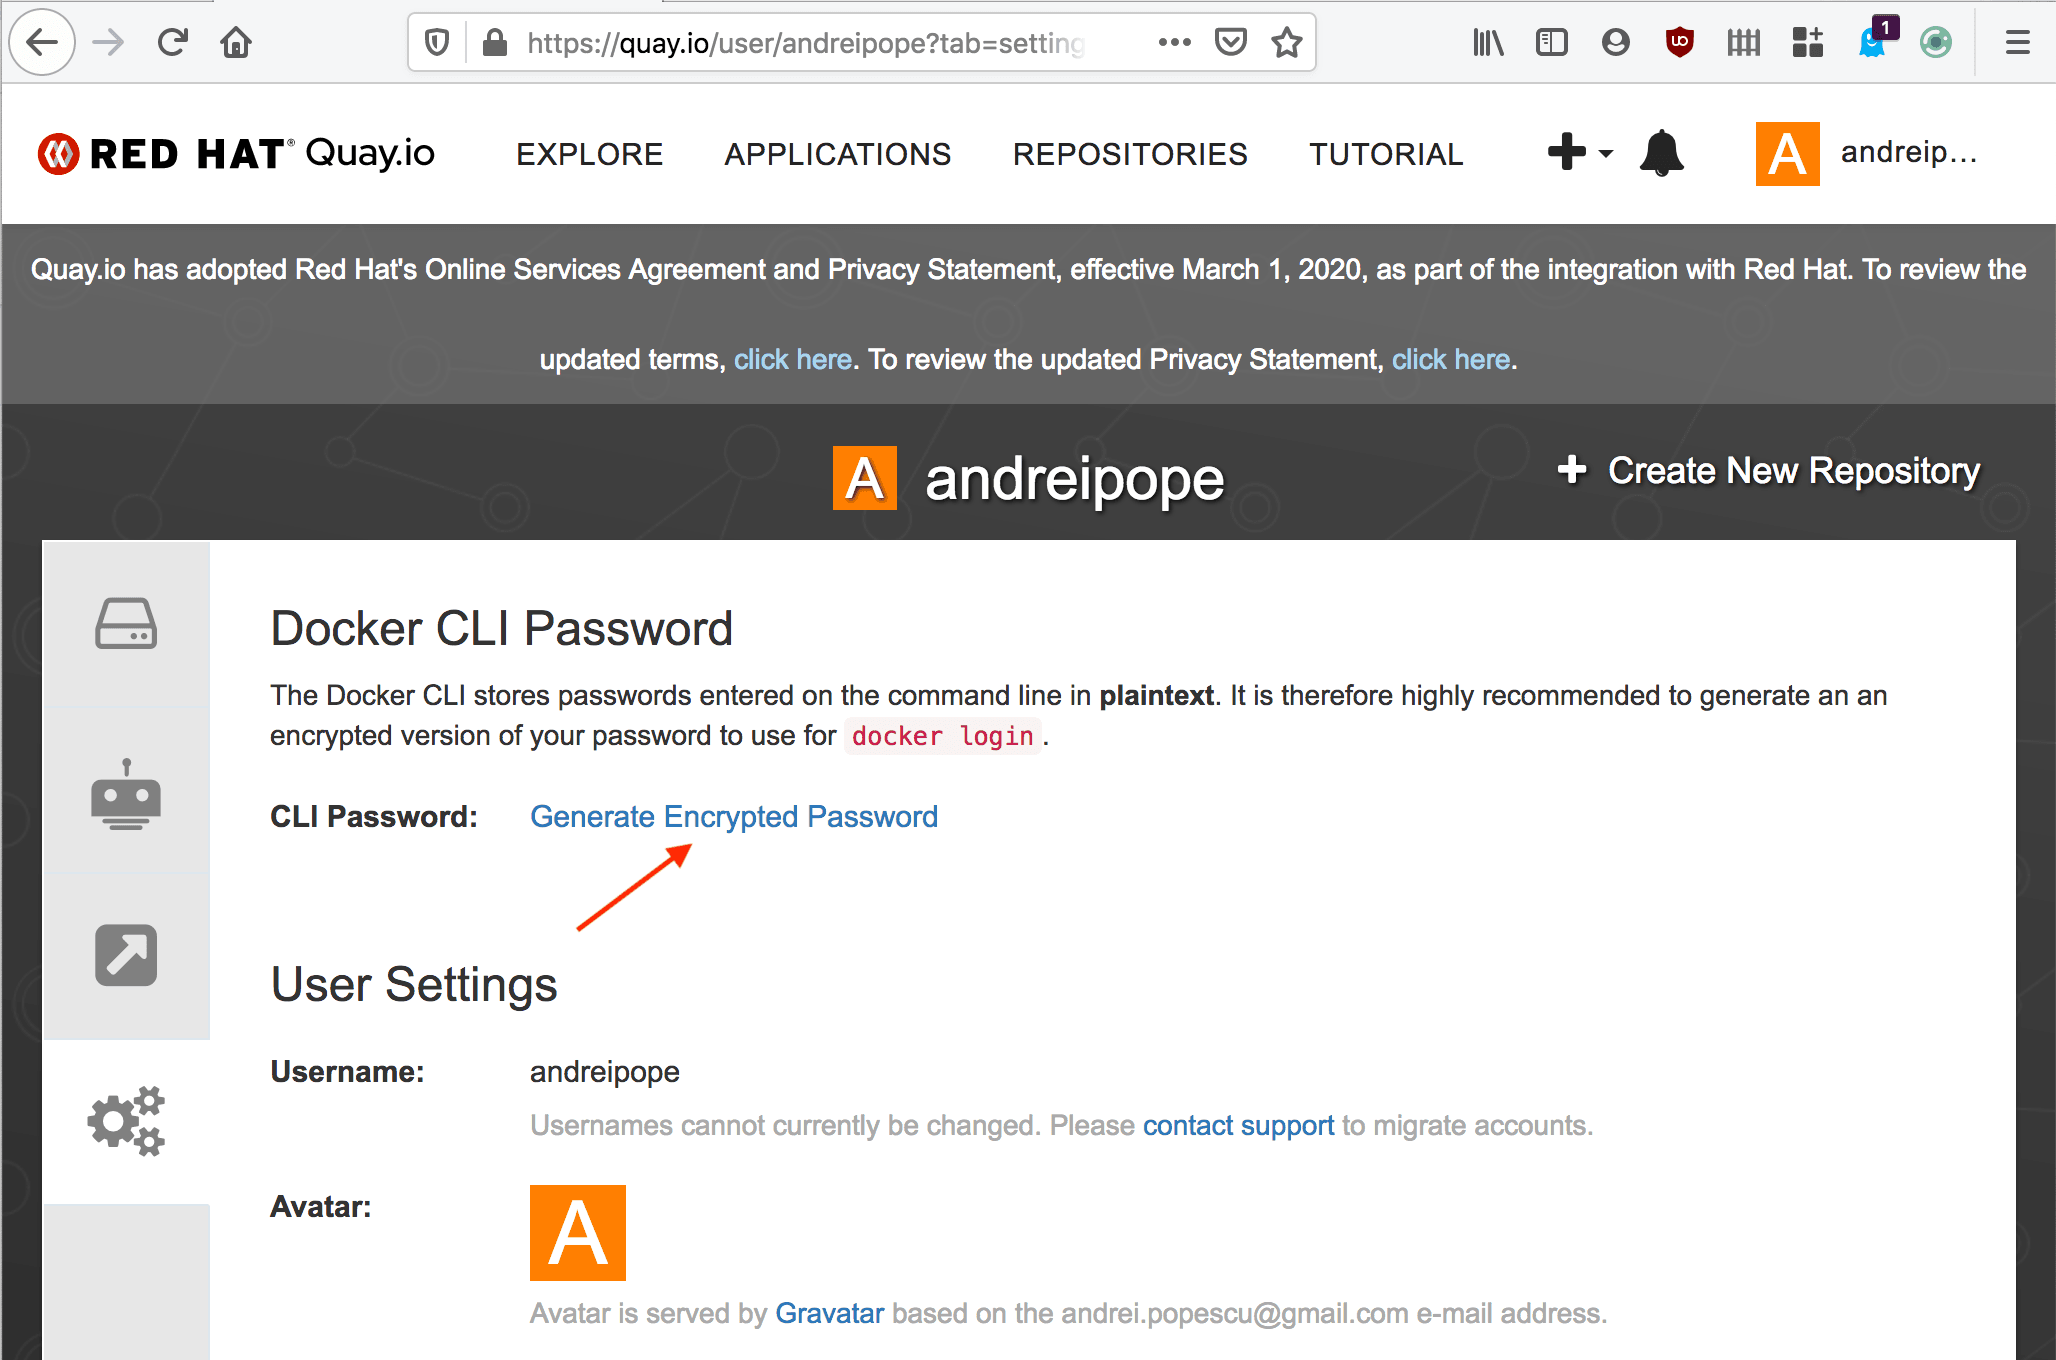
  1. When prompted, enter your Quay.io password:
  1. From the sidebar on the left, select Docker Login. Then, copy your encrypted password:
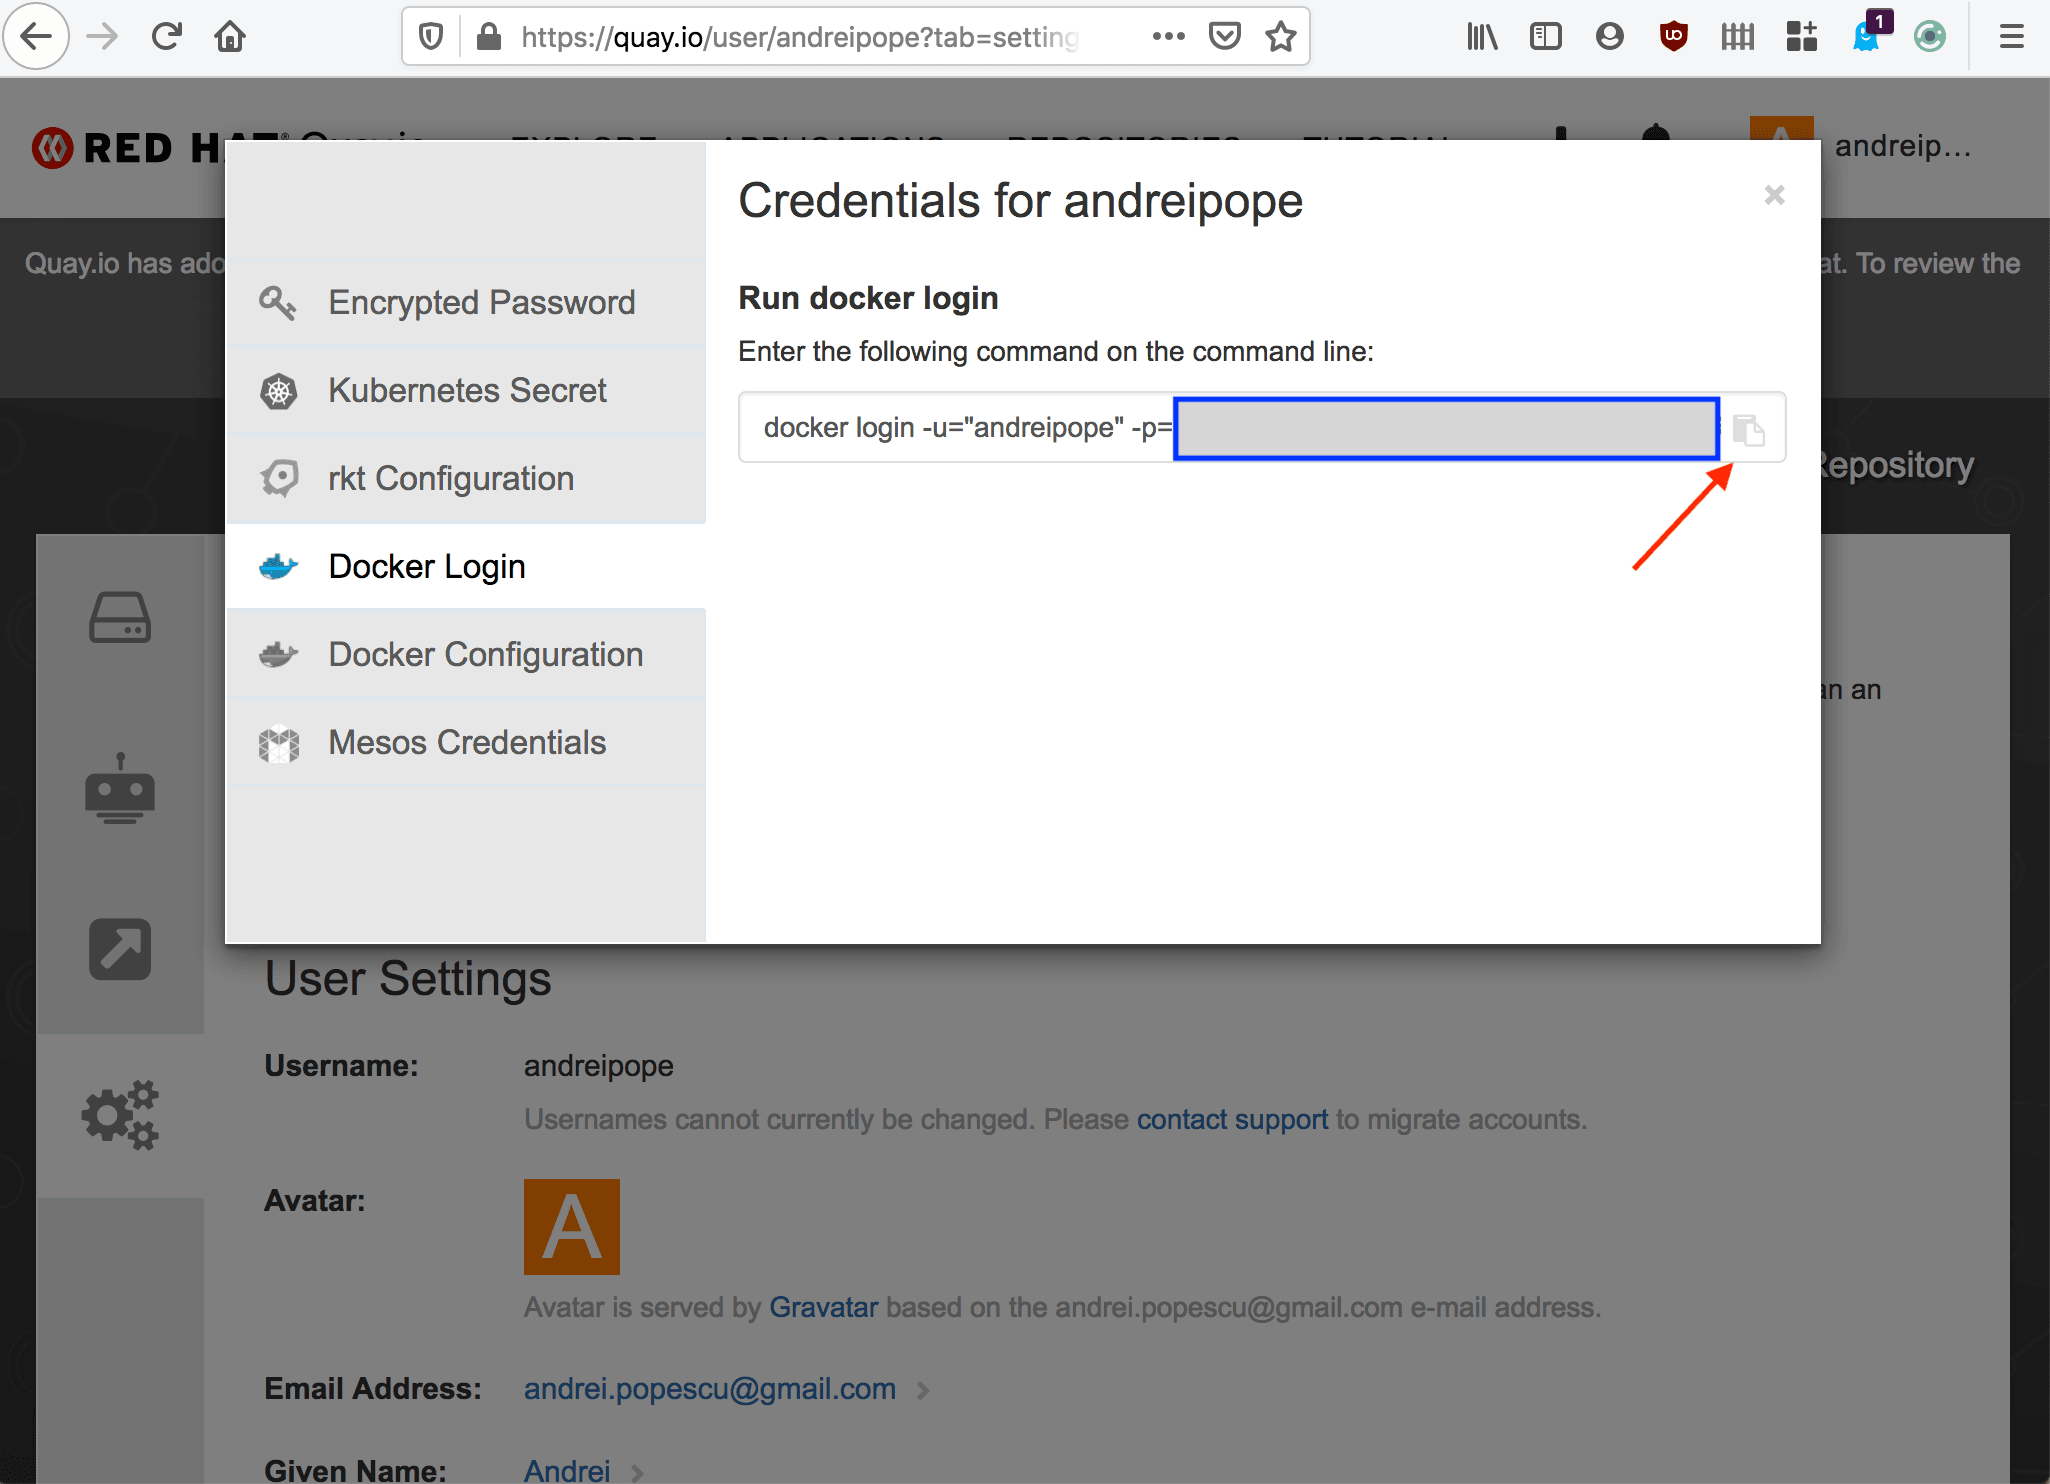
  1. You can now log in to Quay.io. Enter the podman login command specifying:
  • The registry server (quay.io)
  • The -u flag with your username
  • The -p flag with the encrypted password you retrieved earlier
podman login quay.io -u <YOUR_USER_NAME> -p="<YOUR_ENCRYPTED_PASSWORD>"
Login Succeeded!
  1. To push the podman-nuxtjs-demo image to Quay.io, enter the following podman push command:
podman push podman-nuxtjs-demo:podman quay.io/andreipope/podman-nuxtjs-demo:podman
Getting image source signaturesCopying blob 69dfa7bd7a92 doneCopying blob 4d1ab3827f6b doneCopying blob 7948c3e5790c doneCopying blob 01727b1a72df doneCopying blob 03dc1830d2d5 doneCopying blob 1d7382716a27 doneCopying blob 062fc3317d1a doneCopying blob 3d36b8a4efb1 doneCopying blob 1708ebc408a9 doneCopying blob 0aacf878561f doneCopying blob c49b91e9cfd0 doneCopying blob 4294ef3571b7 doneCopying blob 1da55789948c doneCopying config 54c55a8a44 doneWriting manifest to image destinationCopying config 54c55a8a44 doneWriting manifest to image destinationStoring signatures

In the above command, do not forget to replace our username (andreipope) with yours.

  1. Point your browser to https://quay.io/, navigate to the podman-nuxtjs-demo repository, and make sure the repository is public:
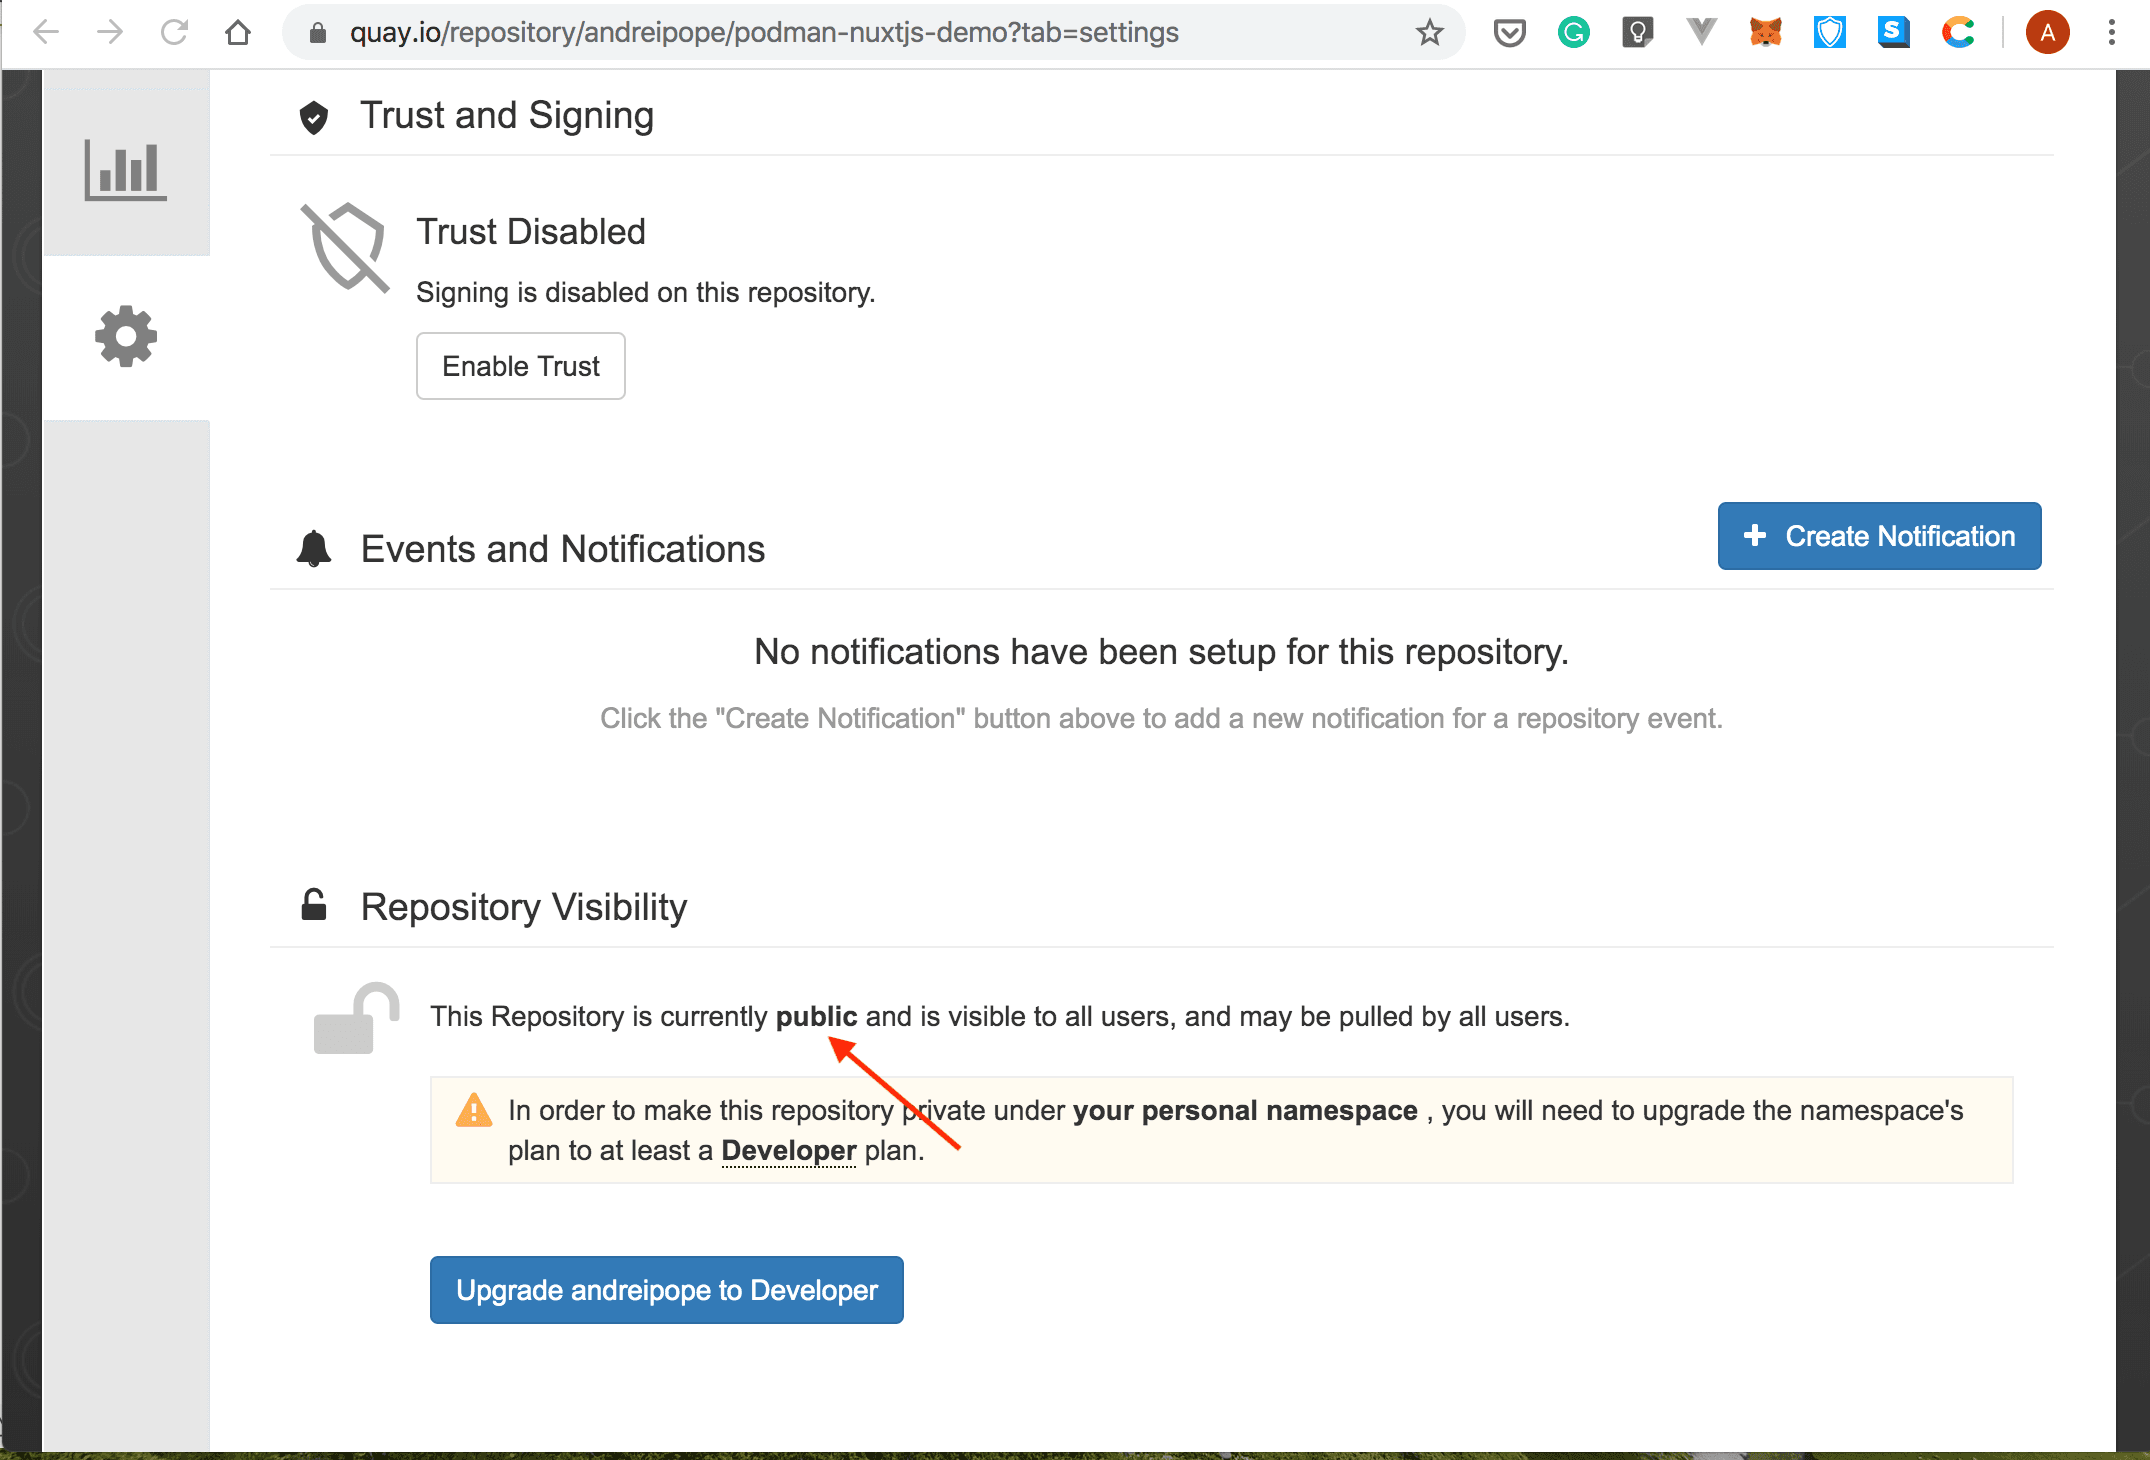
Run Your Podman Image with Docker

Container images are compatible between Podman and Docker. In this section, you’ll use Docker to pull the podman-nuxtjs-demo image from Quay.io and run it. Ideally, you would want to run this on a different machine.

  1. You can log in to Quay.io by entering the docker login command and passing it the following parameters:
  • The -u flag with your username
  • The -p flag with your encrypted password (you retrieved it from Quay.io in the previous section)
  • The name of the registry (quay.io)
docker login -u="<YOUR_USER_NAME>" -p="YOUR_ENCRYPTED_PASSWORD" quay.io
WARNING! Using --password via the CLI is insecure. Use --password-stdin.Login Succeeded
  1. To run the podman-nuxtjs-demo image, you can use the following command:
docker run -dt -p 3000:3000/tcp  quay.io/andreipope/podman-nuxtjs-demo:podman
Unable to find image 'quay.io/andreipope/podman-nuxtjs-demo:podman' locallypodman: Pulling from andreipope/podman-nuxtjs-demo03644a8453bd: Pull completee2c9fbbb35b2: Pull complete0c33fe27c91c: Pull complete957ac2567af6: Pull complete934d2e09d84d: Pull complete50c60e376f59: Pull complete3c43a52a3ecc: Pull completee74942a3267a: Pull completeaf1466e8bc5b: Pull complete3f24948a552e: Pull completedf2fea35a007: Pull complete7045f2526057: Pull complete5090c2f6d806: Pull completeDigest: sha256:fcf90cfc3fe1d0f7e975db8a271003cdd51d6f177e490eb39ec1e44d3659b815Status: Downloaded newer image for quay.io/andreipope/podman-nuxtjs-demo:podman1c0981690d66f2cd8cb77e9573f1dd4e9d7700869e08797b42fc33590d8baabf
  1. Wait a bit until Docker pulls the image and creates the container. Then, issue the the docker ps command to display the list of running containers:
docker ps
CONTAINER ID        IMAGE                                          COMMAND                  CREATED             STATUS              PORTS                    NAMES1c0981690d66        quay.io/andreipope/podman-nuxtjs-demo:podman   "docker-entrypoint.s…"   25 seconds ago      Up 20 seconds       0.0.0.0:3000->3000/tcp   practical_bose
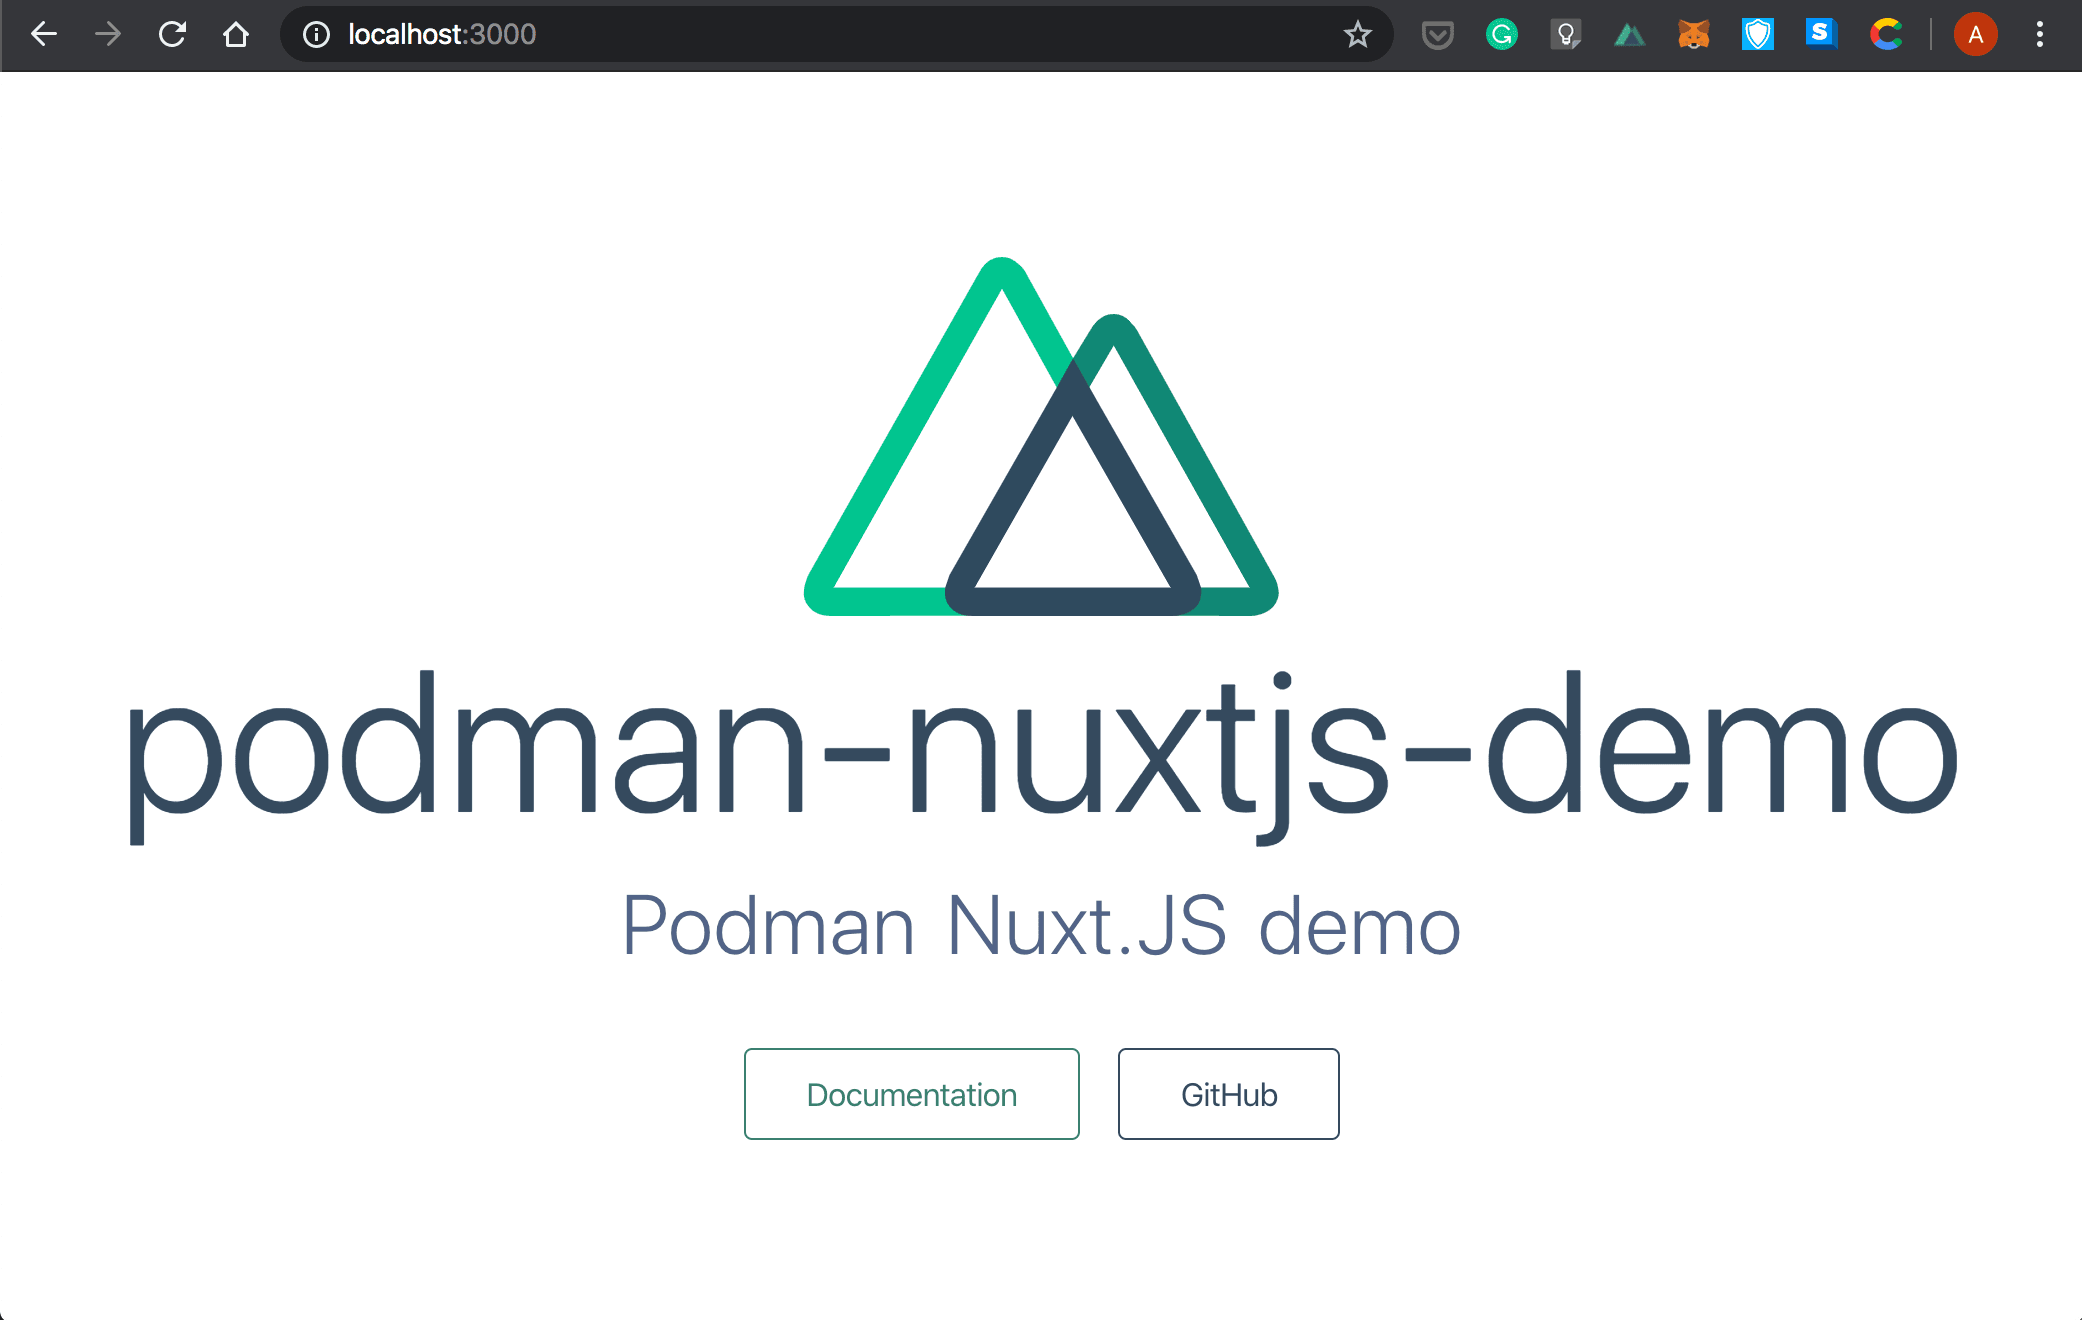
  1. To make sure everything works as expected, point your browser to
    http://localhost:3000
    . You should see something similar to the screenshot below:
Creating Pods

Until now, you’ve used Podman similarly to how Docker is used. However, Podman brings a couple of new features such as the ability to create pods. A Pod is a group of tightly-coupled containers that share their storage and network resources. In a nutshell, you can use a Pod to model a logical host. In this section, we’ll walk you through the process of creating a Pod comprised of the podman-nuxtjs-demo container and a PostgreSQL database. Note that it is beyond the scope of this tutorial to show how you can configure the storage and network for your Pod.

  1. Create a pod with the podman-nuxtjs-demo container. Enter the podman run with the following arguments:
  • -dt to specify that the container should be run in the background and that Podman should allocate a pseudo-TTY
  • --pod with the name of your new Pod. Specifying -new indicates that you want to create a new Pod. Otherwise, Podman tries to attach the container to an existing Pod.
  • -p with the port on host (3000) that’ll be forwarded to the container port (3000), separated by :.
  • The name of your image (podman-nuxtjs-demo:podman)
podman run -dt --pod new:podman_demo -p 3000:3000/tcp quay.io/andreipope/podman-nuxtjs-demo:podman

This will print the identifier of your new Pod:

972c7c1db0c31a42ba4b41025078dfc6abb046f503aa413d6cca313068042041
  1. You can display the list of running Pods with the podman pod list command:
podman pod list
POD ID         NAME             STATUS    CREATED          # OF CONTAINERS   INFRA IDd15a2abd9d5b   podman_demo      Running   32 seconds ago   2                 6a5bc0360ae2

In the output above, the number of containers is 2. This is because all Podman Pods include something called an Infra container, which does nothing except that it goes to sleep. This way, it holds the namespace associated with the Pod so that Podman can attach other containers to the Pod.

  1. Print the list of running containers by entering the podman ps command followed by the -a and -p flags. This lists all containers and prints the identifiers and the names of the Pods your containers are associated with:
podman ps -ap
CONTAINER ID  IMAGE                                         COMMAND      CREATED            STATUS                         PORTS                   NAMES                POD972c7c1db0c3  quay.io/andreipope/podman-nuxtjs-demo:podman  npm run dev  56 seconds ago     Up 55 seconds ago              0.0.0.0:3000->3000/tcp  festive_yonath       d15a2abd9d5b6a5bc0360ae2  k8s.gcr.io/pause:3.1                                       56 seconds ago     Up 55 seconds ago              0.0.0.0:3000->3000/tcp  d15a2abd9d5b-infra   d15a2abd9d5b

As you can see, the Infra container uses the k8s.gcr.io/pause image.

  1. Run the postgres:11-alpine image and associate it with the podman_demo Pod:
podman run -dt --pod podman_demo postgres:11-alpined395bed40988a953257b9501497c66b886b2fb6e81f48aa0ac89d7cfe2639b75
  1. This takes a bit of time to complete. Once everything is ready, you should see that the number of containers has been increased to 3:
 podman pod list
POD ID         NAME             STATUS    CREATED          # OF CONTAINERS   INFRA IDd15a2abd9d5b   podman_demo      Running   8 minutes ago    3                 6a5bc0360ae2
  1. You can display the list of your running containers with the following podman ps command:
podman ps -ap
CONTAINER ID  IMAGE                                         COMMAND      CREATED            STATUS                        PORTS                   NAMES                PODab5bd4810494  docker.io/library/postgres:11-alpine          postgres     5 minutes ago      Up 3 minutes ago              0.0.0.0:3000->3000/tcp  dreamy_jackson       d15a2abd9d5b972c7c1db0c3  quay.io/andreipope/podman-nuxtjs-demo:podman  npm run dev  9 minutes ago      Up 9 minutes ago              0.0.0.0:3000->3000/tcp  festive_yonath       d15a2abd9d5b6a5bc0360ae2  k8s.gcr.io/pause:3.1                                       9 minutes ago      Up 9 minutes ago
  1. As an example, you can stop the podman-nuxtjs-demo container. The other containers in the Pod won’t be affected, and the status of the Pod will show as Running:
podman stop 972c7c1db0c3
972c7c1db0c31a42ba4b41025078dfc6abb046f503aa413d6cca313068042041
podman pod ps
POD ID         NAME             STATUS    CREATED          # OF CONTAINERS   INFRA IDd15a2abd9d5b   podman_demo      Running   12 minutes ago   3                 6a5bc0360ae2
  1. To start again the container, enter the podman start command followed by the identifier of the container you want to start:
podman start 972c7c1db0c3
972c7c1db0c31a42ba4b41025078dfc6abb046f503aa413d6cca313068042041
  1. At this point, if you run the podman ps -ap command, you should see that the status of the podman-nuxtjs-demo container is now Up:
podman ps -apCONTAINER ID  IMAGE                                         COMMAND      CREATED            STATUS                        PORTS                   NAMES                PODab5bd4810494  docker.io/library/postgres:11-alpine          postgres     7 minutes ago      Up 5 minutes ago             0.0.0.0:3000->3000/tcp  dreamy_jackson       d15a2abd9d5b972c7c1db0c3  quay.io/andreipope/podman-nuxtjs-demo:podman  npm run dev  14 minutes ago     Up 54 seconds ago             0.0.0.0:3000->3000/tcp  festive_yonath       d15a2abd9d5b6a5bc0360ae2  k8s.gcr.io/pause:3.1                                       14 minutes ago     Up 14 minutes ago             0.0.0.0:3000->3000/tcp  d15a2abd9d5b-infra   d15a2abd9d5b
  1. Lastly, let’s top the podman_demo pod:
podman pod stop podman_demo
d15a2abd9d5bcb6f403515c0ed4dd4cb7df252a87591a88975b5573eb7f20900
  1. Enter the following command to make sure your Pod is stopped:
podman pod ps
POD ID         NAME             STATUS    CREATED          # OF CONTAINERS   INFRA IDd15a2abd9d5b   podman_demo      Stopped   17 minutes ago   3                 6a5bc0360ae2

Generate a Kubernetes Pod Spec with Podman

Podman can perform a snapshot of your container/Pod and generate a Kubernetes spec. This way, it makes it easier for you to orchestrate your containers with Kubernetes. For the scope of this section, we’ll illustrate how to use Podman to generate a Kubernetes spec and deploy your Pod to Kubernetes.

  1. To create a Kubernetes spec for a container and save it into a file called podman-nuxtjs-demo.yaml, run the following podman generate kube command:
podman generate kube <CONTAINER_ID> > podman-nuxtjs-demo.yaml
  1. Let’s take a look at what’s inside the podman-nuxtjs-demo.yaml file:
cat podman-nuxtjs-demo.yaml
# Generation of Kubernetes YAML is still under development!## Save the output of this file and use kubectl create -f to import# it into Kubernetes.## Created with podman-1.6.4```YAMLapiVersion: v1kind: Podmetadata:  creationTimestamp: "2020-02-12T05:21:44Z"  labels:    app: objectiveneumann  name: objectiveneumannspec:  containers:  - command:    - npm    - run    - dev    env:    - name: PATH      value: /usr/local/sbin:/usr/local/bin:/usr/sbin:/usr/bin:/sbin:/bin    - name: TERM      value: xterm    - name: HOSTNAME    - name: container      value: podman    - name: NODE_VERSION      value: 10.19.0    - name: YARN_VERSION      value: 1.21.1    - name: NUXT_HOST      value: 0.0.0.0    - name: NUXT_PORT      value: "3000"    image: localhost/podman-nuxtjs-demo:podman    name: objectiveneumann    ports:    - containerPort: 3000      hostPort: 3000      protocol: TCP    resources: {}    securityContext:      allowPrivilegeEscalation: true      capabilities: {}      privileged: false      readOnlyRootFilesystem: false    tty: true    workingDir: /usr/src/nuxt-appstatus: {}

There is a lot of output here, but the parts we’re interested in are:

  • metadata.labels.app and metadata.name. You’ll have to give them more meaningful names
  • spec.containers.image. Since in real life you’ll have to pull the images from a registry, you must replace localhost/podman-nuxtjs-demo:podman with the address of your Quay.io container image.
  1. Edit the content of the podman-nuxtjs-demo.yaml file to the following:
# Generation of Kubernetes YAML is still under development!## Save the output of this file and use kubectl create -f to import# it into Kubernetes.## Created with podman-1.6.4apiVersion: v1kind: Podmetadata:  creationTimestamp: "2020-02-12T05:24:44Z"  labels:    app: podman-nuxtjs-demo  name: podman-nuxtjs-demospec:  containers:  - command:    - npm    - run    - dev    env:    - name: PATH      value: /usr/local/sbin:/usr/local/bin:/usr/sbin:/usr/bin:/sbin:/bin    - name: TERM      value: xterm    - name: HOSTNAME    - name: container      value: podman    - name: NODE_VERSION      value: 10.19.0    - name: YARN_VERSION      value: 1.21.1    - name: NUXT_HOST      value: 0.0.0.0    - name: NUXT_PORT      value: "3000"    image: quay.io/andreipope/podman-nuxtjs-demo:podman    name: objectiveneumann    ports:    - containerPort: 3000      hostPort: 3000      protocol: TCP    resources: {}    securityContext:      allowPrivilegeEscalation: true      capabilities: {}      privileged: false      readOnlyRootFilesystem: false    tty: true    workingDir: /usr/src/nuxt-appstatus: {}

The above spec uses the address of our container image – quay.io/andreipope/podman-nuxtjs-demo:podman. Make sure you replace this with your address.

  1. Now, if your Quay.io repository is private, Kubernetes must authenticate with the registry to pull the image. Point your browser to http://quay.io, and then navigate to the Settings section of your repository. Select Generate Encrypted Password, and you’ll be asked to type your password. From the sidebar on the left, select Kubernetes Secret to download your Kubernetes secrets file:
  1. Next, you must refer to this Kubernetes secret from the podman-nuxtjs-demo.yaml. You can do this by adding a field similar to the one below:
imagePullSecrets:    - name: andreipope-pull-secret

Note that the name of our Kubernetes secret is andreipope-pull-secret, but yours will be different.

At this point, your podman-nuxtjs-demo.yaml file should look something like the following:

# Generation of Kubernetes YAML is still under development!## Save the output of this file and use kubectl create -f to import# it into Kubernetes.## Created with podman-1.6.4apiVersion: v1kind: Podmetadata:  creationTimestamp: "2020-02-12T05:24:44Z"  labels:    app: podman-nuxtjs-demo  name: podman-nuxtjs-demospec:  containers:  - command:    - npm    - run    - dev    env:    - name: PATH      value: /usr/local/sbin:/usr/local/bin:/usr/sbin:/usr/bin:/sbin:/bin    - name: TERM      value: xterm    - name: HOSTNAME    - name: container      value: podman    - name: NODE_VERSION      value: 10.19.0    - name: YARN_VERSION      value: 1.21.1    - name: NUXT_HOST      value: 0.0.0.0    - name: NUXT_PORT      value: "3000"    image: quay.io/andreipope/podman-nuxtjs-demo:podman    name: objectiveneumann    ports:    - containerPort: 3000      hostPort: 3000      protocol: TCP    resources: {}    securityContext:      allowPrivilegeEscalation: true      capabilities: {}      privileged: false      readOnlyRootFilesystem: false    tty: true    workingDir: /usr/src/nuxt-app  imagePullSecrets:    - name: andreipope-pull-secretstatus: {}

Create a Kubernetes Cluster with Kind (Optional)

Kind is a tool for running local Kubernetes clusters using Docker container “nodes”. Follow the steps in this section if you don’t have a running Kubernetes cluster:

  1. Create a file called cluster.yaml with the following content:
kind create cluster --config cluster.yaml
# three node (two workers) cluster configkind: ClusterapiVersion: kind.x-k8s.io/v1alpha4nodes:- role: control-plane- role: worker- role: worker
  1. Apply the spec:
kind create cluster --config cluster.yaml
Creating cluster "kind" ... ✓ Ensuring node image (kindest/node:v1.16.3) 🖼 ✓ Preparing nodes 📦 ✓ Writing configuration 📜 ✓ Starting control-plane 🕹️ ✓ Installing CNI 🔌 ✓ Installing StorageClass 💾 ✓ Joining worker nodes 🚜Set kubectl context to "kind-kind"You can now use your cluster with:

This creates a Kubernetes cluster with a control plane and two worker nodes.

Deploying to Kubernetes

  1. Apply your Kubernetes pull secrets spec. Enter the kubectl create command specifying:
  • The -f flag with the name of the file (our example uses a file named andreipope-secret.yml)
  • The --namespace flag with the name of your namespace (we’re using the default namespace)
kubectl create -f andreipope-secret.yml --namespace=default
secret/andreipope-pull-secret created
  1. Now you’re ready to apply the podman-nuxt-js-demo spec:
kubectl apply -f podman-nuxt-js-demo.yaml
pod/podman-nuxtjs-demo created
  1. Monitor the status of your installation with:
kubectl get pods
NAME               READY   STATUS              RESTARTS   AGEpodman-nuxtjs-demo   0/1     ContainerCreating   0          85s
  1. You can retrieve more details about the status of your installation by entering the kubectl describe pod followed by the name of your Pod:
kubectl describe pod  podman-nuxtjs-demo
Name:         podman-nuxtjs-demoNamespace:    defaultPriority:     0Node:         kind-worker2/172.17.0.3Start Time:   Wed, 12 Feb 2020 19:36:37 +0200Labels:       app=podman-nuxtjs-demoAnnotations:  kubectl.kubernetes.io/last-applied-configuration:                {"apiVersion":"v1","kind":"Pod","metadata":{"annotations":{},"creationTimestamp":"2020-02-12T05:24:44Z","labels":{"app":"podman-nuxtjs-dem...Status:       PendingIP:IPs:          <none>Containers:  objectiveneumann:    Container ID:    Image:         quay.io/andreipope/podman-nuxtjs-demo:podman    Image ID:    Port:          3000/TCP    Host Port:     3000/TCP    Command:      npm      run      dev    State:          Waiting      Reason:       ContainerCreating    Ready:          False    Restart Count:  0    Requests:      memory:  1Gi    Environment:      PATH:          /usr/local/sbin:/usr/local/bin:/usr/sbin:/usr/bin:/sbin:/bin      TERM:          xterm      HOSTNAME:      container:     podman      NODE_VERSION:  10.19.0      YARN_VERSION:  1.21.1      NUXT_HOST:     0.0.0.0      NUXT_PORT:     3000    Mounts:      /var/run/secrets/kubernetes.io/serviceaccount from default-token-rp6n5 (ro)Conditions:  Type              Status  Initialized       True  Ready             False  ContainersReady   False  PodScheduled      TrueVolumes:  default-token-rp6n5:    Type:        Secret (a volume populated by a Secret)    SecretName:  default-token-rp6n5    Optional:    falseQoS Class:       BurstableNode-Selectors:  <none>Tolerations:     node.kubernetes.io/not-ready:NoExecute for 300s                 node.kubernetes.io/unreachable:NoExecute for 300sEvents:  Type    Reason     Age   From                   Message  ----    ------     ----  ----                   -------  Normal  Scheduled  57s   default-scheduler      Successfully assigned default/podman-nuxtjs-demo to kind-worker2  Normal  Pulling    55s   kubelet, kind-worker2  Pulling image "quay.io/andreipope/podman-nuxtjs-demo:podman"

As an alternative, you can list events with the following command:

kubectl get events
LAST SEEN   TYPE     REASON                    OBJECT                    MESSAGE4m55s       Normal   RegisteredNode            node/kind-control-plane   Node kind-control-plane event: Registered Node kind-control-plane in Controller4m37s       Normal   Starting                  node/kind-control-plane   Starting kube-proxy.4m36s       Normal   NodeHasSufficientMemory   node/kind-worker          Node kind-worker status is now: NodeHasSufficientMemory4m36s       Normal   NodeHasNoDiskPressure     node/kind-worker          Node kind-worker status is now: NodeHasNoDiskPressure4m36s       Normal   NodeHasSufficientPID      node/kind-worker          Node kind-worker status is now: NodeHasSufficientPID4m35s       Normal   RegisteredNode            node/kind-worker          Node kind-worker event: Registered Node kind-worker in Controller4m15s       Normal   Starting                  node/kind-worker          Starting kube-proxy.3m36s       Normal   NodeReady                 node/kind-worker          Node kind-worker status is now: NodeReady4m34s       Normal   NodeHasSufficientMemory   node/kind-worker2         Node kind-worker2 status is now: NodeHasSufficientMemory4m34s       Normal   NodeHasNoDiskPressure     node/kind-worker2         Node kind-worker2 status is now: NodeHasNoDiskPressure4m34s       Normal   NodeHasSufficientPID      node/kind-worker2         Node kind-worker2 status is now: NodeHasSufficientPID4m30s       Normal   RegisteredNode            node/kind-worker2         Node kind-worker2 event: Registered Node kind-worker2 in Controller4m15s       Normal   Starting                  node/kind-worker2         Starting kube-proxy.3m34s       Normal   NodeReady                 node/kind-worker2         Node kind-worker2 status is now: NodeReady3m29s       Normal   Scheduled                 pod/podman-nuxtjs-demo    Successfully assigned default/podman-nuxtjs-demo to kind-worker23m27s       Normal   Pulling                   pod/podman-nuxtjs-demo    Pulling image "quay.io/andreipope/podman-nuxtjs-demo:podman"
  1. Wait a bit until the pod is created. Then, you can list all pods with:
kubectl get pods
NAME                 READY   STATUS    RESTARTS   AGEpodman-nuxtjs-demo   1/1     Running   0          7m34s
  1. Now let’s forward all requests made to
    http://localhost:3000
    to port 3000 on the podman-nuxtjs-demo Pod:
kubectl port-forward pod/podman-nuxtjs-demo 3000:3000
Forwarding from 127.0.0.1:3000 -> 3000Forwarding from [::1]:3000 -> 3000Handling connection for 3000Handling connection for 3000Handling connection for 3000Handling connection for 3000Handling connection for 3000Handling connection for 3000Handling connection for 3000
  1. Point your browser to
    http://localhost:3000
    . If everything works well, you should see something like the following:

Congratulations on completing this tutorial, now you know enough to use Podman as a replacement for Docker. Stay tuned for our next tutorials where, amongst many other things, you’ll learn how to use Buildah.
Thanks for reading!

Explore Gcore Container as a Service

Related articles

What is Infrastructure as a Service? Definition, benefits, and use cases

Infrastructure as a Service (IaaS) is a cloud computing service model that provides virtualized computing resources over the internet, including servers, storage, and networking components.IaaS enables organizations to outsource their entire IT infrastructure to cloud providers, allowing on-demand access and management of resources without investing in physical hardware. This service model operates through virtualization technology, where physical hardware is abstracted into virtual resources that can be provisioned and scaled instantly based on user requirements.The main components of IaaS include virtual machines, storage systems, networking hardware, and management software for provisioning and scaling resources.Leading cloud providers maintain data centers with thousands of physical servers, storage arrays, and networking equipment that are pooled together to create these virtualized resources accessible through web-based interfaces and APIs.IaaS differs from other cloud service models in terms of control and responsibility distribution between providers and users. While IaaS providers maintain and manage the physical infrastructure, users are responsible for installing and managing their own operating systems, applications, and data, offering greater flexibility compared to Platform as a Service (PaaS) and Software as a Service (SaaS) models.This cloud computing approach matters because it allows businesses to access enterprise-grade infrastructure without the capital expenses and maintenance overhead of physical hardware. It also benefits from a pay-as-you-go pricing model that aligns costs directly with resource consumption.What is Infrastructure as a Service (IaaS)?Infrastructure as a Service (IaaS) is a cloud computing service model that provides virtualized computing resources over the internet, including servers, storage, and networking components that organizations can access on demand without owning physical hardware. This model allows companies to outsource their entire IT infrastructure to cloud providers while maintaining control over their operating systems, applications, and data. IaaS operates on a pay-as-you-go pricing structure where users only pay for the resources they consume, making it cost-effective for businesses with variable workloads.According to Precedence Research (2025), the global IaaS market is projected to reach $898.52 billion by 2031, growing at a compound annual growth rate of 26.82% from 2024 to 2034.How does Infrastructure as a Service work?Infrastructure as a Service works by providing virtualized computing resources over the internet on a pay-as-you-go basis, allowing organizations to access servers, storage, and networking without owning physical hardware. Cloud providers maintain data centers with physical infrastructure while delivering these resources as virtual services that users can provision and manage remotely.The process begins when users request computing resources through a web-based control panel or API. The provider's management software automatically allocates virtual machines from their physical server pools, assigns storage space, and configures network connections.Users receive root-level access to their virtual infrastructure, giving them complete control over operating systems, applications, and data. At the same time, the provider handles hardware maintenance, security updates, and physical facility management.IaaS operates through resource pooling, where providers share physical hardware across multiple customers using virtualization technology. This creates isolated virtual environments that scale up or down based on demand. Users pay only for consumed resources like CPU hours, storage gigabytes, and data transfer, making it cost-effective for variable workloads.What are the main components of IaaS?The main components of IaaS refer to the core infrastructure elements that cloud providers deliver as virtualized services over the internet. The main components of IaaS are listed below.Virtual machines: Virtual machines are software-based computers that run on physical servers but act like independent systems. Users can configure them with specific operating systems, CPU power, and memory based on their needs. They provide the computing power for running applications and processing data.Storage systems: IaaS includes various storage options like block storage for databases and file storage for documents and media. These systems can scale up or down automatically based on demand. Users pay only for the storage space they actually use.Networking infrastructure: This includes virtual networks, load balancers, firewalls, and IP addresses that connect resources together. The networking layer ensures secure communication between different components. It also manages traffic distribution and provides internet connectivity.Management interfaces: These are dashboards and APIs that let users control their infrastructure resources remotely. They provide tools for monitoring performance, setting up automated scaling, and managing security settings. Users can provision new resources or shut down unused ones through these interfaces.Security services: IaaS platforms include built-in security features like encryption, access controls, and threat detection. These services protect data both in transit and at rest. They also provide compliance tools to meet industry regulations.Backup and disaster recovery: These components automatically create copies of data and applications to prevent loss. They can restore systems quickly if hardware fails or data gets corrupted. Recovery services often include geographic redundancy across multiple data centers.How does IaaS compare to PaaS and SaaS?IaaS differs from PaaS and SaaS primarily in the level of infrastructure control, management responsibility, and service abstraction. IaaS provides virtualized computing resources like servers, storage, and networking that users manage directly, while PaaS offers a complete development platform with pre-configured runtime environments, and SaaS delivers ready-to-use applications accessible through web browsers.The technical architecture varies significantly across these models. IaaS users install and configure their own operating systems, middleware, and applications on virtual machines, giving them full control over the software stack.PaaS abstracts away infrastructure management by providing pre-built development frameworks, databases, and deployment tools, allowing developers to focus solely on application code. SaaS eliminates all technical management by delivering fully functional applications that users access without any installation or configuration.Management responsibilities shift dramatically between these service models. IaaS customers handle security patches, software updates, scaling decisions, and application monitoring while providers maintain only the physical infrastructure.PaaS splits responsibilities. Providers manage the platform layer, including runtime environments and scaling automation, while users focus on application development and data management. SaaS providers handle all technical operations, leaving users to manage only their data and user accounts.Cost structures and use cases also differ substantially. IaaS works best for organizations needing infrastructure flexibility and custom configurations. It typically costs more due to management overhead but offers maximum control.PaaS targets development teams seeking faster application deployment with moderate costs and reduced complexity. SaaS serves end-users wanting immediate functionality with the lowest total cost of ownership, operating on simple subscription models without technical expertise requirements.What are the key benefits of Infrastructure as a Service?The key benefits of Infrastructure as a Service refer to the advantages organizations gain when using cloud-based virtualized computing resources instead of owning physical hardware. The key benefits of Infrastructure as a Service are listed below.Cost reduction: Organizations eliminate upfront capital expenses for servers, storage, and networking equipment. They pay only for resources they actually use, converting fixed IT costs into variable operational expenses.Rapid scalability: Computing resources can be increased or decreased within minutes based on demand. This flexibility allows businesses to handle traffic spikes without over-provisioning hardware during quiet periods.Faster deployment: New virtual machines and storage can be provisioned in minutes rather than weeks. This speed enables development teams to launch projects quickly and respond to market opportunities.Reduced maintenance burden: Cloud providers handle hardware maintenance, security patches, and infrastructure updates. IT teams can focus on applications and business logic instead of managing physical equipment.Global accessibility: Resources are available from multiple geographic locations through internet connections. Teams can access infrastructure from anywhere, supporting remote work and distributed operations.Disaster recovery: Built-in backup and redundancy features protect against hardware failures and data loss. Many providers offer automated failover systems that maintain service availability during outages.Resource optimization: Organizations can right-size their infrastructure to match actual needs rather than estimating capacity. This precision reduces waste and improves resource efficiency across different workloads.What are common Infrastructure as a Service use cases?Infrastructure as a Service use cases refer to the specific business scenarios and applications where organizations deploy IaaS cloud computing resources to meet their operational needs. The Infrastructure as a Service use cases are listed below.Development and testing environments: Organizations use IaaS to quickly spin up isolated environments for software development and testing without purchasing dedicated hardware. Teams can create multiple test environments that mirror production systems, then destroy them when projects complete.Disaster recovery and backup: Companies deploy IaaS resources as backup infrastructure that activates when primary systems fail. This approach costs less than maintaining duplicate physical data centers while providing reliable failover capabilities.Web hosting and applications: Businesses host websites, web applications, and databases on IaaS platforms to handle traffic spikes and scale resources automatically. E-commerce sites particularly benefit during seasonal peaks when demand increases dramatically.Big data processing: Organizations use IaaS to access powerful computing resources for analyzing large datasets without investing in expensive hardware. Data scientists can provision high-memory instances for machine learning models, then release resources when analysis completes.Seasonal workload management: Companies with fluctuating demand patterns deploy IaaS to handle peak periods without maintaining excess capacity year-round. Tax preparation firms and retail businesses commonly use this approach during busy seasons.Geographic expansion: Businesses use IaaS to establish an IT presence in new markets without building physical infrastructure. Organizations can deploy resources in different regions to serve local customers with better performance and compliance.Legacy system migration: Companies move aging on-premises systems to IaaS platforms to extend their lifespan while planning modernization. This approach reduces maintenance costs and improves reliability without requiring immediate application rewrites.What are Infrastructure as a Service examples?Infrastructure as a Service examples refer to specific cloud computing platforms and services that provide virtualized computing resources over the internet on a pay-as-you-go basis. Examples of Infrastructure as a Service are listed below.Virtual machine services: Virtual machine service providers provide on-demand access to scalable virtual servers with customizable CPU, memory, and storage configurations. Users can deploy and manage their own operating systems and applications while the provider handles the physical hardware maintenance.Block storage solutions: Cloud-based storage services offer persistent, high-performance storage volumes that can be attached to virtual machines. These services provide data redundancy and backup capabilities without requiring physical storage infrastructure investment.Virtual networking platforms: These services deliver software-defined networking capabilities, including virtual private clouds, load balancers, and firewalls. Organizations can create isolated network environments and control traffic routing without managing physical networking equipment.Container hosting services: Cloud platforms that provide managed container orchestration and deployment capabilities for applications packaged in containers. These services handle the underlying infrastructure while giving developers control over application deployment and scaling.Bare metal cloud servers: Physical servers provisioned on-demand through cloud interfaces, offering dedicated hardware resources without virtualization overhead. These bare metal services combine the control of physical servers with the flexibility of cloud provisioning.GPU computing instances: Specialized virtual machines equipped with graphics processing units for high-performance computing tasks like machine learning and scientific simulations. These GPU service providers provide access to expensive GPU hardware without upfront capital investment.Database infrastructure services: Cloud platforms that provide the underlying infrastructure for database deployment while leaving database management to users. These services offer scalable compute and storage resources optimized for database workloads.How to choose the right IaaS providerYou choose the right IaaS provider by evaluating six critical factors: performance requirements, security standards, pricing models, scalability options, support quality, and integration capabilities.First, define your specific performance requirements, including CPU power, memory, storage speed, and network bandwidth. Test different instance types during free trials to measure actual performance against your workloads rather than relying on provider specifications alone.Next, evaluate security and compliance features based on your industry requirements. Check for certifications like SOC 2 and ISO 27001, as well as industry-specific standards such as HIPAA for healthcare or PCI DSS for payment processing.Then, compare pricing models across providers by calculating the total cost of ownership, not just hourly rates. Include costs for data transfer, storage, backup services, and support plans, as these can add 30-50% to your base compute costs.Assess scalability options, including auto-scaling capabilities, geographic availability, and resource limits. Verify that the provider can handle your peak demand periods and offers regions close to your users for optimal performance.Test customer support quality by submitting technical questions during your evaluation period. Check response times, technical expertise level, and availability of phone support versus ticket-only systems.Finally, verify integration capabilities with your existing tools and systems. Ensure the provider offers APIs, monitoring tools, and management interfaces that work with your current DevOps workflow and security tools.Start with a pilot project using 10-20% of your workload to validate performance, costs, and operational fit before committing to a full migration.Gcore Infrastructure as a Service solutionsWhen building modern applications and services, choosing the right infrastructure foundation becomes critical for both performance and cost control. Gcore's Infrastructure as a Service solutions address these challenges with a global network spanning 210+ locations worldwide, delivering consistent performance while maintaining competitive pricing through our pay-as-you-use model. Our platform combines enterprise-grade virtual machines, high-performance storage, and advanced networking capabilities, allowing you to scale resources instantly based on actual demand rather than projected capacity.What sets our approach apart is the integration of edge computing capabilities directly into the infrastructure layer. This reduces latency by up to 85% for end users while eliminating the complexity of managing multiple providers for different geographic regions.Explore how Gcore IaaS can accelerate your infrastructure deployment.Frequently asked questionsWhat's the difference between IaaS and traditional hosting?IaaS provides virtualized computing resources through the cloud with on-demand scaling, while traditional hosting offers fixed physical or virtual servers with limited flexibility. Traditional hosting requires upfront capacity planning and manual scaling, whereas IaaS automatically adjusts resources based on actual usage through pay-as-you-go pricing.Is IaaS suitable for small businesses?Yes. IaaS is suitable for small businesses because it eliminates upfront hardware costs and provides pay-as-you-go pricing that scales with actual usage. Small businesses can access enterprise-level infrastructure without the capital investment or maintenance overhead required for physical servers.What is Infrastructure as a Service in cloud computing?Infrastructure as a Service (IaaS) is a cloud computing model that provides virtualized computing resources like servers, storage, and networking over the internet on a pay-as-you-go basis. Organizations rent these resources instead of buying and maintaining physical hardware, while retaining control over their operating systems and applications.How much does IaaS cost compared to on-premises infrastructure?IaaS typically costs 20-40% less than on-premises infrastructure when factoring in hardware, maintenance, staffing, and facility expenses. Organizations save on upfront capital expenditure and benefit from pay-as-you-go pricing that scales with actual usage.Can I migrate existing applications to IaaS?Yes, you can migrate existing applications to IaaS by moving your software, data, and configurations to cloud-based virtual machines while maintaining the same operating environment. The migration process involves assessment, planning, data transfer, and testing to ensure applications run properly on the new infrastructure.What happens if my IaaS provider experiences an outage?When your IaaS provider experiences an outage, your virtual machines, applications, and data hosted on their infrastructure become temporarily unavailable until service is restored. Most enterprise IaaS providers offer 99.9% uptime guarantees and maintain redundant systems across multiple data centers to minimize outage duration and impact.

What is cloud security? Definition, challenges, and best practices

Cloud security is the discipline of protecting cloud-based infrastructure, applications, and data from internal and external threats, ensuring confidentiality, integrity, and availability of cloud resources. This protection model has become important as organizations increasingly move their operations to cloud environments.Cloud security operates under a shared responsibility model where providers secure the infrastructure while customers secure their deployed applications, data, and access policies. This responsibility distribution varies by service model, with Infrastructure as a Service (IaaS), Platform as a Service (PaaS), and Software as a Service (SaaS) each requiring different levels of customer involvement.The model creates clear boundaries between provider and customer security obligations.Cloud security protects resources and data individually rather than relying on a traditional perimeter defense approach. This protection method uses granular controls like cloud security posture management (CSPM), network segmentation, and encryption to secure specific assets. The approach addresses the distributed nature of cloud computing, where resources exist across multiple locations and services.Organizations face several cloud security challenges, including misconfigurations, account hijacking, data breaches, and insider threats.Cloud security matters because the average cost of a cloud data breach has reached $5 million according to IBM, making effective security controls essential for protecting both financial assets and organizational reputation.What is cloud security?Cloud security is the practice of protecting cloud-based infrastructure, applications, and data from cyber threats through specialized technologies, policies, and controls designed for cloud environments. This protection operates under a shared responsibility model where cloud providers secure the underlying infrastructure while customers protect their applications, data, and access configurations.Cloud security includes identity and access management (IAM), data encryption, continuous monitoring, workload protection, and automated threat detection to address the unique challenges of distributed cloud resources. The approach differs from traditional security by focusing on individual resource protection rather than perimeter defense, as cloud environments require granular controls and real-time visibility across flexible infrastructure.How does cloud security work?Cloud security works by using a multi-layered defense system that protects data, applications, and infrastructure hosted in cloud environments through shared responsibility models, identity controls, and continuous monitoring. Unlike traditional perimeter-based security, cloud security operates on a distributed model where protection is applied at multiple levels across the cloud stack.The foundation of cloud security rests on the shared responsibility model, where cloud providers secure the underlying infrastructure while customers protect their applications, data, and access policies. This division varies by service type - in Infrastructure as a Service (IaaS), customers handle more security responsibilities, including operating systems and network controls. In contrast, Software as a Service (SaaS) shifts most security duties to the provider.Identity and Access Management (IAM) serves as the primary gatekeeper, controlling who can access cloud resources and what actions they can perform.IAM systems use role-based access control (RBAC) and multi-factor authentication (MFA) to verify user identities and enforce least-privilege principles. These controls prevent unauthorized access even if credentials are compromised.Data protection operates through encryption both at rest and in transit, ensuring information remains unreadable to unauthorized parties. Cloud security platforms also employ workload protection agents that monitor running applications for suspicious behavior. At the same time, Security Information and Event Management (SIEM) systems collect and analyze logs from across the cloud environment to detect potential threats.Continuous monitoring addresses the flexible nature of cloud environments, where resources are constantly created, modified, and destroyed.Cloud Security Posture Management (CSPM) tools automatically scan configurations against security best practices, identifying misconfigurations that could expose data.What are the main cloud security challenges?Cloud security challenges refer to the obstacles and risks that organizations face when protecting their cloud-based infrastructure, applications, and data from threats. The main cloud security challenges are listed below.Misconfigurations: According to Zscaler research, improper cloud settings create the most common security vulnerabilities, with 98.6% of organizations having misconfigurations that cause critical risks to data and infrastructure. These include exposed storage buckets, overly permissive access controls, and incorrect network settings.Shared responsibility confusion: Organizations struggle to understand which security tasks belong to the cloud provider versus what their own responsibilities are. This confusion leads to security gaps where critical protections are assumed to be handled by the other party.Identity and access management complexity: Managing user permissions across multiple cloud services and environments becomes difficult as organizations scale. Weak authentication, excessive privileges, and poor access controls create entry points for attackers.Data protection across environments: Securing sensitive data as it moves between on-premises systems, multiple cloud platforms, and edge locations requires consistent encryption and monitoring. Organizations often lack visibility into where their data resides and how it's protected.Compliance and regulatory requirements: Meeting industry standards like GDPR, HIPAA, or SOC 2 becomes more complex in cloud environments where data location and processing methods may change flexibly. Organizations must maintain compliance across multiple jurisdictions and service models.Limited visibility and monitoring: Traditional security tools often can't provide complete visibility into cloud workloads, containers, and serverless functions. This blind spot makes it difficult to detect threats, track user activities, and respond to incidents quickly.Insider threats and privileged access: Cloud environments often grant broad administrative privileges that can be misused by malicious insiders or compromised accounts. The distributed nature of cloud access makes it harder to monitor and control privileged user activities.What are the essential cloud security technologies and tools?Essential cloud security technologies and tools refer to the specialized software, platforms, and systems designed to protect cloud-based infrastructure, applications, and data from cyber threats and operational risks. The essential cloud security technologies and tools are listed below.Identity and access management (IAM): IAM systems control who can access cloud resources and what actions they can perform through role-based permissions and multi-factor authentication. These platforms prevent unauthorized access by requiring users to verify their identity through multiple methods before granting system entry.Cloud security posture management (CSPM): CSPM tools continuously scan cloud environments to identify misconfigurations, compliance violations, and security gaps across multiple cloud platforms. They provide automated remediation suggestions and real-time alerts when security policies are violated or resources are improperly configured.Data encryption services: Encryption technologies protect sensitive information both at rest in storage systems and in transit between cloud services using advanced cryptographic algorithms. These tools mean that even if data is intercepted or accessed without authorization, it remains unreadable without proper decryption keys.Cloud workload protection platforms (CWPP): CWPP solutions monitor and secure applications, containers, and virtual machines running in cloud environments against malware, vulnerabilities, and suspicious activities. They provide real-time threat detection and automated response capabilities specifically designed for flexible cloud workloads.Security information and event management (SIEM): Cloud-based SIEM platforms collect, analyze, and correlate security events from across cloud infrastructure to detect potential threats and compliance violations. These systems use machine learning and behavioral analysis to identify unusual patterns that may indicate security incidents.Cloud access security brokers (CASB): CASB solutions act as intermediaries between users and cloud applications, enforcing security policies and providing visibility into cloud usage across the organization. They monitor data movement, detect risky behaviors, and ensure compliance with regulatory requirements for cloud-based activities.Network security tools: Cloud-native firewalls and network segmentation tools control traffic flow between cloud resources and external networks using intelligent filtering rules. These technologies create secure network boundaries and prevent lateral movement of threats within cloud environments.What are the key benefits of cloud security?The key benefits of cloud security refer to the advantages organizations gain from protecting their cloud-based infrastructure, applications, and data from threats. The key benefits of cloud security are listed below.Cost reduction: Cloud security eliminates the need for expensive on-premises security hardware and reduces staffing requirements. Organizations can access enterprise-grade security tools through subscription models rather than large capital investments.Improved threat detection: Cloud security platforms use machine learning and AI to identify suspicious activities in real-time across distributed environments. These systems can detect anomalies that traditional security tools might miss.Automatic compliance: Cloud security solutions help organizations meet regulatory requirements like GDPR, HIPAA, and SOC 2 through built-in compliance frameworks. Automated reporting and audit trails simplify compliance management and reduce manual oversight.Reduced misconfiguration risks: Cloud security posture management tools automatically scan for misconfigurations and provide remediation guidance.Enhanced data protection: Cloud security provides multiple layers of encryption for data at rest, in transit, and in use. Advanced key management systems ensure that sensitive information remains protected even if other security measures fail.Flexible security coverage: Cloud security solutions automatically scale with business growth without requiring additional infrastructure investments. Organizations can protect new workloads and applications instantly as they use them.Centralized security management: Cloud security platforms provide unified visibility across multiple cloud environments and hybrid infrastructures. Security teams can monitor, manage, and respond to threats from a single dashboard rather than juggling multiple tools.What are the challenges of cloud security?Cloud security challenges refer to the obstacles and risks organizations face when protecting their cloud-based infrastructure, applications, and data from threats. These challenges are listed below.Misconfigurations: Cloud environments are complex, and improper settings create security gaps that attackers can exploit. These errors include exposed storage buckets, overly permissive access controls, and incorrect network settings.Shared responsibility confusion: Organizations often misunderstand which security tasks belong to them versus their cloud provider. This confusion leads to gaps where critical security measures aren't implemented by either party. The division of responsibilities varies between IaaS, PaaS, and SaaS models, adding to the complexity.Identity and access management complexity: As organizations scale, managing user permissions across multiple cloud services and environments becomes difficult. Weak authentication methods and excessive privileges create entry points for unauthorized access. Multi-factor authentication and role-based access controls require careful planning and ongoing maintenance.Data protection across environments: Ensuring data remains encrypted and secure as it moves between on-premises systems and cloud platforms presents ongoing challenges. Organizations must track data location, apply appropriate encryption, and maintain compliance across different jurisdictions. Data residency requirements add another layer of complexity.Visibility and monitoring gaps: Traditional security tools often can't provide complete visibility into cloud environments and workloads. The flexible nature of cloud resources makes it hard to track all assets and their security status. Real-time monitoring becomes critical but technically challenging to use effectively.Compliance and regulatory requirements: Meeting industry standards and regulations in cloud environments requires continuous effort and specialized knowledge. Different regions have varying data protection laws that affect cloud deployments. Organizations must prove compliance while maintaining operational effectiveness.Insider threats and privileged access: Cloud environments often grant broad access to administrators and developers, creating risks from malicious or careless insiders. Monitoring privileged user activities without impacting productivity requires advanced tools and processes. The remote nature of cloud access makes traditional oversight methods less effective.How to implement cloud security best practices?You use cloud security best practices by establishing a complete security framework that covers identity management, data protection, monitoring, and compliance across your cloud environment.First, configure identity and access management (IAM) with role-based access control (RBAC) and multi-factor authentication (MFA). Create specific roles for different job functions and require MFA for all administrative accounts to prevent unauthorized access.Next, encrypt all data both at rest and in transit using industry-standard encryption protocols like AES256.Enable encryption for databases, storage buckets, and communication channels between services to protect sensitive information from interception.Then, use continuous security monitoring with automated threat detection tools. Set up real-time alerts for suspicious activities, failed login attempts, and unusual data access patterns to identify potential security incidents quickly.After that, establish cloud security posture management (CSPM) to scan for misconfigurations automatically. Configure automated remediation for common issues like open security groups, unencrypted storage, and overly permissive access policies.Create network segmentation using virtual private clouds (VPCs) and security groups to isolate different workloads. Limit communication between services to only what's necessary and use zero-trust network principles.Set up regular security audits and compliance monitoring to meet industry standards like SOC 2, HIPAA, or GDPR. Document all security controls and maintain audit trails for regulatory requirements.Finally, develop an incident response plan specifically for cloud environments. Include procedures for isolating compromised resources, preserving forensic evidence, and coordinating with your cloud provider's security team.Start with IAM and encryption as your foundation, then build additional security layers progressively to avoid overwhelming your team while maintaining strong protection.Gcore cloud securityWhen using cloud security measures, the underlying infrastructure becomes just as important as the security tools themselves. Gcore’s cloud security solutions address this need with a global network of 180+ points of presence and 30ms latency, ensuring your security monitoring and threat detection systems perform consistently across all regions. Our edge cloud infrastructure supports real-time security analytics and automated threat response without the performance bottlenecks that can leave your systems vulnerable during critical moments.What sets our approach apart is the combination of security directly into the infrastructure layer, eliminating the complexity of managing separate security vendors while providing enterprise-grade DDoS protection and encrypted data transmission as standard features. This unified approach typically reduces security management overhead by 40-60% compared to multi-vendor solutions, while maintaining the continuous monitoring capabilities.Explore how Gcore's integrated cloud security infrastructure can strengthen your defense plan at gcore.com/cloud.Frequently asked questionsWhat's the difference between cloud security and traditional approaches?Cloud security differs from traditional approaches by protecting distributed resources through shared responsibility models and cloud-native tools, while traditional security relies on perimeter-based defenses around centralized infrastructure. Traditional security assumes a clear network boundary with firewalls and intrusion detection systems protecting internal resources. In contrast, cloud security secures individual workloads, data, and identities across multiple environments without relying on network perimeters.What is cloud security posture management?Cloud security posture management (CSPM) is a set of tools and processes that continuously monitor cloud environments to identify misconfigurations, compliance violations, and security risks across cloud infrastructure. CSPM platforms automatically scan cloud resources, assess security policies, and provide remediation guidance to maintain proper security configurations.How does Zero Trust apply to cloud security?Zero Trust applies to cloud security by treating every user, device, and connection as untrusted and requiring verification before granting access to cloud resources. This approach replaces traditional perimeter-based security with continuous authentication, micro-segmentation, and least-privilege access controls across cloud environments.What compliance standards apply?Cloud security must comply with industry-specific regulations like SOC 2, ISO 27001, GDPR, HIPAA, PCI DSS, and FedRAMP, depending on your business sector and geographic location. Organizations typically need to meet multiple standards simultaneously, with financial services requiring PCI DSS compliance, healthcare needing HIPAA certification, and EU operations mandating GDPR adherence.What happens during a cloud security breach?During a cloud security breach, attackers gain unauthorized access to cloud resources, potentially exposing sensitive data, disrupting services, and causing financial damage averaging $5 million per incident, according to IBM. The breach typically involves exploiting misconfigurations, compromised credentials, or vulnerabilities to access cloud infrastructure, applications, or data stores.

Query your cloud with natural language: A developer’s guide to Gcore MCP

What if you could ask your infrastructure questions and get real answers?With Gcore’s open-source implementation of the Model Context Protocol (MCP), now you can. MCP turns generative AI into an agent that understands your infrastructure, responds to your queries, and takes action when you need it to.In this post, we’ll demo how to use MCP to explore and inspect your Gcore environment just by prompting, to list resources, check audit logs, and generate cost reports. We’ll also walk through a fun bonus use case: provisioning infrastructure and exporting it to Terraform.What is MCP and why do devs love it?Originally developed by Anthropic, the Model Context Protocol (MCP) is an open standard that turns language models into agents that interact with structured tools: APIs, CLIs, or internal systems. Gcore’s implementation makes this protocol real for our customers.With MCP, you can:Ask questions about your infrastructureList, inspect, or filter cloud resourcesView cost data, audit logs, or deployment metadataExport configs to TerraformChain multi-step operations via natural languageGcore MCP removes friction from interacting with your infrastructure. Instead of wiring together scripts or context-switching across dashboards and CLIs, you can just…ask.That means:Faster debugging and auditsMore accessible infra visibilityFewer repetitive setup tasksBetter team collaborationBecause it’s open source, backed by the Gcore Python SDK, you can plug it into other APIs, extend tool definitions, or even create internal agents tailored to your stack. Explore the GitHub repo for yourself.What can you do with it?This isn’t just a cute chatbot. Gcore MCP connects your cloud to real-time insights. Here are some practical prompts you can use right away.Infrastructure inspection“List all VMs running in the Frankfurt region”“Which projects have over 80% GPU utilization?”“Show all volumes not attached to any instance”Audit and cost analysis“Get me the API usage for the last 24 hours”“Which users deployed resources in the last 7 days?”“Give a cost breakdown by region for this month”Security and governance“Show me firewall rules with open ports”“List all active API tokens and their scopes”Experimental automation“Create a secure network in Tokyo, export to Terraform, then delete it”We’ll walk through that last one in the full demo below.Full video demoWatch Gcore’s AI Software Engineer, Algis Dumbris, walk through setting up MCP on your machine and show off some use cases. If you prefer reading, we’ve broken down the process step-by-step below.Step-by-step walkthroughThis section maps to the video and shows exactly how to replicate the workflow locally.1. Install MCP locally (0:00–1:28)We use uv to isolate the environment and pull the project directly from GitHub.curl -Ls https://astral.sh/uv/install.sh | sh uvx add gcore-mcp-server https://github.com/G-Core/gcore-mcp-server Requirements:PythonGcore account + API keyTool config file (from the repo)2. Set up your environment (1:28–2:47)Configure two environment variables:GCORE_API_KEY for authGCORE_TOOLS to define what the agent can access (e.g., regions, instances, costs, etc.)Soon, tool selection will be automatic, but today you can define your toolset in YAML or JSON.3. Run a basic query (3:19–4:11)Prompt:“Find the Gcore region closest to Antalya.”The agent maps this to a regions.list call and returns: IstanbulNo need to dig through docs or write an API request.4. Provision, export, and clean up (4:19–5:32)This one’s powerful if you’re experimenting with CI/CD or infrastructure-as-code.Prompt:“Create a secure network in Tokyo. Export to Terraform. Then clean up.”The agent:Provisions the networkExports it to Terraform formatDestroys the resources afterwardYou get usable .tf output with no manual scripting. Perfect for testing, prototyping, or onboarding.Gcore: always building for developersTry it now:Clone the repoInstall UVX + configure your environmentStart prompting your infrastructureOpen issues, contribute tools, or share your use casesThis is early-stage software, and we’re just getting started. Expect more tools, better UX, and deeper integrations soon.Watch how easy it is to deploy an inference instance with Gcore

Cloud computing: types, deployment models, benefits, and how it works

Cloud computing is a model for enabling on-demand network access to a shared pool of configurable computing resources, such as networks, servers, storage, applications, and services that can be rapidly provisioned and released with minimal management effort or service provider interaction. According to research by Gartner (2024), the global cloud computing market size is projected to reach $1.25 trillion by 2025, reflecting the rapid growth and widespread adoption of these services.The National Institute of Standards and Technology (NIST) defines five core characteristics that distinguish cloud computing from traditional IT infrastructure. These include on-demand self-service, broad network access, resource pooling, rapid elasticity, and measured service.Each characteristic addresses specific business needs while enabling organizations to access computing resources without maintaining physical hardware on-premises.Cloud computing services are organized into three main categories that serve different business requirements and technical needs. Infrastructure as a Service (IaaS) provides basic computing resources, Platform as a Service (PaaS) offers development environments and tools, and Software as a Service (SaaS) delivers complete applications over the internet. Major cloud providers typically guarantee 99.9% or higher uptime in service level agreements to ensure reliable access to these services.Organizations can choose from four primary use models based on their security, compliance, and operational requirements. Public cloud services are offered over the internet to anyone, private clouds are proprietary networks serving limited users, hybrid clouds combine public and private cloud features, and community clouds serve specific groups with shared concerns. Each model provides different levels of control, security, and cost structures.Over 90% of enterprises use some form of cloud services as of 2024, according to Forrester Research (2024), making cloud computing knowledge important for modern business operations. This widespread adoption reflects how cloud computing has become a cornerstone of digital change and competitive advantage across industries.What is cloud computing?Cloud computing is a model that delivers computing resources like servers, storage, databases, and software over the internet on demand, allowing users to access and use these resources without owning or managing the physical infrastructure. Instead of buying and maintaining your own servers, you can rent computing power from cloud providers and scale resources up or down based on your needs.Over 90% of enterprises now use some form of cloud services, with providers typically guaranteeing 99.9% or higher uptime in their service agreements.The three main service models offer different levels of control and management. Infrastructure as a Service (IaaS) provides basic computing resources like virtual machines and storage. Platform as a Service (PaaS) adds development tools and runtime environments, and Software as a Service (SaaS) delivers complete applications that are ready to use. Each model handles different aspects of the technology stack, so you only manage what you need while the provider handles the rest.Cloud use models vary by ownership and access control. Public clouds serve multiple customers over the internet, private clouds operate exclusively for one organization, and hybrid clouds combine both approaches for flexibility. This variety lets organizations choose the right balance of cost, control, and security for their specific needs while maintaining the core benefits of cloud computing's flexible, elastic infrastructure.What are the main types of cloud computing services?The main types of cloud computing services refer to the different service models that provide computing resources over the internet with varying levels of management and control. The main types of cloud computing services are listed below.Infrastructure as a service (IaaS): This model provides basic computing infrastructure, including virtual machines, storage, and networking resources over the internet. Users can install and manage their own operating systems, applications, and development frameworks while the provider handles the physical hardware.Platform as a service (PaaS): This service offers a complete development and use environment in the cloud, including operating systems, programming languages, databases, and web servers. Developers can build, test, and use applications without managing the underlying infrastructure complexity.Software as a service (SaaS): This model delivers fully functional software applications over the internet through a web browser or mobile app. Users access the software on a subscription basis without needing to install, maintain, or update the applications locally.Function as a service (FaaS): Also known as serverless computing, this model allows developers to run individual functions or pieces of code in response to events. The cloud provider automatically manages server provisioning, scaling, and maintenance while charging only for actual compute time used.Database as a service (DBaaS): This service provides managed database solutions in the cloud, handling database administration tasks like backups, updates, and scaling. Organizations can access database functionality without maintaining physical database servers or hiring specialized database administrators.Storage as a service (STaaS): This model offers flexible cloud storage solutions for data backup, archiving, and file sharing needs. Users can store and retrieve data from anywhere with internet access while paying only for the storage space they actually use.What are the different cloud deployment models?Cloud use models refer to the different ways organizations can access and manage cloud computing resources based on ownership, location, and access control. The cloud use models are listed below.Public cloud: Services are delivered over the internet and shared among multiple organizations by third-party providers. Anyone can purchase and use these services on a pay-as-you-go basis, making them cost-effective for businesses without large upfront investments.Private cloud: Computing resources are dedicated to a single organization and can be hosted on-premises or by a third party. This model offers greater control, security, and customization options but requires higher costs and more management overhead.Hybrid cloud: Organizations combine public and private cloud environments, allowing data and applications to move between them as needed. This approach provides flexibility to keep sensitive data in private clouds while using public clouds for less critical workloads.Community cloud: Multiple organizations with similar requirements share cloud infrastructure and costs. Government agencies, healthcare organizations, or financial institutions often use this model to meet specific compliance and security standards.Multi-cloud: Organizations use services from multiple cloud providers to avoid vendor lock-in and improve redundancy. This plan allows businesses to choose the best services from different providers while reducing dependency on any single vendor.How does cloud computing work?Cloud computing works by delivering computing resources like servers, storage, databases, and software over the internet on an on-demand basis. Instead of owning physical hardware, users access these resources through web browsers or applications, while cloud providers manage the underlying infrastructure in data centers worldwide.The system operates through a front-end and back-end architecture. The front end includes your device, web browser, and network connection that you use to access cloud services.The back end consists of servers, storage systems, databases, and applications housed in the provider's data centers. When you request a service, the cloud infrastructure automatically allocates the necessary resources from its shared pool.The technology achieves its flexibility through virtualization, which creates multiple virtual instances from single physical servers. Resource pooling allows providers to serve multiple customers from the same infrastructure, while rapid elasticity automatically scales resources up or down based on demand.This elastic scaling can reduce resource costs by up to 30% compared to fixed infrastructure, according to McKinsey (2024), making cloud computing both flexible and cost-effective for businesses of all sizes.What are the key benefits of cloud computing?The key benefits of cloud computing refer to the advantages organizations and individuals gain from using internet-based computing services instead of traditional on-premises infrastructure. The key benefits of cloud computing are listed below.Cost reduction: Organizations eliminate upfront hardware investments and reduce ongoing maintenance expenses by paying only for resources they actually use. Cloud providers handle infrastructure management, reducing IT staffing costs and operational overhead.Flexibility and elasticity: Computing resources can expand or contract automatically based on demand, ensuring best performance during traffic spikes. This flexibility prevents over-provisioning during quiet periods and under-provisioning during peak usage.Improved accessibility: Users can access applications and data from any device with an internet connection, enabling remote work and global collaboration. This mobility supports modern work patterns and increases productivity across distributed teams.Enhanced reliability: Cloud providers maintain multiple data centers with redundant systems and backup infrastructure to ensure continuous service availability.Automatic updates and maintenance: Software updates, security patches, and system maintenance happen automatically without user intervention. This automation reduces downtime and ensures systems stay current with the latest features and security protections.Disaster recovery: Cloud services include built-in backup and recovery capabilities that protect against data loss from hardware failures or natural disasters. Recovery times are typically faster than traditional backup methods since data exists across multiple locations.Environmental effectiveness: Shared cloud infrastructure uses resources more effectively than individual company data centers, reducing overall energy consumption. Large cloud providers can achieve better energy effectiveness through economies of scale and advanced cooling technologies.What are the drawbacks and challenges of cloud computing?The drawbacks and challenges of cloud computing refer to the potential problems and limitations organizations may face when adopting cloud-based services. They are listed below.Security concerns: Organizations lose direct control over their data when it's stored on third-party servers. Data breaches, unauthorized access, and compliance issues become shared responsibilities between the provider and customer. Sensitive information may be vulnerable to cyber attacks targeting cloud infrastructure.Internet dependency: Cloud services require stable internet connections to function properly. Poor connectivity or outages can completely disrupt business operations and prevent access to critical applications. Remote locations with limited bandwidth face particular challenges accessing cloud resources.Vendor lock-in: Switching between cloud providers can be difficult and expensive due to proprietary technologies and data formats. Organizations may become dependent on specific platforms, limiting their flexibility to negotiate pricing or change services. Migration costs and technical complexity often discourage switching providers.Limited customization: Cloud services offer standardized solutions that may not meet specific business requirements. Organizations can't modify underlying infrastructure or install custom software configurations. This restriction can force businesses to adapt their processes to fit the cloud platform's limitations.Ongoing costs: Monthly subscription fees can accumulate to exceed traditional on-premise infrastructure costs over time. Unexpected usage spikes or data transfer charges can lead to budget overruns. Organizations lose the asset value that comes with owning physical hardware.Performance variability: Shared cloud resources can experience slower performance during peak usage periods. Network latency affects applications requiring real-time processing or frequent data transfers. Organizations can't guarantee consistent performance levels for mission-critical applications.Compliance complexity: Meeting regulatory requirements becomes more challenging when data is stored across multiple locations. Organizations must verify that cloud providers meet industry-specific compliance standards. Audit trails and data governance become shared responsibilities that require careful coordination.Gcore Edge CloudWhen building AI applications that require serious computational power, the infrastructure you choose can make or break your project's success. Whether you're training large language models, running complex inference workloads, or tackling high-performance computing challenges, having access to the latest GPU technology without performance bottlenecks becomes critical.Gcore's AI GPU Cloud Infrastructure addresses these demanding requirements with bare metal NVIDIA H200. H100. A100. L40S, and GB200 GPUs, delivering zero virtualization overhead for maximum performance. The platform's ultra-fast InfiniBand networking and multi-GPU cluster support make it particularly well-suited for distributed training and large-scale AI workloads, starting from just €1.25/hour. Multi-instance GPU (MIG) support also allows you to improve resource allocation and costs for smaller inference tasks.Discover how Gcore's bare metal GPU performance can accelerate your AI training and inference workloads at https://gcore.com/gpu-cloud.Frequently asked questionsPeople often have questions about cloud computing basics, costs, and how it fits their specific needs. These answers cover the key service models, use options, and practical considerations that help clarify what cloud computing can do for your organization.What's the difference between cloud computing and traditional hosting?Cloud computing delivers resources over the internet on demand, while traditional hosting provides fixed server resources at dedicated locations. Cloud offers elastic growth and pay-as-you-go pricing, whereas traditional hosting requires upfront capacity planning and fixed costs regardless of actual usage.What is cloud computing security?Cloud computing security protects data, applications, and infrastructure in cloud environments through shared responsibility models between providers and users. Cloud providers secure the underlying infrastructure while users protect their data, applications, and access controls.What is virtualization in cloud computing?Virtualization in cloud computing creates multiple virtual machines (VMs) on a single physical server using hypervisor software that separates computing resources. This technology allows cloud providers to increase hardware effectiveness and offer flexible, isolated environments to multiple users simultaneously.Is cloud computing secure for business data?Yes, cloud computing is secure for business data when proper security measures are in place, with major providers offering encryption, access controls, and compliance certifications that often exceed what most businesses can achieve on-premises. Cloud service providers typically guarantee 99.9% or higher uptime in service level agreements while maintaining enterprise-grade security standards.How much does cloud computing cost compared to on-premises infrastructure?Cloud computing typically costs 20-40% less than on-premises infrastructure due to shared resources, reduced hardware purchases, and lower maintenance expenses, according to IDC (2024). However, costs vary primarily based on usage patterns, with predictable workloads sometimes being cheaper on-premises while variable workloads benefit more from cloud's pay-as-you-go model.How do I choose between IaaS, PaaS, and SaaS?Choose based on your control needs. IaaS gives you full infrastructure control, PaaS handles infrastructure so you focus on development, and SaaS provides ready-to-use applications with no technical management required.

Pre-configure your dev environment with Gcore VM init scripts

Provisioning new cloud instances can be repetitive and time-consuming if you’re doing everything manually: installing packages, configuring environments, copying SSH keys, and more. With cloud-init, you can automate these tasks and launch development-ready instances from the start.Gcore Edge Cloud VMs support cloud-init out of the box. With a simple YAML script, you can automatically set up a development-ready instance at boot, whether you’re launching a single machine or spinning up a fleet.In this guide, we’ll walk through how to use cloud-init on Gcore Edge Cloud to:Set a passwordInstall packages and system updatesAdd users and SSH keysMount disks and write filesRegister services or install tooling like Docker or Node.jsLet’s get started.What is cloud-init?cloud-init is a widely used tool for customizing cloud instances during the first boot. It reads user-provided configuration data—usually YAML—and uses it to run commands, install packages, and configure the system. In this article, we will focus on Linux-based virtual machines.How to use cloud-init on GcoreFor Gcore Cloud VMs, cloud-init scripts are added during instance creation using the User data field in the UI or API.Step 1: Create a basic scriptStart with a simple YAML script. Here’s one that updates packages and installs htop:#cloud-config package_update: true packages: - htop Step 2: Launch a new VM with your scriptGo to the Gcore Customer Portal, navigate to VMs, and start creating a new instance (or just click here). When you reach the Additional options section, enable the User data option. Then, paste in your YAML cloud-init script.Once the VM boots, it will automatically run the script. This works the same way for all supported Linux distributions available through Gcore.3 real-world examplesLet’s look at three examples of how you can use this.Example 1: Add a password for a specific userThe below script sets the for the default user of the selected operating system:#cloud-config password: <password> chpasswd: {expire: False} ssh_pwauth: True Example 2: Dev environment with Docker and GitThe following script does the following:Installs Docker and GitAdds a new user devuser with sudo privilegesAuthorizes an SSH keyStarts Docker at boot#cloud-config package_update: true packages: - docker.io - git users: - default - name: devuser sudo: ALL=(ALL) NOPASSWD:ALL groups: docker shell: /bin/bash ssh-authorized-keys: - ssh-rsa AAAAB3Nza...your-key-here runcmd: - systemctl enable docker - systemctl start docker Example 3: Install Node.js and clone a repoThis script installs Node.js and clones a GitHub repo to your Gcore VM at launch:#cloud-config packages: - curl runcmd: - curl -fsSL https://deb.nodesource.com/setup_18.x | bash - - apt-get install -y nodejs - git clone https://github.com/example-user/dev-project.git /home/devuser/project Reusing and versioning your scriptsTo avoid reinventing the wheel, keep your cloud-init scripts:In version control (e.g., Git)Templated for different environments (e.g., dev vs staging)Modular so you can reuse base blocks across projectsYou can also use tools like Ansible or Terraform with cloud-init blocks to standardize provisioning across your team or multiple Gcore VM environments.Debugging cloud-initIf your script doesn’t behave as expected, SSH into the instance and check the cloud-init logs:sudo cat /var/log/cloud-init-output.log This file shows each command as it ran and any errors that occurred.Other helpful logs:/var/log/cloud-init.log /var/lib/cloud/instance/user-data.txt Pro tip: Echo commands or write log files in your script to help debug tricky setups—especially useful if you’re automating multi-node workflows across Gcore Cloud.Tips and best practicesIndentation matters! YAML is picky. Use spaces, not tabs.Always start the file with #cloud-config.runcmd is for commands that run at the end of boot.Use write_files to write configs, env variables, or secrets.Cloud-init scripts only run on the first boot. To re-run, you’ll need to manually trigger cloud-init or re-create the VM.Automate it all with GcoreIf you're provisioning manually, you're doing it wrong. Cloud-init lets you treat your VM setup as code: portable, repeatable, and testable. Whether you’re spinning up ephemeral dev boxes or preparing staging environments, Gcore’s support for cloud-init means you can automate it all.For more on managing virtual machines with Gcore, check out our product documentation.Explore Gcore VM product docs

How to cut egress costs and speed up delivery using Gcore CDN and Object Storage

If you’re serving static assets (images, videos, scripts, downloads) from object storage, you’re probably paying more than you need to, and your users may be waiting longer than they should.In this guide, we explain how to front your bucket with Gcore CDN to cache static assets, cut egress bandwidth costs, and get faster TTFB globally. We’ll walk through setup (public or private buckets), signed URL support, cache control best practices, debugging tips, and automation with the Gcore API or Terraform.Why bother?Serving directly from object storage hits your origin for every request and racks up egress charges. With a CDN in front, cached files are served from edge—faster for users, and cheaper for you.Lower TTFB, better UXWhen content is cached at the edge, it doesn’t have to travel across the planet to get to your user. Gcore CDN caches your assets at PoPs close to end users, so requests don’t hit origin unless necessary. Once cached, assets are delivered in a few milliseconds.Lower billsMost object storage providers charge $80–$120 per TB in egress fees. By fronting your storage with a CDN, you only pay egress once per edge location—then it’s all cache hits after that. If you’re using Gcore Storage and Gcore CDN, there’s zero egress fee between the two.Caching isn’t the only way you save. Gcore CDN can also compress eligible file types (like HTML, CSS, JavaScript, and JSON) on the fly, further shrinking bandwidth usage and speeding up file delivery—all without any changes to your storage setup.Less origin traffic and less data to transfer means smaller bills. And your storage bucket doesn’t get slammed under load during traffic spikes.Simple scaling, globallyThe CDN takes the hit, not your bucket. That means fewer rate-limit issues, smoother traffic spikes, and more reliable performance globally. Gcore CDN spans the globe, so you’re good whether your users are in Tokyo, Toronto, or Tel Aviv.Setup guide: Gcore CDN + Gcore Object StorageLet’s walk through configuring Gcore CDN to cache content from a storage bucket. This works with Gcore Object Storage and other S3-compatible services.Step 1: Prep your bucketPublic? Check files are publicly readable (via ACL or bucket policy).Private? Use Gcore’s AWS Signature V4 support—have your access key, secret, region, and bucket name ready.Gcore Object Storage URL format: https://<bucket-name>.<region>.cloud.gcore.lu/<object> Step 2: Create CDN resource (UI or API)In the Gcore Customer Portal:Go to CDN > Create CDN ResourceChoose "Accelerate and protect static assets"Set a CNAME (e.g. cdn.yoursite.com) if you want to use your domainConfigure origin:Public bucket: Choose None for authPrivate bucket: Choose AWS Signature V4, and enter credentialsChoose HTTPS as the origin protocolGcore will assign a *.gcdn.co domain. If you’re using a custom domain, add a CNAME: cdn.yoursite.com CNAME .gcdn.co Here’s how it works via Terraform: resource "gcore_cdn_resource" "cdn" { cname = "cdn.yoursite.com" origin_group_id = gcore_cdn_origingroup.origin.id origin_protocol = "HTTPS" } resource "gcore_cdn_origingroup" "origin" { name = "my-origin-group" origin { source = "mybucket.eu-west.cloud.gcore.lu" enabled = true } } Step 3: Set caching behaviorSet Cache-Control headers in your object metadata: Cache-Control: public, max-age=2592000 Too messy to handle in storage? Override cache logic in Gcore:Force TTLs by path or extensionIgnore or forward query strings in cache keyStrip cookies (if unnecessary for cache decisions)Pro tip: Use versioned file paths (/img/logo.v3.png) to bust cache safely.Secure access with signed URLsWant your assets to be private, but still edge-cacheable? Use Gcore’s Secure Token feature:Enable Secure Token in CDN settingsSet a secret keyGenerate time-limited tokens in your appPython example: import base64, hashlib, time secret = 'your_secret' path = '/videos/demo.mp4' expires = int(time.time()) + 3600 string = f"{expires}{path} {secret}" token = base64.urlsafe_b64encode(hashlib.md5(string.encode()).digest()).decode().strip('=') url = f"https://cdn.yoursite.com{path}?md5={token}&expires={expires}" Signed URLs are verified at the CDN edge. Invalid or expired? Blocked before origin is touched.Optional: Bind the token to an IP to prevent link sharing.Debug and cache tuneUse curl or browser devtools: curl -I https://cdn.yoursite.com/img/logo.png Look for:Cache: HIT or MISSCache-ControlX-Cached-SinceCache not working? Check for the following errors:Origin doesn’t return Cache-ControlCDN override TTL not appliedCache key includes query strings unintentionallyYou can trigger purges from the Gcore Customer Portal or automate them via the API using POST /cdn/purge. Choose one of three ways:Purge all: Clear the entire domain’s cache at once.Purge by URL: Target a specific full path (e.g., /images/logo.png).Purge by pattern: Target a set of files using a wildcard at the end of the pattern (e.g., /videos/*).Monitor and optimize at scaleAfter rollout:Watch origin bandwidth dropCheck hit ratio (aim for >90%)Audit latency (TTFB on HIT vs MISS)Consider logging using Gcore’s CDN logs uploader to analyze cache behavior, top requested paths, or cache churn rates.For maximum savings, combine Gcore Object Storage with Gcore CDN: egress traffic between them is 100% free. That means you can serve cached assets globally without paying a cent in bandwidth fees.Using external storage? You’ll still slash egress costs by caching at the edge and cutting direct origin traffic—but you’ll unlock the biggest savings when you stay inside the Gcore ecosystem.Save money and boost performance with GcoreStill serving assets direct from storage? You’re probably wasting money and compromising performance on the table. Front your bucket with Gcore CDN. Set smart cache headers or use overrides. Enable signed URLs if you need control. Monitor cache HITs and purge when needed. Automate the setup with Terraform. Done.Next steps:Create your CDN resourceUse private object storage with Signature V4Secure your CDN with signed URLsCreate a free CDN resource now

Subscribe to our newsletter

Get the latest industry trends, exclusive insights, and Gcore updates delivered straight to your inbox.