Gcore named a Leader in the GigaOm Radar for AI Infrastructure!Get the report
  1. Home
  2. Developers
  3. What Is a DNS Zone?

What Is a DNS Zone?

  • By Gcore
  • 9 min read
What Is a DNS Zone?

The Domain Name System (DNS) is a naming database that enables your computer to identify and translate a domain name (e.g., google.com) into an IP address (e.g., 74.125.226.72). DNS zones are specific portions of the DNS managed by a particular organization or administrator. These DNS zones are critical to the DNS as a whole as they simplify the management of DNS records across large, distributed networks. This article is a deep-dive into DNS zones. We explain what DNS zones are, how they work, and why they are important for managing DNS records.

Understanding the Basics of DNS Zones

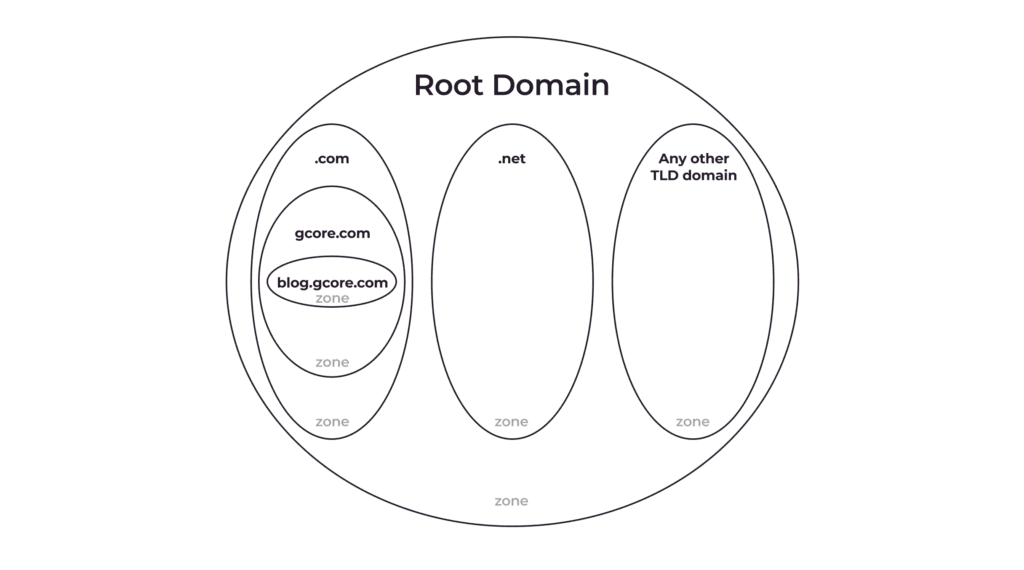
A DNS zone is a logical entity that refers to a specific domain and its subdomains managed by a single administrator. This concept is quite complex, so let’s break it down.

What Exactly Is a DNS Zone?

A DNS zone is not a material entity. It is a term people use to show that a specific domain—or a part of it (a subdomain/subdomains)—is managed by a single administrator. The administrator can manage DNS records related to their DNS zone by changing, adding, or deleting records.

When you buy a domain, you automatically get control of its DNS zone; you can manage the DNS record of this domain and its subdomains. However, if you want, you can separate out (delegate) some subdomains so that they are managed by someone else. Such a separation means that you create a new DNS zone which contains only the separated subdomain(s).

Why Create a Separate DNS Zone?

The domain owner can separate subdomains and create a new DNS zone for the convenience of managing DNS records. For example, gcore.com has many subdomains, including:

  • account.gcore.com
  • api.gcore.com
  • speedtest.gcore.com

Let’s say a dedicated team is responsible for the speedtest. To allow them autonomy, we can separate speedtest.gcore.com into a separate DNS zone and let the speed test team become the administrator. If they want to move the speed test to different servers, or perhaps link it to a mail server, they can do so themselves without affecting the main site or requiring an external approval process.

FAQs About DNS Zones

What components does a DNS zone include?

A DNS zone includes resource records as its components. One SOA and two NS records are mandatory.

Are top-level domains also DNS zones?

Yes. They simply delegate control over their subdomains (i.e., second-level domains) to the owners of those subdomains.

How can you separate subdomains into a separate DNS zone?

You need to add NS records for the relevant subdomains to the main domain. For more info, check out the DNS Zone Delegation section of this article.

Does each DNS zone correspond to one file with its DNS records?

Yes. One DNS zone corresponds to one file that contains all the DNS records for that specific DNS zone.

Can one DNS zone contain different second-level domains?

No, it can only contain subdomains of the same domain or the domain itself.

Are DNS zones tied to specific DNS servers?

No. One DNS zone corresponds to one file with DNS records. Such a file can be stored on any DNS server. In other words, different files for different DNS zones can be stored on the same server.

What Is a DNS Zone File?

A DNS zone file is usually presented in the form of a plain-text file containing all the important information about a domain name. It contains resource records that are used to map and link domain names to corresponding requests.

A DNS zone file typically contains a Start of Authority (SOA) and NS record and other relevant resource records (RRs,) including—but not limited to—MX, CNAME, A, and TXT records. Let’s take a quick look at what the most common types of records do.

Resource records in DNS zone filesFunction(s)
SOA (start of authority) recordsProvide the primary source of authority for the domain, including all essential information like the primary DNS server, contact email address, and settings that control how the domain operates
NS (nameserver) recordsSpecify IP addresses of authoritative nameservers and which servers are responsible for providing DNS information about the domain
A (address) recordsMap the domain names to their associated IP addresses
MX (mail exchange) recordsIdentify the mail servers responsible for handling email for the domain
CNAME (canonical name) recordsProvide an alias with an actual domain name for existing A records.
TXT (text) recordsContain text-based information associated with the domain, such as SPF (Sender Policy Framework) records used for domain ownership validation.

What Does a DNS Zone File Look Like?

Here is an example of what a DNS zone file for gcore.com could look like in BIND format:

$TTL 1h@               IN      SOA     dns1.gcore.com. hostmaster.gcore.com. (                        20211209                        1d                        2h                        4w                        1h                        )                IN      NS      dns1.gcore.com.                IN      NS      dns2.gcore.com.                IN      MX      10      mail.gcore.com.dns1            IN      A       192.168.0.1dns2            IN      A       192.168.0.2mail            IN      A       192.168.0.3web             IN      A       192.168.0.4www             IN      CNAME   webftp             IN      CNAME   web@		IN	TXT     "v=spf1 a mx include:spf.gcore.com ~all"spf		IN	TXT	"v=spf1 include:spf.protection.outlook.com include:spf.emailsignatures365.com -all"

In this example, the DNS zone file begins with a time-to-live (TTL) directive, which sets the duration for caching DNS records. The “@” symbol represents the root of the domain. Next is the start of authority (SOA) record, which identifies the primary DNS server for the domain, and includes the administrator’s email address. Two nameservers are specified using the IN NS (Internet Nameserver) command, and an MX record is added to designate the mail server, and assign it a priority value of 10.

Several A records are included to define the IP address of various servers. These A records specify the DNS server, mail server and web server IP addresses. The zone file also contains CNAME records, which serve as aliases or alternative names for the web server. This allows different domain names to point to the same web server. Finally, a TXT record is included to specify the Sender Policy Framework (SPF) record for email authentication purposes. This record helps verify that incoming emails originate from authorized servers.

By structuring the DNS zone files like this, administrators can effectively manage the DNS records for their domain. This ensures proper routing of emails, website accessibility, and email authentication.

DNS Zone Delegation

DNS zone delegation is a process that involves dividing a larger DNS zone into smaller zones and assigning them to different DNS servers. This process enables more efficient and localized handling of DNS queries, particularly for larger organizations with multiple subdomains. By delegating zones, the burden on a single server is reduced, leading to improved performance and availability of the overall DNS infrastructure.

Let’s consider a scenario where a large organization manages a primary domain (e.g., example.com) as well as several subdomains (e.g., it.example.com, europe.example.com, us.example.com, etc.) To optimize DNS operations, the organization can delegate each subdomain to separate DNS servers, distributing the workload and enhancing efficiency.

How To Delegate a DNS Zone

To delegate a DNS zone, certain steps need to be followed. The administrator must create NS (nameserver) records for the subdomain. These NS records assign the authoritative servers responsible for handling DNS queries for the subdomain. For example, if the administrator delegates it.example.com subdomain, an NS needs to be added to the example.com zone file. This NS record signifies that the zone file governing the “it” subdomain has the authority to handle all associated DNS queries.

How Do DNS Zones Work?

Imagine that you own the domain example.com. Whenever someone enters example.com into their web browser, their device sends a DNS query to a server requesting the IP address for your website. The server then searches for authoritative DNS zones related to your domain and asks them for the IP address of your website. Once obtained, this IP address is used to establish a connection between the visitor’s device and the server hosting your website.

As the website owner or administrator, DNS zones allow you to manage DNS records for specific parts of your domain. For example, you can have separate DNS zones for mail.example.com or blog.example.com without affecting the records for the entire example.com domain.

To create such a DNS zone, you must specify the subdomain you want to manage in the server’s control panel and create NS records for the subdomain. The NS record can be in the form of an “A” record, which associates the subdomain with an IP address, or an “MX” record, which specifies the mail server for handling email for the subdomain.

What Are DNS Zone Changes?

DNS zone changes are modifications to the DNS information associated with a particular domain. These can include changes to the IP address of the server responsible for hosting the website, adjusting the mail server settings, or adding new servers. These modifications can occur intentionally or accidentally when the domain owner or their authorized representative makes them. However, it’s important to note that DNS zone changes can be maliciously induced by cybercriminals.

Why Track DNS Zone Changes?

Tracking DNS zone changes is crucial for maintaining smooth operation and security of a website. Changes to DNS records can have a significant impact on website functionality. A prime example is the 2021 Facebook outage, during which the website was inaccessible for about seven hours. The outage was caused by the loss of IP routes to the Facebook DNS servers. The resulting revenue loss for Facebook was between $60-100 million.

Furthermore, malicious DNS zone changes can pose serious risks. They can redirect visitors to unauthorized websites, compromising user security. These changes can also open back doors for intrusions into databases and potential breaches of user privacy, which are often triggered by DDoS attacks.

Companies can monitor changes to their domain’s DNS records by actively tracking DNS zone changes. This monitoring allows companies to identify and address any unauthorized or unexpected changes promptly and is essential for safeguarding online presence and protecting user trust.

How To Track DNS Zone Changes

There are five techniques that companies can deploy to track DNS zone changes:

Tracking TechniqueHow It Works
Zone Change Notification (ZCN)This feature allows DNS servers to send notifications to other DNS servers when a change occurs in a DNS zone. By enabling ZCN, DNS servers can stay updated with their zone information, and be used for replication of zones as and when needed.
DNS LoggingMany DNS servers provide logging capabilities, which monitor DNS queries and updates. These logs provide a record of DNS zone changes, enabling you to identify and troubleshoot issues arising from DNS zone changes.
External Monitoring ServicesThese services use automated tools to monitor DNS answers continuously. They detect changes, such as adding or removing DNS records, and send real-time alerts when DNS zone changes occur. This enables quick responses to potential issues.
DigThis command-line tool allows the user to retrieve DNS information, including DNS records, name servers, and IP addresses. Dig can also be used to track DNS zone changes by comparing DNS queries to DNS servers before and after the zone change, helping the user pinpoint differences.
DNS Query AnalysisThis technique analyzes DNS queries received by DNS servers to track changes in DNS zones. It provides valuable insights into the domains and subdomains being queried, the types of queries received, and the frequency of queries to specific DNS records. Monitoring these patterns can flag changes to the corresponding DNS zones.

Why Monitor DNS Zone Changes?

Monitoring DNS zone changes has three main benefits: detecting unauthorized changes immediately, ensuring DNS record accuracy, and improving IT resource management.

Immediate Detection of Unauthorized Changes

Unauthorized changes to DNS zones, whether accidental or malicious, can result in DNS errors, slow query response times, and even domain name resolution failures. Attackers may attempt to modify DNS records to redirect users to phishing sites, intercept traffic, or compromise sensitive information. Actively monitoring DNS zone changes helps mitigate these risks, promptly identifying any unauthorized modifications and enabling DNS administrators to take immediate action.

DNS Record Accuracy

When changes are made to a website or server IP address, corresponding updates to DNS records are necessary to ensure seamless user access to the new server. Incorrect or outdated DNS records can result in website downtime, slow page loading times or even complete website inaccessibility. By monitoring DNS zone changes, companies can verify the accuracy of DNS records, which is crucial for a seamless user experience and for proactively preventing potential problems.

Better IT Resource Management

Regular monitoring of DNS zone changes helps efficiently allocate IT resources. By staying up to date about changes, teams can optimize activities, minimize downtime, and reduce operational costs.

What Is a Reverse Lookup Zone?

A reverse lookup zone enables the identification of domain names associated with specific IP addresses. It works opposite to the more common forward lookup zone, which finds the IP address linked to a domain name.

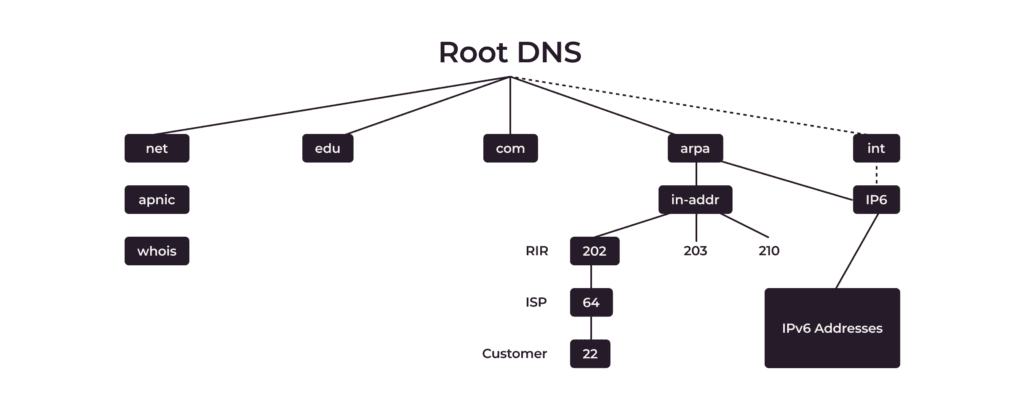
A reverse lookup zone utilizes special PTR (Pointer) records. It uses the in-addr.appa domain, and IP addresses are arranged from the less specific to the more specific, while the domain names are arranged from the more specific to the less specific. Consider the figure above, for example, the customer’s IP address is 22.64.202.in-addr.appa.

PTRs are always managed in the reverse zone (not forward zone,) like in-addr.arpa or ip6.arpa e.g <octet_2>.<octet_1>.in-addr.arpa. Your ISP must delegate the zone to your NSes. Therefore, when you perform a reverse lookup, the DNS server searches for the PTR record corresponding to the IP address you provide and retrieves the associated domain name.

Reverse lookup zones are particularly valuable in larger networks with numerous IP addresses for troubleshooting network issues. For example, if you detect suspicious activity originating from a particular IP address on your organization’s network, it’s easy to determine visually the domain name associated with that IP address.

Additionally, PTR records are widely used in public networks. You can identify the name associated with an IP address and make a fair assumption about who is responsible for the part of the network that is overloaded or generates malicious traffic. For example:

traceroute to 1.1.1.1 (1.1.1.1), 64 hops max, 52 byte packets 1  192.168.31.1 (192.168.31.1)  10.842 ms  3.846 ms  3.389 ms 2  192.168.178.1 (192.168.178.1)  5.021 ms  5.808 ms  5.727 ms 3  dhcp-077-249-057-001.chello.nl (77.249.57.1)  16.033 ms  13.006 ms  15.976 ms 4  212.142.51.25 (212.142.51.25)  11.897 ms  14.024 ms  12.946 ms 5  asd-tr0021-cr101-be112-2.core.as33915.net (213.51.7.92)  15.071 ms  14.261 ms  15.145 ms 6  nl-ams14a-ri1-ae51-0.core.as9143.net (213.51.64.186)  18.707 ms  16.519 ms  23.037 ms 7  213.46.191.210 (213.46.191.210)  15.810 ms  16.197 ms  16.946 ms 8  172.71.96.2 (172.71.96.2)  15.055 ms    172.70.44.2 (172.70.44.2)  14.475 ms    172.71.180.2 (172.71.180.2)  16.163 ms 9  one.one.one.one (1.1.1.1)  19.013 ms  17.318 ms  21.799 ms

You may notice that some addresses don’t have associated PTR records. Usually those addresses are from private IP spaces, and are being used on internal interfaces of the routers. Although we can’t see their name in public, most providers have PTRs for them on their own nameservers, and they are resolved when those nameservers are in use e.g., inside the provider’s network.

It is also worth mentioning that it is not mandatory for a PTR record to correspond to the forward record, and in general it can be an arbitrary domain name. As such, anyone with access to the in-addr.arpa subzone can create PTR for google.com or any other domain name, which in turn can mislead a user or network administrator.

Conclusion

DNS zones play a critical role in the broader DNS system, enabling efficient management of specific subsets of DNS records. Effective DNS management is essential for maintaining website accessibility and email delivery, and supporting various online activities. Poor DNS management can lead to reduced traffic, revenue loss and diminished user trust. Fortunately, companies can optimize DNS management by using appropriate tools and resources, enhancing both efficiency and security in communications between user devices and their chosen servers.

Gcore offers advanced features that empower companies to track DNS zones, detect unauthorized changes, and quickly resolve issues. Gcore’s services include comprehensive tracking, monitoring, and security functionalities. Gcore also provides fast, resilient, and reliable enterprise-grade DNS hosting services. With Gcore, companies can streamline DNS management and ensure a secure, seamless online experience for their users.

Related articles

What Is Transcoding and What Role Does It Play in Streaming?

Transcoding is a vital process that enables digital media to be converted between formats, ensuring that your digital content remains accessible regardless of your audience’s device or bandwidth. You’ll learn about the critical role transcoding plays in streaming services, its ability to unify different file types, support a variety of devices, optimize storage space, and facilitate adaptive streaming. By the end of this article, you’ll understand how transcoding works and its indispensable function in our technologically diverse world.What Is Transcoding?Transcoding is the conversion of compressed digital media between formats. Media is encoded in one specific format, and transcoding takes that same media but encodes it differently. Typically, the data is a video or audio file, but it can be even an image or even text.Encoding is another term that we should clarify before we dive deeper. The words “encoding” and “transcoding” sound similar and are indeed related terms, but different nevertheless. Encoding refers to compressing the original media data into one target format, whereas transcoding re-encodes the already-encoded media to another format. You can’t have transcoding without first encoding. So, using words “encoding” and “transcoding” interchangeably, although common, would be a mistake.One place where transcoding inevitably occurs is in digital video distribution. Nowadays, when you use devices like digital cameras, the outcome media is encoded one way or another, because you pre-configure the parameters of the recorded media—like frame size and audio bitrate—in your camera settings. Typically, the codec used to encode media is configured in the camera. However, to adapt the media for playback on different devices or even make it possible to play at all, it often needs to be transcoded to another format.Transcoding Reasons, Use Cases, and BenefitsTranscoding can be beneficial across industry types, for businesses of all sizes. Let’s explore some ways in which transcoding can help businesses thrive, and understand some real-life examples of its application.Transcoding Helps Support Different Device TypesIt often happens that the format in which a media was originally encoded is not suitable for playing on all devices. The variety of personal computers, smartphones, tablets, and digital TVs available has led to diversity in software and media formats requiring support. By creating many copies of the original file, each encoded differently, transcoding allows the delivery of the media to all devices in the format each device requires.Transcoding Helps Save SpaceAnother common reason for transcoding is reducing a media file’s size; quality media usually requires a lot of space, but certain formats less so. This is particularly of interest when using encoding formats preserving the original quality. You can, for example, store photos and videos taken with your digital camera on your computer’s hard drive at the original (or close to original) quality, but in a file with reduced size.Transcoding Helps Unify Different FilesImagine you need to deal with many video or audio files encoded in different formats, for example, while working on a documentary movie or archiving footage received from different sources. Transcoding can convert all of the files to a single format that is convenient for you to work with.Transcoding Helps Adaptive StreamingAnd finally, transcoding is unavoidable in streaming and sending media files via the internet in general. It helps to adapt a file to different bandwidths and screen sizes. In fact, sometimes transcoding the original file using a lower resolution or different codec is the only way to enable the content receiver to play it.How Does Transcoding Work?Now that we know what transcoding is and why we need it, we can explore how it works and what is needed to transcode a media file.Transcoding is a two-step process (see Figure 1):Decoding the original media into an intermediate, uncompressed format. In this case, the word “uncompressed” doesn’t mean “without a loss”: If the file initially was encoded with a loss, the same level of loss will be present in the intermediate representation as well.Re-encoding, typically, to another format or using a different set of parameters.Figure 1. The process of transcoding a fileSo, a transcoder is a software or hardware device that performs transcoding. It takes the original media file, decodes it, and re-encodes it into a target format.Types of TranscodersTranscoders can be classified on different grounds. To start with, there are transcoders that work with different types of media—most often audio, video, or images. But that’s not all. Let’s see how else transcoders could be categorized.Hardware and Software TranscodersThe classification that divides transcoders into software applications and hardware devices is the most fundamental. There are many transcoding software options available on the market, from the popular command line tool FFmpeg that can be integrated into any kind of infrastructure, through to shiny multi-functional apps like Adobe Premiere Pro. A software transcoder is the most obvious, and often free, option.At the same time, transcoding itself can demand massive computational powers. Even if you transcode in background, a performance hit in the foreground processes is inevitable. As such, sometimes a hardware transcoder makes a better sense: While the specialized piece of hardware works, the main computer is free for performing other tasks.Hardware transcoders have chips and boards dedicated and heavily optimized for the job, and as a result the process is completed more efficiently. On the other hand, it also means that you have less freedom: Some encoding parameters are burned into the chip and can’t be easily altered.Cloud and On-Premises TranscodersIf you own a video service, you can transcode your video files yourself. Sometimes, it’s good to have everything under your control. But it’s also a responsibility and, of course, brings additional costs.Many cloud platforms offer transcoding as a part of their services, including Gcore. Outsourcing the task to another service makes transcoding someone else’s headache.Live and Offline TranscodersTranscoding a stored file and saving the result in another file is the most straightforward workflow that comes into mind. However, it’s not always the way it works. When it comes to live streaming, especially with adaptive bitrate, live transcoding comes in. It’s tricky and even more labor intensive than the offline version, because any mistake—and slow processing—will increase latency, resulting in playback hiccups.Transcoding vs. Transmuxing ProcessesThe transcoding process is somewhat similar to, and often confused with, transmuxing. But transmuxing is different because it keeps the media format and quality unaltered and merely repackages it into a different media container or delivery format. As we now understand, transcoding goes beyond this by altering the contents of the package: It changes the way the packed media was encoded, including its compression rate, bitrate, and frame size.Types of TranscodingGenerally, transcoding keeps data compression on the same level or increases the level of compression, discarding more data and resulting in a loss of quality. Transcoding can be divided into three types based on compression and quality loss:Lossless-to-losslessLossless-to-lossyLossy-to-lossyThe word “loss” in this case means a discarded part of the data of the original file. As a result, the file has a smaller size, but its contents are of lower quality.In the first scenario, lossless-to-lossless, the original quality is preserved. You might want to re-encode your losslessly compressed file using a different set of codecs (i.e., the algorithms which are used to compress the media) that demands less space for the outcome; compression algorithms evolve continuously and the most modern ones can offer better compression without quality loss.The second option, lossless-to-lossy transcoding, means that the transcoded media has the original quality which is lost during transcoding due to a deeper compression.Finally, the lossy-to-lossy transcoding refers to the situation when the media is already compressed with quality loss, and transcoding either leaves the same degree of compression, or uses an even more intense algorithm that results in a further quality loss. Thus, repetitive lossy encoding cumulatively worsens the media quality.Until recently, the option of lossy-to-lossless transcoding was out of question: If the original media was compressed with any loss, there was no way on earth to restore previously discarded data (and, thus, regain the original quality.) Now, AI/ML is beginning to provide solutions that can restore the original quality.Here’s a table that summarizes the differences of the three most common types of transcoding:Transcoding typeInitial qualityResulting qualityLossless-to-losslessOriginal, no quality lossOriginal, no quality lossLossless-to-lossyOriginal, no quality lossCompressed, with some loss of qualityLossy-to-lossyCompressed, with a loss of qualityCompressed, with more loss of qualityApart from the loss-based classification, there are various types of transcoding that can be used separately or combined together in a single operation. Let’s take a look at them in the next few sections.Re-EncodingSometimes, encoded data needs editing. For instance, you need to reorder scenes in a video. In this case, the file is decoded, edited, and then re-encoded to the same format. So, this type of transcoding doesn’t affect audio or video codecs used for encoding or framerate of a video. It’s used to decode the media and re-encode it back using the same parameters after the editing is complete.In the digital world, it’s hard to keep the original quality in the edited version, so re-encoding a lossy format leads to further losses. To avoid this pitfall, it’s better to edit the original file and encode it only when it’s ready.TransratingWhen a media needs to fit a smaller space or lower bandwidth, its bitrate can be changed, say, from 12 to 4 Mbps. This process is called transrating. The format and codec stay the same, only bitrate is changed.TranssizingAs its name suggests, transsizing—also known as scaling—refers to changing an image or video frame size. This is, for example, what Netflix does when you downgrade your Premium plan including 4K HD Ultra HD video to the Basic plan, which includes only the 720p HD resolution.In theory, transsizing can be performed during playback, but in most cases, it makes more sense to perform it beforehand to spare computational resources and space. In the case of streaming, transsizing before playback reduces the quantity of transferred data.What Role Does Transcoding Play in Streaming?Video streaming is where transcoding shines, and here’s why. The world of media content production is constantly evolving, with new media formats and capturing devices introduced frequently. Content-consuming devices, especially smartphones and tablets, are also subject to regular new releases and updates. This ever-changing variety introduces challenges for video and audio streaming: Once created and encoded, the media is expected to be able for playback anywhere.This is where transcoding comes into use: It is an integral intermediate step in content delivery, which ensures that as many target devices as possible are supported.Apart from the (in)compatibility issue, different devices have different screen sizes and resolution, as well as varying levels of connectivity. Transcoding ensures that various resolutions and sizes of the same video are ready for the adaptive streaming protocols, like HLS. Just think of how YouTube picks the most suitable quality of a video so that you can watch it continuously, without lagging.As a result, the media is available to a wide audience with the best possible quality and minimal buffering time. It’s exactly what your viewers need.How Gcore Can Help You Not To Think About Transcoding in Streaming Services?Everything said above makes transcoding a crucial component for content delivery that, at the same time, might also become very tricky to implement. As an advanced service that provides video hosting and streaming solutions, Gcore takes full care of transcoding of your media.Not only does Gcore make sure that videos are delivered to all known device types, we do so in an adaptive manner so that people with any connectivity level are covered. Additionally, Gcore’s failsafe transcoding system improves transcoding stability, helping your content reach the widest possible audience.ConclusionTo summarize, transcoding re-encodes media files, adapting them to different devices, bandwidths, and purposes. If you need to host or stream video or audio content, or if you just need to save some disk space for storing more media, it’s time to look into transcoding.As crucial as it is for content delivery, transcoding can also be a complicated and expensive operation. You may want to hold full control (as well as responsibility and expenses) in your hands—or you could let a specialized service, like Gcore, take care of the details.

Why is HTTP not secure? The difference between HTTP and HTTPS

HTTP, also known as Hypertext Transfer Protocol, serves as a language for your browser and web server to communicate over the internet. Every action on the Internet, from searching for recipes to online equity trading—you can do it thanks to HTTP data transfer. Although it is good to know how important HTTP is for successful data communication on the World Wide Web, it has one significant flaw: it is not secure. That’s where HTTPS (Hypertext Transfer Protocol Secure) comes into play. HTTPS is a secure protocol that uses encryption to protect the data transmitted between your browser and the server.In this article, we’ll compare and contrast the differences between HTTP and HTTPS. Additionally, you’ll learn about the basics of HTTP and why it is not secure. By the time you finish reading, you will fully understand the importance of using HTTPS to secure your website and application.Key points about HTTPHTTP is a communication protocol. It enables the exchange of information between clients and servers over the internet, using a request-response model where the client (typically a web browser) sends an HTTP request to the server, and the server responds with an HTTP response.For example, once you visit a website and type the URL in the browser, the browser sends an HTTP request to the server, which then sends back the requested web page.HTTP is a stateless protocol. The protocol itself does not retain any information about previous requests—it doesn’t “remember” at end points and therefore each request from the client is treated as new. That being said, services using HTTP require the ability to associate multiple requests from the same browser and cookies function as unique identifiers stored in browsers to help applications retrieve session data.For example, when you bypass entering login credentials while visiting the same site repeatedly—that’s a cookie in action (and HTTP is transferring that info unencrypted, which we address in the next section).HTTP is a text-based protocol. HTTP uses a set of standardized messages to facilitate communication between clients and servers. These messages include HTTP methods (such as GET, POST, PUT, and DELETE) and status codes (such as “200 OK,” “404 Not Found,” and “500 Internal Server Error”). We’ll dive into these concepts in more detail later.For example, when you click a link on a web page, the browser sends an HTTP GET request to the server to retrieve the linked page, and the server responds with a 200 OK status code and the HTML for the new page.How does HTTP work?It works by following a set of rules for formatting messages that are sent between the client (e.g. a web browser) and the server that hosts the requested web page. Here’s how:A client sends an HTTP request to the web server. When a user enters a website address (URL) and presses “enter” on their device, the client sends an HTTP request to the web server. The request contains specific details about the requested resource, such as the type of request (e.g., GET, POST), headers (metadata about the request), and a message body (optional).The web server receives the request. The server processes it, and sends back an HTTP response to the client. The response contains information about the requested resource, such as the HTTP version, status code, headers (metadata about the response), and a message body (optional).The client receives the response. It now renders the content in the browser window.For instance, say you’re planning a movie night with friends and you’re interested in checking out some reviews for the latest releases. While connected to the internet, you might type in “http://imdb.com” into your browser’s address bar, and the browser will do the rest, connecting to the server and returning the web page to you.What is HTTP request and response?An HTTP request is a message generated by the client (usually your browser) that is sent to the server. For instance, if you search for a “reliable CDN at an affordable price” on Google, you might click on one of the websites in the search results. Once you click on that link, your browser generates an HTTP request for you to visit the site and get that information.Here are the following components in the HTTP request:HTTP method. This is the type of request that a browser (client) sends to the server to initiate an action. The most commonly used HTTP methods are GET, POST, PUT, DELETE and PATCH. Each method has a specific purpose and can perform different types of operations on the server. For example, when you open a website about CDNs, you send a GET request. It’s called “get” because such a request helps to get the content of the website.URL. This stands for “uniform resource locator” and it refers to the address of the page you are trying to access. For example, you may visit the https://gcore.com address because we provide a CDN.Resource path. The part of a URL that identifies a specific resource on a server. This portion of the URL comes after the domain name and any subdirectories. For example, in the URL “https://gcore.com/cdn/gaming,” the resource path is “/cdn/gaming.” The server uses the resource path to locate and retrieve the requested resource, such as a web page, an image, or any other data type.HTTP protocol version. This is a number indicating the version of the HTTP protocol being used for a particular request or response. The HTTP protocol has gone through several versions, including HTTP/0.9, HTTP/1.0, HTTP/1.1, HTTP/2 and HTTP/3. Each version has its own features and improvements over the previous versions.Request headers. These are a list of additional details included in an HTTP request to provide more context and information about the request being made. For example, it can include the type of browser being used, the language preferences of the user, and the type of content being requested.HTTP body. This is the optional data that your browser sends as part of the HTTP request. The HTTP body might contain HTML, JSON, XML, or any other type of content that the client wants to send.In this example, the client uses the GET method with index.html as the resource path for the URL www.example.com with HTTP/1.1 protocol version. This also includes request headers that provide more information such as the type of browser (Mozilla/5.0) and what language and type of content.Now that you’re familiar with HTTP requests, let’s discuss what HTTP response is.An HTTP response is the message that a server sends to a client after receiving an HTTP request. It contains the data that the client requested, such as a web page or a file, along with additional information such as the status of the request and any headers. The response is typically sent using the HTTP protocol and can be customized based on the specific request from the client.HTTP responses generally consist of the following information:HTTP protocol version. Same with HTTP request, it indicates what protocol version was being used for a certain request or response. The standard versions are HTTP/1.1, HTTP/2 and HTTP/3.HTTP status code. The HTTP status code is a three-digit code that a server sends back to the client in response to its request. This code indicates the success, failure, or other status of the request. For example, the “200 OK” status means that the request succeeded.Status message. A server generates an HTTP response and sends it to a client with the purpose of fulfilling the client’s request for a resource, notifying the client that the requested action has been completed, or indicating that an error occurred during the processing of the request.Response headers. An HTTP response header is a section of a network packet that a web server transmits to a web browser or client device in response to an HTTP request. Its purpose is to provide additional information about the server’s response and the requested resource. The header also facilitates the transfer of web content and other web-based data from the server to the browser of the end-user who requested it during web communications.In this example, the response headers indicate that the server responded with an HTTP 200 OK status code on November 15, 2022 at 9:12:31 GMT. It says here that the server is running Apache version 2.4.6 (CentOS). Then, based on the response, the content type is text/html, telling us that the response body (which is the content) contains an HTML code. From here, it tells us that the content length is 1274 bytes, indicating the overall size of the content.Why is HTTP not secure?HTTP does not encrypt data during client-to-server communication, which means that any data transmitted over HTTP is sent in plain text without any encryption or security mechanisms. As a result, it can be intercepted and read by anyone with access to the network traffic, including cybercriminals. Additionally, HTTP does not provide any authentication, making it vulnerable to man-in-the-middle attacks. Attackers can eavesdrop on communication between a server and a client, resulting in the theft of personal information such as login credentials and credit card numbers.For instance, say you set up an e-commerce website that sells shoes and you take online payments. If your website uses HTTP, chances are high that users’ credentials and other account details can be easily intercepted and stolen by cybercriminals.Therefore, using HTTP on a website or application can indeed lead to various security risks and potential losses, including data theft, legal liabilities and negative impact on business revenue. Here are just a few examples of the consequences possible when relying on HTTP:Consequences of Using HTTPPotential LossesLoss of customer trustCustomers may lose trust in the business due to the lack of security on the website. This will lead them to take their business elsewhere.Data breachesUsing HTTP can put sensitive customer information at risk of being stolen by hackers. This can result in legal issues, fines, and a damaged reputation.SEO disadvantagesWebsites using HTTP are likely to rank lower in search results compared to HTTPS websites. This can result in decreased website traffic and revenue.Liability issuesIf a data breach occurs on a website using HTTP, the business owner may be held liable for damages, fines, and legal fees.Lost revenueData breaches and loss of customer trust directly translate to lost revenue for the business.How do I know if a website is secure?There are two easy steps to check if your site is secure.Check the URL of the website in the address bar. If the beginning of the URL says “http” and not “https”—for example, “http://example.com”—it means that your connection to the site is not secure. This lack of encryption can potentially compromise the security of user data.Check the security status symbol. On the web address bar, there are symbols that tell us the security of the connection. As an example, with Google Chrome, a padlock icon typically indicates a secure connection, while a not secure icon indicates an unsafe connection. The Info icon may appear in different contexts, such as when displaying additional information about the website or if it’s not secure.Once you become aware of the security symbols in web browsers, it’s easier to distinguish whether a website is secure. If you own a website and it’s still using HTTP, it’s highly recommended to switch to HTTPS to improve security for potential customers.What is HTTPS?HTTPS, short for Hypertext Transfer Protocol Secure, is a more secure version of HTTP. Unlike HTTP, HTTPS encrypts the communication between a web browser and a website, making it more difficult for hackers to eavesdrop, tamper with, or forge data.This enhanced security makes HTTPS the preferred protocol for online transactions, including online banking and e-commerce, where sensitive information like credit card numbers, passwords, and personal details are transmitted over the internet.By encrypting data and verifying website identity, HTTPS provides a safe way for users to share and receive information online without worrying about the security of their data.How does HTTPS work?HTTPS secures communication between the client and server using asymmetric encryption, a significant improvement over HTTP’s plain text. The encryption protocol used in HTTPS is called Transport Layer Security (TLS). In other words, when a website uses HTTPS, it signifies that the TLS standard is being used to encrypt the data being transmitted between parties. In order to do this, a valid SSL certificate should be installed on the server. From that point, a website can switch from HTTP to HTTPS and activate the lock icon in the address bar.At its core, TLS provides three key services: encryption, authentication, and data integrity.Encryption. TLS uses encryption to protect data transmitted between clients (e.g., a browser or a native app) and servers. With TLS encryption, plaintext data is transformed into an unreadable text (called ciphertext) that only those with the secret key can access or decrypt. This helps to keep the data secure and protected from unauthorized users.Authentication. TLS assists in confirming the server and the client identity verification. This is crucial, since it makes sure that the client is speaking with the correct server and not an imposter who might try to steal information.Data integrity. TLS aids in preventing data modification or tampering while it is being transmitted. This proves that the information sent by servers and received by clients is accurate and hasn’t been changed in any way.What are the benefits of using HTTPS?As you continue reading and learn more about how HTTPS works, you may be curious about the benefits of using it as either a website owner or a regular user. Is it really worth it to switch from HTTP to HTTPS? And what advantages does HTTPS bring to the table? Here are the benefits:Data encryption and integrity. HTTPS uses encryption to protect sensitive data that users send and receive on a website, such as login credentials or credit card information. It also ensures data integrity where the data being transmitted between the user’s browser and the web server has not been tampered with or altered during transmission. This can help prevent hackers from intercepting or stealing this data.Authentication. HTTPS verifies that the website that a user is visiting is the authentic website and not an impostor. This can help prevent phishing attacks and build trust with visitors.Improved SEO. Google uses HTTPS as a ranking signal, so websites that use HTTPS may rank higher in search results than those that don’t.Regulatory compliance. Many industries have regulatory requirements for data security and privacy, and using HTTPS can help meet these requirements.Boost brand reputation. Alert signs for non-HTTPS websites are displayed by popular web browsers like Chrome and Firefox, which may discourage visitors and damage a website’s credibility. These warnings can be avoided by using HTTPS.HTTP vs. HTTPS—What’s the difference?Both HTTP and HTTPS are protocols used for transferring data between web browsers and web servers. However, the main difference between the two is the level of security they offer. HTTPS uses SSL/TLS protocols to authenticate both the web browser and the web server, ensuring that data transmitted between them is encrypted and secure. In contrast, HTTP doesn’t use any encryption protocol, leaving data vulnerable to interception and unauthorized access.Now that you have learned about the benefits of HTTPS and the potential drawbacks of using HTTP, let’s compare the two in real-life situations to understand how they can differ in impacting your business.FeatureHTTPHTTPSReal-life exampleData SecurityNot secure, as data is transmitted in plain textSecure, as data is encrypted between the web browser and the web serverWithout HTTPS, sensitive data such as customer login credentials and payment details are vulnerable to interception and theft by hackers. For example, a business that processes credit card transactions on their website would need to use HTTPS to ensure their customers’ financial information is kept safe.Search Engine Optimization (SEO)Not a ranking factor for SEOA ranking factor for SEO, as Google prefers secure websitesHTTPS can give a business an SEO advantage over non-HTTPS websites. For example, an e-commerce site that uses HTTPS may rank higher in Google search results for certain keywords compared to a competitor site that doesn’t use HTTPS.Brand ReputationLack of HTTPS can harm a business’ reputation and deter potential customersHTTPS can improve a business’ reputation and instill trust in customersWithout HTTPS, customers may perceive a business as untrustworthy and be less likely to make purchases or share personal information on the site. For example, a medical practice that uses HTTPS to protect patient data can gain a reputation for taking security seriously and earn the trust of its patients.Legal ComplianceLack of HTTPS could lead to legal issues and finesHTTPS is increasingly becoming a legal requirement for businesses that process sensitive dataIn some industries, such as healthcare and finance, businesses are required by law to protect sensitive data using HTTPS. For example, a financial institution that doesn’t use HTTPS could face legal repercussions for failing to meet data protection standards.How to convert from HTTP to HTTPSNow that you understand the advantages of using HTTPS, you may be wondering how to make the switch from HTTP to HTTPS. To enable HTTPS on your website, you typically need to obtain an SSL/TLS certificate and configure your web server to use it.Obtain an SSL/TLS certificate. This can be done by purchasing a SSL certificate from a trusted Certificate Authority (CA) or by using a free one like Let’s Encrypt. To obtain an SSL certificate, you will need to provide certain information such as your domain name, organization name (if applicable), and contact details. This information will be used to generate a Certificate Signing Request (CSR), which you will then pass on to the Certificate Authority (CA) to obtain the SSL certificate. Please note that specific information may vary depending on the type of SSL certificate you’re using.Install the certificate on your web server. The installation process will vary depending on your web server software. Generally, you’ll need to configure your web server to use the certificate and private key you obtained in the previous step. This makes your website available over HTTPS and ensures that the encryption key is in place.Update your website links. Once the certificate is installed, you’ll need to update your website links to use HTTPS instead of HTTP. This includes updating all internal links, as well as any external links you may have on your site. This step ensures that all content on your website is available over HTTPS and that there are no content warnings.Test your site. After you’ve enabled HTTPS on your site, it’s important to test it to ensure that everything is working properly. You can use various online tools to check for SSL/TLS certificate errors and mixed content warnings. This step further ensures that your website is available over HTTPS and that there are no errors or warnings that could impact user experience or search engine ranking.How does Gcore help website owners to enable HTTPS encryption?At Gcore, we are dedicated to helping our clients to make the switch from HTTP to HTTPS.With any of our CDN plans, you can issue a free Let’s Encrypt SSL certificate for all domains associated with your Gcore account. Also, you can install a custom SSL certificate from another provider. When the certificate is installed, you can switch from HTTP to HTTPS in a few clicks.Furthermore, we offer various paid SSL certificates to cater to different industries and sectors. Let’s delve into each of the SSL certificate types we provide:Certificate TypeDescriptionBest forDV certificate with domain validationThis certificate is useful for protecting basic web pages such as personal websites and blogs.A Domain Validated (DV) certificate is a type of SSL certificate that provides basic encryption and is issued within minutes. It is typically the most affordable type of SSL certificate and offers the lowest level of validation. An example of a DV certificate is the Let’s Encrypt SSL certificate.Blogs, informational websitesOV certificate with organization validationThis certificate is required for e-commerce and online sales.An OV certificate identifies the website owner and contains a company name. Fraudsters will not be able to pass the validation check and get this certificate.Once this certificate is obtained, a company name is displayed in the browser bar. Such websites are more trustworthy for visitors.Online stores, websites that require its users to log inIDN certificateThis certificate supports domains in native language characters.If your website domain name does not contain ASCII characters, you’ll need to get an IDN certificate.Domain and subdomain. Domain names that use non-English languagesWildcard certificateThis certificate covers both the domain and its subdomains.Subdomains must have the same second-level domain name (i.e., domain.com).Mail server, online banking services, social media platformTo review the price of each certificate, check out our pricing comparison.ConclusionIn summary, HTTP is a protocol that is vulnerable to attacks, while HTTPS is a secure version of HTTP that uses encryption to protect data in transit.Fortunately, switching to HTTPS is a relatively simple process, and Gcore CDN service allows users to enable HTTPS encryption for free using Let’s Encrypt certificate. However, using a free SSL certificate has its limitations. Gcore has this covered as well, offering SSL certificates with various validation levels, including DV, OV, IDN, and Wildcard, giving website owners several options to choose from based on their specific requirements. Finally, seeking guidance from experts can help website owners ensure their websites are adequately secured and protected from potential threats.

What Is SSH? | How to Use SSH (Secure Shell)

SSH is a way to access and manage computers securely remotely over a network. A widely-used remote administration protocol, it offers a robust and secure mechanism to access, control, and modify remote servers over the internet. This article provides a comprehensive overview of SSH, its functionalities, benefits, and practical use cases, enabling you to establish secure connections and mitigate potential security threats effectively.What Is SSH?SSH, or Secure Shell Protocol, is like a secure key to a computer that’s physically located at a distance to you. It uses encryption as the main way to ensure that your data is protected when sent over potentially insecure networks. Encryption guards against threats, enhancing the security of remote login and data sharing.When you use SSH, you’re working with three main parts: the SSH command, your username, and the server’s details—its IP address or domain. Think of these as the lock, key, and door to your distant computer. Namely, the SSH command serves as the lock, setting up the secure connection. Your username acts like the key, identifying you to gain access, and the server’s details represent the door, specifying which computer you’re connecting to. These components work together to ensure you can securely interact with a remote computer.Versions of SSHSSH comes in two versions: SSH-1 and SSH-2. Of these, SSH-2 is the one you’ll generally want to use, and the one we focus on in this how-to guide. It has improved security features compared to SSH-1. Importantly, SSH-2 is not interchangeable with SSH-1 due to design differences.Who Uses SSH and Why?SSH serves as a versatile and crucial protocol with various use cases.What is SSH used for?System administrators use SSH to log into and manage a server located in another part of the world, establishing a secure connection from their own computer to the remote server. This is useful for tasks like software updates, which can be done without the need to travel to the server’s physical location.When it comes to transferring files, SSH is more secure than alternatives like FTP (file transfer protocol.) When you use SSH to send sensitive files, such as financial documents, the protocol encrypts the data, making it difficult for unauthorized users to access or tamper with the data while it’s in transit.SSH provides a secure way to access cloud services. For example, if you have an online business and store customer data in the cloud, you can use SSH to retrieve this information securely, keeping your clients’ data safe from potential online threats.SSH can get around firewall restrictions by routing your connection through another server, which isn’t restricted by the same firewalls.SSH BenefitsNow that we have an understanding of what SSH is, let’s understand what benefits it offers.Enhances security through encryption: SSH encrypts the data traveling between the client and the server by using mathematical algorithms to turn it into a code. This process ensures that only authorized parties can decipher the data in transit, essential for companies taking payment details or dealing with medical information, for example.Symmetric and asymmetric encryption: SSH first uses symmetric encryption, where the same key both encodes and decodes the initial data. Then it switches to asymmetric encryption, using two different keys—one for encoding and another for decoding the ongoing data exchange. This ensures a secure initial connection while verifying the identity of both parties involved.Tunneling and port forwarding: SSH can wrap less secure data in a layer of encryption, creating a secure tunnel for web traffic, without breaching any firewalls (more on this later.) This adds another layer of security.Improves data integrity: SSH uses a technique called hashing to create a unique digital fingerprint of the data, which confirms that data in contracts and other sensitive documents remain unchanged when it reaches the other party. This makes SSH a powerful benefit for data integrity, useful for verifying contracts and digital signatures, and confirming that software downloads haven’t been tampered with.Facilitates hybrid and flex work environments: A feature called X11 forwarding allows you to run graphical user interface (GUI) applications installed on a remote server and display them on your local machine. You can use and interact with visual software programs as if you were at the computer where they’re installed. For example, you could use a drawing program installed on your work computer while you’re sitting at home, seeing all the functions just as you would in the office. In this way, SSH users enjoy greater flexibility and productivity, regardless of location.SSH FeaturesBefore turning to how SSH works, let’s briefly learn about three key SSH features that underlie its functionality.SSHD: The remote computer runs an SSH daemon (sshd,) which is a program that waits for incoming connections on a specific online pathway, known as port 22. Once a connection request comes in, it checks for authorization before allowing secure data exchange.RFC: This stands for Request for Comments. It’s a set of rules that SSH follows to make sure all data exchanges are secure. These rules cover everything from encryption methods to security certificates.SSH layers: SSH is organized into three main layers. The transport layer handles making the connection secure through encryption. The user authentication layer is responsible for verifying who is trying to connect. The connection layer manages the flow of data once the connection is established.How Does SSH Work?How SSH works, step by stepHere’s how SSH works, step by step. We’ll first explain each step, and then show the code snippet that performs that step, so you can apply SSH for yourself.1. Client connection request: The SSH process begins with the client initiating a connection request to the remote server. The client sends a TCP handshake to establish the connection, indicating its intent to communicate securely with the server over SSH.def initiate_ssh_connection(hostname, port, username, password):ssh_client = paramiko.SSHClient()ssh_client.set_missing_host_key_policy(paramiko.AutoAddPolicy())try:ssh_client.connect(hostname, port, username, password)print("Connected successfully.")except paramiko.AuthenticationException:print("Authentication failed.")except paramiko.SSHException as ssh_ex:print(f"SSH error: {ssh_ex}")except socket.error as sock_ex:print(f"Socket error: {sock_ex}")finally:ssh_client.close()2. Authentication and encryption in SSH: SSH uses public key cryptography for authentication. The server presents its public key to the client, which the client uses to verify the server’s identity. Simultaneously, the client generates a shared secret key through a secure exchange process with the server. This symmetric encryption key will be used to protect the data transmitted during the session.SSH (using password-based authentication)def password_authentication(username, password):return paramiko.Password(username, password)3. Secure SSH connection establishment: SSH relies on the TCP/IP protocol suite for its underlying communication. During the connection setup, the client and server negotiate encryption protocols to protect future communications. The Diffie-Hellman key exchange algorithm is employed to create symmetric encryption keys, ensuring that both parties agree on a shared encryption key without transmitting it directly over the network.Establishment (SSH handshake)def establish_secure_connection(ssh_client, hostname, port):ssh_client.connect(hostname, port)4. User authentication: Once the secure connection is established, the client must authenticate itself to the server by entering a username and password, or by using SSH keys which provide a more secure and automated means of access.def authenticate_user(ssh_client, username, password):ssh_client.auth_password(username, password)5. Execution of commands: With successful authentication, the client gains access to the remote server and can execute commands as if it were operating directly on the server’s terminal. These commands are securely transmitted through the encrypted connection, ensuring confidentiality and integrity.def execute_ssh_command(ssh_client, command):stdin, stdout, stderr = ssh_client.exec_command(command)return stdout.read().decode()6. Data exchange: SSH facilitates secure file transfers through its built-in SSH File Transfer Protocol (SFTP.) Any data exchanged between the client and the server, such as file transfers or responses to commands, is encrypted.def secure_file_transfer(ssh_client, local_path, remote_path):sftp_client = ssh_client.open_sftp()sftp_client.put(local_path, remote_path)sftp_client.close()7. Session termination: When the user ends the SSH session or logs out, the secure connection is terminated, and the encryption keys used for that session are discarded. This helps maintain the security of future sessions and prevents unauthorized access.def close_ssh_connection(ssh_client):ssh_client.close()# Example usage:if _name_ == "__main__":# Replace these with your server credentialshostname = "your_server_ip_or_domain"port = 22username = "your_username"password = "your_password"How to Connect SSH to a Remote ServerOnce SSH is installed and configured on an organization’s computer per the above steps, connecting to that remote server using Secure Shell Protocol is a straightforward process that allows secure access and administration:Open a terminal window. The terminal provides a command-line interface through which you can interact with the system.ssh_client = paramiko.SSHClient()ssh_client.load_system_host_keys()ssh_client.set_missing_host_key_policy(paramiko.AutoAddPolicy())Use the ssh command followed by the username and the remote server’s hostname or IP address to connect to the remote server. For example, to connect to a server named freeserver.com with the username user, you would use the following command: ssh user@freeserver.com ssh_client.connect(hostname, port, username, password)Enter the password for the user account on the remote server. You will then be prompted to enter the password associated with the specified username on the remote server. Type the password carefully, as characters will not be displayed on the screen to ensure security.# Open an interactive shell sessionssh_shell = ssh_client.invoke_shell()# Print the welcome message (terminal window)print(ssh_shell.recv(1024).decode())Confirm the authenticity of the remote server. This is a security measure to ensure that you are connecting to the correct server. Verify that the fingerprint of the host key matches the expected value. If it does, type yes and press Enter to continue.response = input("Are you sure you want to continue connecting? (yes/no): ")if response.lower() == "yes":ssh_shell.send("yes\n")else:ssh_client.close()ReturnEstablish the SSH connection. You will be logged into the remote server. At this point, you can start running commands on the remote server just as if you were using its local terminal.print("SSH connection established. You are now logged in to the remote server.")print("You can start running commands on the remote server.").# To close the SSH connection:# ssh_client.close()except paramiko.AuthenticationException:print("Authentication failed. Please check your credentials.")except paramiko.SSHException as e:print(f"SSH connection failed: {e}")except Exception as e:print(f"Error: {e}")if _name_ == "__main__":# Replace these values with your remote server detailsremote_hostname = "freetees.com"remote_port = 22 # Default SSH port is 22remote_username = "your_username"remote_password = "your_password"establish_ssh_connection(remote_hostname, remote_port, remote_username, remote_password)How to Connect to a Linux Server via SSHConnecting to a Linux server via SSH is straightforward. Refer to Gcore’s tutorial on connecting to a Linux server via SSH.Prerequisites for Linux Server SSH Connection Before establishing a secure SSH connection to a remote Linux server, ensure that the following requirements are met:Ensure SSH is enabled and running on the remote Linux server. SSH typically operates on port 22 by default, allowing secure communication between the client and the server.Obtain the server’s IP address or domain name. You can obtain the IP address from your server administrator or use domain name resolution tools to find the server’s domain name.Verify that your client machine has SSH client software installed. Most Linux and macOS systems come with an SSH client pre-installed, making it easy to establish SSH connections. However, on Windows, you may need to install an SSH client application such as PuTTY, which provides a user-friendly interface for SSH connections.Troubleshooting Linux SSH Connection Issues The first step in troubleshooting SSH errorsIf you encounter difficulties while connecting to a Linux server via SSH, follow these troubleshooting steps to identify and resolve common issues:Check that the SSH service is running on the remote server. You can verify this by logging into the server directly or contacting your server administrator to confirm the SSH service status.Verify firewall settings and port forwarding rules on the server to ensure that SSH traffic is allowed. Make sure that the SSH port (usually port 22) is open and accessible on the server’s firewall settings.Ensure that you are using the correct username and password or that your SSH key pair is correctly configured. If you are using SSH key authentication, ensure that your public key is correctly added to the remote server’s “authorized_keys” file.If you are connecting from behind a corporate network or restrictive firewall, check if any restrictions or proxy settings are causing the issue. Consult your network administrator to understand any limitations or proxy configurations that may be affecting your SSH connection.SSH Security: Risks and Best PracticesTo ensure the integrity and confidentiality of SSH connections, it’s important to understand the common risks associated with SSH and how to mitigate these concerns. Below, we outline some key security risks and the best practices for addressing them.Weak PasswordsRisk: Attackers can exploit weak passwords to gain unauthorized entry, leading to potential data breaches and system compromises.Remedy: Enforce strong authentication protocols and encourage users to adopt robust, unique passwords. This minimizes the risk of attackers exploiting weak passwords and enhances SSH security.SSH Key Management FailuresRisk: Inadequately protected SSH keys can be compromised or stolen, allowing malicious actors to bypass authentication.Remedy: Implement a robust SSH key management strategy. Regularly audit, rotate, and promptly revoke SSH keys to safeguard your network against unauthorized entry and key theft.Man-in-the-Middle AttacksRisk: During a MITM attack, an attacker may intercept SSH connections and eavesdrop on communications.Remedy: Use public key infrastructure (PKI) for SSH keys to achieve a secure framework for cryptographic key generation, distribution, and management.Outdated SoftwareRisk: Running outdated SSH software exposes your system to known vulnerabilities.Remedy: Update your SSH software whenever a new update is available to ensure that known vulnerabilities are promptly patched.SSH Agent ForwardingRisk: Inappropriate use of SSH agent forwarding can result in privilege escalation.Remedy: Limit SSH agent forwarding to minimize the risk of exposing sensitive credentials by disabling agent forwarding in your SSH configuration file (often located at /etc/ssh/sshd_config on the server) by setting the AllowAgentForwarding option to no. On the client side, refrain from using the -A flag when initiating SSH connections.Excessive User PrivilegesRisk: Granting excessive privileges increases the risk and potential damage of unauthorized access.Remedy: Embrace the principle of least privilege by granting only the necessary access aligned for each user role.Insecure ConfigurationRisk: Misconfigurations, such as allowing root login or using weak encryption algorithms, can compromise security.Remedy: Disable direct root login and transition to SSHv2 for a more secure connection, thereby reducing the risk of unauthorized access. To disable root login, edit your SSH server configuration file, usually located at /etc/ssh/sshd_config, and set the PermitRootLogin option to no. After making this change, restart the SSH service to apply the new settings. To transition to SSHv2, locate the Protocol option in the same SSH configuration file and set it to 2. Again, restart the SSH service to apply the update.Logging and AuditingRisk: Without sufficient logs, it becomes challenging to identify unauthorized access and security breaches.Remedy: Monitor SSH logs for signs of suspicious (unexpected) activity and establish audit trails for compliance and incident investigation.SSH TunnelingRisk: SSH tunneling can be misused to bypass firewalls and establish unauthorized communication channels.Remedy: Establish firewall rules that restrict SSH access exclusively to authorized IP addresses. For example, if you’re using iptables on a Linux server, you can use the command sudo iptables -A INPUT -p tcp --dport 22 -s [AUTHORIZED_IP_ADDRESS] -j ACCEPT to allow SSH access only from [AUTHORIZED_IP_ADDRESS]. Deny all other SSH traffic with a command like sudo iptables -A INPUT -p tcp --dport 22 -j DROP. Denial-of-Service (DoS) AttacksRisk: SSH servers may face DoS attacks, disrupting legitimate access.Remedy: Implement protective measures against DoS attacks to ensure service availability, like Gcore DDoS Protection.Insufficient User TrainingRisk: Lack of proper user training can lead to inadvertent security breaches.Remedy: Educate users on SSH security best practices and potential threats to foster a security-aware culture.Conclusion SSH facilitates encrypted connections and secure data transmission between client and server—essential in modern IT environments. By recognizing the importance of SSH and implementing it appropriately, individuals and organizations can enhance their cybersecurity, safeguard sensitive data, and effectively protect against potential threats.Discover how Gcore can protect your website, application, and server against complex DDoS and other cyberattacks.Try for free

Anycast: what it is, how it works, and why your business needs it

Anycast: what it is, how it works, and why your business needs it

When you visit a website or load an app, you expect it to work, and fast. But how does that content reach you from halfway across the world almost instantly?One reason is a behind-the-scenes technology, a network addressing and routing methodology called Anycast. If you're choosing a CDN or DNS provider, it's worth understanding what Anycast does because it can significantly improve your customers’ experience of your online services and content by speeding up loading, reducing downtime, and providing more consistent performance.What is Anycast?Anycast is a network routing method where multiple servers in different locations share the same IP address. When a user sends a request, it’s routed to the closest server based on network path efficiency.Think of it like calling a customer service number and getting routed to the closest available agent. If one agent is unavailable, the call goes to the next-closest one. You can also compare it to a car GPS. If a road is closed, you get rerouted and still arrive at your destination smoothly.How Anycast benefits your customersAnycast can be used with CDN and DNS services. With a CDN, Anycast ensures that content will be served to eyeballs from the closest point of presence. This improves speed and reliability.The overall benefits to your customers are significant:Faster load speed: With Anycast, users connect to the nearest available server. This reduces round-trip time and latency, improving load speed.Less downtime: If one server fails, traffic is automatically rerouted to the next available node. This boosts availability, minimizing downtime. In addition, having multiple routes available means no single point of failure. If one path is unavailable, another is used, thanks to Anycast’s redundancy.Consistent performance: Anycast’s load distribution helps balance traffic across multiple servers, especially during traffic spikes. That means great performance even at peak times.Better DDoS resilience: Anycast helps absorb distributed denial-of-service (DDoS) attacks by spreading incoming traffic across multiple points of presence. This makes it harder for attackers to overwhelm a single server. At Gcore, we use Anycast to power Super Transit for superior DDoS protection.How it works behind the scenesAnycast routes user requests to the nearest server that shares a common IP address, using a protocol called BGP (Border Gateway Protocol). Each server advertises the same IP, and BGP determines the optimal route based on routing policies and network topology, not just physical distance.If a server goes offline, BGP stops advertising it. The request is automatically routed to the next-best server.The alternative to Anycast is Unicast. Unicast assigns one IP address to one server, so all traffic is routed to that single location, no matter where the user is.That means in a Unicast setup, users in Asia may still connect to a server in Europe, slowing down load times. With Anycast, users in Asia would connect to a server in Asia for faster responses.Limitations of AnycastAnycast isn’t always the best choice for every workload. Real-time applications like voice calls, video conferencing, or financial transactions that depend on long-lived, stateful connections can sometimes experience disruptions if routing changes mid-session.And failover isn’t instant. When a server fails, BGP may take several seconds to re-converge and reroute traffic. This can briefly affect availability, though it is still significantly faster than manual failover processes.That said, these risks can often be mitigated. Many platforms design their applications to re-establish sessions quickly or use protocols that tolerate reconnections. Where strict session persistence is essential, you can combine Anycast with additional logic or fallback mechanisms.Gcore’s implementation is flexible. DNS-based Anycast is enabled by default, but you can fine-tune traffic behavior and routing policies depending on your setup and use cases. Our team is available 24/7 to advise on best practices for applications that may be sensitive to routing changes.Gcore and AnycastAnycast is a core part of Gcore CDN and DNS infrastructure. Our global network is designed to maximize its impact, delivering faster responses, higher reliability, and better protection for your services. This also improves our FastEdge and Inference at the Edge availability and latency.Key capabilities include:210+ points of presence worldwide for broad coverage and regional performance20ms average global latency for consistently fast response timesReal-time failover to keep services available even during outagesIntelligent traffic distribution to balance load and prevent congestionWith Gcore, wherever your users are, they can connect quickly and reliably.Experience Anycast with Gcore today on our free-forever CDN plan. Or, if you’re looking for a CDN provider, check out our free ebook on how to choose a CDN provider.Get Anycast with Gcore Free CDN plan

New to streaming? Here’s what you need to know about Video-on-Demand (VOD)

What does VOD mean?A definition of VOD:Video-on-Demand (VOD) refers to a prerecorded video that can be accessed by viewers whenever they want.VOD encompasses a wide range of video content that includes event shows, product promotions, movies, and television shows. These videos can be streamed instantaneously to various devices over the internet or downloaded for viewing later on. As opposed to tuning in at a set schedule to watch a program on conventional television, VOD enables viewers to select from a catalog of video to watch at any time that is convenient for them.What is VOD streaming?VOD streaming is essentially a method for viewing VOD content. As more viewers adopt this way of consuming content, several companies and content creators have started using VOD streaming for business.For instance, during the pandemic, with brick-and-mortar stores closed, businesses helped customers through product tutorials that can be replayed to watch later. Many businesses also created product launch videos to reach customers and keep them informed about new products and services. Studios skipped the theater and released movies via streaming. Educators and instructors continued conducting classes and lectures by using VOD that could be accessed either free or for a fee, and more companies developed training videos to onboard new employees and pass along corporate knowledge from one generation of workers to another.Things are now largely back to normal, but VOD remains in high demand among audiences and organizations, proving that VOD streaming is here to stay. Video streaming platforms in particular help generate incremental revenue that businesses want to pursue, and almost anyone can develop a video app or a streaming service with the right platform.Live video vs. VODLive video is broadcasted in real time, so viewers must join in right on schedule to watch it. However, with a good streaming solution, it can be recorded and uploaded later to a website for viewers to access as VOD content if they missed the broadcast. VOD, on the other hand, can be watched at any time. It is stored on a server and delivered to the viewers upon request.How can VOD help your business?Here are some benefits businesses can get from VOD:Increased reach and viewers. Businesses are able to reach a wider audience as viewers across the globe can stream the VOD content at any moment from any device.Post-event engagement. By making VOD accessible for a longer time, businesses can drive continued engagement on the rewatch and sharing of content, which further promotes the brand.Content repurposing. Repurposing live videos as VOD content for marketing, social media, or tutorials can help businesses save content production time.Monetization. Businesses can monetize VOD content through ad insertion, paid memberships or subscription, pay-per-view, or viewer conversion.How to get started with VOD streamingHere are the key things you need to start VOD streaming:Content library. Create a video collection that will engage viewers and make your brand recognizable. VOD content can be anything from video blogs and video podcasts to video gaming streams, music videos, workout classes, makeup tutorials, and more.Streaming platform. Select a VOD streaming platform that will help you host, share, and monetize your content all in one place. You can use free streaming platforms like YouTube or professional-grade streaming platforms like Gcore.Content distribution network (CDN). Use a CDN when streaming to protect your video server and distribute content to viewers across the globe with reduced latency and buffering issues.Revenue model. Decide the right monetization model for your VOD content to generate a steady stream of income. You can apply one or more methods. Here are some of the most popular:ModelDescriptionExampleSubscription-basedBusinesses generate revenue through the monthly or yearly subscription fees viewers pay to access a set of videos.NetflixHuluDisney+Amazon PrimeTransaction-based or pay-per-viewBusinesses generate revenue through the rental or purchase fee viewers pay for a particular video they want to watch.YouTubeGoogle TVApple TVAdvertising-basedBusinesses generate revenue through showing ads to viewers when watching video.YouTubeFacebook WatchTwitchMarketing and promotion. Implement strategies to promote and draw customers to your business. You can post your VOD content on your website, add video snippets on social media, or add calls-to-action into the video encouraging customers to sign up for a newsletter.How to choose the right VOD streaming platformHere are some essential features to consider when selecting a VOD streaming platform:Automatic transcoding. This creates multiple files of the same video, each with different sizes, resolutions, and bitrates to make the content viewable on the widest possible range of devices.Video hosting. This streamlines the upload, storage, management, organization, and distribution of VOD content.Adaptive streaming. This adjusts video quality based on device capacity and network conditions to produce seamless playback for the viewers.Cross-platform playback. This ensures playback across any platform including web, mobile, casting devices, gaming consoles, set-top boxes, and smart TVs.CDN. This reduces load on the origin server and ensures that VOD content reaches viewers anywhere in the world faster and more securely.Privacy and security. This protects VOD content from unauthorized access and download with features such as AES encryption, DRM, signed tokens, geo and domain restrictions, and a lot more.Monetization. This enables businesses to monetize or earn money from VOD content. Monetization options include the ones described above.Analytics. This helps businesses measure how a video performs and make informed business decisions based on the data.API and SDK access. This allows for customization and integration with external apps and technologies. This is something you need if you are looking to make your own app that connects with a streaming platform.Head to the “How to choose a streaming platform: your ultimate checklist” post to learn more about what features to look for.VOD streaming with the Gcore Streaming PlatformPeople are increasingly turning to videos, which is a great reason to jump in and start creating video content for your business.Gcore Streaming Platform makes it easy, and with the free plan, there is no risk. With our advanced streaming platform based on a powerful CDN, you can upload, manage, and instantaneously share videos to anywhere in the world. It also has the features mentioned above, and more that you need to succeed in the online video space.Find out below and on the website the other exciting features and functions that our platform can do for you.Check out these comparisons showing how our platform stacks up against other streaming providers on the market today.Sign up for a free trial to see the Gcore Streaming Platform in action.Watch a sample videoHere is a sample video at 4K resolution hosted on the Gcore Streaming Platform.

What Is Transport Layer Security (TLS)?

Transport Layer Security is a widely deployed protocol that uses a combination of cryptographic functions to allow for private and secure communication over a network.Websites, in particular, are best known for using TLS to secure data transmissions between browsers and servers. Other forms of communications that also rely on this security protocol include email sending, instant messaging, file uploading, video streaming, audio conferencing, and more.In this TLS deep dive, we’ll explain how this protocol achieves this.What does TLS do?At its core, TLS provides three key services: encryption, authentication, and data integrity.Encryption. TLS uses encryption to protect data transmitted between clients (e.g., a browser or a native app) and servers. What is TLS encryption, exactly? With TLS encryption, plaintext data is transformed into an unreadable text (called ciphertext) that only those with the secret key can access or decrypt. This helps to keep the data secure and protected from unauthorized users.Authentication. TLS aids in the identity verification of both the server and the client. This is important because it ensures that the client is communicating with the correct server and not with someone pretending to be the server who may try to steal information.Data integrity. TLS helps prevent data during transmission from being altered or tampered with. This indicates that the data transmitted by servers and received by clients remains consistent and has not been altered in any manner.SSL vs TLSBoth SSL (Secure Socket Layer) and TLS are protocols used to provide privacy and security between communicating clients and servers. They are commonly lumped together by name—as SSL/TLS remains interchangeable in reference to security certificates—but they are not the same because TLS is the successor of the older SSL.SSL is considered obsolete these days, and TLS is already the encryption standard that modern browsers and servers use. TLS is the upgraded version of SSL; it’s more secure and delivers better performance in terms of encryption algorithms, handshake process, and message authentication.How does TLS affect HTTPS?HTTPS is basically plaintext HTTP that runs over the encrypted TLS. When a website uses HTTPS, it indicates that the data exchanged between parties is encrypted according to the TLS standard. Installing a valid SSL certificate on the server makes a website run on HTTPS and activates the lock icon in the address bar.How does TLS work?Say a user is connecting to a website over HTTPS. Once the browser has established a TCP (Transmission Control Protocol) connection to the server, the TLS session can start.TLS handshake protocolTLS handshake starts the TLS session. The handshake is a series of exchanges through which both browser and server authenticate each other, decide the protocols to use, and generate the shared or session key to start communicating through a secure channel. The exact handshake steps vary based on the encryption and key exchange algorithm used, but during the process, the following occurs:Negotiation. The browser and server agree upon the TLS protocol version and encryption algorithm to use during the communication.Authentication. The browser authenticates the identity of the server by checking the SSL certificate. In two-way TLS authentication, the server also authenticates the browser by checking the client certificate.Key exchange. The session key used for the symmetric encryption of data is produced. In TLS 1.3 version, key agreement is defined in terms of Diffie-Hellman (DH) algorithm, where both the browser and server calculate the session securely over a public network.TLS record protocolA TLS record is a unit of data that is used to encapsulate other data during a TLS session. The record format is used to provide a consistent framework for encryption and integrity protection, and it is used to transmit data such as application data and control messages between a client and a server. A TLS record typically contains a header that includes information about the type of content that is being transmitted (e.g., application data and control messages) and the length of the data payload. The data payload is then encrypted and integrity-protected using cryptographic algorithms, and the resulting ciphertext is transmitted over the network.Does TLS affect web performance?TLS has always contributed to longer webpage load times. The process of establishing a TLS connection and encrypting and decrypting data uses more CPU processing time, which adds some latency to requests. Fortunately, the latest version of the TLS protocol—TLS 1.3—comes with updates that improve both performance and security. The most notable are:TLS session resumption using a pre-shared key (PSK). Session resumption via a session ID or a session ticket is replaced by a PSK mechanism in TLS 1.3. This key is obtained via a prior handshake and then used by the client to facilitate 0-RTT connection for resumed sessions.Faster handshake (1-RTT). The number of negotiations has been reduced, having only one round trip to complete the handshake.Zero round trip time resumption or 0-RTT. This is a resumption mechanism that enables browsers to send encrypted data as part of the renegotiation message, which improves user experience. It’s only available for servers that users have visited before.Overall, the benefits of using TLS on your website far outweigh any potential impacts on speed. With TLS, you achieve several goals for your business: reduced data leakage and exposure to cyberattacks (which can lead to major reputational harm and revenue losses), secure transactions, protected customer information, guaranteed SEO boost, and greater customer trust.If you have not enabled HTTPS yet on your website (whether you collect sensitive data from your customers doesn’t matter), make it a priority in your next set of goals. And as a best practice, use the latest protocol version for the strongest security.Start using TLS for your websiteNow that you know the importance of TLS, it is time to secure your website. To do this, you need to have an SSL certificate installed on your server. Typically, you can get this done through your web hosting provider.If you are hosting at Gcore, you can set it up in no time with our control panel. You can generate and use free SSL certificates from Let’s Encrypt with any of our CDN plans for all domains associated with your Gcore account, or choose to install a custom SSL certificate from a different provider. You also never have to worry about certificate expiration or being intercepted by hackers because we manage the certificates for you.Start with our free plan and get your website perfectly secure and loading at its fastest.

Subscribe to our newsletter

Get the latest industry trends, exclusive insights, and Gcore updates delivered straight to your inbox.