How to add a smooth scrolling VOD feature to your iOS app in 15 minutes
- March 27, 2023
- 7 min read

This is a complete a step-by-step guide on Gcore’s solution for adding a new VOD feature to your iOS application in 15 minutes. The feature allows users to scroll and watch videos through the player on one screen with minimal preloading (like on TikTok).
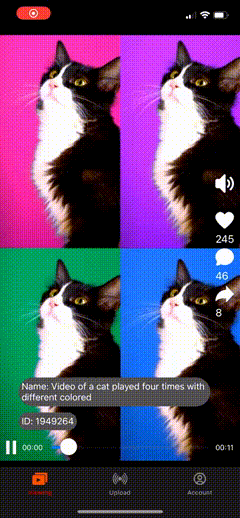
Here is what the result will look like:
This is part of a series of guides about adding new video features to an iOS application. In other articles, we show you how to create a mobile streaming app on iOS, and how to add video call and VOD uploading features to an existing app.
What functions you can add with the help of this guide
The solution includes the following:
- List of AVPlayers: A virtual list of video players with a separate AVPlayer for each video
- Autoplay: Automatically start playback when scrolling by the video, and pause when scrolling further down the video
- Swipe: Support for swipe up and down gestures for switching between videos
- Preload in the background: An algorithm for preloading videos that the user has not yet scrolled to; this allows you to quickly start playback without buffering
- Adaptive bitrate playback: Preload videos in a quality that matches the user’s internet connection: low quality for a poor connection, high quality for a better connection, etc.
How to add the smooth scrolling VOD feature
Step 1. Authorization
You’ll need a Gcore account, which can be created in just 1 minute at gcore.com. You won’t need to pay anything; you can test the solution with a free plan.
To use Gcore services, you’ll need an access token, which comes in the server’s response to the authentication request. Here’s how to get it:
1. Create a model that will come from the server.
struct Tokens: Decodable { let refresh: String let access: String }2. Create a common protocol for requests.
protocol DataRequest { associatedtype Response var url: String { get } var method: HTTPMethod { get } var headers: [String : String] { get } var queryItems: [String : String] { get } var body: Data? { get } var contentType: String { get } func decode(_ data: Data) throws -> Response } extension DataRequest where Response: Decodable { func decode(_ data: Data) throws -> Response { let decoder = JSONDecoder() return try decoder.decode(Response.self, from: data) } } extension DataRequest { var contentType: String { "application/json" } var headers: [String : String] { [:] } var queryItems: [String : String] { [:] } var body: Data? { nil } }3. Create an authentication request.
struct AuthenticationRequest: DataRequest { typealias Response = Tokens let username: String let password: String var url: String { GсoreAPI.authorization.rawValue } var method: HTTPMethod { .post } var body: Data? { try? JSONEncoder().encode([ "password": password, "username": username, ]) } }4. Then you can use the request in any part of the application, using your preferred approach for your internet connection. For example:
func signOn(username: String, password: String) { let request = AuthenticationRequest(username: username, password: password) let communicator = HTTPCommunicator() communicator.request(request) { [weak self] result in switch result { case .success(let tokens): Settings.shared.refreshToken = tokens.refresh Settings.shared.accessToken = tokens.access Settings.shared.username = username Settings.shared.userPassword = password DispatchQueue.main.async { self?.view.window?.rootViewController = MainController() } case .failure(let error): self?.errorHandle(error) } } }Step 2. Getting a video
After you receive the access token, you need to use it to get a list of videos. To do this, create another request:
struct VODRequest: DataRequest { typealias Response = [VOD] let token: String let page: Int var url: String { GcoreAPI.videos.rawValue } var method: HTTPMethod { .get } var headers: [String: String] { [ "Authorization" : "Bearer \(token)" ] } var queryItems: [String: String] { [ "q[status_eq]": String(3), // It is used to download only ready-to-watch videos "page": String(page), ] } }In the response, an array of videos will come from the server; the limit for a page is 25 videos.
Step 3. UI
VOD data view
We will use the tableNode from AsyncDisplayKit, it will take over most of the work on displaying and downloading videos, and caching. But to display the VOD data (name, ID), we will use an additional View over the table Cell.
1. Create VODDataView.
final class VODDataView: UIView { private let nameLabel = UILabel() private let idLabel = UILabel() override init(frame: CGRect) { super.init(frame: frame) setupView() } required init?(coder: NSCoder) { super.init(coder: coder) setupView() } func setupData(with vod: VOD) { nameLabel.text = "Name: \(vod.name)" idLabel.text = "ID: \(vod.id)" [nameLabel, idLabel].forEach { $0.widthAnchor.constraint(equalToConstant: $0.intrinsicContentSize.width + 20).isActive = true $0.heightAnchor.constraint(equalToConstant: $0.intrinsicContentSize.height + 10).isActive = true } } }2. Create init layout for the view.
private func setupView() { backgroundColor = .clear isUserInteractionEnabled = false [nameLabel, idLabel].forEach { $0.translatesAutoresizingMaskIntoConstraints = false $0.textColor = .white $0.backgroundColor = .darkGray $0.font = .systemFont(ofSize: 17) $0.clipsToBounds = true $0.layer.cornerRadius = 15 $0.textAlignment = .center } let stackView = UIStackView(arrangedSubviews: [nameLabel, idLabel]) stackView.axis = .vertical stackView.alignment = .leading stackView.distribution = .fill stackView.spacing = 10 stackView.translatesAutoresizingMaskIntoConstraints = false addSubview(stackView) NSLayoutConstraint.activate([ stackView.leftAnchor.constraint(equalTo: leftAnchor, constant: 30), stackView.rightAnchor.constraint(lessThanOrEqualTo: rightAnchor, constant: -20), stackView.bottomAnchor.constraint(equalTo: bottomAnchor, constant: -30) ]) }3. Create a custom node cell. AVPlayer will be connected to each cell, which creates a list of players, adding a variable for autoplay.
import Foundation import AsyncDisplayKit final class VODSmoothCell: ASCellNode { var data: VOD var playerNode: ASVideoPlayerNode var isShouldPlay = false { didSet { checkPlayerState(playerNode.playerState) } } init(data: VOD) { self.data = data playerNode = ASVideoPlayerNode(url: data.hls!) super.init() playerNode.placeholderImageURL = data.screenshot playerNode.delegate = self playerNode.gravity = AVLayerVideoGravity.resizeAspect.rawValue DispatchQueue.main.async { [weak self] in guard let self = self, let hls = data.hls else { return } self.playerNode.asset = AVAsset(url: hls) let dataView = VODDataView() dataView.setupData(with: data) dataView.frame = self.view.bounds self.view.addSubview(dataView) self.view.backgroundColor = .black } addSubnode(playerNode) } }4. Add layout for the node cell:
override func layoutSpecThatFits(_ constrainedSize: ASSizeRange) -> ASLayoutSpec { ASInsetLayoutSpec(insets: .zero, child: playerNode) }5. Subscribe to ASVideoNodeDelegate in order to catch the events of the player.
extension VODSmoothCell: ASVideoPlayerNodeDelegate { func videoPlayerNode(_ videoPlayer: ASVideoPlayerNode, willChangeVideoNodeState state: ASVideoNodePlayerState, toVideoNodeState toState: ASVideoNodePlayerState) { if toState == .paused && isShouldPlay { checkPlayerState(.unknown) } else { checkPlayerState(toState) } } }6. Add a method to start/pause the player.
private func checkPlayerState(_ state: ASVideoNodePlayerState) { switch state { case .playbackLikelyToKeepUpButNotPlaying, .paused: if isShouldPlay { playerNode.play() } case .playing: if !isShouldPlay { playerNode.pause() } default: break } }MainView
Create the main view for the module. To display different screen states, we will use enumeration.
1. Add a table view that will swipe the cells.
final class SmoothScrollingMainView: UIView { enum State { case proccess, empty, content } weak var delegate: SmoothScrollingMainViewDelegate? var state: State = .proccess { didSet { switch state { case .empty: showEmptyState() case .proccess: showProccessState() case .content: showContentState() } } } lazy var tableView: ASTableNode = { let table = ASTableNode(style: .plain) table.view.isPagingEnabled = true table.view.separatorColor = .clear table.view.backgroundColor = .black return table }() private let indicatorView: UIActivityIndicatorView = { let view = UIActivityIndicatorView() view.color = .grey800 view.transform = .init(scaleX: 2, y: 2) view.hidesWhenStopped = false view.startAnimating() return view }() private let emptyView = EmptyStateView() override init(frame: CGRect) { super.init(frame: frame) setupView() } required init?(coder: NSCoder) { super.init(coder: coder) setupView() } private func setupView() { emptyView.delegate = self initLayout() } }2. Implement methods that will change the screen state.
private func showContentState() { indicatorView.isHidden = true emptyView.isHidden = true tableView.isHidden = false } private func showEmptyState() { indicatorView.isHidden = true emptyView.isHidden = false tableView.isHidden = true } private func showProccessState() { indicatorView.isHidden = false emptyView.isHidden = true tableView.isHidden = true }3. Create a method that will customize the layout.
func initLayout() { [tableView.view, indicatorView, emptyView].forEach { $0.translatesAutoresizingMaskIntoConstraints = false addSubview($0) } NSLayoutConstraint.activate([ tableView.view.topAnchor.constraint(equalTo: topAnchor), tableView.view.leftAnchor.constraint(equalTo: leftAnchor), tableView.view.rightAnchor.constraint(equalTo: rightAnchor), tableView.view.bottomAnchor.constraint(equalTo: bottomAnchor), emptyView.topAnchor.constraint(equalTo: topAnchor), emptyView.bottomAnchor.constraint(equalTo: bottomAnchor), emptyView.leftAnchor.constraint(equalTo: leftAnchor), emptyView.rightAnchor.constraint(equalTo: rightAnchor), indicatorView.centerXAnchor.constraint(equalTo: centerXAnchor), indicatorView.centerYAnchor.constraint(equalTo: centerYAnchor) ]) }The result of the layout will look like this:

Controller
Create a controller that will contain the logic for displaying video and interacting with the server.
1. Create the SmoothScrollingController class and init properties and layout.
import UIKit import AVKit import AsyncDisplayKit final class SmoothScrollingController: BaseViewController { override var preferredStatusBarStyle: UIStatusBarStyle { .lightContent } private let mainView = SmoothScrollingMainView() private var isLoading = false var data: [VOD] = [] private var currentPage = 1 private var lastCell: VODSmoothCell? override func viewDidLoad() { super.viewDidLoad() view.addSubview(mainView) let statusBarView = UIView(frame: UIApplication.shared.statusBarFrame) statusBarView.backgroundColor = .black view.addSubview(statusBarView) mainView.translatesAutoresizingMaskIntoConstraints = false mainView.tableView.delegate = self mainView.tableView.dataSource = self mainView.state = .proccess loadVOD(page: 1) NSLayoutConstraint.activate([ mainView.topAnchor.constraint(equalTo: view.layoutMarginsGuide.topAnchor), mainView.leftAnchor.constraint(equalTo: view.leftAnchor), mainView.rightAnchor.constraint(equalTo: view.rightAnchor), mainView.bottomAnchor.constraint(equalTo: view.layoutMarginsGuide.bottomAnchor), ]) } override func viewWillAppear(_ animated: Bool) { super.viewWillAppear(animated) tabBarController?.tabBar.barTintColor = .black } override func viewWillDisappear(_ animated: Bool) { super.viewWillDisappear(animated) tabBarController?.tabBar.barTintColor = .white } }2. Add a method for VOD downloading.
Due to HLS and access to various qualities, the player will play using the Adaptive Bitrate (ABR) playback.
private func loadVOD(page: Int) { guard !isLoading else { return } isLoading = !isLoading guard let token = Settings.shared.accessToken else { refreshToken() return } if mainView.state == .empty { mainView.state = .proccess } let http = HTTPCommunicator() let requst = VODRequest(token: token, page: page) http.request(requst) { [weak self] result in guard let self = self else { return } DispatchQueue.main.async { defer { self.isLoading = !self.isLoading } switch result { case .failure(let error): if let error = error as? ErrorResponse, error == .invalidToken { Settings.shared.accessToken = nil self.refreshToken() } else { self.errorHandle(error) } case .success(let vodArray): var newVOD: [VOD] = [] vodArray.forEach { loadedVod in if !self.data.contains(where: { $0.id == loadedVod.id }) { newVOD += [loadedVod] } } guard !self.data.isEmpty || !newVOD.isEmpty else { self.mainView.state = .empty return } if !newVOD.isEmpty { self.data += newVOD self.mainView.tableView.reloadData() } if self.data.count == self.currentPage * 25 { self.currentPage += 1 } self.mainView.state = .content } } } }Preloading in the background
Responsibility for preloading the video is shifted to TableNode. To do the preloading, you need to subscribe to the necessary protocols and transfer data to the cell.
Subscribe to the table node protocols.
extension SmoothScrollingController: ASTableDataSource { func tableNode(_: ASTableNode, numberOfRowsInSection _: Int) -> Int { data.count } func tableNode(_: ASTableNode, nodeBlockForRowAt indexPath: IndexPath) -> ASCellNodeBlock { let vod = data[indexPath.row] let cell = VODSmoothCell(data: vod) if lastCell == nil { lastCell = cell cell.isShouldPlay = true } return { return cell } } } extension SmoothScrollingController: ASTableDelegate { func tableNode(_: ASTableNode, constrainedSizeForRowAt _: IndexPath) -> ASSizeRange { return ASSizeRangeMake(mainView.tableView.bounds.size) } func shouldBatchFetch(for _: ASTableNode) -> Bool { return false } func tableNode(_: ASTableNode, willBeginBatchFetchWith context: ASBatchContext) { loadVOD(page: currentPage) } func scrollViewDidEndDecelerating(_ scrollView: UIScrollView) { let currentPage = Int(scrollView.contentOffset.y / scrollView.frame.size.height) let indexPath = IndexPath(item: currentPage, section: 0) guard let currentCell = mainView.tableView.nodeForRow(at: indexPath) as? VODSmoothCell, currentCell != lastCell else { return } // load new page when we get the penultimate video if data.count = currentPage * 25 && currentCell.indexPath?.row ?? 0 >= data.count - 2 { loadVOD(page: currentPage) } // Here we will also switch the flag in order for the video to be played automatically. lastCell?.isShouldPlay = false currentCell.isShouldPlay = true lastCell = currentCell } }And this was the last step; the job is done! The new feature has been added to your app and configured.
Result
By properly configuring all parts of your application and using Gcore services, you’ve provided your users with a convenient way to watch videos.

Developer notes
There was a problem with data management and VOD loading in the form of AJAX pagination. To resolve this, all the functionality was put into a separate entity that started a maximum of 60 VOD in RAM, and, if necessary, the prior or next videos were loaded.
All the necessary code is provided in the project.
To perform video preload, we use the Texture framework. Besides preloading and saving videos, it also has several advantages:
It clears the cache itself, which prevents errors related to lack of memory;
It downloads and caches screenshots for videos by itself;
It takes all the display logic from the main thread, which beneficially affects the performance.
It is installed via cocoapods. You need to add this line to the podfile below your project:
pod "Texture"Conclusion
Through this guide, you’ve learned how to add a smooth scrolling VOD feature to your iOS application. We hope this solution will satisfy your needs and delight your users with new options.
Also, we invite you to take a look at our demo application. You will see the result of setting up the VOD viewing for an iOS project.

Related articles

For many startups, infrastructure decisions are mostly about performance, pricing, and developer experience. For Melious AI, they are also about trust.Melious AI is a German startup building a European AI platform around privacy, transparen


At Gcore, delivering exceptional streaming experiences to users across our global network is at the heart of what we do. We're excited to share how we're taking our CDN performance monitoring to new heights through our partnership with AVEQ


As streaming demand surges worldwide, providers face mounting pressure to deliver high-quality video without buffering, lag, or quality dips, no matter where the viewer is or what device they're using. That pressure is only growing as audie
Subscribe to our newsletter
Get the latest industry trends, exclusive insights, and Gcore updates delivered straight to your inbox.