Radar has landed - discover the latest DDoS attack trends. Get ahead, stay protected.Get the report
Under attack?

Products

Solutions

Resources

Partners

Why Gcore

  1. Home
  2. Developers
  3. How to Disable the Sudo Command Password

How to Disable the Sudo Command Password

  • By Gcore
  • September 13, 2023
  • 2 min read
How to Disable the Sudo Command Password

For those looking to streamline their administrative tasks on a Unix or Linux-based system, the frequent password prompts when using the sudo command can become tedious. This article provides a clear guide on how to disable the password requirement for the sudo command, while also highlighting the potential security implications. Before making any changes to your system, it’s essential to be aware of the balance between convenience and security.

About Sudo command

The sudo command in Unix-like systems allows users to run commands with elevated privileges. It enhances security by delegating specific administrative tasks without granting full root access and maintains a log of these commands. When used, the system usually asks for a password to verify the action, but this can be configured or disabled.

Some users choose to disable the password prompt for convenience, especially if they run sudo commands frequently during their workflow. Continually entering a password can interrupt and slow down tasks. However, it’s crucial to understand that while this can streamline operations, it can also introduce security vulnerabilities, as it removes a layer of protection against unauthorized or inadvertent changes to the system.

Sudo command on Linux without password

Using the sudo command without a password can streamline tasks on Linux, but it’s essential to recognize the security implications of this action. If you decide to proceed, here’s a step-by-step guide to configure sudo to work without prompting for a password:

1. Open Terminal. Press Ctrl + Alt + T together. This shortcut will open the Terminal.

2. Backup sudoers file.  Before making any changes, it’s good practice to back up the sudoers file:

sudo cp /etc/sudoers /etc/sudoers.bak

3. Edit the sudoers file. You should never edit the sudoers file directly with a regular text editor. Instead, use visudo:

sudo visudo

Sample Output:

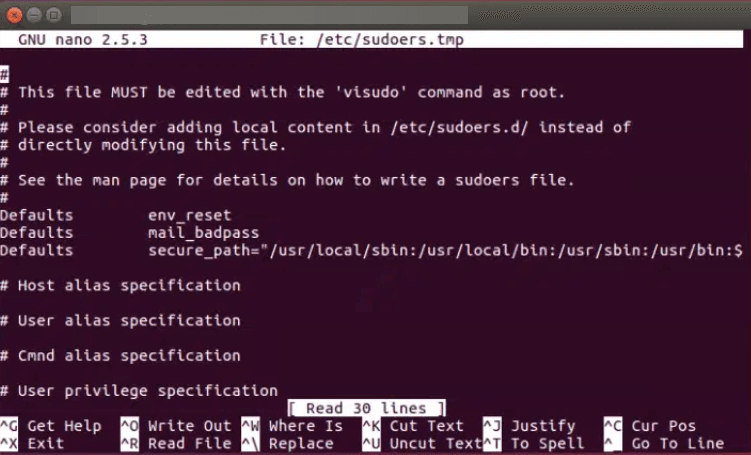
4. Modify the file. Navigate to the section that looks like:

# User privilege specificationroot    ALL=(ALL:ALL) ALL

Below this line, add the following, replacing username with your actual username:

username ALL=(ALL:ALL) NOPASSWD: ALL

Example:

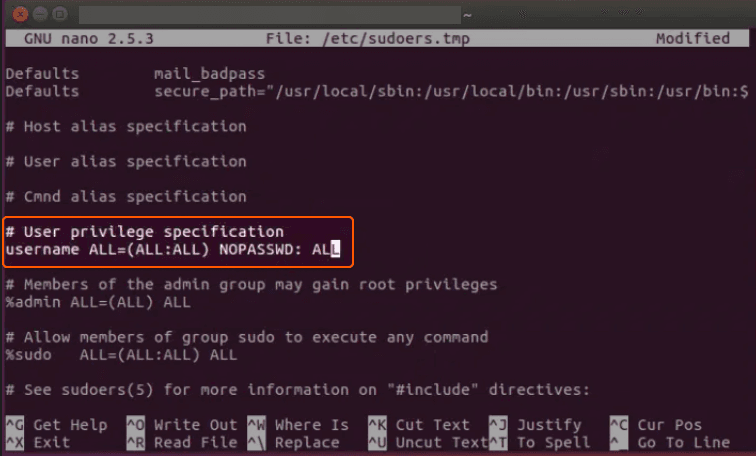
If you only want to disable the password for a particular command, replace ALL at the end with the full path to the command. For example:

username ALL=(ALL:ALL) NOPASSWD: /path/to/command

5. Save and exit. If visudo uses the Vim editor by default (common on many systems), press Esc, then type :wq and press Enter. If it’s using nano, press Ctrl + O, then Enter, and then Ctrl + X.

6. Test the configuration. Try executing a command with sudo. It shouldn’t ask for a password.

That’s it! Now you’ve disabled the password for the sudo command. Please be aware that making sudo password-less can introduce a security risk, particularly if unauthorized individuals access your machine. Always weigh the security implications and make informed decisions.

Conclusion

Looking to deploy Linux in the cloud? With Gcore Cloud, you can choose from Basic VM, Virtual Instances, or VPS/VDS suitable for Linux:

Choose an instance

Related Articles

What are zero-day attacks? Risks, prevention tips, and new trends

Zero-day attack is a term for any attack that targets a vulnerability in software or hardware that has yet to be discovered by the vendor or developer. The term “zero-day” stems from the idea that the developer has had zero days to address or patch the vulnerability before it is exploited.In a zero-day attack, an attacker finds a vulnerability before a developer discovers and patches itThe danger of zero-day attacks lies in their unknownness. Because the vulnerabilities they target are undiscovered, traditional defense mechanisms or firewalls may not detect them as no specific patch exists, making attack success rates higher than for known attack types. This makes proactive and innovative security measures, like AI-enabled WAAP, crucial for organizations to stay secure.Why are zero-day attacks a threat to businesses?Zero-day attacks pose a unique challenge for businesses due to their unpredictable nature. Since these exploits take advantage of previously unknown vulnerabilities, organizations have no warning or time to deploy a patch before they are targeted. This makes zero-day attacks exceptionally difficult to detect and mitigate, leaving businesses vulnerable to potentially severe consequences. As a result, zero-day attacks can have devastating consequences for organizations of all sizes. They pose financial, reputational, and regulatory risks that can be difficult to recover from, including the following:Financial and operational damage: Ransomware attacks leveraging zero-day vulnerabilities can cripple operations and lead to significant financial losses due to data breach fines. According to recent studies, the average cost of a data breach in 2025 has surpassed $5 million, with zero-day exploits contributing significantly to these figures.Reputation and trust erosion: Beyond monetary losses, zero-day attacks erode customer trust. A single breach can damage an organization’s reputation, leading to customer churn and lost opportunities.Regulatory implications: With strict regulations like GDPR in the EU and similar frameworks emerging globally, organizations face hefty fines for data breaches. Zero-day vulnerabilities, though difficult to predict, do not exempt businesses from compliance obligations.The threat is made clear by recent successful examples of zero-day attacks. The Log4j vulnerability (Log4Shell), discovered in 2021, affected millions of applications worldwide and was widely exploited. In 2023, the MOVEit Transfer exploit was used to compromise data from numerous government and corporate systems. These incidents demonstrate how zero-day attacks can have far-reaching consequences across different industries.New trends in zero-day attacksAs cybercriminals become more sophisticated, zero-day attacks continue to evolve. New methods and technologies are making it easier for attackers to exploit vulnerabilities before they are discovered. The latest trends in zero-day attacks include AI-powered attacks, expanding attack surfaces, and sophisticated multi-vendor attacks.AI-powered attacksAttackers are increasingly leveraging artificial intelligence to identify and exploit vulnerabilities faster than ever before. AI tools can analyze vast amounts of code and detect potential weaknesses in a fraction of the time it would take a human. Moreover, AI can automate the creation of malware, making attacks more frequent and harder to counter.For example, AI-driven malware can adapt in real time to avoid detection, making it particularly effective in targeting enterprise networks and cloud-based applications. Hypothetically, an attacker could use an AI algorithm to scan for weaknesses in widely used SaaS applications, launching an exploit before a patch is even possible.Expanding attack surfacesThe digital transformation continues to expand the attack surface for zero-day exploits. APIs, IoT devices, and cloud-based services are increasingly targeted, as they often rely on interconnected systems with complex dependencies. A single unpatched vulnerability in an API could provide attackers with access to critical data or applications.Sophisticated multi-vector attacksCybercriminals are combining zero-day exploits with other tactics, such as phishing or social engineering, to create multi-vector attacks. This approach increases the likelihood of success and makes defense efforts more challenging.Prevent zero-day attacks with AI-powered WAAPWAAP solutions are becoming a cornerstone of modern cybersecurity, particularly in addressing zero-day vulnerabilities. Here’s how they help:Behavioral analytics: WAAP solutions use behavioral models to detect unusual traffic patterns, blocking potential exploits before they can cause damage.Automated patching: By shielding applications with virtual patches, WAAP can provide immediate protection against vulnerabilities while a permanent fix is developed.API security: With APIs increasingly targeted, WAAP’s ability to secure API endpoints is critical. It ensures that only authorized requests are processed, reducing the risk of exploitation.How WAAP stops AI-driven zero-day attacksAI is not just a tool for attackers—it is also a powerful ally for defenders. Machine learning algorithms can analyze user behavior and network activity to identify anomalies in real time. These systems can detect and block suspicious activities that might indicate an attempted zero-day exploit.Threat intelligence platforms powered by AI can also predict emerging vulnerabilities by analyzing trends and known exploits. This enables organizations to prepare for potential attacks before they occur.At Gcore, our WAAP solution combines these features to provide comprehensive protection. By leveraging cutting-edge AI and machine learning, Gcore WAAP detects and mitigates threats in real time, keeping web applications and APIs secure even from zero-day attacks.More prevention techniquesBeyond WAAP, layering protection techniques can further enhance your business’ ability to ward off zero-day attacks. Consider the following measures:Implement a robust patch management system so that known vulnerabilities are addressed promptly.Conduct regular security assessments and penetration testing to help identify potential weaknesses before attackers can exploit them.Educate employees about phishing and other social engineering tactics to decease the likelihood of successful attacks.Protect your business against zero-day attacks with GcoreZero-day attacks pose a significant threat to businesses, with financial, reputational, and regulatory consequences. The rise of AI-powered cyberattacks and expanding digital attack surfaces make these threats even more pressing. Organizations must adopt proactive security measures, including AI-driven defense mechanisms like WAAP, to protect their critical applications and data. By leveraging behavioral analytics, automated patching, and advanced threat intelligence, businesses can minimize their risk and stay ahead of attackers.Gcore’s AI-powered WAAP provides the robust protection your business needs to defend against zero-day attacks. With real-time threat detection, virtual patching, and API security, Gcore WAAP ensures that your web applications remain protected against even the most advanced cyber threats, including zero-day threats. Don’t wait until it’s too late—secure your business today with Gcore’s cutting-edge security solutions.Discover how WAAP can help stop zero-day attacks

What are virtual machines?

A virtual machine (VM), also called a virtual instance, is a software-based version of a physical computer. Instead of running directly on hardware, a VM operates inside a program that emulates a complete computer system, including a processor, memory, storage, and network connections. This allows multiple VMs to run on a single physical machine, each with its own operating system and applications, as if they were independent computers.VMS are useful because they provide flexibility, isolation, and scalability. Since each VM is self-contained, it can run different operating systems (like Windows, Linux, or macOS) on the same hardware without affecting other VMs or the host machine. This makes them ideal for testing software, running legacy applications, or efficiently using server resources in data centers. Because VMs exist as software, they can be easily copied, moved, or backed up, making them a powerful tool for both individuals and businesses.Read on to learn about types of VMs, their benefits, common use cases, and how to choose the right VM provider for your needs.How do VMs work?A virtual machine (VM) runs inside a program called a hypervisor, which acts as an intermediary between the VM and the actual computer hardware. Every time a VM needs to perform an action—such as running software, accessing storage, or using the processor—the hypervisor intercepts these requests and decides how to allocate resources like CPU power, memory, and disk space. You can think of a hypervisor as an operating system for VMs, managing multiple virtual machines on a single physical computer. Popular hypervisors like VirtualBox and VMware enable users to run multiple operating systems simultaneously while providing strong isolation.Modern hypervisors optimize performance by giving VMs direct access to certain hardware components when possible, reducing the need for constant intervention. However, some level of overhead remains because the hypervisor still needs to manage and coordinate resources efficiently. This means that while VMs can leverage most of the system’s hardware, they can’t use 100% of it, as some processing power is always reserved for managing virtualization itself. This small trade-off is often worth it, as hypervisors keep each VM isolated and secure, preventing one VM from interfering with another.VM layersFigure 1 illustrates the layers of a system virtual machine setup. The layer model can vary depending on the hypervisor. Some hypervisors include a built-in host operating system, while modern hardware offers native virtualization support. Many hypervisors can also manage multiple physical machines and VMs efficiently.VM snapshots are an essential feature in cloud computing, allowing users to quickly restore a virtual machine to a previous state.Figure 1: Layers of system virtual machinesHypervisors that emulate hardware architectures different from what the guest OS expects have a bigger overhead, as they can’t relay commands directly to the hardware without first translating them.VM snapshotsVM snapshots are an essential feature in cloud computing, allowing users to quickly restore a virtual machine to a previous state. The hypervisor can save the complete state of the VM and restore it at a later time to skip the boot process of the guest OS. The hypervisor can also move these snapshots between different physical machines, making the software running in the VM completely independent from the underlying hardware.What are the benefits of using VMs?Virtual machines offer benefits including resource efficiency, isolation, simplified operations, easy migration, faster deployment, cost savings, and security. Let’s look at these one by one.Multiple VMs can run on a single physical machine, making sharing resources between various guest operating systems easier. This is especially important when each guest OS needs to be isolated from the others, such as when they belong to different customers of a cloud service provider. Sharing resources through VMs makes running a server cheaper because you don’t have to buy or rent a whole physical machine, but only parts of it.Since VMs abstract the underlying hardware, they also improve resilience. If the physical machine fails, the hypervisor can perform a quick recovery by moving the snapshots to another machine without changing the guest OS installations to minimize downtime. This abstraction also allows operations teams to focus their deployment efforts on a standardized VM instead of considering different physical implementations.Migrations become easier with snapshots as you can simply move them to a faster machine without modifying the software running inside the VM.Faster deployments are possible because starting a VM is just a software execution instead of setting up a physical server in a data center. While you had to buy a server or rent it for months, with fast deployments, you can now rent a machine for hours, minutes, or even seconds, which allows for quite some savings.Modern CPUs have built-in virtualization features that enable easy resource sharing and enforce the isolation at the hardware layer. This prevents the services of one VM from accessing the resources of the others, improving security compared to running multiple apps inside one OS.Common use cases for VMsVMs have a range of use cases. Let’s look at the most popular ones.Cloud computingThe most popular use case is cloud computing, where VMs allow the secure sharing of the cloud provider’s resources, enabling their customers to rent only the resources they need for the period their workload will run.Software development and testingSoftware development often requires specific tools and libraries that aren’t available on a production machine, so having a development VM with all these tools preinstalled can be helpful. An example is cloud IDEs, which look and feel like regular IDEs but run on a cloud VM. A developer can have one for each project with the required dev tools installed.VMs also allow a developer to set up a machine for software testing that looks exactly like the production environment. Here, the opposite of the development VM is required; it should not have any development tools installed because they would also be missing from production.Cross-platform developmentA special case of the software development use case is cross-platform development. When you implement an app for Android or iOS, for example, you usually don’t do this on a mobile device but on your computer. With VMs, developers can simulate different hardware environments, enabling cross-platform testing without requiring physical devices.Legacy system supportIf the hardware your application requires is no longer in production, a VM might be the only way to keep running your software without reimplementing it. This is similar to the cross-platform development use case, as the VM emulates different hardware, but the difference is that the hardware no longer exists.How to choose the right VM providerTo find the right provider for your workload, the most important factor to assess is your own workload requirements. Ask the following questions and compare the answers to what providers offer.Is your workload compute or I/O-bound?Many workloads, like web servers, are I/O-bound. They don’t make complex calculations but rather simply load data and send it over the network. If you need a VM for an I/O-bound workload, you care more about disk and memory size, as well as network speed.However, compute-heavy workloads, such as AI inference or Kubernetes clusters, require careful resource allocation. If you’re evaluating whether to run Kubernetes on bare metal or VMs, check out our white paper on Bare Metal vs. VM-based Kubernetes Clusters for an in-depth comparison.If your workload is compute-bound instead, you need a high-performance CPU or a GPU and loads of memory. An AI inference engine, for example, only sends a bit of text to a client, but it does many calculations to generate this text.How long will your workload run?Web servers usually run indefinitely, but some workloads only run a few hours or minutes. If you’re doing AI training, you don’t want to pay for your huge VM cluster 24/7 if it only runs a few hours or days a week. In such cases, looking for a provider that allows renting your desired VM type hourly on a pay-as-you-go model might be worthwhile.Certain cloud providers offer cost-effective spot instances, which provide lower prices for non-critical workloads that can tolerate interruptions. These cheap VMs can get shut down at any time with minimal notice, but if your calculations aren’t time-critical, you might save quite a bit of money here.How does your workload scale?Scaling in the cloud is usually done horizontally. That is, by adding more VMs and distributing the work between them. Workloads can have different requirements for when and how fast they must be added and removed.In the AI training example, you might know in advance that one training takes more resources than the other, so you can provision enough VMs when starting. However, a web server workload might change its requirements constantly. Hence, you need a load balancer that automatically scales the instances up and down depending on the number of clients that want to access your service.Do you handle sensitive data?You might have to comply with specific laws and regulations depending on your jurisdiction(s) and industry. This means you must check whether the cloud provider also complies. How secure are their data centers? Where are they located? Do they support encryption in transit, at rest, and in process?What are your reliability requirements?Reliability is a question of costs and, again, of compliance. You might get into financial or regulatory troubles if your workload can’t run. Cloud providers often boast about their guaranteed uptimes, but remember that 99% uptime a year still means over three days of potential downtime. Check your needs and then seek a provider that can meet them reliably.Do you need customer support?If your organization doesn’t have the know-how for operating VMs in the cloud, you might need technical support from the provider. Most cloud providers are self-service, offering you a GUI and an API to manage resources. If your business lacks the resources to operate VMs, seek out a provider that can manage VMs on your behalf.SummaryVMs are a core technology for cloud computing and software development alike. They enable efficient resource sharing, improve security with hardware-enforced guest isolation, and simplify migration and disaster recovery. Choosing the right VM provider starts with understanding your workload requirements, from resource allocation to security and scalability.Maximize cloud efficiency with Gcore Virtual Machines—engineered for high performance, seamless scalability, and enterprise-grade security at competitive pricing. Whether you need to run workloads at scale or deploy applications in seconds, our VMs provide enterprise-grade security, built-in resilience, and optimized resource allocation, all powered by cutting-edge infrastructure. With global reach, fast provisioning, egress traffic included, and pay-as-you-go pricing, you get the scalability and reliability your business needs without overspending. Start your journey with Gcore VMs today and experience cloud computing that’s built for speed, security, and savings.Discover Gcore VMs

Why do bad actors carry out Minecraft DDoS attacks?

One of the most played video games in the world, Minecraft, relies on servers that are frequently a target of distributed denial-of-service (DDoS) attacks. But why would malicious actors target Minecraft servers? In this article, we’ll look at why these servers are so prone to DDoS attacks and uncover the impact such attacks have on the gaming community and broader cybersecurity landscape. For a comprehensive analysis and expert tips, read our ultimate guide to preventing DDoS attacks on Minecraft servers.Disruption for financial gainFinancial exploitation is a typical motivator for DDoS attacks in Minecraft. Cybercriminals frequently demand ransom to stop their attacks. Server owners, especially those with lucrative private or public servers, may feel pressured to pay to restore normalcy. In some cases, bad actors intentionally disrupt competitors to draw players to their own servers, leveraging downtime for monetary advantage.Services that offer DDoS attacks for hire make these attacks more accessible and widespread. These malicious services target Minecraft servers because the game is so popular, making it an attractive and easy option for attackers.Player and server rivalriesRivalries within the Minecraft ecosystem often escalate to DDoS attacks, driven by competition among players, servers, hosts, and businesses. Players may target opponents during tournaments to disrupt their gaming experience, hoping to secure prize money for themselves. Similarly, players on one server may initiate attacks to draw members to their server and harm the reputation of other servers. Beyond individual players, server hosts also engage in DDoS attacks to disrupt and induce outages for their rivals, subsequently attempting to poach their customers. On a bigger scale, local pirate servers may target gaming service providers entering new markets to harm their brand and hold onto market share. These rivalries highlight the competitive and occasionally antagonistic character of the Minecraft community, where the stakes frequently surpass in-game achievements.Personal vendettas and retaliationPersonal conflicts can occasionally be the source of DDoS attacks in Minecraft. In these situations, servers are targeted in retribution by individual gamers or disgruntled former employees. These attacks are frequently the result of complaints about unsolved conflicts, bans, or disagreements over in-game behavior. Retaliation-driven DDoS events can cause significant disruption, although lower in scope than attacks with financial motivations.Displaying technical masterySome attackers carry out DDoS attacks to showcase their abilities. Minecraft is a perfect testing ground because of its large player base and community-driven server infrastructure. Successful strikes that demonstrate their skills enhance reputations within some underground communities. Instead of being a means to an end, the act itself becomes a badge of honor for those involved.HacktivismHacktivists—people who employ hacking as a form of protest—occasionally target Minecraft servers to further their political or social goals. These attacks are meant to raise awareness of a subject rather than be driven by personal grievances or material gain. To promote their message, they might, for instance, assault servers that are thought to support unfair policies or practices. This would be an example of digital activism. Even though they are less frequent, these instances highlight the various reasons why DDoS attacks occur.Data theftMinecraft servers often hold significant user data, including email addresses, usernames, and sometimes even payment information. Malicious actors sometimes launch DDoS attacks as a smokescreen to divert server administrators’ attention from their attempts to breach the server and steal confidential information. This dual-purpose approach disrupts gameplay and poses significant risks to user privacy and security, making data theft one of the more insidious motives behind such attacks.Securing the Minecraft ecosystemDDoS attacks against Minecraft are motivated by various factors, including personal grudges, data theft, and financial gain. Every attack reveals wider cybersecurity threats, interferes with gameplay, and damages community trust. Understanding these motivations can help server owners take informed steps to secure their servers, but often, investing in reliable DDoS protection is the simplest and most effective way to guarantee that Minecraft remains a safe and enjoyable experience for players worldwide. By addressing the root causes and improving server resilience, stakeholders can mitigate the impact of such attacks and protect the integrity of the game.Gcore offers robust, multi-layered security solutions designed to shield gaming communities from the ever-growing threat of DDoS attacks. Founded by gamers for gamers, Gcore understands the industry’s unique challenges. Our tools enable smooth gameplay and peace of mind for both server owners and players.Want an in-depth look at how to secure your Minecraft servers?Download our ultimate guide

How to deploy DeepSeek 70B with Ollama and a Web UI on Gcore Everywhere Inference

Large language models (LLMs) like DeepSeek 70B are revolutionizing industries by enabling more advanced and dynamic conversational AI solutions. Whether you’re looking to build intelligent customer support systems, enhance content generation, or create data-driven applications, deploying and interacting with LLMs has never been more accessible.In this tutorial, we’ll show you exactly how to set up DeepSeek 70B using Ollama and a Web UI on Gcore Everywhere Inference. By the end, you’ll have a fully functional environment where you can easily interact with your custom LLM via a user-friendly interface. This process involves three simple steps: deploying Ollama, deploying the web UI, and configuring the web UI and connecting to Ollama.Let’s get started!Step 1: Deploy OllamaLog in to Gcore Everywhere Inference and select Deploy Custom Model.In the model image field, enter ollama/ollama.Set the Port to 11434.Under Pod Configuration, configure the following:Select GPU-Optimized.Choose a GPU type, such as 1×A100 or 1×H100.Choose a region (e.g., Luxembourg-3).Set an autoscaling policy or use the default settings.Name your deployment (e.g., ollama).Click Deploy model on the right side of the screen.Once deployed, you’ll have an Ollama endpoint ready to serve your model.Step 2: Deploy the Web UI for OllamaGo back to the Gcore Everywhere Inference console and select Deploy Custom Model again.In the Model Image field, enter ghcr.io/open-webui/open-webui:main.Set the Port to 8080.Under Pod Configuration, set:CPU-Optimized.Choose 4 vCPU / 16 GiB RAM.Select the same region as before (e.g., Luxembourg-3).Configure an autoscaling policy or use the default settings.Name your deployment (e.g., webui).Click Deploy model on the right side of the screen.Once deployed, navigate to the Web UI endpoint from the Gcore Customer Portal.Step 3: Configure the Web UIFrom the Web UI endpoint and set up a username and password when prompted.Log in and navigate to the admin panel.Go to Settings → Connections → Disable the OpenAI API integration.In the Ollama API field, enter the endpoint for your Ollama deployment. You can find this in the Gcore Customer Portal. It will look similar to this: https://<your-ollama-deployment>.ai.gcore.dev/.Click Save to confirm your changes.Step 4: Pull and Use DeepSeek 70BOpen the chat section in the Web UI.In the Select a model field, type deepseek-r1:70b.Click Pull to download the model.Wait for the download to complete.Once downloaded, select the model and start chatting!Your AI environment is ready to exploreBy following these steps, you’ve successfully deployed DeepSeek 70B on Gcore Everywhere Inference with Ollama. This setup provides a powerful and user-friendly environment for experimenting with LLMs, prototyping AI-driven features, or integrating advanced conversational AI into your applications.Ready to unlock the full potential of AI? Gcore Everywhere Inference offers outstanding scalability, performance, and support, making it the perfect solution for developers and businesses working with advanced AI models. Dive deeper into our powerful tools and resources by exploring our AI blog and docs.Discover Gcore Everywhere Inference

How do CDNs work?

Picture this: A visitor lands on your website excited to watch a video, buy an item, or explore your content. If your page loads too slowly, they may leave before it even loads completely. Every second matters when it comes to customer retention, engagement, and purchasing patterns.This is where a content delivery network (CDN) comes in, operating in the background to help end users access digital content quickly, securely, and without interruption. In this article, we’ll explain how a CDN works to optimize the delivery of websites, applications, media, and other online content, even during high-traffic spikes and cyberattacks. If you’re new to CDNs, you might want to check out our introductory article first.Key components of a CDNA CDN is a network of interconnected servers that work together to optimize content delivery. These servers communicate to guarantee that data reaches users as quickly and efficiently as possible. The core of a CDN consists of globally distributed edge servers, also known as points of presence (PoPs):Origin server: The central server where website data is stored. Content is distributed from the origin to other servers in the CDN to improve availability and performance.Points of presence (PoPs): A globally distributed network of edge servers. PoPs store cached content—pre-saved copies of web pages, images, videos, and other assets. By serving cached content from the nearest PoP to the user, the CDN reduces the distance data needs to travel, improving load times and minimizing strain on the origin server. The more PoPs a network has, the faster content is served globally.How a CDN delivers contentCDNs rely on edge servers to store content in a cache, enabling faster delivery to end users. The delivery process differs depending on whether the content is already cached or needs to be fetched from the origin server.A cache hit occurs when the requested content is already stored on a CDN’s edge server. Here’s the process:User requests content: When a user visits a website, their device sends a request to load the necessary content.Closest edge server responds: The CDN routes the request to the nearest edge server to the user, minimizing travel time.Content delivered: The edge server delivers the cached content directly to the user. This is faster because:The distance between the user and the server is shorter.The edge server has already optimized the content for delivery.What happens during a cache miss?A cache miss occurs when the requested content is not yet stored on the edge server. In this case, the CDN fetches the content from the origin server and then updates its cache:User requests content: The process begins when a user’s device sends a request to load website content.The closest server responds: As usual, the CDN routes the request to the nearest edge server.Request to the origin server: If the content isn’t cached, the CDN fetches it from the origin server, which houses the original website data. The edge server then delivers it to the user.Content cached on edge servers: After retrieving the content, the edge server stores a copy in its cache. This ensures that future requests for the same content can be delivered quickly without returning to the origin server.Do you need a CDN?Behind every fast, reliable website is a series of split-second processes working to optimize content delivery. A CDN caches content closer to users, balances traffic across multiple servers, and intelligently routes requests to deliver smooth performance. This reduces latency, prevents downtime, and strengthens security—all critical for businesses serving global audiences.Whether you’re running an e-commerce platform, a streaming service, or a high-traffic website, a CDN ensures your content is delivered quickly, securely, and without interruption, no matter where your users are or how much demand your site experiences.Take your website’s performance to the next level with Gcore CDN. Powered by a global network of over 180+ points of presence, our CDN enables lightning-fast content delivery, robust security, and unparalleled reliability. Don’t let slow load times or security risks hold you back. Contact our team today to learn how Gcore can elevate your online presence.Discover Gcore CDN

How to get the size of a directory in Linux

Understanding how to check directory size in Linux is critical for managing storage space efficiently. Understanding this process is essential whether you’re assessing specific folder space or preventing storage issues.This comprehensive guide covers commands and tools so you can easily calculate and analyze directory sizes in a Linux environment. We will guide you step-by-step through three methods: du, ncdu, and ls -la. They’re all effective and each offers different benefits.What is a Linux directory?A Linux directory is a special type of file that functions as a container for storing files and subdirectories. It plays a key role in organizing the Linux file system by creating a hierarchical structure. This arrangement simplifies file management, making it easier to locate, access, and organize related files. Directories are fundamental components that help ensure smooth system operations by maintaining order and facilitating seamless file access in Linux environments.#1 Get Linux directory size using the du commandUsing the du command, you can easily determine a directory’s size by displaying the disk space used by files and directories. The output can be customized to be presented in human-readable formats like kilobytes (KB), megabytes (MB), or gigabytes (GB).Check the size of a specific directory in LinuxTo get the size of a specific directory, open your terminal and type the following command:du -sh /path/to/directoryIn this command, replace /path/to/directory with the actual path of the directory you want to assess. The -s flag stands for “summary” and will only display the total size of the specified directory. The -h flag makes the output human-readable, showing sizes in a more understandable format.Example: Here, we used the path /home/ubuntu/, where ubuntu is the name of our username directory. We used the du command to retrieve an output of 32K for this directory, indicating a size of 32 KB.Check the size of all directories in LinuxTo get the size of all files and directories within the current directory, use the following command:sudo du -h /path/to/directoryExample: In this instance, we again used the path /home/ubuntu/, with ubuntu representing our username directory. Using the command du -h, we obtained an output listing all files and directories within that particular path.#2 Get Linux directory size using ncduIf you’re looking for a more interactive and feature-rich approach to exploring directory sizes, consider using the ncdu (NCurses Disk Usage) tool. ncdu provides a visual representation of disk usage and allows you to navigate through directories, view size details, and identify large files with ease.For Debian or Ubuntu, use this command:sudo apt-get install ncduOnce installed, run ncdu followed by the path to the directory you want to analyze:ncdu /path/to/directoryThis will launch the ncdu interface, which shows a breakdown of file and subdirectory sizes. Use the arrow keys to navigate and explore various folders, and press q to exit the tool.Example: Here’s a sample output of using the ncdu command to analyze the home directory. Simply enter the ncdu command and press Enter. The displayed output will look something like this:#3 Get Linux directory size using 1s -1aYou can alternatively opt to use the ls command to list the files and directories within a directory. The options -l and -a modify the default behavior of ls as follows:-l (long listing format)Displays the detailed information for each file and directoryShows file permissions, the number of links, owner, group, file size, the timestamp of the last modification, and the file/directory name-a (all files)Instructs ls to include all files, including hidden files and directoriesIncludes hidden files on Linux that typically have names beginning with a . (dot)ls -la lists all files (including hidden ones) in long format, providing detailed information such as permissions, owner, group, size, and last modification time. This command is especially useful when you want to inspect file attributes or see hidden files and directories.Example: When you enter ls -la command and press Enter, you will see an output similar to this:Each line includes:File type and permissions (e.g., drwxr-xr-x):The first character indicates the file type- for a regular filed for a directoryl for a symbolic linkThe next nine characters are permissions in groups of three (rwx):r = readw = writex = executePermissions are shown for three classes of users: owner, group, and others.Number of links (e.g., 2):For regular files, this usually indicates the number of hard linksFor directories, it often reflects subdirectory links (e.g., the . and .. entries)Owner and group (e.g., user group)File size (e.g., 4096 or 1045 bytes)Modification date and time (e.g., Jan 7 09:34)File name (e.g., .bashrc, notes.txt, Documents):Files or directories that begin with a dot (.) are hidden (e.g., .bashrc)ConclusionThat’s it! You can now determine the size of a directory in Linux. Measuring directory sizes is a crucial skill for efficient storage management. Whether you choose the straightforward du command, use the visual advantages of the ncdu tool, or opt for the versatility of ls -la, this expertise enhances your ability to uphold an organized and efficient Linux environment.Looking to deploy Linux in the cloud? With Gcore Edge Cloud, you can choose from a wide range of pre-configured virtual machines suitable for Linux:Affordable shared compute resources starting from €3.2 per monthDeploy across 50+ cloud regions with dedicated servers for low-latency applicationsSecure apps and data with DDoS protection, WAF, and encryption at no additional costGet started today

Subscribe
to our newsletter

Get the latest industry trends, exclusive insights, and Gcore updates delivered straight to your inbox.