
For Ubuntu users, having VLC is synonymous with an enhanced media experience, free from the constraints of format incompatibilities. This guide delves into the seamless process of installing VLC on Ubuntu, ensuring you’re just a few clicks away from a world-class multimedia playback experience.
What is VLC?
VLC, or VLC Media Player, is a free and open-source, cross-platform multimedia player and framework. It’s developed by the VideoLAN project and has garnered popularity due to several notable features:
- Broad Media Format Support. VLC can play a vast array of multimedia formats, effortlessly handling MP3, MP4, MKV, AVI, MOV, OGG, FLAC, and many others. It can also play DVDs, audio CDs, VCDs, and various streaming protocols without the need for external codecs.
- Compatibility. VLC is available for a plethora of platforms, from Windows, macOS, and Linux to mobile ecosystems like Android and iOS.
- No Need for Additional Codecs. VLC’s comprehensive codec support ensures smooth playback of nearly all multimedia files right out of the box, eliminating the hassle of downloading extra codec packs.
- Advanced Features. Beyond mere playback, VLC offers tools for media conversion, streaming capabilities, and even video effects and adjustments.
- Community Support. With its open-source ethos, VLC boasts a vibrant community, ensuring its evolution with regular updates, fixes, and improvements based on genuine user feedback.
Installing VLC on Ubuntu
Here’s a step-by-step guide on how to install VLC on Ubuntu:
1. Update the Package Index. Begin by ensuring your package list and software are up to date.
sudo apt update && sudo apt upgrade -y2. Install VLC. Now, install VLC using the apt package manager.
sudo apt install vlcIf that doesn’t work, you can also try these following commands:
sudo snap install vlc sudo apt install vlc-binExample:
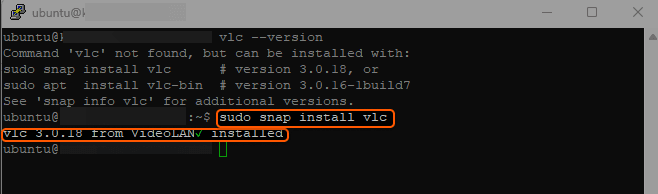
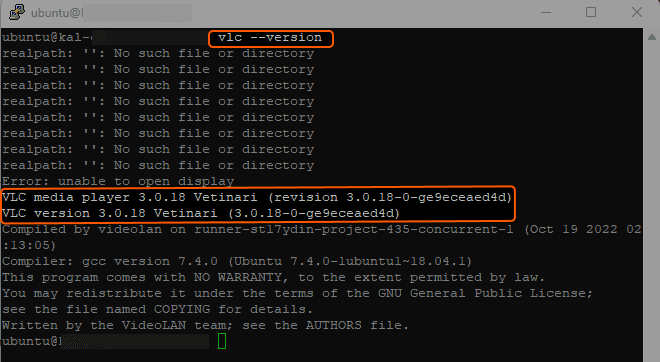
3. Verify Installation. Once installed, you can check the version of VLC to verify it was installed correctly.
vlc --versionExample:
4. Launch VLC. You can now launch VLC either from the terminal or through the Ubuntu application menu.
vlcExpected Output: VLC Media Player will open and show its familiar user interface.

That’s it! You’ve successfully installed VLC on Ubuntu. Whenever you want to play media files, VLC will be ready to handle almost any format you throw at it.
Conclusion
Want to run Ubuntu in a virtual environment? With Gcore Cloud, you can choose from Basic VM, Virtual Instances, or VPS/VDS suitable for Ubuntu:
- Gcore Basic VM offers shared virtual machines from €3.2 per month
- Virtual Instances are virtual machines with a variety of configurations and an application marketplace
- Virtual Dedicated Servers provide outstanding speed of 200+ Mbps in 20+ global locations
Related articles

How AI is reshaping the future of interactive streaming
Interactive streaming is entering a new era. Artificial intelligence is changing how live content is created, delivered, and experienced. Advances in real-time avatars, voice synthesis, deepfake rendering, and ultra-low-latency delivery are giving rise to new formats and expectations.Viewers don’t want to be passive audiences anymore. They want to interact, influence, and participate. For platforms that want to lead, the stakes are growing: innovate now, or fall behind.At Gcore, we support this shift with global streaming infrastructure built to handle responsive, AI-driven content at scale. This article explores how real-time interactivity is evolving and how you can prepare for what’s next.A new era for live contentStreaming used to mean watching someone else perform. Today, it’s becoming a conversation between the creator and the viewer. AI tools are making live content more reactive and personalized. A cooking show host can take ingredient requests from the audience and generate live recipes. A language tutor can assess student pronunciation and adjust the lesson plan on the spot. These aren’t speculative use cases—they’re already being piloted.Traditional cameras and presenters are no longer required. Some creators now use entirely digital hosts, powered by motion capture and generative AI. They can stream with multiple personas, switch backgrounds on command, or pause for mid-session translations. This evolution is not about replacing humans but creating new ways to engage that scale across time zones, languages, and platforms.Creating virtual influencersVirtual influencers are digital characters designed to build audiences, promote products, and hold conversations with followers. Unlike human influencers, they don’t get tired, change jobs, or need extensive re-shoots when messaging changes. They’re fully programmable, and the most successful ones are backed by teams of writers, animators, and brand strategists.For example, a skincare company might launch a virtual influencer with a consistent tone, recognizable look, and 24/7 availability. This persona could host product tutorials in the morning, respond to DMs during the day, and livestream reactions to customer feedback at night—all in the local language of the audience.These characters are not limited to influencer marketing. A virtual celebrity might appear as a guest at a live product launch or provide commentary during a sports event. The point is consistency, scalability, and control. Gcore’s global delivery network ensures these digital personas perform without delay, wherever the audience is located.Real-time avatars and AI-generated personasReal-time avatars use motion capture and emotion detection to mimic human behavior with digital models. A fitness instructor can appear as a stylized avatar while tracking their own real movements. A virtual talk show host can gesture, smile, or pause in response to viewer comments. These avatars do more than just look the part—they respond dynamically.AI-generated personas build on this foundation with language generation and decision-making. For instance, an edtech company could deploy a digital tutor that asks learners comprehension questions and adapts its tone based on their engagement level. In entertainment, a music artist might perform live as a virtual character that reflects audience mood through color shifts, dance patterns, or facial expression.These experiences require ultra-low latency. If the avatar lags, the illusion collapses. Gcore’s infrastructure supports the real-time input-output loop needed to make digital characters feel present and responsive.Deepfake technology for creative storytellingDeepfakes are often associated with misinformation, but the same tools can be used to build engaging, high-integrity content. The technology enables face-swapping, voice cloning, and character animation, all of which are powerful in live formats.A museum might use deepfake avatars of historical figures for interactive educational sessions. Visitors could ask questions, and Abraham Lincoln or Golda Meir might respond with historically grounded answers in real time. A brand could create a fictional spokesperson who evolves over time, appearing in product demos, ads, and livestreams. Deepfake technology also allows multilingual content without re-recording—the speaker’s lip movements and tone are modified to match each language.These applications raise legitimate ethical questions. Gcore’s streaming infrastructure includes controls to ensure the source and integrity of AI-generated content are traceable and secure. We provide the technical foundation that enables deepfake use cases without compromising trust.Synthetic voices and personalized audioAudio is often overlooked in discussions about AI streaming, but it’s just as important as video. Synthetic voices today can express subtle emotions and match speaking styles. They can whisper, shout, pause for dramatic effect, and even mimic regional accents.Let’s consider a news platform that offers interactive daily briefings. Viewers choose their preferred language, delivery style (casual, serious, humorous), and even the voice profile. The AI generates a personalized broadcast on the fly. In gaming, synthetic characters can offer encouragement, warn about strategy mistakes, or narrate progress—all without human voice actors.Gcore’s streaming infrastructure ensures that synthetic voice outputs are tightly synchronized with video, so users don’t experience out-of-sync dialogue or lag during back-and-forth exchanges.Increasing interactivity through feedback and participationInteractivity in streaming now goes far beyond comments or emoji reactions. It includes live polls that influence story outcomes, branching narratives based on audience behavior, and user-generated content layered into the broadcast.For example, a live talent show might allow viewers to suggest challenges mid-broadcast. An online classroom could let students vote on the next topic. A product launch might include a real-time Q&A where the host pulls questions from chat and answers them in the moment.All of these use cases rely on real-time data processing, behavior tracking, and adaptive rendering. Gcore’s platform handles the underlying complexity so that creators can focus on building experiences, not infrastructure.Why low latency is criticalInteractive content only works if it feels immediate. A delay of even a second can break immersion, especially when users are trying to influence the outcome or receive a response. Low latency is essential for real-time gaming, sports, interviews, and educational formats.A live trivia game with hundreds of participants won’t retain users if there’s a lag between the question appearing and the timer starting. A remote surgery training session won’t work if the avatar’s responses trail behind the mentor’s instructions. In each of these cases, timing is everything.Gcore Video Streaming minimizes buffering, supports high-resolution streams, and synchronizes data flows to keep participants engaged. Our infrastructure is built to support high-throughput, globally distributed audiences with the responsiveness that interactive formats demand.Preparing for what’s nextAI-generated content is no longer a novelty. It’s becoming a standard feature of modern streaming strategies. Whether you’re building a platform that features virtual influencers, immersive avatars, or interactive educational streams, the foundation matters. That foundation is infrastructure.If you’re planning the next generation of live content, we’re ready to help you bring it to life. At Gcore, we provide the performance, scale, and security to launch these experiences with confidence. Our streaming solutions are designed to support real-time content generation, audience interaction, and global delivery without compromise.Want to see interactive streaming in action? Learn how fan.at used Gcore Video Streaming to deliver ultra-low-latency streams and boost fan engagement with real-time features.Read the case study

What are captions and subtitles, and how do they work?
Subtitles and captions are essential to consuming video content today. But how do they work behind the scenes?Creating subtitles and captions involves a five-step process to ensure that your video’s spoken and auditory content is accurately and effectively conveyed. The five steps are transcription, correction, synchronization/spotting, translation, and simulation/display on screen.The whole process is usually managed using specialized subtitle or caption creator software.In this blog, we explain the five steps in more detail, what the end user sees, and how to choose the right caption/subtitle service for your needs.Step 1: TranscriptionSpoken content is transformed into a text-based format. Formats are different ways to implement the textual elements, depending on technical needs.Transcription creates the raw materials that will be refined in stages 2–4.Step 2: CorrectionCorrection enhances readability by improving the textual flow. Punctuation, grammar, and sentence structure are adjusted so that the user’s reading experience is seamless and doesn’t detract from the content.Step 3: Synchronization/spottingNext, the text and audio are aligned precisely. Each caption or subtitle’s timing is adjusted so it appears and disappears at the correct moment.Step 4: TranslationTranslation is required for content intended for consumption in multiple languages. During this stage, it’s important to consider format requirements and character limitations. For example, a caption that fits on two lines in English might require three in Spanish, and so in Spanish, one caption becomes two. As a result, additional synchronization might be necessary.Step 5: Simulation/display on screenFinally, the captions or subtitles need to be integrated onto the end user’s screen. Formatting issues might arise at this stage, requiring tweaks for an optimal user experience.How does the end user see subtitles and captions?After the technical process of creating captions and subtitles, the next step is understanding how these elements appear to the end user. The type of captions you choose can greatly impact the user experience, especially when considering accessibility, engagement, and clarity. Below, we break down the different options available and how they serve different viewing scenarios.Open captions: These are always visible to viewers and are a fixed part of the video. They’re popular, for example, for video installations in museums and employee training videos—cases where maximum accessibility is the key consideration when it comes to captions and/or subtitles.Closed captions: Viewers can turn these on or off based on preference. For instance, an online course might offer this feature, allowing learners to choose how to consume the content. Students could opt temporarily to turn on closed captions to note the spelling of a new term introduced during the course.Real-time captions: These are great for live events like webinars, where the text appears almost simultaneously as the words are spoken. They keep the audience engaged in real time without missing out on crucial points. For example, ambient noise like chatter in a sports bar might obscure commentary on a live TV basketball game. Real-time captions allow viewers to benefit from near-live commentary regardless of the bar’s noise levels or if the TV’s sound is muted.Burned-in subtitles: These are etched onto the video and cannot be turned off. A promotional video targeting a multilingual audience might use this feature so that everyone understands the message, regardless of their language preference.What to look for in captioning and subtitling servicesTo deliver high-quality captions and subtitles, it's important to choose a provider that offers key features for accuracy, efficiency, and audience engagement.Original language transcription: Accurate documentation of every spoken word in your video for unrivaled accuracy.Tailored translation: Localized content that integrates translations with cultural relevance, increasing resonance with diverse audiences.Alignment synchronization: Time-annotated subtitles, matching words perfectly to the on-screen action.Automatic SRT file generation: A simplified subtitling and captioning process through effortless file creation for a better user experience.Transform your videos with cutting-edge captions and subtitles from GcoreNo matter your video content needs, it’s essential to be aware of the best type of captions and subtitles for your audience’s needs. Choosing the right format ensures a smoother viewing experience, better accessibility, and stronger engagement across every platform.Gcore Video Streaming offers subtitles and closed captions to enhance users’ experience. Each feature within the subtitling and captioning toolkit is crafted to expand your video content’s reach and impact, catering to a multitude of use cases. Embedding captions is quick and easy, and AI-automated speech recognition also saves you time and money.Try Gcore's automated subtitle and caption solution for free

Why captions and subtitles are essential for video engagement
From TikToks on silent commutes to training videos in noisy offices, silent viewing is now standard. Captions and subtitles aren’t just accessibility features anymore. They’re essential for user engagement, global reach, and video performance.This article explores why captions and subtitles matter and how they boost engagement with your videos, providing a better user experience for your audience. If you want to know how captions and subtitles work, we’ve got an article for that too.How subtitles and captions improve your video performanceSubtitles are now widely used across platforms and age groups. For many younger viewers, reading along while watching is second nature, especially on social media. For others, subtitles are a practical solution: watching videos in public spaces, scrolling during breaks, or learning on the go—all without needing sound.Captions offer tangible benefits across four key areas:Engagement and comprehension: Improve clarity in movies, boost understanding in online courses, and increase focus in business content.Accessibility and inclusion: Make content available to hard-of-hearing users and break language barriers for global audiences.SEO and discoverability: Search engines can crawl subtitle text, making your video content more findable, even when autoplayed without sound.Silent usability: Your content works in all environments, from crowded trains to quiet offices.Captions have shifted from niche to norm, helping creators reach more people, boost retention, and deliver clearer messages.Common challenges and their solutionsImplementing captions at scale poses three major challenges: cost, delay, and accuracy. Here's why these challenges exist and how Gcore Video Streaming can help you overcome them at the click of a button.CostInvesting in high-quality transcriptions can be a financial burden, especially for smaller players in online education. Specialized expertise is required for accurate educational content, and human oversight adds ongoing labor costs. Transcription is a recurring expense that grows with multiple languages or regulatory compliance.Gcore scalable AI-powered transcription services reduce reliance on costly manual processes, offering affordable, multi-language support with built-in compliance features, making transcription cost-effective for all budgets.Delay/latencyIn live events, even slight delays in captioning can disengage audiences. For example, in a Formula One race, missing real-time commentary on pit stops or track conditions can leave viewers confused or frustrated. Lagging captions fail to keep pace with the action, breaking immersion.Real-time AI ASR (automatic speech recognition) from Gcore minimizes captioning delay, so that live captions sync perfectly with events, keeping viewers fully engaged without lag.AccuracyA small text error in captions can distort the message and harm reputation. Errors in MOOCs or corporate webinars risk undermining credibility and discouraging future participation. Precision is critical to maintain trust and clarity.Gcore leverages advanced AI models fine-tuned for domain-specific vocabulary and includes automated quality checks, drastically reducing errors and preserving message integrity across all video content.Enhance your video content with Gcore AI-powered caption and subtitles toolsCaptions are now a strategic content layer, not just an accessibility checkbox. With video now the dominant format across marketing, education, and entertainment, it's critical to implement captions efficiently, affordably, and at scale.Gcore’s AI-powered Video Streaming lets you generate accurate, real-time captions across multiple languages with minimal developer effort. Built-in AI ASR (automatic speech recognition) means your captions stay synchronized even during fast-paced live events. Whether you’re running an LMS, hosting global events, or publishing OTT content, Gcore Video Streaming helps you scale captions with speed and precision.Request a demo of Gcore AI ASR

Pre-configure your dev environment with Gcore VM init scripts
Provisioning new cloud instances can be repetitive and time-consuming if you’re doing everything manually: installing packages, configuring environments, copying SSH keys, and more. With cloud-init, you can automate these tasks and launch development-ready instances from the start.Gcore Edge Cloud VMs support cloud-init out of the box. With a simple YAML script, you can automatically set up a development-ready instance at boot, whether you’re launching a single machine or spinning up a fleet.In this guide, we’ll walk through how to use cloud-init on Gcore Edge Cloud to:Set a passwordInstall packages and system updatesAdd users and SSH keysMount disks and write filesRegister services or install tooling like Docker or Node.jsLet’s get started.What is cloud-init?cloud-init is a widely used tool for customizing cloud instances during the first boot. It reads user-provided configuration data—usually YAML—and uses it to run commands, install packages, and configure the system. In this article, we will focus on Linux-based virtual machines.How to use cloud-init on GcoreFor Gcore Cloud VMs, cloud-init scripts are added during instance creation using the User data field in the UI or API.Step 1: Create a basic scriptStart with a simple YAML script. Here’s one that updates packages and installs htop:#cloud-config package_update: true packages: - htop Step 2: Launch a new VM with your scriptGo to the Gcore Customer Portal, navigate to VMs, and start creating a new instance (or just click here). When you reach the Additional options section, enable the User data option. Then, paste in your YAML cloud-init script.Once the VM boots, it will automatically run the script. This works the same way for all supported Linux distributions available through Gcore.3 real-world examplesLet’s look at three examples of how you can use this.Example 1: Add a password for a specific userThe below script sets the for the default user of the selected operating system:#cloud-config password: <password> chpasswd: {expire: False} ssh_pwauth: True Example 2: Dev environment with Docker and GitThe following script does the following:Installs Docker and GitAdds a new user devuser with sudo privilegesAuthorizes an SSH keyStarts Docker at boot#cloud-config package_update: true packages: - docker.io - git users: - default - name: devuser sudo: ALL=(ALL) NOPASSWD:ALL groups: docker shell: /bin/bash ssh-authorized-keys: - ssh-rsa AAAAB3Nza...your-key-here runcmd: - systemctl enable docker - systemctl start docker Example 3: Install Node.js and clone a repoThis script installs Node.js and clones a GitHub repo to your Gcore VM at launch:#cloud-config packages: - curl runcmd: - curl -fsSL https://deb.nodesource.com/setup_18.x | bash - - apt-get install -y nodejs - git clone https://github.com/example-user/dev-project.git /home/devuser/project Reusing and versioning your scriptsTo avoid reinventing the wheel, keep your cloud-init scripts:In version control (e.g., Git)Templated for different environments (e.g., dev vs staging)Modular so you can reuse base blocks across projectsYou can also use tools like Ansible or Terraform with cloud-init blocks to standardize provisioning across your team or multiple Gcore VM environments.Debugging cloud-initIf your script doesn’t behave as expected, SSH into the instance and check the cloud-init logs:sudo cat /var/log/cloud-init-output.log This file shows each command as it ran and any errors that occurred.Other helpful logs:/var/log/cloud-init.log /var/lib/cloud/instance/user-data.txt Pro tip: Echo commands or write log files in your script to help debug tricky setups—especially useful if you’re automating multi-node workflows across Gcore Cloud.Tips and best practicesIndentation matters! YAML is picky. Use spaces, not tabs.Always start the file with #cloud-config.runcmd is for commands that run at the end of boot.Use write_files to write configs, env variables, or secrets.Cloud-init scripts only run on the first boot. To re-run, you’ll need to manually trigger cloud-init or re-create the VM.Automate it all with GcoreIf you're provisioning manually, you're doing it wrong. Cloud-init lets you treat your VM setup as code: portable, repeatable, and testable. Whether you’re spinning up ephemeral dev boxes or preparing staging environments, Gcore’s support for cloud-init means you can automate it all.For more on managing virtual machines with Gcore, check out our product documentation.Explore Gcore VM product docs

How to cut egress costs and speed up delivery using Gcore CDN and Object Storage
If you’re serving static assets (images, videos, scripts, downloads) from object storage, you’re probably paying more than you need to, and your users may be waiting longer than they should.In this guide, we explain how to front your bucket with Gcore CDN to cache static assets, cut egress bandwidth costs, and get faster TTFB globally. We’ll walk through setup (public or private buckets), signed URL support, cache control best practices, debugging tips, and automation with the Gcore API or Terraform.Why bother?Serving directly from object storage hits your origin for every request and racks up egress charges. With a CDN in front, cached files are served from edge—faster for users, and cheaper for you.Lower TTFB, better UXWhen content is cached at the edge, it doesn’t have to travel across the planet to get to your user. Gcore CDN caches your assets at PoPs close to end users, so requests don’t hit origin unless necessary. Once cached, assets are delivered in a few milliseconds.Lower billsMost object storage providers charge $80–$120 per TB in egress fees. By fronting your storage with a CDN, you only pay egress once per edge location—then it’s all cache hits after that. If you’re using Gcore Storage and Gcore CDN, there’s zero egress fee between the two.Caching isn’t the only way you save. Gcore CDN can also compress eligible file types (like HTML, CSS, JavaScript, and JSON) on the fly, further shrinking bandwidth usage and speeding up file delivery—all without any changes to your storage setup.Less origin traffic and less data to transfer means smaller bills. And your storage bucket doesn’t get slammed under load during traffic spikes.Simple scaling, globallyThe CDN takes the hit, not your bucket. That means fewer rate-limit issues, smoother traffic spikes, and more reliable performance globally. Gcore CDN spans the globe, so you’re good whether your users are in Tokyo, Toronto, or Tel Aviv.Setup guide: Gcore CDN + Gcore Object StorageLet’s walk through configuring Gcore CDN to cache content from a storage bucket. This works with Gcore Object Storage and other S3-compatible services.Step 1: Prep your bucketPublic? Check files are publicly readable (via ACL or bucket policy).Private? Use Gcore’s AWS Signature V4 support—have your access key, secret, region, and bucket name ready.Gcore Object Storage URL format: https://<bucket-name>.<region>.cloud.gcore.lu/<object> Step 2: Create CDN resource (UI or API)In the Gcore Customer Portal:Go to CDN > Create CDN ResourceChoose "Accelerate and protect static assets"Set a CNAME (e.g. cdn.yoursite.com) if you want to use your domainConfigure origin:Public bucket: Choose None for authPrivate bucket: Choose AWS Signature V4, and enter credentialsChoose HTTPS as the origin protocolGcore will assign a *.gcdn.co domain. If you’re using a custom domain, add a CNAME: cdn.yoursite.com CNAME .gcdn.co Here’s how it works via Terraform: resource "gcore_cdn_resource" "cdn" { cname = "cdn.yoursite.com" origin_group_id = gcore_cdn_origingroup.origin.id origin_protocol = "HTTPS" } resource "gcore_cdn_origingroup" "origin" { name = "my-origin-group" origin { source = "mybucket.eu-west.cloud.gcore.lu" enabled = true } } Step 3: Set caching behaviorSet Cache-Control headers in your object metadata: Cache-Control: public, max-age=2592000 Too messy to handle in storage? Override cache logic in Gcore:Force TTLs by path or extensionIgnore or forward query strings in cache keyStrip cookies (if unnecessary for cache decisions)Pro tip: Use versioned file paths (/img/logo.v3.png) to bust cache safely.Secure access with signed URLsWant your assets to be private, but still edge-cacheable? Use Gcore’s Secure Token feature:Enable Secure Token in CDN settingsSet a secret keyGenerate time-limited tokens in your appPython example: import base64, hashlib, time secret = 'your_secret' path = '/videos/demo.mp4' expires = int(time.time()) + 3600 string = f"{expires}{path} {secret}" token = base64.urlsafe_b64encode(hashlib.md5(string.encode()).digest()).decode().strip('=') url = f"https://cdn.yoursite.com{path}?md5={token}&expires={expires}" Signed URLs are verified at the CDN edge. Invalid or expired? Blocked before origin is touched.Optional: Bind the token to an IP to prevent link sharing.Debug and cache tuneUse curl or browser devtools: curl -I https://cdn.yoursite.com/img/logo.png Look for:Cache: HIT or MISSCache-ControlX-Cached-SinceCache not working? Check for the following errors:Origin doesn’t return Cache-ControlCDN override TTL not appliedCache key includes query strings unintentionallyYou can trigger purges from the Gcore Customer Portal or automate them via the API using POST /cdn/purge. Choose one of three ways:Purge all: Clear the entire domain’s cache at once.Purge by URL: Target a specific full path (e.g., /images/logo.png).Purge by pattern: Target a set of files using a wildcard at the end of the pattern (e.g., /videos/*).Monitor and optimize at scaleAfter rollout:Watch origin bandwidth dropCheck hit ratio (aim for >90%)Audit latency (TTFB on HIT vs MISS)Consider logging using Gcore’s CDN logs uploader to analyze cache behavior, top requested paths, or cache churn rates.For maximum savings, combine Gcore Object Storage with Gcore CDN: egress traffic between them is 100% free. That means you can serve cached assets globally without paying a cent in bandwidth fees.Using external storage? You’ll still slash egress costs by caching at the edge and cutting direct origin traffic—but you’ll unlock the biggest savings when you stay inside the Gcore ecosystem.Save money and boost performance with GcoreStill serving assets direct from storage? You’re probably wasting money and compromising performance on the table. Front your bucket with Gcore CDN. Set smart cache headers or use overrides. Enable signed URLs if you need control. Monitor cache HITs and purge when needed. Automate the setup with Terraform. Done.Next steps:Create your CDN resourceUse private object storage with Signature V4Secure your CDN with signed URLsCreate a free CDN resource now

From reactive to proactive: how AI is transforming WAF cybersecurity solutions
While digital transformation in recent years has driven great innovation, cyber threats have changed in parallel, evolving to target the very applications businesses rely on to thrive. Traditional web application security measures, foundational as they may be, are no longer effective in combating sophisticated attacks in time. Enter the next generation of WAFs (web application firewalls) powered by artificial intelligence.Next-generation WAFs, often incorporated into WAAP solutions, do much more than respond to threats; instead, they will use AI and ML-powered techniques to predict and neutralize threats in real time. This helps businesses to stay ahead of bad actors by securing applications, keeping valuable data safe, and protecting hard-earned brand reputations against ever-present dangers in an expanding digital world.From static to AI-powered web application firewallsTraditional WAFs were relied on to protect web applications against known threats, such as SQL injection and cross-site scripting. They’ve done a great job as the first line of defense, but their reliance on static rules and signature-based detection means they struggle to keep up with today’s fast-evolving cyber threats. To understand in depth why traditional WAFs are no longer sufficient in today’s threat landscape, read our ebook.AI and ML have already revolutionized what a WAF can do. AI/ML-driven WAFs can examine vast streams of traffic data and detect patterns, including new threats, right at the emergence stage. The real-time adaptability that this allows is effective even against zero-day attacks and complex new hacking techniques.How AI-powered WAP proactively stops threatsOne of the most significant advantages of AI/ML-powered WAFs is proactive identification and prevention capabilities. Here's how this works:Traffic pattern analysis: AI systems monitor both incoming and outgoing traffic to set up baselines for normal behavior. This can then allow for the detection of anomalies that could show a zero-day attack or malicious activity.Real-time decision making: Machine learning models keep learning from live traffic and detect suspicious activities on the go sans waiting for any updates in the rule set. This proactive approach ensures that businesses are guarded from emerging threats before they escalate.Heuristic tagging and behavioral insights: Advanced heuristics used by AI-driven systems tag everything from sessionless clients to unusual request frequencies. It helps administrators classify potential bots or automated attacks much faster.Ability to counter zero-day attacks: Traditional WAF solutions can only mitigate attacks that are already in the process of accessing sensitive areas. AI/ML-powered WAFs, on the other hand, can use data to identify and detect patterns indicative of future attacks, stopping attackers in their tracks and preventing future damage.Intelligent policy management: Adaptive WAFs detect suspicious activity and alert users to misconfigured security policies accordingly. They reduce the need for manual configuration while assuring better protection.Integrated defense layers: One of the strongest features of AI/ML-powered systems is the ease with which they integrate other layers of security, including bot protection and DDoS mitigation, into a connected architecture that protects several attack surfaces.User experience and operational impactAI-driven WAFs improve the day-to-day operations of security teams by transforming how they approach threat management. With intuitive dashboards and clearly presented analytics, as offered by Gcore WAAP, these tools empower security professionals to quickly interpret complex data, streamline decision-making, and respond proactively to threats.Instead of manually analyzing vast amounts of traffic data, teams now receive immediate alerts highlighting critical security events, such as abnormal IP behaviors or unusual session activity. Each alert includes actionable recommendations, enabling rapid adjustments to security policies without guesswork or delay.By automating the identification of sophisticated threats such as credential stuffing, scraping, and DDoS attacks, AI-powered solutions significantly reduce manual workloads. Advanced behavioral profiling and heuristic tagging pinpoint genuine threats with high accuracy, allowing security teams to concentrate their efforts where they're most needed.Embracing intelligent security with Gcore’s AI-driven WAAPOur AI-powered WAAP solution provides intelligent, interrelated protection to empower companies to actively outperform even the most sophisticated, ever-changing threats by applying advanced traffic analysis, heuristic tagging, and adaptive learning. With its cross-domain functionality and actionable security insights, this solution stands out as an invaluable tool for both security architects and strategic decision-makers. It combines innovation and practicality to address the needs of modern businesses.Curious to learn more about WAAP? Check out our ebook for cybersecurity best practices, the most common threats to look out for, and how WAAP can safeguard your businesses’ digital assets. Or, get in touch with our team to learn more about Gcore WAAP.Learn why WAAP is essential for modern businesses with a free ebook
Subscribe to our newsletter
Get the latest industry trends, exclusive insights, and Gcore updates delivered straight to your inbox.