
It is very easy to connect Gcore CDN to a website powered by WordPress with our plugin. We wrote on how to work with it in detail back in 2019 in our article titled “How to integrate a WordPress website with CDN”.
But it has been over a year since then and we always seek to improve our solutions. We updated and made our plugin even more user-friendly. Here is what has been changed and how to work with the updated plugin.
Installation and general settings
No changes here. Once the plugin is installed, go to CDN settings, tick Enable CDN and complete the Personal domain field.

For an instruction on how to install the plugin and configure general settings, check our previous article or knowledge base.
Working with the plugin
We wanted to make settings as user-friendly as possible. It was important for us to make sure that setting necessary parameters could take just a couple of clicks and simple functionality should in no way limit the plugin capabilities.
To that end, we divided settings into two modes: basic (simple) and advanced. Basic settings include all the most popular parameters and the only thing you have to do is to choose which ones you need. Such a simple setup will take no more than a couple of minutes.
And if this is not enough for you, all necessary parameters can be configured in the advanced mode.
Let’s figure it out how to work with both modes.
File types
First, you need to specify which files will be distributed via CDN.
In the basic mode, you just need to choose extensions from the available list.

If the file type you are looking for is not on the list, use the advanced mode:
- Activate Advanced settings.
- In the new field, enter necessary extensions. Enter them one by one and click Add. Newly added extensions will appear on the tab.

Folders
If you want only files from specific folders to be distributed via CDN, you need to specify the paths to these folders in the settings.
In the basic mode, as in the case of the file types, you only need to choose necessary folders from the available list.
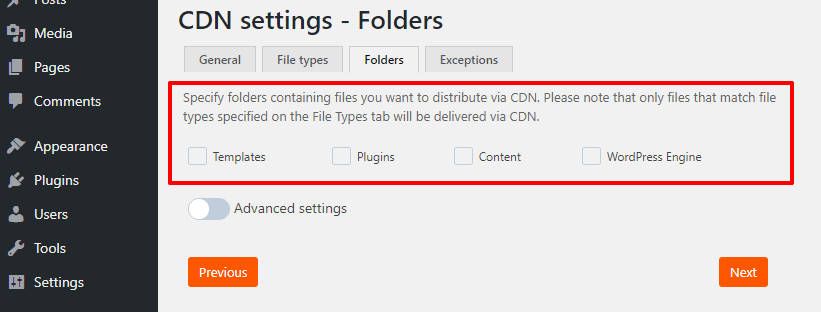
If this is not enough for you, use the advanced mode:
- Activate Advanced settings.
- In the new field, enter paths to folders one by one and click Add.
- The folders will appear on the same tab.

Please note that if you do not specify anything on the Folders tab, all files that match file types specified on the File types tab will be delivered via CDN.
Exceptions
There are no basic and advanced modes on this tab. Everything is the same here. If you want certain files not to be distributed via CDN, specify their URLs in the Exceptions tab field.
Enter them one by one and click Add. The files will appear on the same tab.

How the plugin works
The operation logic also remains unchanged.

For more on the plugin logic, check our previous article or knowledge base.
Conclusions
- It is easy to connect a website powered by WordPress to Gcore CDN with our plugin.
- We have updated the plugin to make it easier and faster to work with—we developed two setup modes: basic and advanced.
- The basic mode allows you to set up CDN in just a couple of minutes. We made some lists of the most popular parameters. In order to specify folders and types of files, which will be delivered via CDN, just choose the necessary extensions from the list.
- If there are too few options in the basic mode, you can activate advanced settings and specify the necessary parameters on your own.
Connect CDN to your WordPress websites and speed them up in a few clicks. Try Gcore CDN for free or get a free consultation.
Related articles
Introducing FastEdge Triggers: real-time edge logic
When you're building real-time applications, whether for streaming platforms, SaaS dashboards, or security-sensitive services, you need content that adapts on the fly. Blocking suspicious IPs, injecting personalized content, transforming media on the edge—these should be fast, scalable, and reliable.Until now, they weren't.Developers and technical teams often had to work across multiple departments to create brittle, hardcoded solutions. Each use case, like watermarking video or rewriting headers, required a custom integration. There was no easy way to run logic dynamically at the edge. That changes with FastEdge Triggers.Real-time logic, built into the edgeFastEdge Triggers let you execute custom serverless logic at key moments in the HTTP lifecycle:on_request_headerson_request_bodyon_response_headerson_response_bodyFastEdge is built on the proxy-wasm standard, making it easy to adapt existing proxy-wasm applications (e.g., for Envoy or Kong) for use with Gcore. These trigger types align directly with proxy-wasm conventions, meaning less friction for developers familiar with modern proxy architectures.This means that you can now:Authenticate users' tokens, such as JWTBlock access by IP, region, or user agentInject CSS, HTML, or JavaScript into responsesTransform images or convert markdown to HTML before deliveryAdd security tokens or watermarks to video contentRewrite or sanitize request headers and bodiesNo backend round-trips. No manual routing. Just real-time, programmable edge behavior, backed by Gcore's global infrastructure.While FastEdge enables instant logic execution at the edge, response-stage triggers (on_response_headers and on_response_body) naturally depend on receiving data from the origin before acting. Even so, transformations happen at the edge, reducing backend load and improving overall efficiency.Our architecture means that FastEdge logic is executed in ultra-low-latency environments, tightly coupled with CDN. Triggers can be layered across multiple stages of a request without performance degradation.Built for developersFastEdge Triggers were built to solve three core pain points for technical teams:Hard to scale: Custom logic used to require bespoke, team-specific workaroundsHard to maintain: Even single-team solutions became brittle without proper edge infrastructureLimited flexibility: Legacy CDN logic couldn't support complex, dynamic behaviorWith FastEdge, developers have full control: no DevOps bottlenecks, no workarounds, no compromises. Logic runs at the edge, not your origin, minimizing backend exposure. FastEdge apps execute in isolated, sandboxed environments, reducing the risk of vulnerabilities that might otherwise be introduced when logic runs on central infrastructure.How it works behind the scenesEach FastEdge application is written in Rust or AssemblyScript and connected to the HTTP request lifecycle through Gcore's configuration interface. Apps are linked to trigger types through the CDN resource settings page in the Gcore Customer Portal.Configuring FastEdge Triggers from the CDN resource settings screen in the Gcore Customer PortalHere's what happens under the hood:You assign a FastEdge app to a trigger point.Our Core Proxy detects that trigger and automatically routes execution through your custom logic.The result is returned before hitting cache or origin, modified, enriched, and secured.This flow is deeply integrated with our CDN, delivering minimal latency with zero friction.A sequence diagram showing how FastEdge Triggers works under the hood A real-life use case: markdown to HTML at the edgeHere's a real-world example that shows how FastEdge Triggers can power multi-step content transformation without a single backend server.One customer wanted to serve Markdown-based documentation as styled HTML, without spinning up infrastructure. Using this FastEdge app written in Rust, they achieved just that.The app listens at three trigger points: on_request_headers, on_response_headers, and on_response_bodyIt detects requests for .md files and converts them on the flyThe HTML is served directly via CDN, no origin compute requiredYou can see it live here:README renderedTerraform docs renderedThis use case showcases FastEdge's ability to orchestrate multi-stage logic at the edge: ideal for serverless documentation, lightweight rendering, or content transformation pipelines.Ready to build smarter at the edge?FastEdge Triggers are available now for all FastEdge customers. If you're looking to modernize your edge logic, simplify architecture, and ship faster with fewer backend dependencies, FastEdge is built for you.Reach out to your account manager or contact us to activate FastEdge Triggers in your environment.Try Fastedge Triggers

How to choose the right CDN provider in a turbulent marketplace
In a CDN marketplace marked by provider shutdowns, price hikes, and shifting priorities, reliability is survival. If your current provider folds, you're not just facing downtime—you're losing revenue and customer trust. For the world’s top 2,000 companies, the total annual downtime cost is $400 billion, eroding 9% of profits. Choosing the right CDN partner isn’t just about performance, it’s about protecting your business from disruption.In this guide, we show you how to identify early warning signs, evaluate providers, and switch before your business takes the hit.Red flags: signs that it’s time to consider a new CDN providerIf you’re experiencing any of the following issues with your current CDN provider, it might be time to reconsider your current setup.Slower load times: If you’ve noticed lagging performance, your CDN provider may be running on outdated infrastructure or not investing in upgrades.Rising costs: Increasing prices without additional value? A higher bill and the same service is a major red flag.Uncertainty about long-term service: Look for clear communication and a demonstrated commitment to infrastructure investment, essential a market where providers frequently consolidate and shift focus.Your CDN should scale with you, not hold you back. Prioritize a partner who can evolve with your needs and support your long-term success.5 must-haves when choosing a CDN partnerNot all CDNs are created equal. Before switching, compare providers across these five key factors.Performance: Check real-world performance benchmarks and global coverage maps to understand how a CDN will serve your audience in key regions. Throughput (the amount of data that can be successfully delivered from a server to an end user over a specific period of time) and low latency are non-negotiable when choosing a CDN provider.Pricing: Before signing up, it’s essential to know what is and isn’t included in the price in case there are hidden fees. Look for predictable billing, volume-based tiers, and transparent overage charges to avoid surprise costs. Avoid vendors who lure you in with low rates, then add hidden overage fees.Security: Choose a CDN that offers built-in protection out of the box: DDoS mitigation, TLS, WAF, and API security. Bonus points for customizable policies that fit your stack. Strong security features should be standard for CDNs to combat advanced cyber threats.Edge computing: When it comes to Edge computing, understanding the power of this strategic CDN add-on can give you a significant advantage. Look for CDN providers that offer flexible edge compute capabilities, so you can process data closer to users, reduce latency, and improve response times.Future-proofing: The CDN market’s volatility makes partnering with providers with long-term stability vital. Pick a provider that’s financially solid, tech-forward, and committed to innovation—not just sticking around to get acquired.Choosing a new provider may feel like a challenge, but the long-term payoff—improved performance, lower risk, and a future-ready infrastructure—makes it well worth it. By picking a CDN partner that meets your needs now and for the future, you’ll receive fast, personalized, and secure experiences that truly stand out.What makes Gcore CDN different?Gcore CDN isn’t just another CDN, we’re your long-term performance partner. Here’s what we offer:Global scale, blazing speed: Our network spans 180+ edge locations across 6 continents, optimized for low-latency delivery no matter where your users are.Transparent, flexible pricing: No hidden fees. No lock-in. Just fair, flexible pricing models designed to scale with your growth.A stable partner in a shaky market: While others pivot or fold, Gcore is doubling down. We’re investing in infrastructure, expanding globally, and building for the next wave of content and edge use cases.If you’re ready to make the switch, we’re here to help. Get in touch for a free consultation to discuss your specific needs and tailor a transition plan that suits your business. For more insights about choosing the right CDN for your business, download our free CDN buyer's guide for a more in-depth look at the CDN landscape.Get your free CDN buyers guide now
How gaming studios can use technology to safeguard players
Online gaming can be an enjoyable and rewarding pastime, providing a sense of community and even improving cognitive skills. During the pandemic, for example, online gaming was proven to boost many players’ mental health and provided a vital social outlet at a time of great isolation. However, despite the overall benefits of gaming, there are two factors that can seriously spoil the gaming experience for players: toxic behavior and cyber attacks.Both toxic behavior and cyberattacks can lead to players abandoning games in order to protect themselves. While it’s impossible to eradicate harmful behaviors completely, robust technology can swiftly detect and ban bullies as well as defend against targeted cyberattacks that can ruin the gaming experience.This article explores how gaming studios can leverage technology to detect toxic behavior, defend against cyber threats, and deliver a safer, more engaging experience for players.Moderating toxic behavior with AI-driven technologyToxic behavior—including harassment, abusive messages, and cheating—has long been a problem in the world of gaming. Toxic behavior not only affects players emotionally but can also damage a studio’s reputation, drive churn, and generate negative reviews.The online disinhibition effect leads some players to behave in ways they may not in real life. But even when it takes place in a virtual world, this negative behavior has real long-term detrimental effects on its targets.While you can’t control how players behave, you can control how quickly you respond.Gaming studios can implement technology that makes dealing with toxic incidents easier and makes gaming a safer environment for everyone. While in the past it may have taken days to verify a complaint about a player’s behavior, today, with AI-driven security and content moderation, toxic behavior can be detected in real time, and automated bans can be enforced. The tool can detect inappropriate images and content and includes speech recognition to detect derogatory or hateful language.In gaming, AI content moderation analyzes player interactions in real time to detect toxic behavior, harmful content, and policy violations. Machine learning models assess chat, voice, and in-game media against predefined rules, flagging or blocking inappropriate content. For example, let’s say a player is struggling with in-game harassment and cheating. With AI-powered moderation tools, chat logs and gameplay behavior are analyzed in real time, identifying toxic players for automated bans. This results in healthier in-game communities, improved player retention, and a more pleasant user experience.Stopping cybercriminals from ruining the gaming experienceAnother factor negatively impacting the gaming experience on a larger scale is cyberattacks. Our recent Radar Report showed that the gaming industry experienced the highest number of DDoS attacks in the last quarter of 2024. The sector is also vulnerable to bot abuse, API attacks, data theft, and account hijacking.Prolonged downtime damages a studio’s reputation—something hackers know all too well. As a result, gaming platforms are prime targets for ransomware, extortion, and data breaches. Cybercriminals target both servers and individual players’ personal information. This naturally leads to a drop in player engagement and widespread frustration.Luckily, security solutions can be put in place to protect gamers from this kind of intrusion:DDoS protection shields game servers from volumetric and targeted attacks, guaranteeing uptime even during high-profile launches. In the event of an attack, malicious traffic is mitigated in real-time, preventing zero downtime and guaranteeing seamless player experiences.WAAP secures game APIs and web services from bot abuse, credential stuffing, and data breaches. It protects against in-game fraud, exploits, and API vulnerabilities.Edge security solutions reduce latency, protecting players without affecting game performance. The Gcore security stack helps ensure fair play, protecting revenue and player retention.Take the first steps to protecting your customersGaming should be a positive and fun experience, not fraught with harassment, bullying, and the threat of cybercrime. Harmful and disruptive behaviors can make it feel unsafe for everyone to play as they wish. That’s why gaming studios should consider how to implement the right technology to help players feel protected.Gcore was founded in 2014 with a focus on the gaming industry. Over the years, we have thwarted many large DDoS attacks and continue to offer robust protection for companies such as Nitrado, Saber, and Wargaming. Our gaming specialization has also led us to develop game-specific countermeasures. If you’d like to learn more about how our cybersecurity solutions for gaming can help you, get in touch.Speak to our gaming solutions experts today

How to choose the right technology tools to combat digital piracy
One of the biggest challenges facing the media and entertainment industry is digital piracy, where stolen content is redistributed without authorization. This issue causes significant revenue and reputational losses for media companies. Consumers who use these unregulated services also face potential threats from malware and other security risks.Governments, regulatory bodies, and private organizations are increasingly taking the ramifications of digital piracy seriously. In the US, new legislation has been proposed that would significantly crack down on this type of activity, while in Europe, cloud providers are being held liable by the courts for enabling piracy. Interpol and authorities in South Korea have also teamed up to stop piracy in its tracks.In the meantime, you can use technology to help stop digital piracy and safeguard your company’s assets. This article explains anti-piracy technology tools that can help content providers, streaming services, and website owners safeguard their proprietary media: geo-blocking, digital rights management (DRM), secure tokens, and referrer validation.Geo-blockingGeo-blocking (or country access policy) restricts access to content based on a user’s geographic location, preventing unauthorized access and limiting content distribution to specific regions. It involves setting rules to allow or deny access based on the user’s IP address and location in order to comply with regional laws or licensing agreements.Pros:Controls access by region so that content is only available in authorized marketsHelps comply with licensing agreementsCons:Can be bypassed with VPNs or proxiesRequires additional security measures to be fully effectiveTypical use cases: Geo-blocking is used by streaming platforms to restrict access to content, such as sports events or film premieres, based on location and licensing agreements. It’s also helpful for blocking services in high-risk areas but should be used alongside other anti-piracy tools for better and more comprehensive protection.Referrer validationReferrer validation is a technique that checks where a content request is coming from and prevents unauthorized websites from directly linking to and using content. It works by checking the “referrer” header sent by the browser to determine the source of the request. If the referrer is from an unauthorized domain, the request is blocked or redirected. This allows only trusted sources to access your content.Pros:Protects bandwidth by preventing unauthorized access and misuse of resourcesGuarantees content is only accessed by trusted sources, preventing piracy or abuseCons:Can accidentally block legitimate requests if referrer headers are not correctly sentMay not work as intended if users access content via privacy-focused methods that strip referrer data, leading to false positivesTypical use cases: Content providers commonly use referrer validation to prevent unauthorized streaming or hotlinking, which involves linking to media from another website or server without the owner’s permission. It’s especially useful for streamers who want to make sure their content is only accessed through their official platforms. However, it should be combined with other security measures for more substantial protection.Secure tokensSecure tokens and protected temporary links provide enhanced security by granting temporary access to specific resources so only authorized users can access sensitive content. Secure tokens are unique identifiers that, when linked to a user’s account, allow them to access protected resources for a limited time. Protected temporary links further restrict access by setting expiration dates, meaning the link becomes invalid after a set time.Pros:Provides a high level of security by allowing only authorized users to access contentTokens are time-sensitive, which prevents unauthorized access after they expireHarder to circumvent compared to traditional password protection methodsCons:Risk of token theft if they’re not managed or stored securelyRequires ongoing management and rotation of tokens, adding complexityCan be challenging to implement properly, especially in high-traffic environmentsTypical use cases: Streaming platforms use secure tokens and protected temporary links so only authenticated users can access premium content, like movies or live streams. They are also useful for secure file downloads or limiting access to exclusive resources, making them effective for protecting digital content and preventing unauthorized sharing or piracy.Digital rights managementDigital rights management (DRM) refers to a set of technologies designed to protect digital content from unauthorized use so that only authorized users can access, copy, or share it, according to licensing agreements. DRM uses encryption, licensing, and authentication mechanisms to control access to digital resources so that only authorized users can view or interact with the content. While DRM offers strong protection against piracy, it comes with higher complexity and setup costs than other security methods.Pros:Robust protection against unauthorized copying, sharing, and piracyHelps safeguard intellectual property and revenue streamsEnforces compliance with licensing agreementsCons:Can be complex and expensive to implementMay cause inconvenience for users, such as limiting playback on unauthorized devices or restricting sharingPotential system vulnerabilities or compatibility issuesTypical use cases: DRM is commonly used by streaming services to protect movies, TV shows, and music from piracy. It can also be used for e-books, software, and video games, ensuring that content is only used by licensed users according to the terms of the agreement. DRM solutions can vary, from software-based solutions for media files to hardware-based or cloud-based DRM for more secure distribution.Protect your content from digital piracy with GcoreDigital piracy remains a significant challenge for the media and entertainment industry as it poses risks in terms of both revenue and security. To combat this, partnering with a cloud provider that can actively monitor and protect your digital assets through advanced multi-layer security measures is essential.At Gcore, our CDN and streaming solutions give rights holders peace of mind that their assets are protected, offering the features mentioned in this article and many more besides. We also offer advanced cybersecurity tools, including WAAP (web application and API protection) and DDoS protection, which further integrate with and enhance these security measures. We provide trial limitations for streamers to curb piracy attempts and respond swiftly to takedown requests from rights holders and authorities, so you can rest assured that your assets are in safe hands.Get in touch to learn more about combatting digital piracy
The latest updates for Gcore Video Streaming: lower latency, smarter AI, and seamless scaling
At Gcore, we’re committed to continuous innovation in video streaming. This month, we’re introducing significant advancements in low-latency streaming, AI-driven enhancements, and infrastructure upgrades, helping you deliver seamless, high-quality content at scale.Game-changing low-latency streamingOur latest low-latency live streaming solutions are now fully available in production, delivering real-time engagement with unmatched precision:WebRTC to HLS/DASH: Now in production, enabling real-time transcoding and delivery for WebRTC streams using HTTP-based LL-HLS and LL-DASH.LL-DASH with two-second latency: Optimized for ultra-fast content delivery via our global CDN, enabling minimal delay for seamless streaming.LL-HLS with three-second latency: Designed to deliver an uninterrupted and near-real-time live streaming experience.Gcore’s live streaming dashboard with OBS Studio integration, enabling real-time transcoding and delivery with low-latency HLS/DASHWhat this means for youWith glass-to-glass latency as low as 2–3 seconds, these advancements unlock new possibilities for real-time engagement. Whether you’re hosting live auctions, powering interactive gaming experiences, or enabling seamless live shopping, Gcore Video Streaming’s low-latency options keep your viewers connected without delay.Our solution integrates effortlessly with hls.js, dash.js, native Safari support, and our HTML web player, guaranteeing smooth playback across devices. Backed by our global CDN infrastructure, you can count on reliable, high-performance streaming at scale, no matter where your audience is.Exciting enhancements: AI and live streaming featuresWe’re making live streaming smarter with cutting-edge AI capabilities:Live stream recording with overlays: Record live streams while adding dynamic overlays such as webcam pop-ups, chat, alerts, advertisement banners, and time or weather widgets. This feature allows you to create professional, branded content without post-production delays. Whether you’re broadcasting events, tutorials, or live commerce streams, overlays help maintain a polished and engaging viewer experience.AI-powered VOD subtitles: Advanced AI automatically generates and translates subtitles into more than 100 languages, helping you expand your content’s reach to global audiences. This ensures accessibility while improving engagement across different regions.Deliver seamless live experiences with GcoreOur commitment to innovation continues, bringing advancements to enhance performance, efficiency, and streaming quality. Stay tuned for even lower latency and more AI-driven enhancements coming soon!Gcore Video Streaming empowers you to deliver seamless live experiences for auctions, gaming, live shopping, and other real-time applications. Get reliable, high-performance content delivery—whether you’re scaling to reach global audiences or delivering unique experiences to niche communities.Try Gcore Video Streaming today
How we optimized our CDN infrastructure for paid and free plans
At Gcore, we’re dedicated to delivering top-tier performance and reliability. To further enhance performance for all our customers, we recently made a significant change: we moved our CDN free-tier customers to a separate, physically isolated infrastructure. By isolating free-tier traffic, customers on paid plans receive uninterrupted, premium-grade service, while free users benefit from an environment tailored to their needs.Why we’ve separated free and paid plan infrastructureThis optimization has been driven by three key factors: performance, stability and scalability, and improved reporting.Providing optimal performanceFree-tier users are essential to our ecosystem, helping to stress-test our systems and extend our reach. However, their traffic can be unpredictable. By isolating free traffic, we provide premium customers with consistently high performance, minimizing disruption risks.Enhancing stability and scalabilityWith separate infrastructures, we can better manage traffic spikes and load balancing without impacting premium services. This improves overall platform stability and scalability, guaranteeing that both customer groups will enjoy a reliable experience.Improving reporting and performance insightsAlongside infrastructure enhancements, we’ve upgraded our reports page to offer clearer visibility into traffic and performance:New 95th percentile bandwidth graph: Helps users analyze traffic patterns more effectively.Improved aggregated bandwidth view: Makes it easier to assess usage trends at a glance.These tools empower you to make more informed decisions with accurate and accessible data.95th percentile bandwidth usage over the last three months, highlighting a significant increase in January 2025Strengthening content delivery with query string forwardingWe’ve also introduced a standardized query string forwarding feature to boost content delivery stability. By replacing our previous custom approach, we achieved the following:Increased stability: Reducing the risk of disruptionsLower maintenance requirements: Freeing up engineering resourcesSmoother content delivery: Enhancing experiences for streaming and content-heavy applicationsQuery string forwarding settings allow seamless parameter transfer for media deliveryWhat this means for our customersFor customers on paid plans: You can expect a more stable, high-performance service without the disruptions caused by fluctuating free-tier activity. Enhanced reporting and streamlined content delivery also empower you to make better, data-driven decisions.For free-tier customers: You will continue to have access to our services on a dedicated infrastructure that has been specifically optimized for your needs. This setup allows us to innovate and improve performance without compromising service quality.Strengthening Gcore CDN for long-term growthAt Gcore, we continuously refine our CDN to enable top-tier performance, reliability, and scalability. The recent separation of free-tier traffic, improved reporting capabilities, and optimized content delivery are key to strengthening our infrastructure. These updates enhance service quality for all users, minimizing disruptions and improving traffic management.We remain committed to pushing the boundaries of CDN efficiency, delivering faster load times, robust security, and seamless scalability. Stay tuned for more enhancements as we continue evolving our platform to meet the growing demands of businesses worldwide.Explore Gcore CDN
Subscribe to our newsletter
Get the latest industry trends, exclusive insights, and Gcore updates delivered straight to your inbox.