Overview
Use Gcore Video CDN to deliver live streams and video-on-demand content globally without transcoding. This guide walks you through creating a CDN resource optimized for video delivery.When to use Video CDN
- Use video CDN if...
- Use Video Streaming if...
You should use video CDN when:
- You already have HLS, DASH, or FLV streams ready
- You handle transcoding on your own servers
- You need global delivery at scale (thousands to millions of viewers)
- You want advanced CDN features:
- Geo-blocking by country
- Secure token authentication
- Custom domains
- Origin shielding
- You want to reduce origin bandwidth costs
- HLS (
.m3u8playlists,.tsor.m4ssegments) - MPEG-DASH (
.mpdmanifests) - HTTP-FLV (
.flvstreams) - MP4 (progressive download, VOD only)
- You run a media server (Wowza, Nginx-RTMP, SRS) producing HLS
- You’re migrating from another CDN (Cloudflare, AWS, etc.)
- You need geo-restrictions for broadcasting rights
- You want to offload bandwidth from your origin
Quick setup (4 steps)
Step 1: Request streaming activation
Contact Gcore Support or use the chat in the bottom-right corner and ask to enable video delivery for your CDN account. This is CDN-side approval for prepared HLS and DASH delivery. Provide:- Your Client ID (found on the main page of Gcore Customer Portal)
- Domain name and company name
- Content type: Sports, education, entertainment, news, etc.
- Sample stream URL: Example of your typical stream format
- Viewer geography: Where your audience is located
- Broadcasting license or content compliance policy
- Abuse or copyright contact email

Step 2: Activate paid CDN plan
Video streaming requires a paid CDN subscription:- Navigate to CDN in the Customer Portal
- If you’re on the free plan, upgrade to:
- Start (1.5 TB included traffic)
- Pro (5 TB included traffic)
Step 3: Create CDN resource
Once streaming is activated by support, create your CDN resource:- Go to CDN > CDN Resources
- Click Create CDN Resource
- Configure the resource (for static assets):
- Your own server
- Gcore Storage
- Origin type: Your server
- Origin address: Your media server domain or IP
- Example:
live.example.comor192.0.2.1
- Example:
- Origin protocol: HTTP or HTTPS (match your origin)
- Choose a custom domain:
video.yourdomain.com - Or use auto-generated:
123456.gcdn.co
- Click Create CDN Resource
Step 4: Configure caching rules
Optimize caching for video delivery:- For Live HLS Streaming
- For VOD (Video on Demand)
- For Live MPEG-DASH CMAF Streaming
- For FLV Streaming
Basic cache configuration for live streams: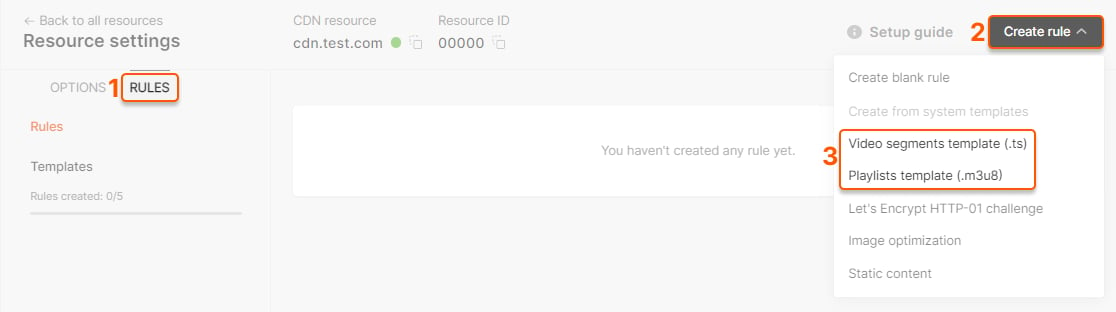
Step 1: Enable “Always online” (Recommended)
- Go to CDN Resource > Cache
- Enable “Always online” with these settings:
- Check error (serve stale cache if origin returns errors)
- Check timeout (serve stale cache if origin times out)
- ?? Uncheck “updating” (important - conflicts with internal optimizations)
- Protects viewers from origin failures
- If origin goes down, CDN serves cached content instead of error pages
- Improves reliability and uptime
Step 2: Set resource-level cache (for segments)
- Still in CDN Resource > Cache
- Set CDN cache expiry time: 60 seconds
- This caches all content (except manifests, see below) for 60 seconds
- If you use DVR, increase this to match your DVR window (e.g., 30 minutes)
Step 3: Create manifest caching rule
- Go to CDN Resource > Rules
- Click Create Rule > Enter manually:
- Rule name:
manifests - Pattern:
^/.+\.(m3u8|mpd|ism)$(regex for manifest files) - Cache time: 2 seconds
- Browser cache: 0 seconds (no browser caching for manifests)
- Rule name:
- Click Create rule
- Segments (60s): Balances freshness with cache efficiency. Longer than segment duration for slow connections.
- Manifests (2s): Very short to ensure viewers get latest segment list
- DVR adjustment: If DVR enabled, segment cache should match DVR window
Optional: LL-HLS (Low-Latency) configuration
If using LL-HLS (Low-Latency HLS):- Go to CDN Resource > Cache
- Enable Query parameters whitelist
- Add these parameters:
_HLS_msn,_HLS_part,_HLS_skip- These are required for LL-HLS to work correctly
- All other query parameters will be ignored
Need advanced performance optimization? For high-traffic streaming or specific performance requirements, contact Gcore Support to configure:
- Cache sharding: Distribute cache across multiple servers
- Cache lock timing: Optimize concurrent request handling
- Custom TTL strategies: Fine-tune cache behavior per file type
- Origin connection limits: Protect origin from traffic spikes
Step 5 (Live only): Enable LIVE STREAMING preset
For live streams only - Skip this step if you’re delivering VOD.
- Go to CDN Resources
- Click the three dots next to your video CDN resource
- Select Turn on LIVE STREAMING preset

Test your stream
Get your CDN URL
Update your stream URLs from origin to CDN: Before (origin):Test playback
Test your stream in a player that supports HLS:- Browser: VLC Media Player
- Online: HLS.js demo player
- Mobile: Native Safari (iOS) or Chrome (Android)
Optional: Advanced configuration
Enable origin shielding
For high-traffic streams (100+ concurrent viewers), enable origin shielding:- Go to CDN Resource > General > Origin shielding
- Toggle Enable origin shielding
- Select shield location closest to your origin
Add geo-restrictions
Restrict content by country (e.g., for broadcasting rights):- Go to CDN Resource > Security > Country access policy
- Choose:
- Allow only: Content available only in selected countries
- Block: Content blocked in selected countries
- Select countries
- Save changes
Add secure tokens
Protect content with time-limited authenticated URLs:- Go to CDN Resource > Security > Secure Token
- Enable and configure token settings
- Generate tokens on your backend for each user
Next steps
HLS and LL-HLS
Detailed HLS configuration and optimization
FLV Streaming Guide
Ultra-low latency streaming with HTTP-FLV
Video CDN Overview
Learn about all Video CDN features
CDN Statistics
Monitor your video delivery performance
Troubleshooting
Stream not playing
- Check origin is accessible: Test origin URL directly in browser
- Verify DNS: Ensure CNAME points to CDN (if using custom domain)
- Check cache rules: Verify
.m3u8and.tsrules are configured - Review CDN logs: Check for 4xx/5xx errors in CDN statistics
High latency
- Enable LIVE STREAMING preset: For live streams (see Step 5)
- Reduce playlist cache: Set
.m3u8cache to 1-2 seconds - Enable origin shielding: Reduces routing hops
- Contact support: For advanced latency optimization