Available reserved tags
Reserved tags can be divided into two categories: general tags that are used in custom rules with various conditions and API protection tags that are specifically designed to protect your APIs. API protection tags contain the URL rule condition. General tags:- Registered
- Logged In
- Paid
- Monitor
- Ignored Automation
- Login Page
- Legitimate Activity
- Malicious Activity
- Item Added to Cart
- Cart Checkout
- API Privileged Access
- API Admin Access
- Indicate API Privileged User
- Indicate API Admin User
- Ignore Email Address Detection
- Ignore Phone Number Detection
- Auth Endpoint
- Ignore CCN Detection
- Ignore SSN Detection
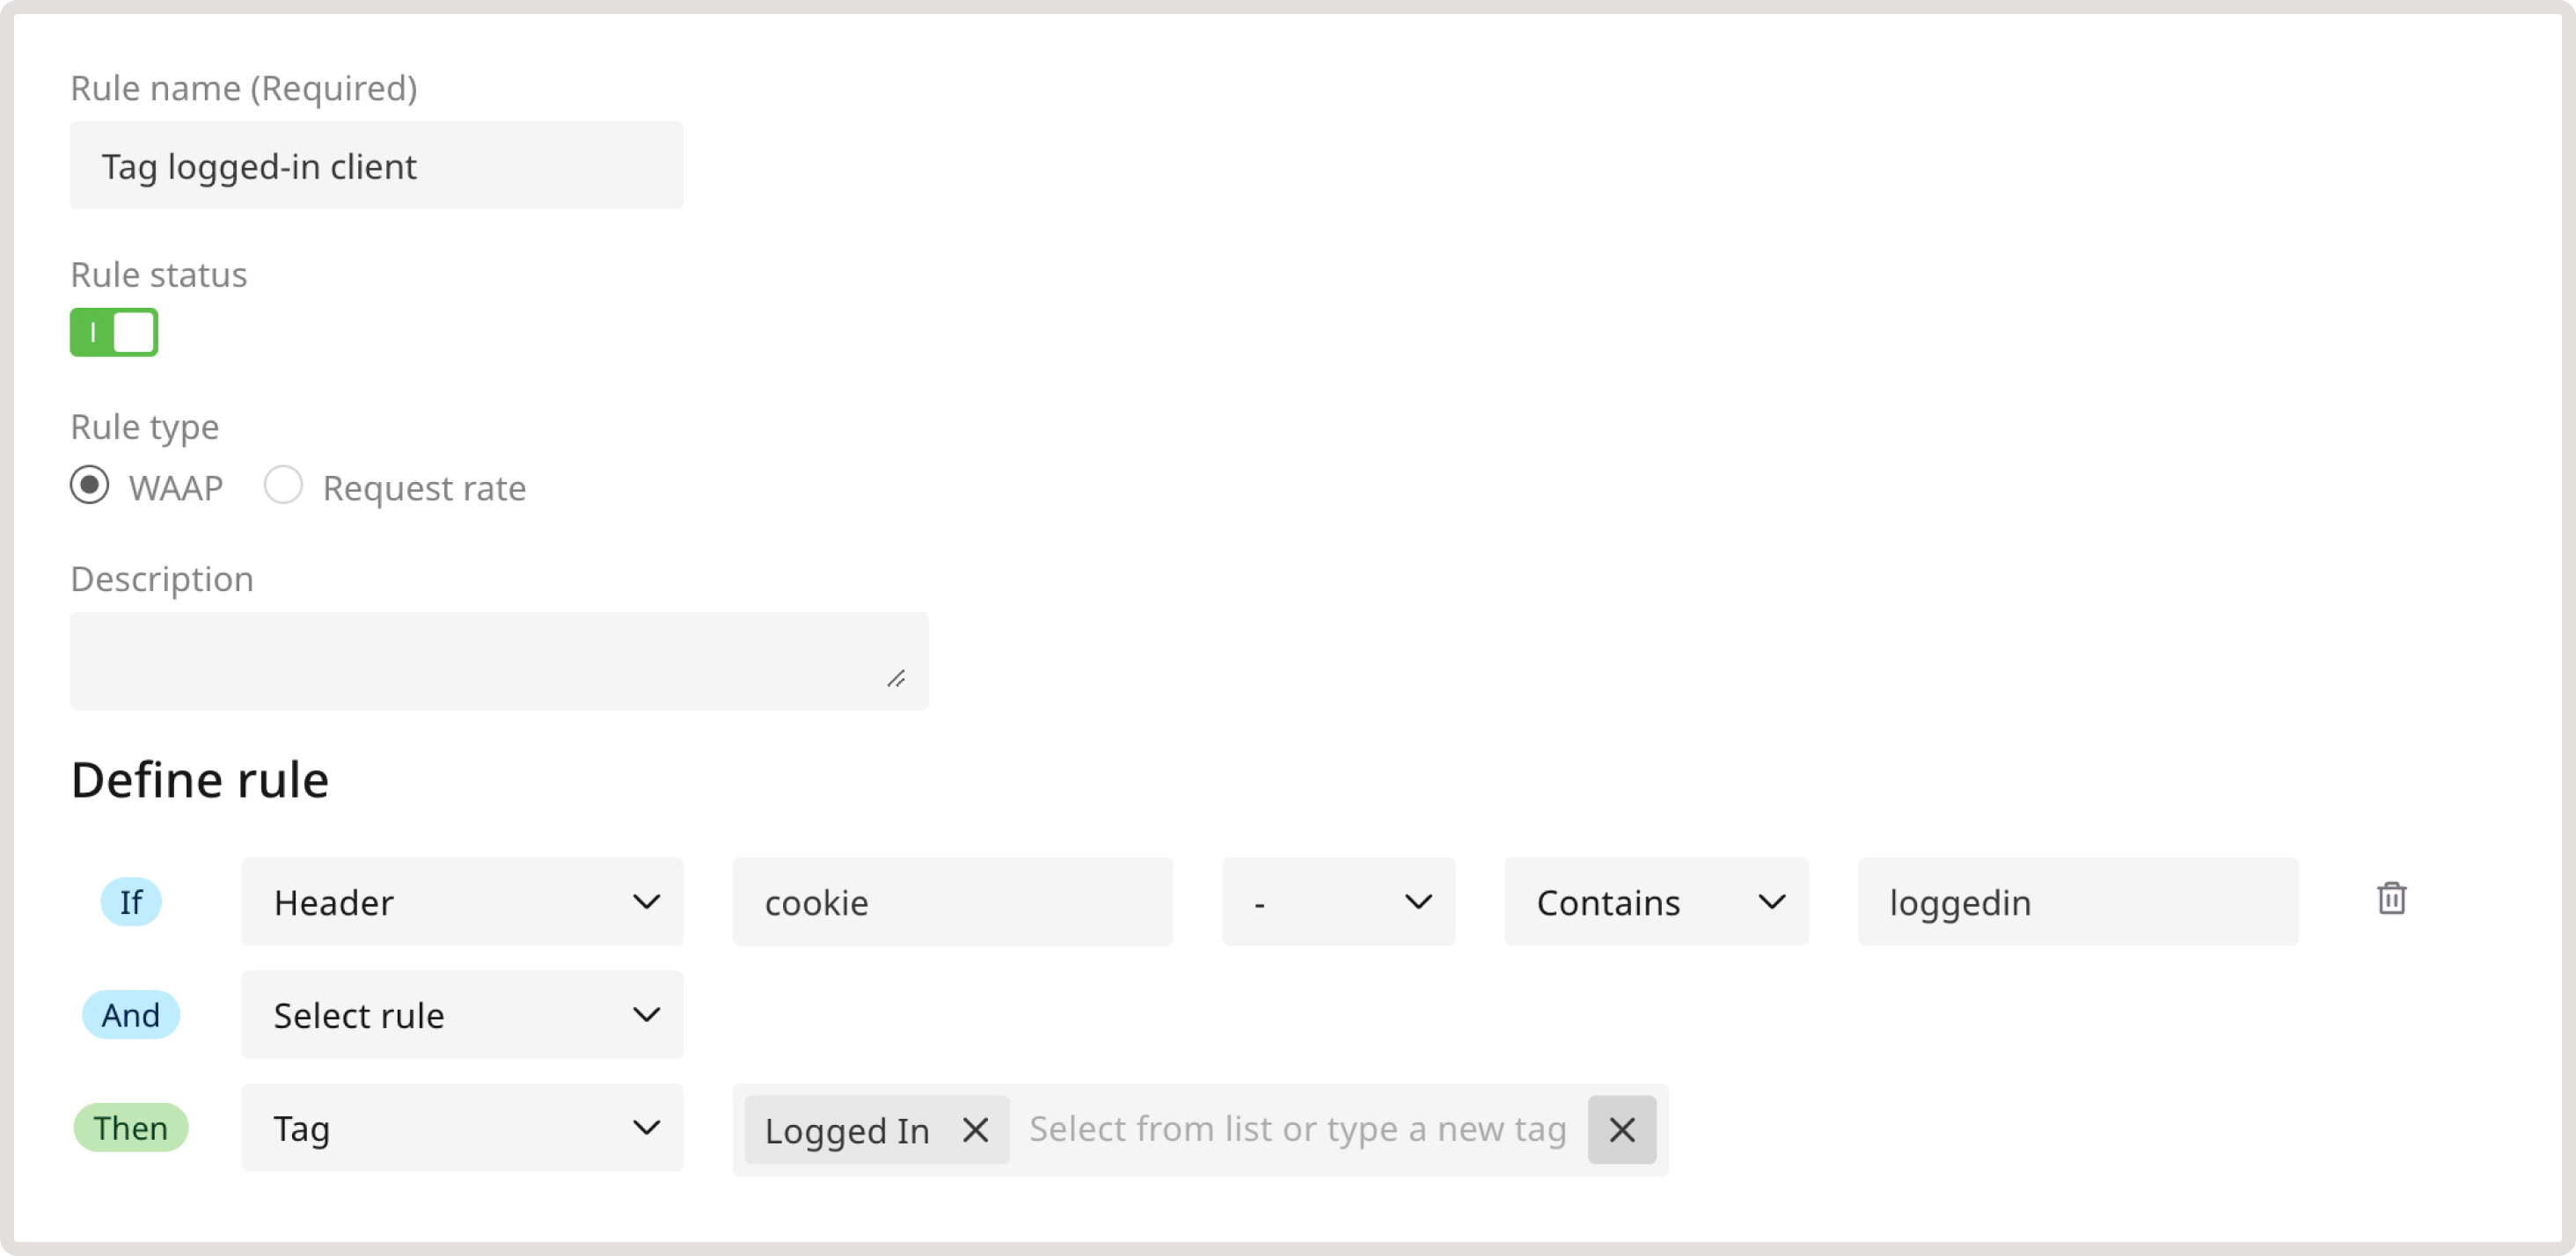
Tag requests from logged-in, registered, or paid users
The registered, logged-in, and paid tags allow you to identify requests from users who have created accounts on your domain, are authenticated, or have paid subscriptions. When creating a rule, make sure that you specify a secure condition. For example, explicitly define the IP address from which the requests will be coming (e.g., IP=1.2.3.4). Don’t use the conditions that are easy to spoof, such as the User Agent header. You can also use a server signal that will serve as a unique identifier and can verify the client. For instance, apply a tag based on a session cookie or a specific HTTP response header. For example, you can create the rule that looks for the X-Registered header, which designates registered users: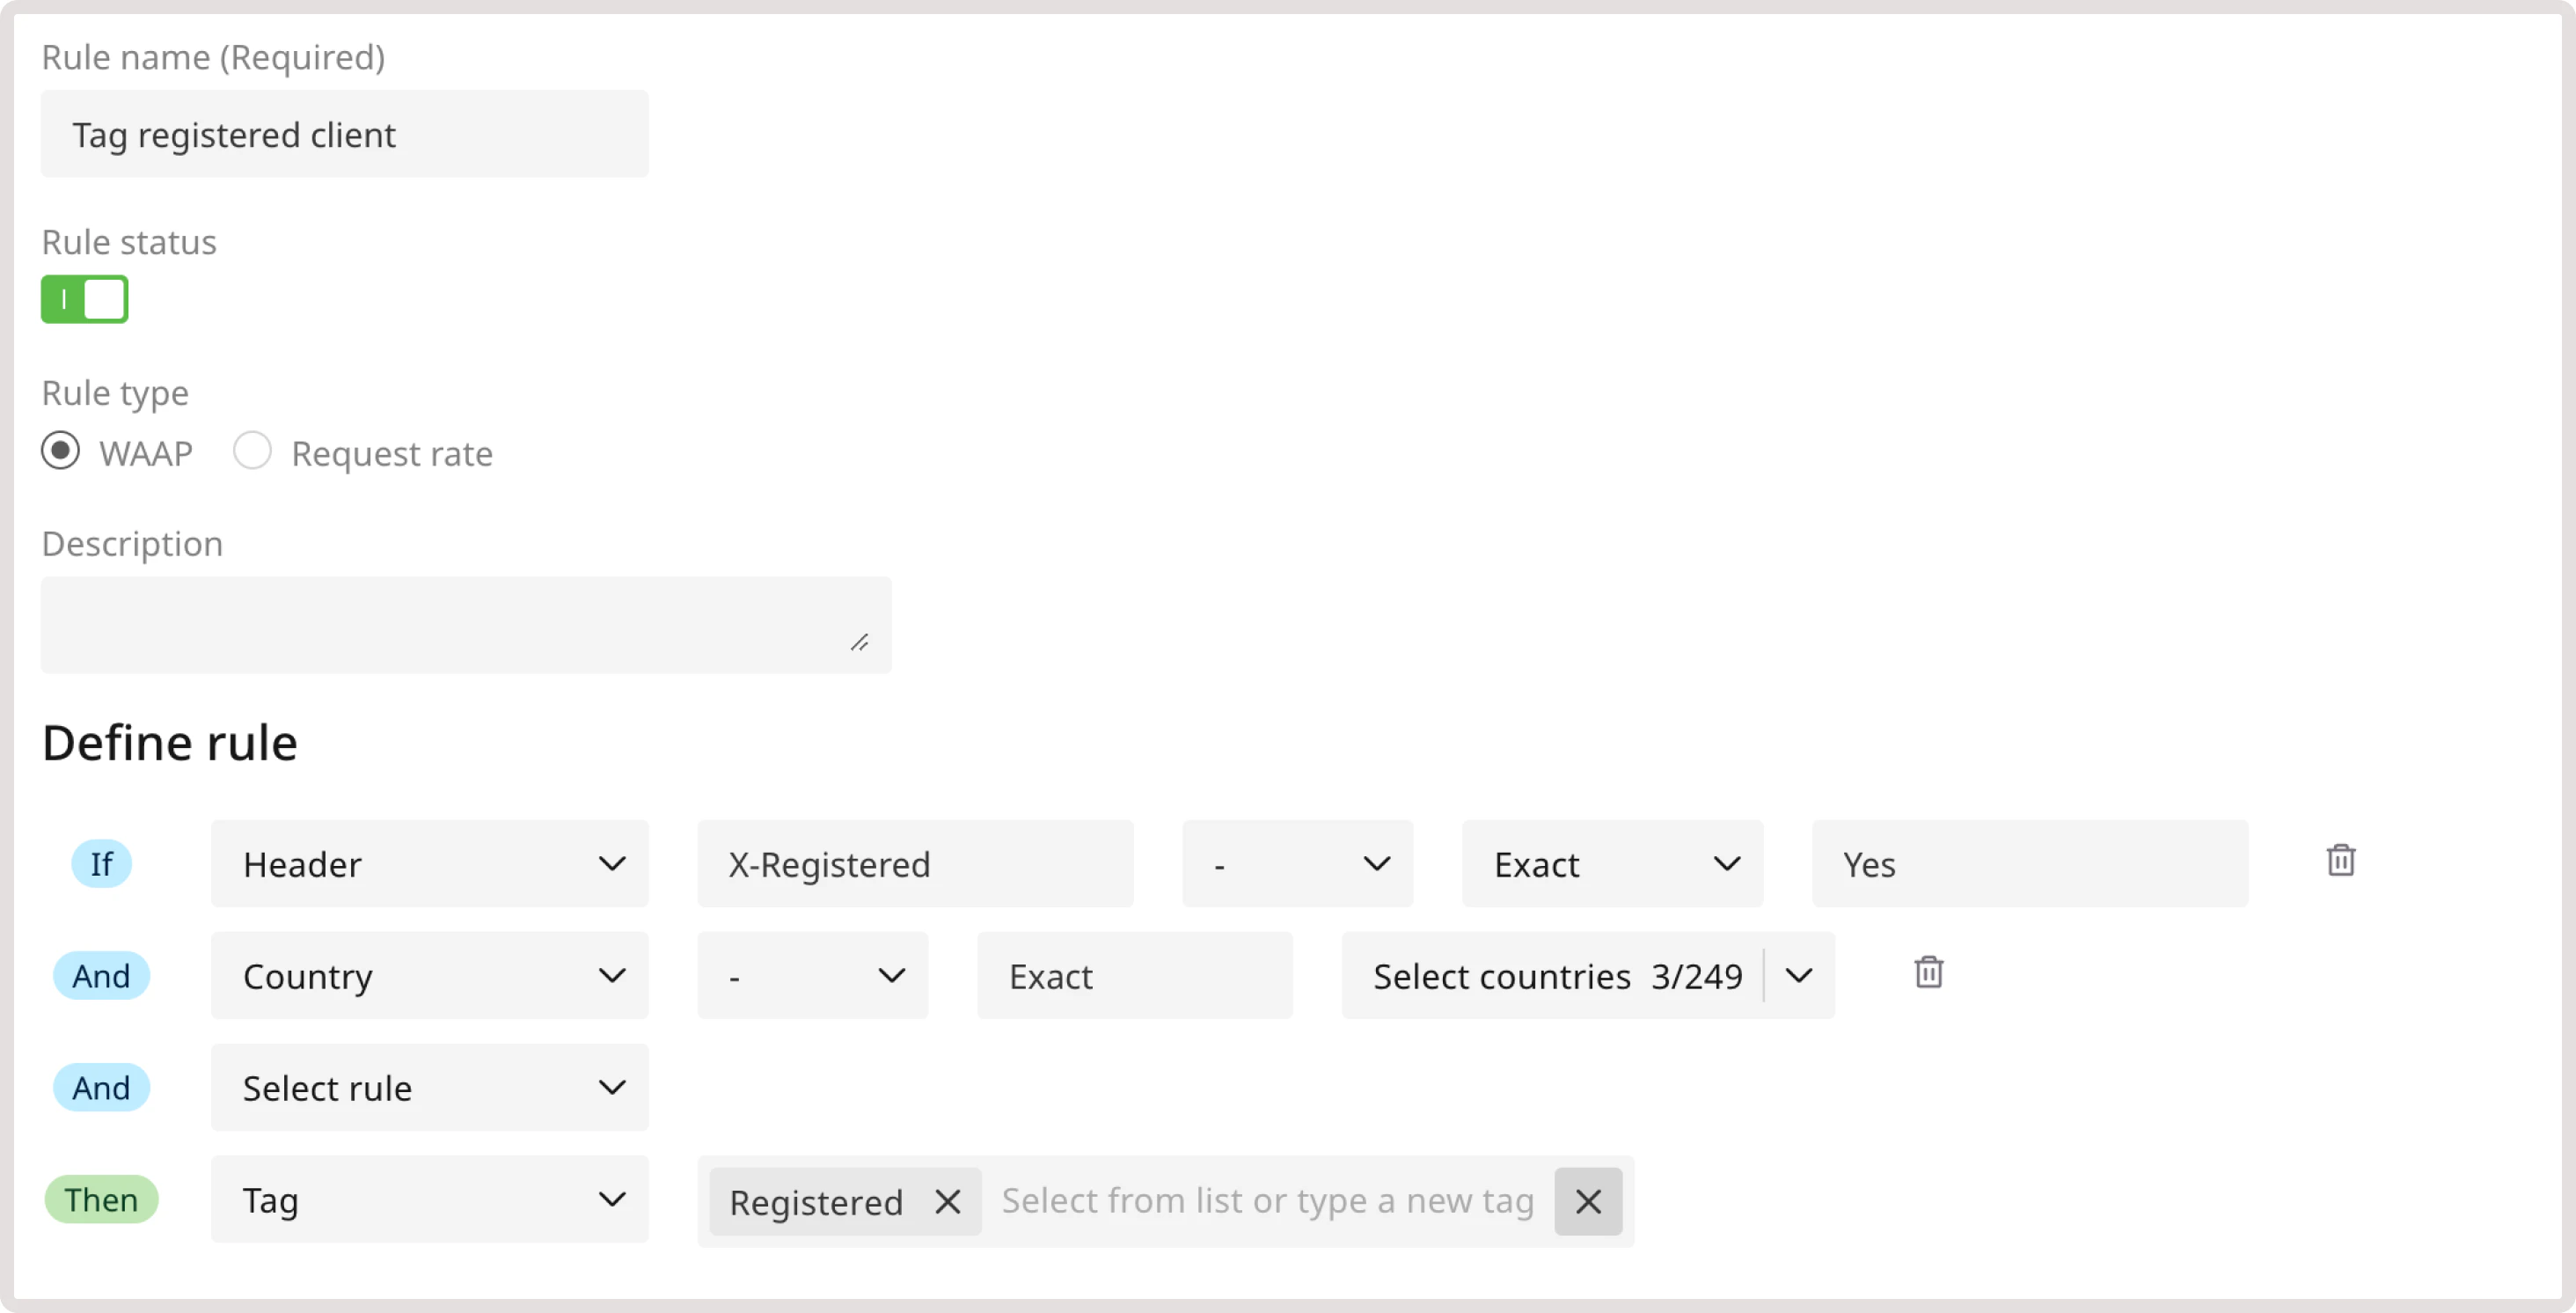
Inspect WAAP traffic
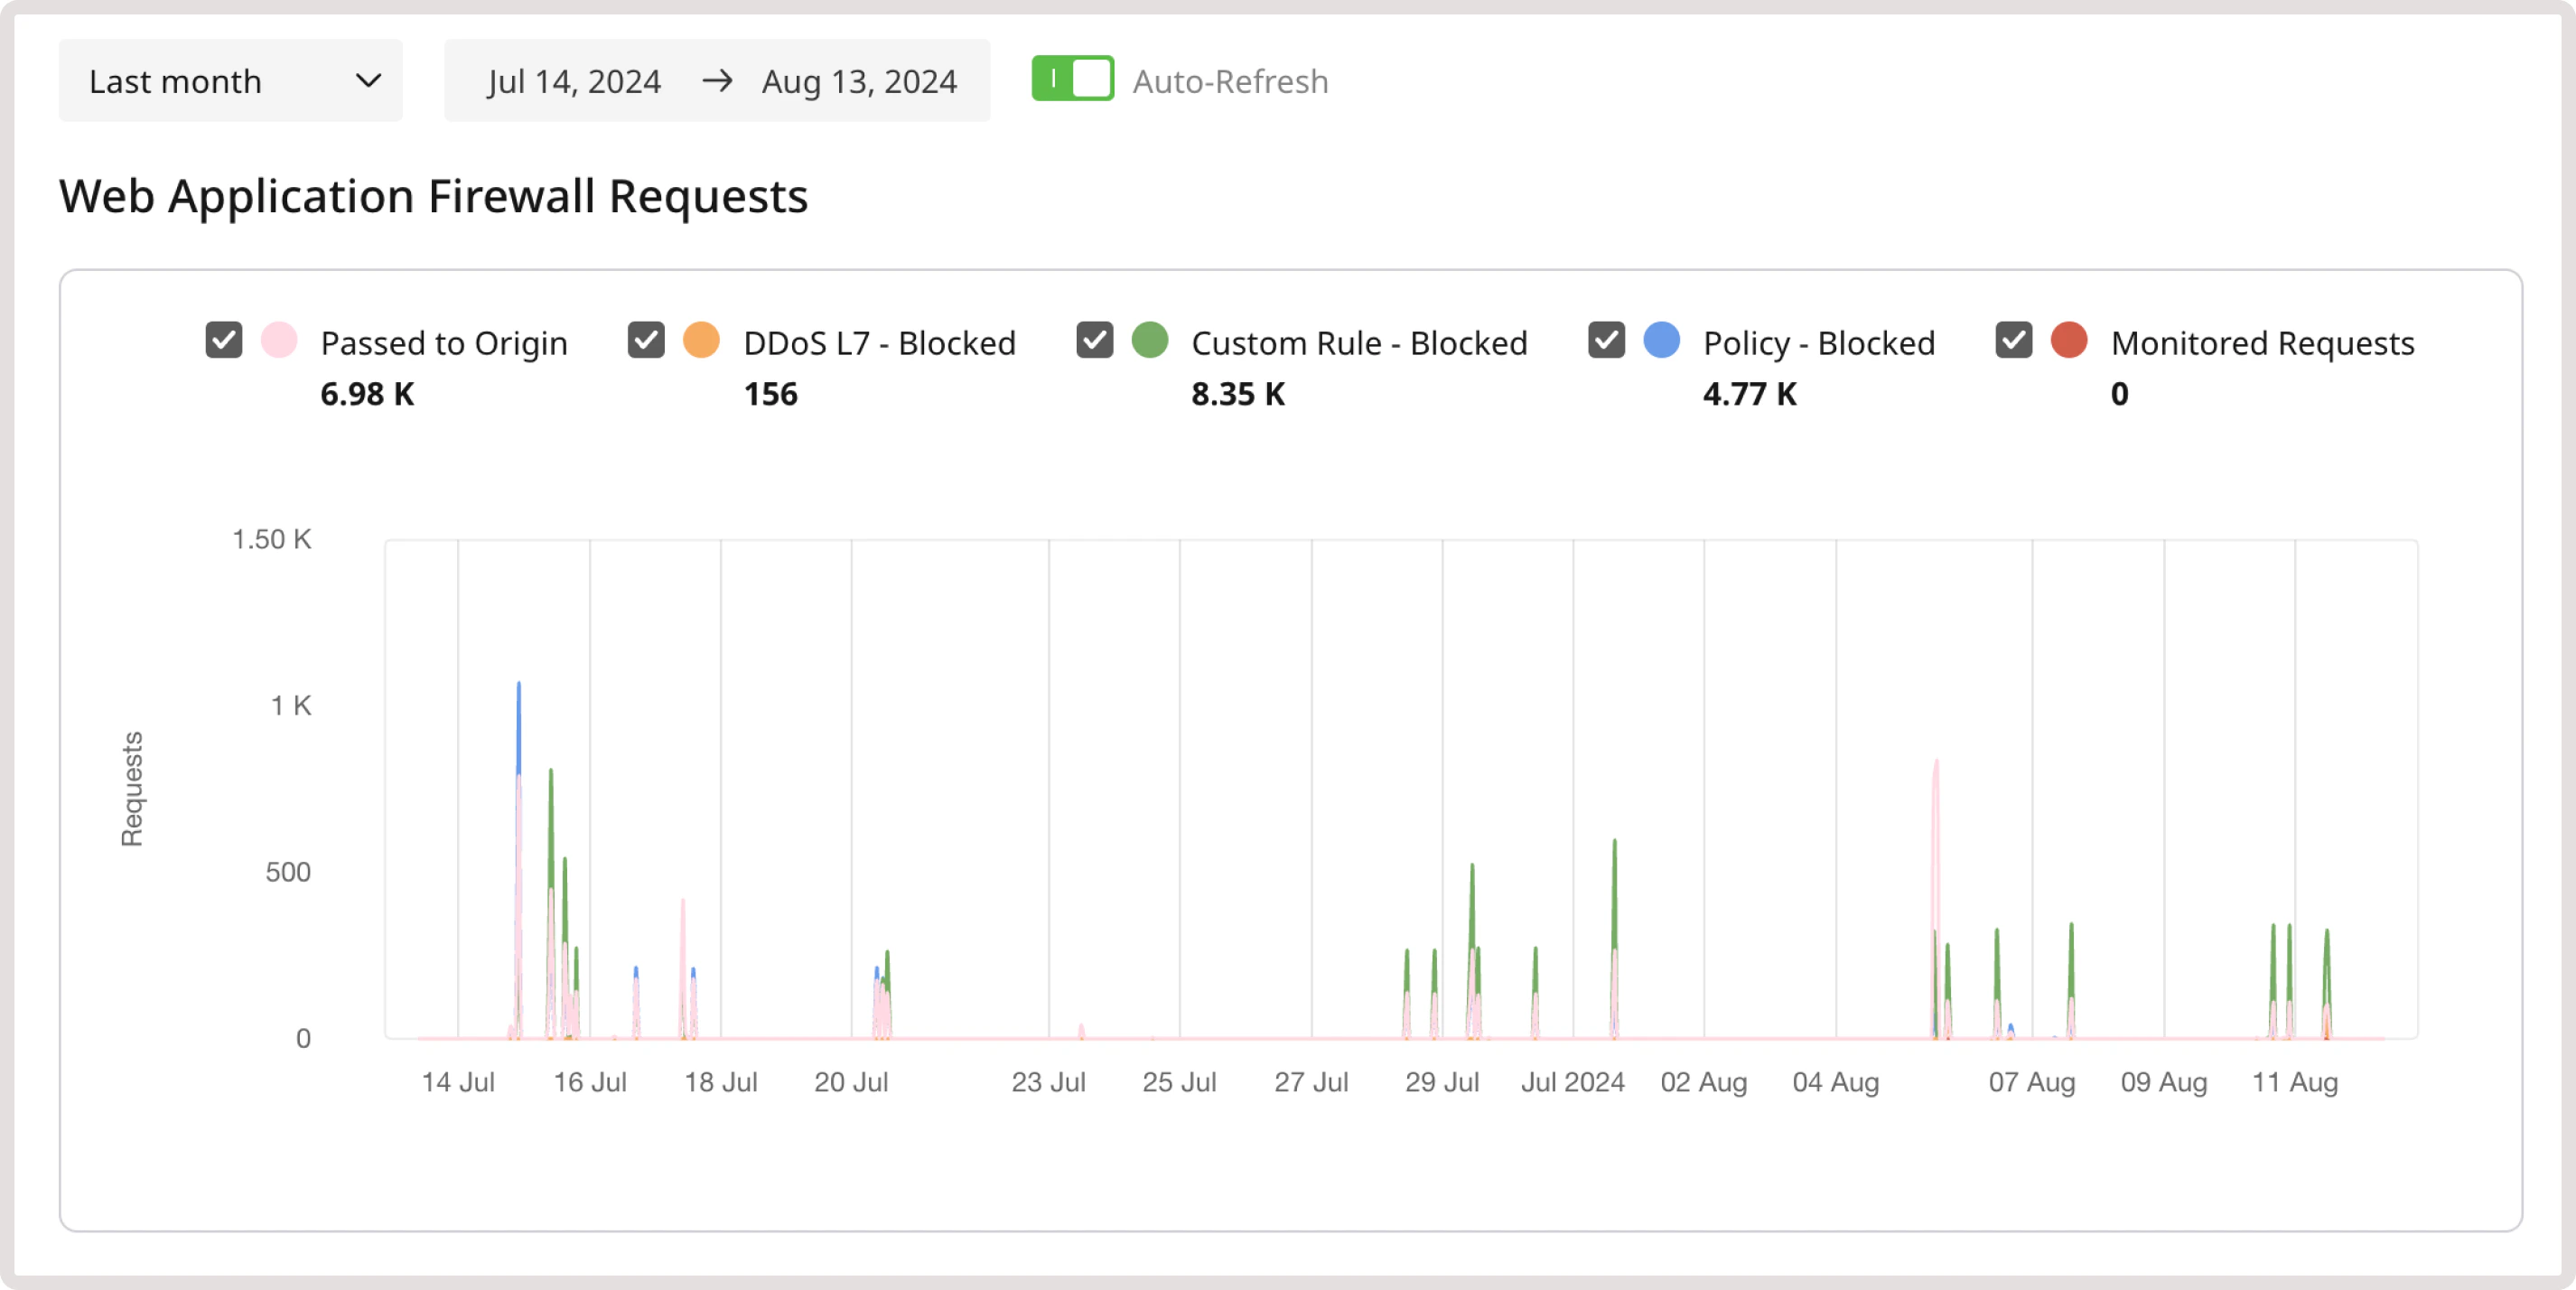
If you want to track certain traffic on the WAAP analytics page, use the reserved monitor tag. Each request marked with this tag will appear:- On the Web Application Firewall Requests graph. Enable the Monitored Requests checkbox to view all tagged requests.
- In the Requests table. Select the Monitored traffic type to view the tagged requests.
Sample rule with the monitor tag
As an example, create a rule that will allow you to view analytics on monitored requests from particular countries: 1. In the IF section, select Country from the dropdown. 2. In the following dropdown, select - to apply the rule to every request that comes from the relevant country. 3. Select Equals to trigger the rule only when the request comes from the specified country. 4. Choose the needed country from the list. 5. In the THEN section, select the Tag action and choose Monitor. 6. Click Save to create the rule.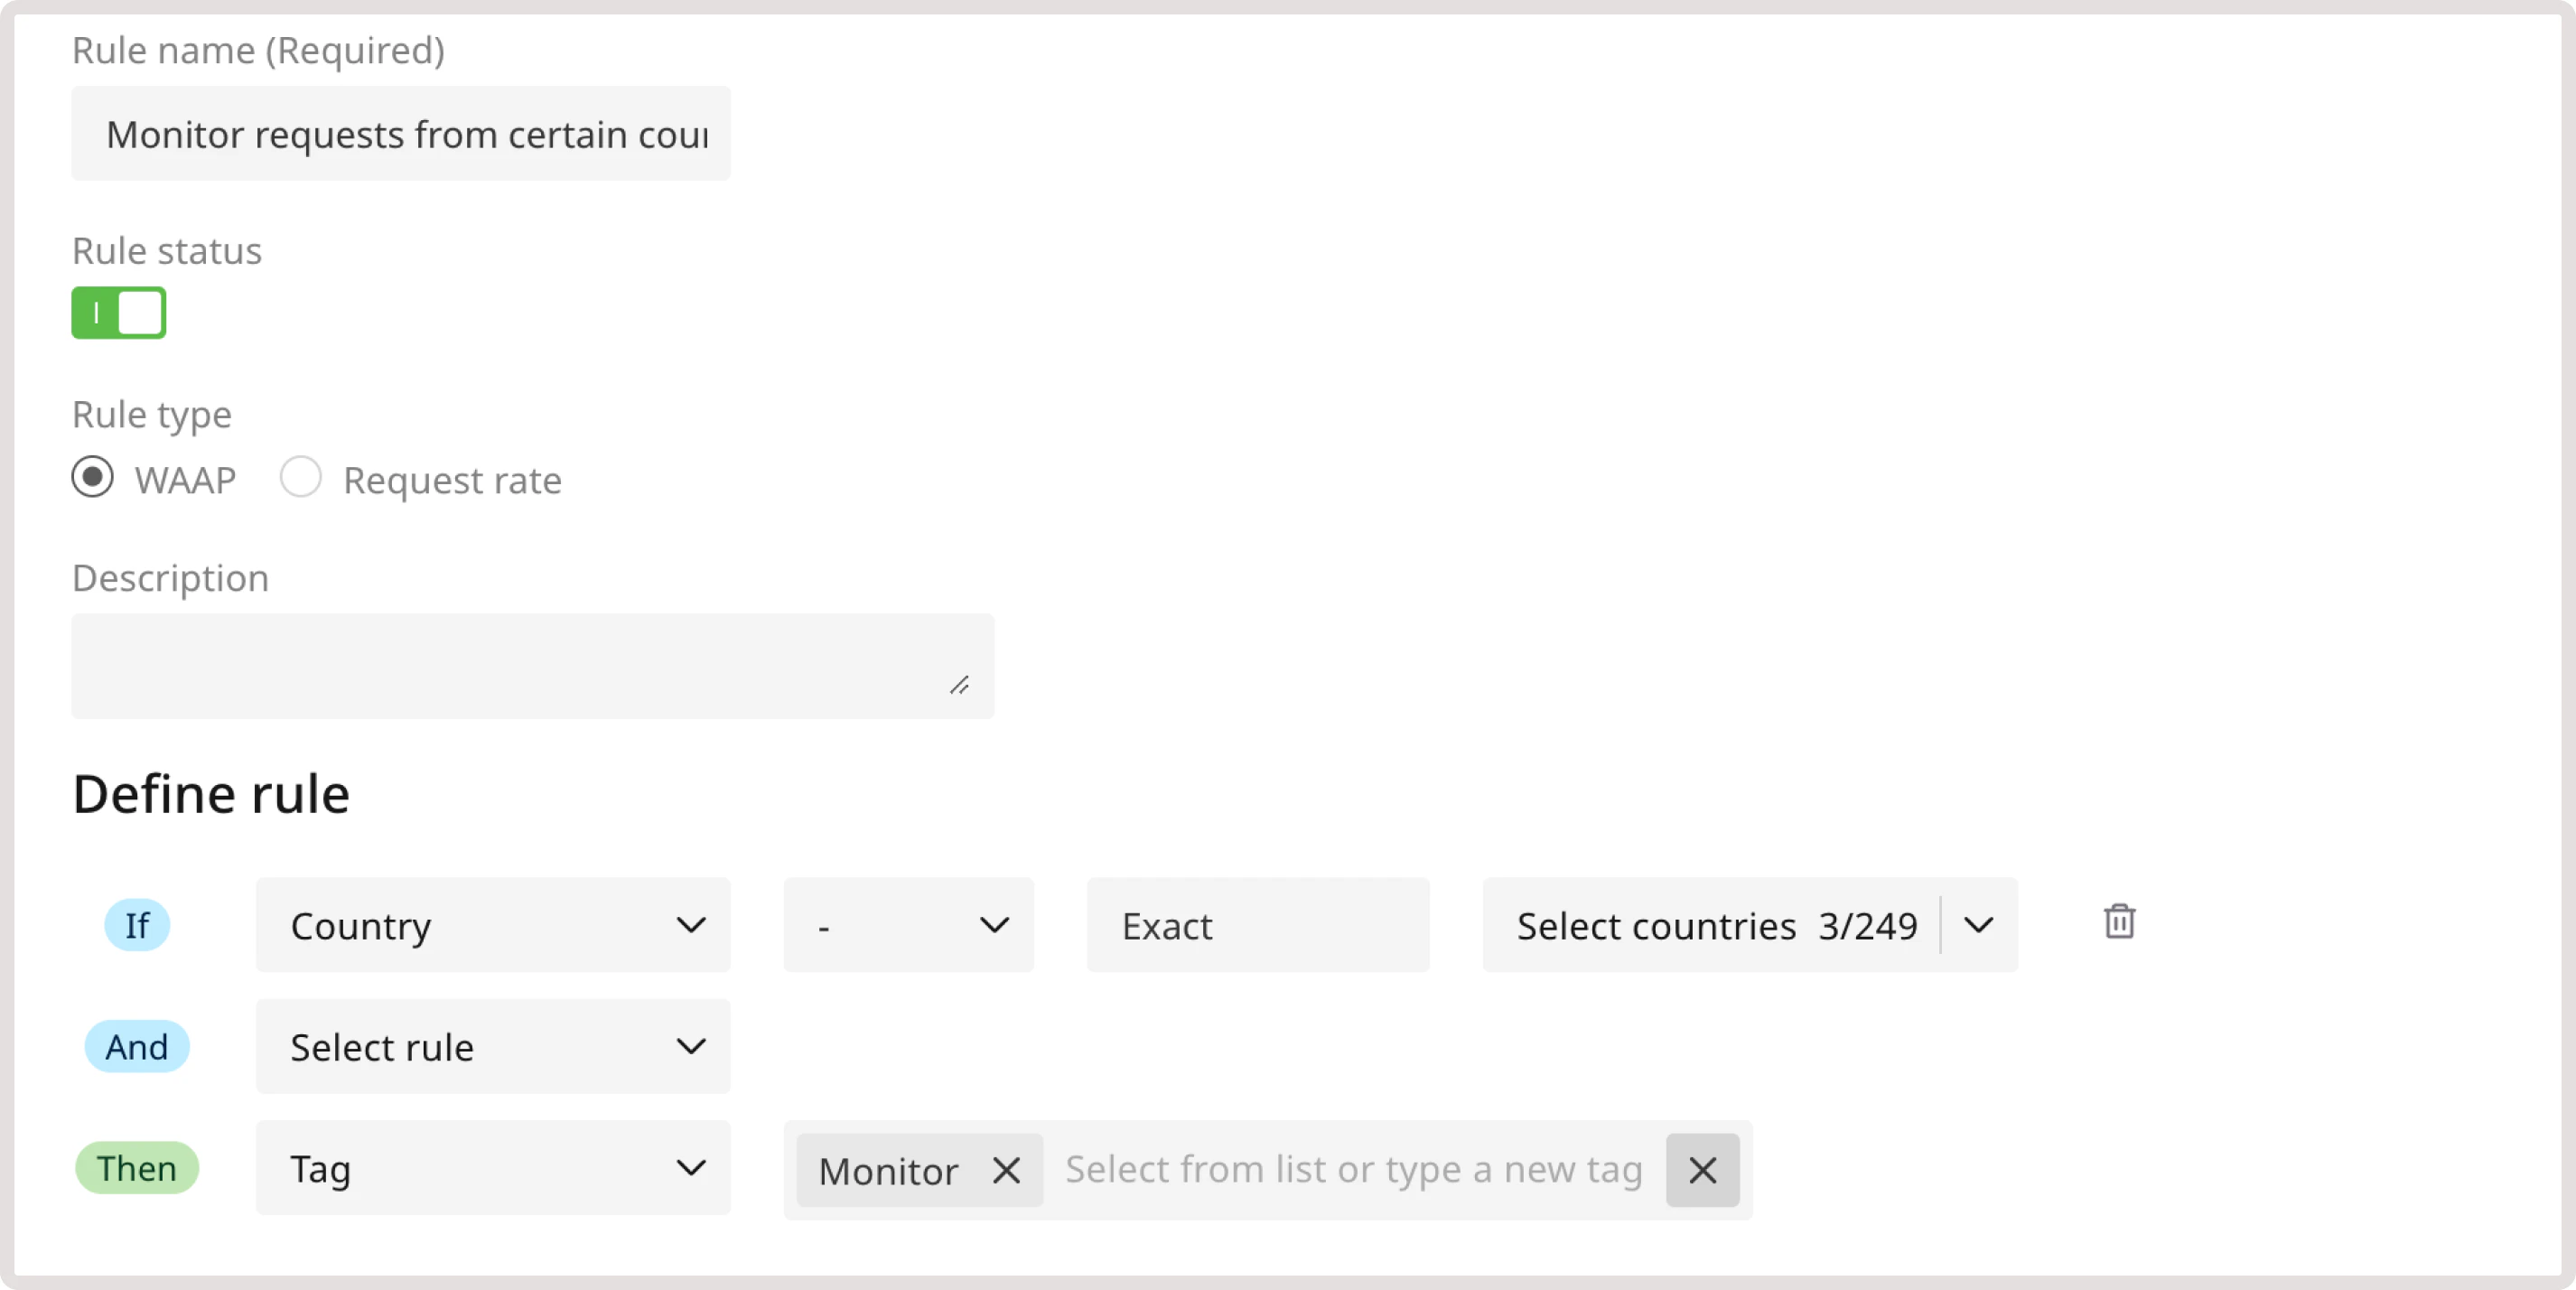
Ignore automation services
This functionality will notify WAAP of legitimate automation behavior and exclude requests from being affected by our Anti-automation and bot protection policy group. This means that you stay protected from unknown automation services while allowing known bots to access your domain. To allow the activity of some automation services, create a custom rule with the Ignored Automation tag: 1. In the IF section, select User Agent from the dropdown. 2. In the following dropdown, select - to apply the rule to every request that comes from the relevant bot. In this example, “mybot”. 3. Enter the bot in the User Agent field. 4. In the THEN section, select the Tag action and choose Ignored Automation.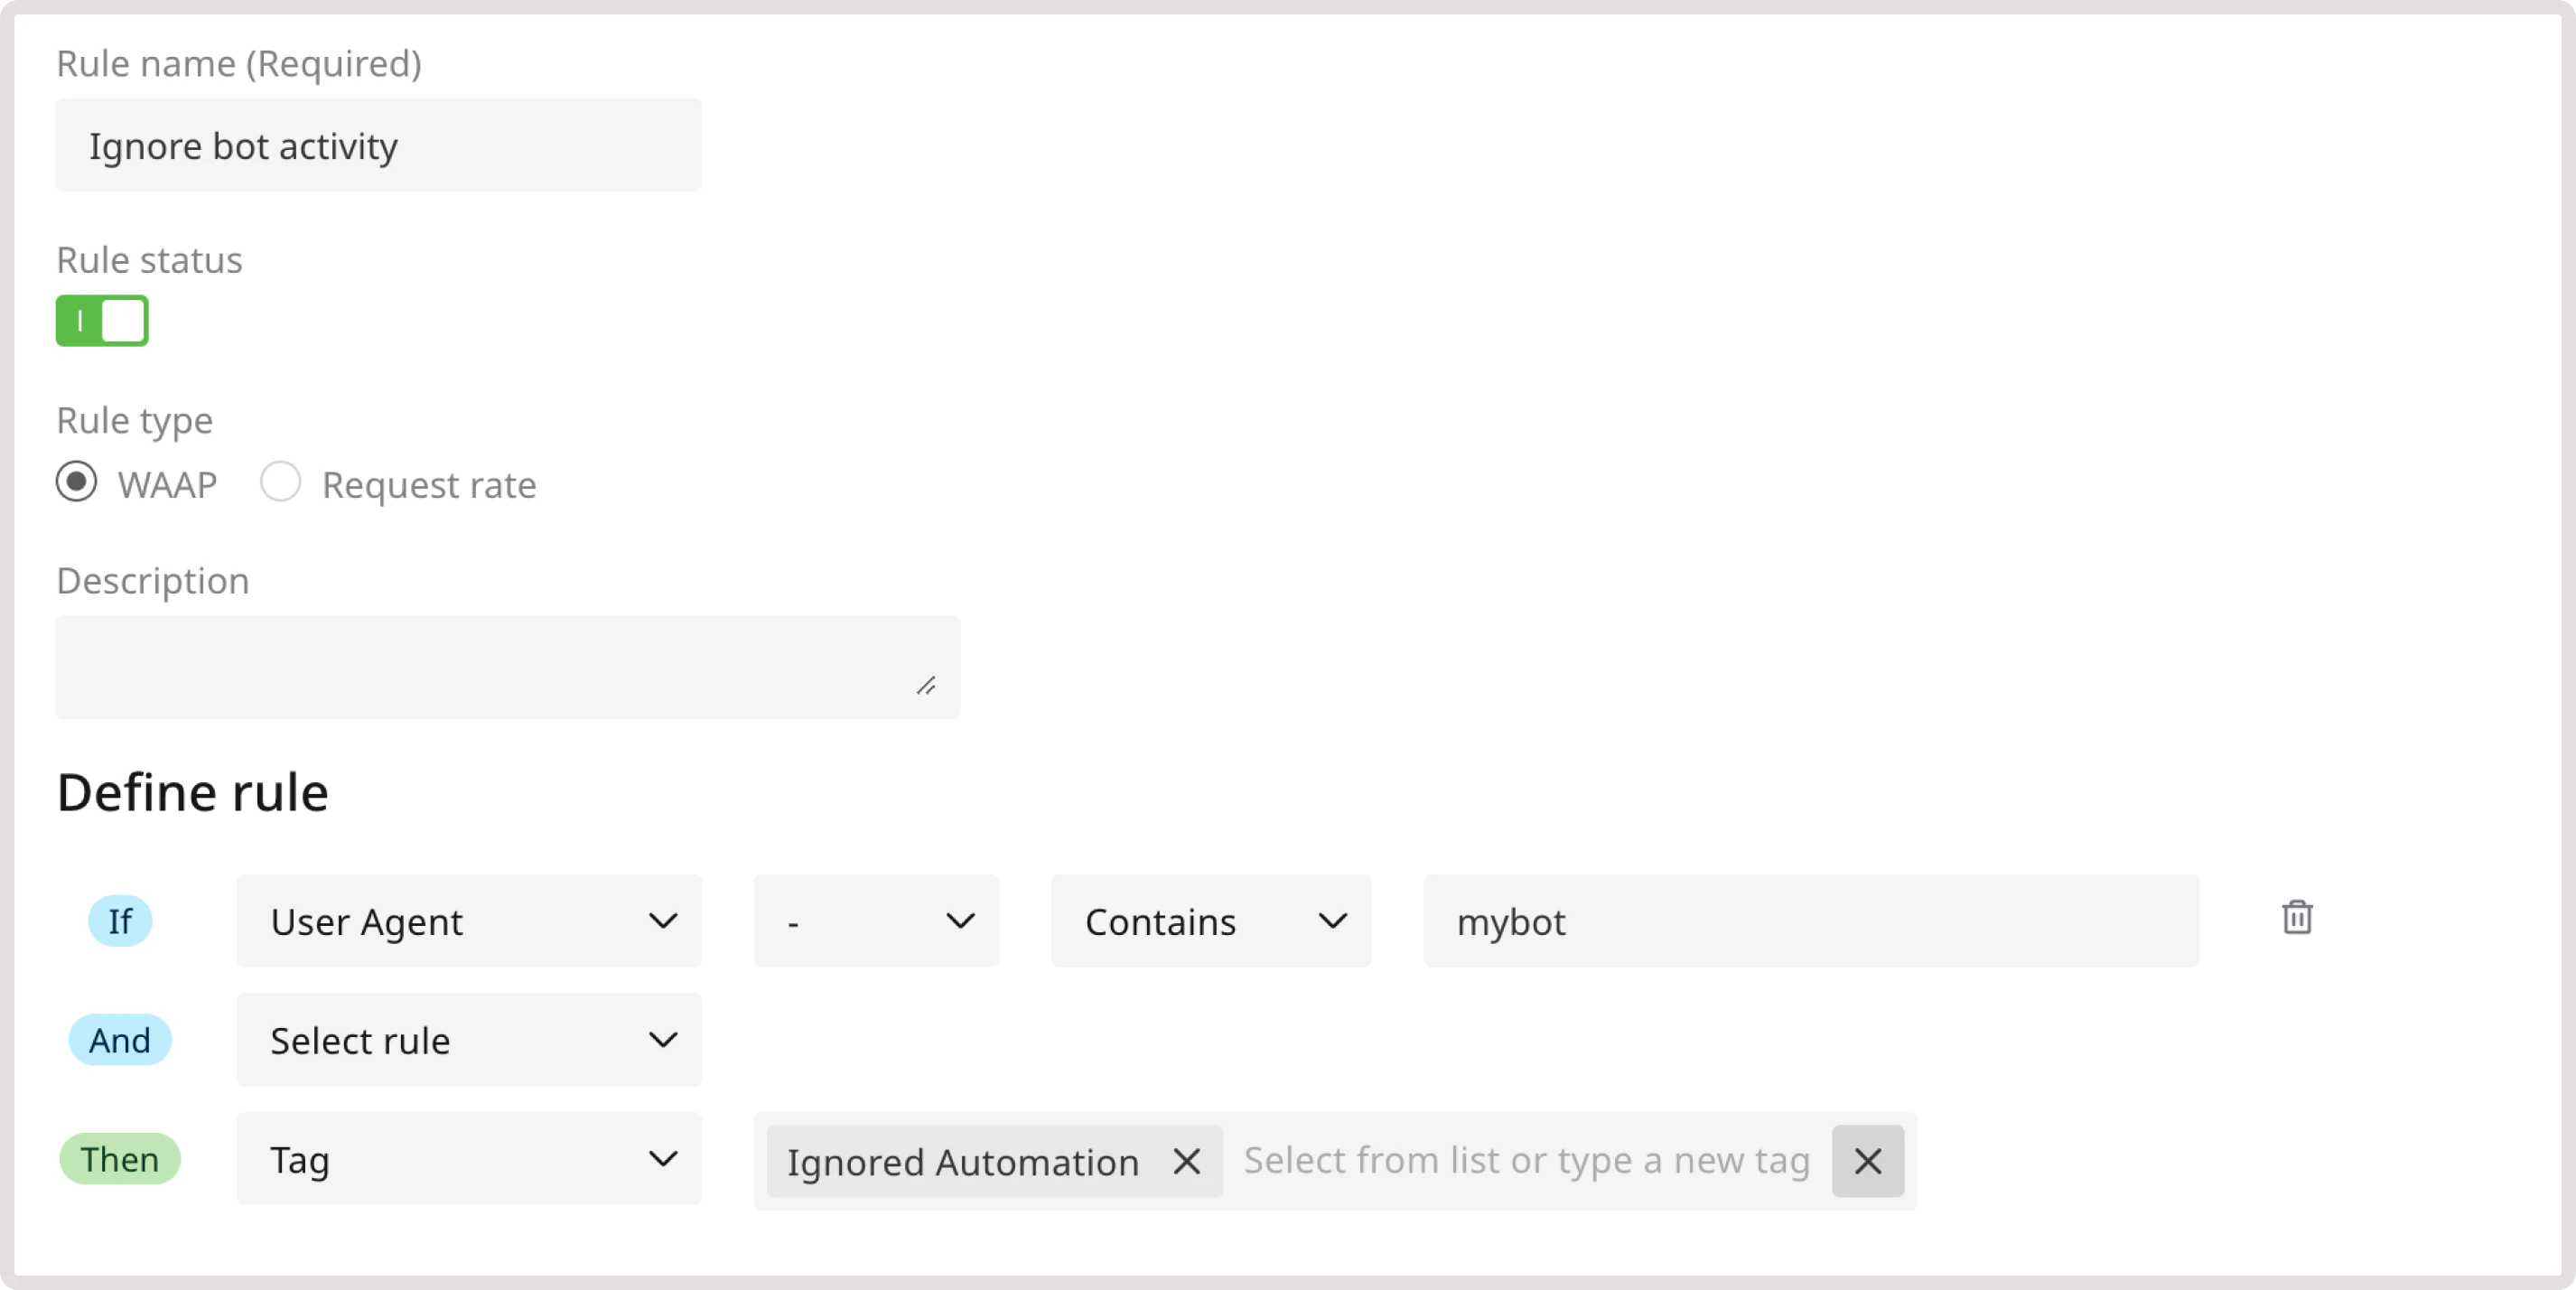
Protect login pages
Use this tag to notify WAAP if certain endpoints are used as login pages. This functionality will help identify such threats such as brute force attacks. To identify login pages for the WAAP, create the following custom rule: 1. In the IF section, select URL from the dropdown. 2. In the following dropdown, select - to apply the rule to the exact endpoint. 3. Provide the login page endpoint. 4. In the THEN section, select the Tag action and choose Login Page.
Detect malicious and legitimate activity
Gcore WAAP has preconfigured thresholds that identify and tag requests as malicious or legitimate. This works as follows: 1. Our heuristic models check for good and bad behavioral patterns associated with a particular request. 2. Based on the analyzed behavior, the request is tagged as either malicious or legitimate. The relevant tag sticks to the client based on identifiers like the IP or session data. 3. If the client behavior changes, our heuristic models can remove the previous tag and update it either to a legitimate or malicious one. However, the tag can only be replaced after the client consistently demonstrates a particular behavior, meeting the defined threshold. This threshold represents the number of times a request has to be tagged as malicious or legitimate until it sticks to the client. For example, if the threshold for declined orders is set to three, and the threshold for successful orders is set to two, then a client would be considered a legitimate actor if it made two successful orders after being wrong twice.Sample rule with the legitimate and malicious activity tags
Using the legitimate activity and malicious activity tags, you can categorize particular requests based on the behavior they exhibit. To do so, create the following custom rule: 1. In the IF section, select Header from the dropdown. 2. In the Header key field, enter cookie. 3. In the following dropdown, select - to apply the rule to the exact header. 4. Select Contains to trigger the rule even when the header partially matches the specified one. 5. In the Header key field, enter paid. 6. In the THEN section, select the Tag action and choose Legitimate Activity.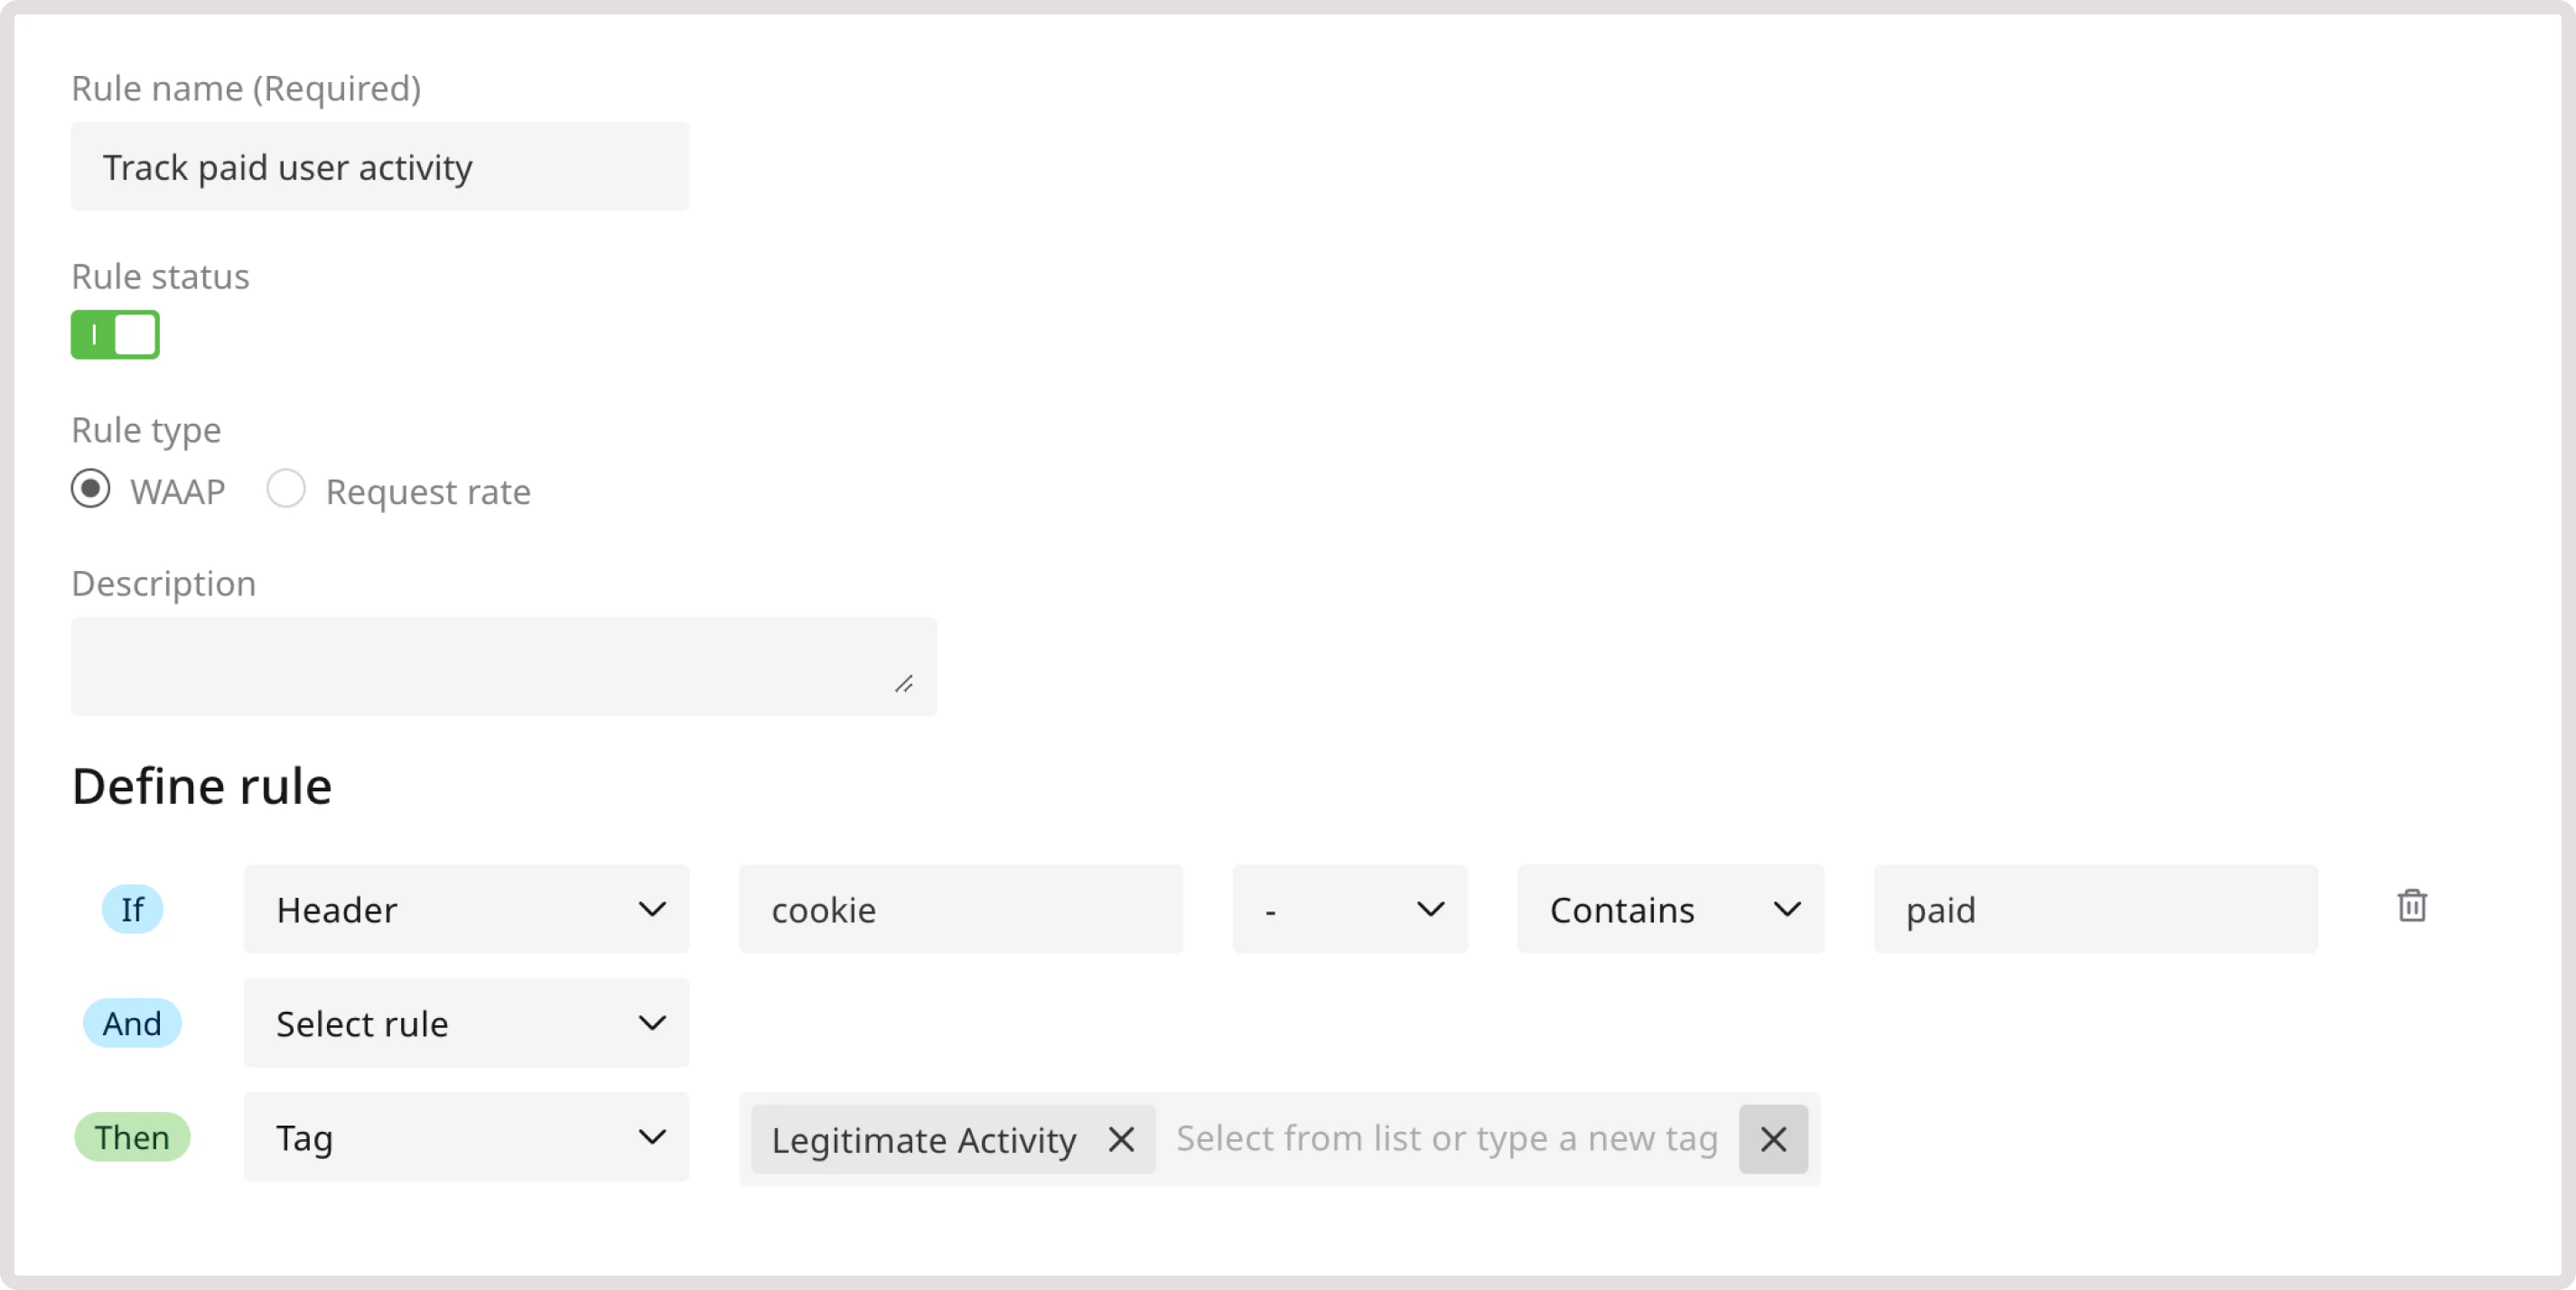
InfoContact our support team to get additional configuration for the malicious activity and legitimate activity tags.
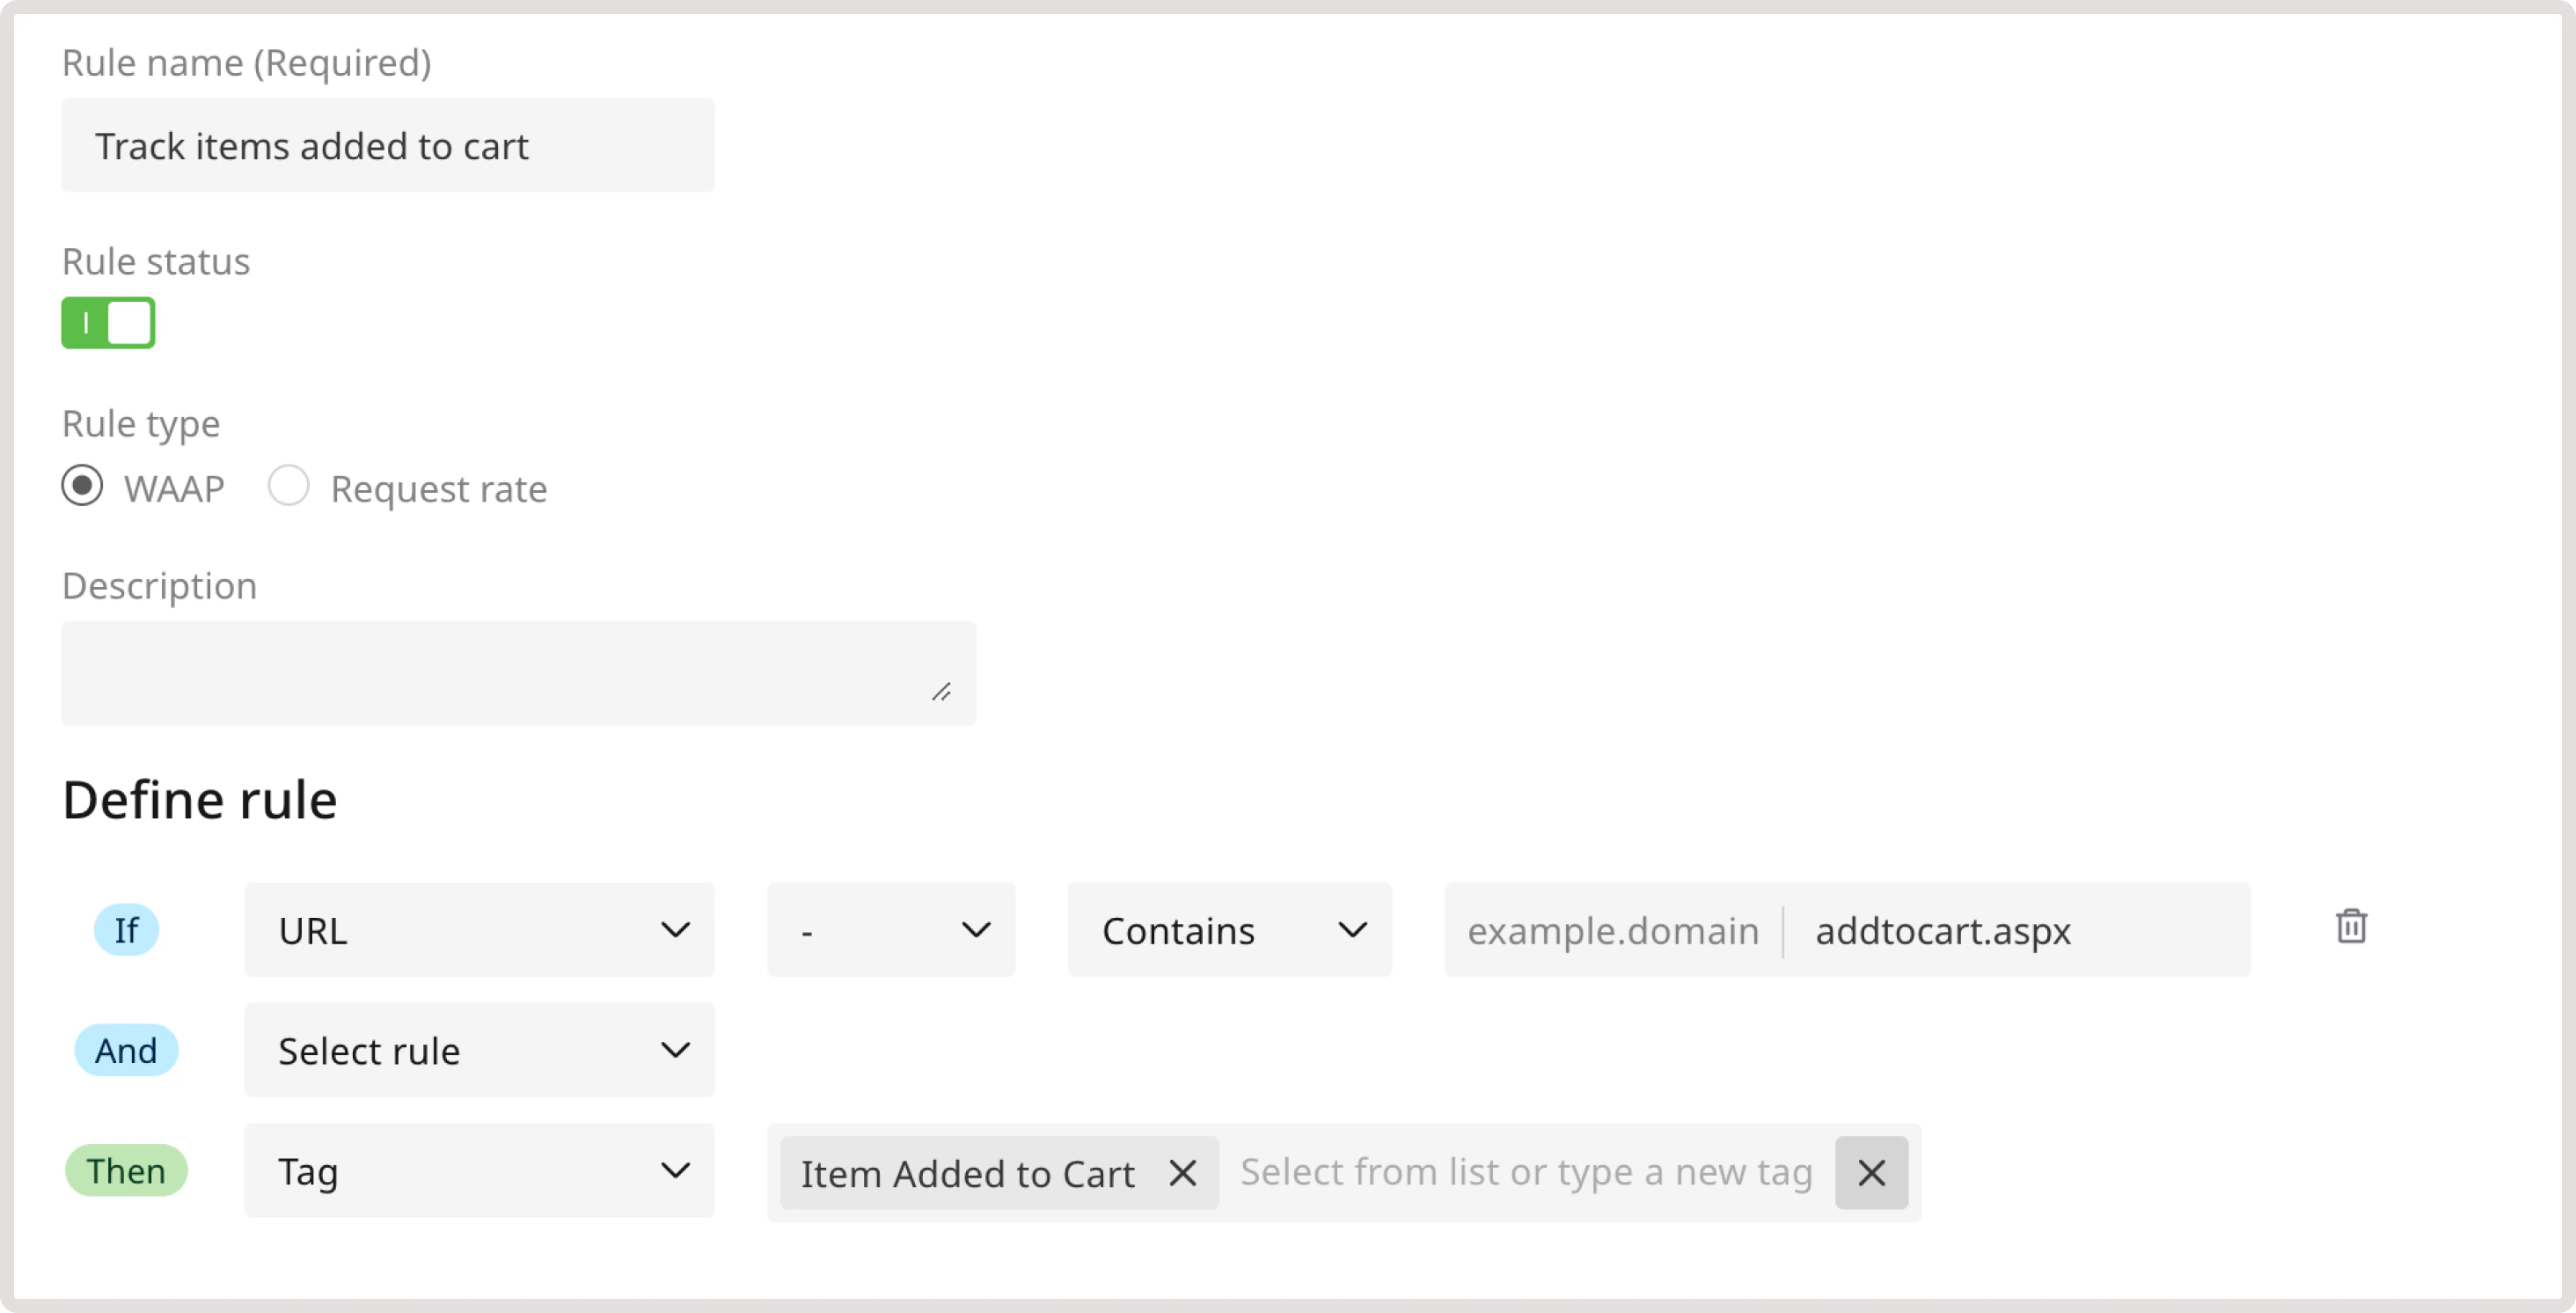
Detect denial of inventory
You can create custom rules with reserved tags to prevent denial of inventory (inventory hoarding) attacks. This mitigation method aims to detect hoarder bots that use endpoints to rapidly add items to a cart without completing the purchase. WAAP will calculate the number of items in each client’s cart and compare the number to the threshold configured by support. If the threshold is exceeded and the client doesn’t check out the order, WAAP will tag this client as hoarderbot. To detect denial of inventory, create the following rule: 1. In the IF section, select URL from the dropdown. 2. In the next dropdown, select - to apply the rule only to the specified condition. 3. Define match criteria. Select Contains to apply the rule even when a URL partly matches the specified one. 4. Enter the checkout.aspx in the URL field. 5. In the THEN section, select the Tag action and choose the Cart Checkout tag.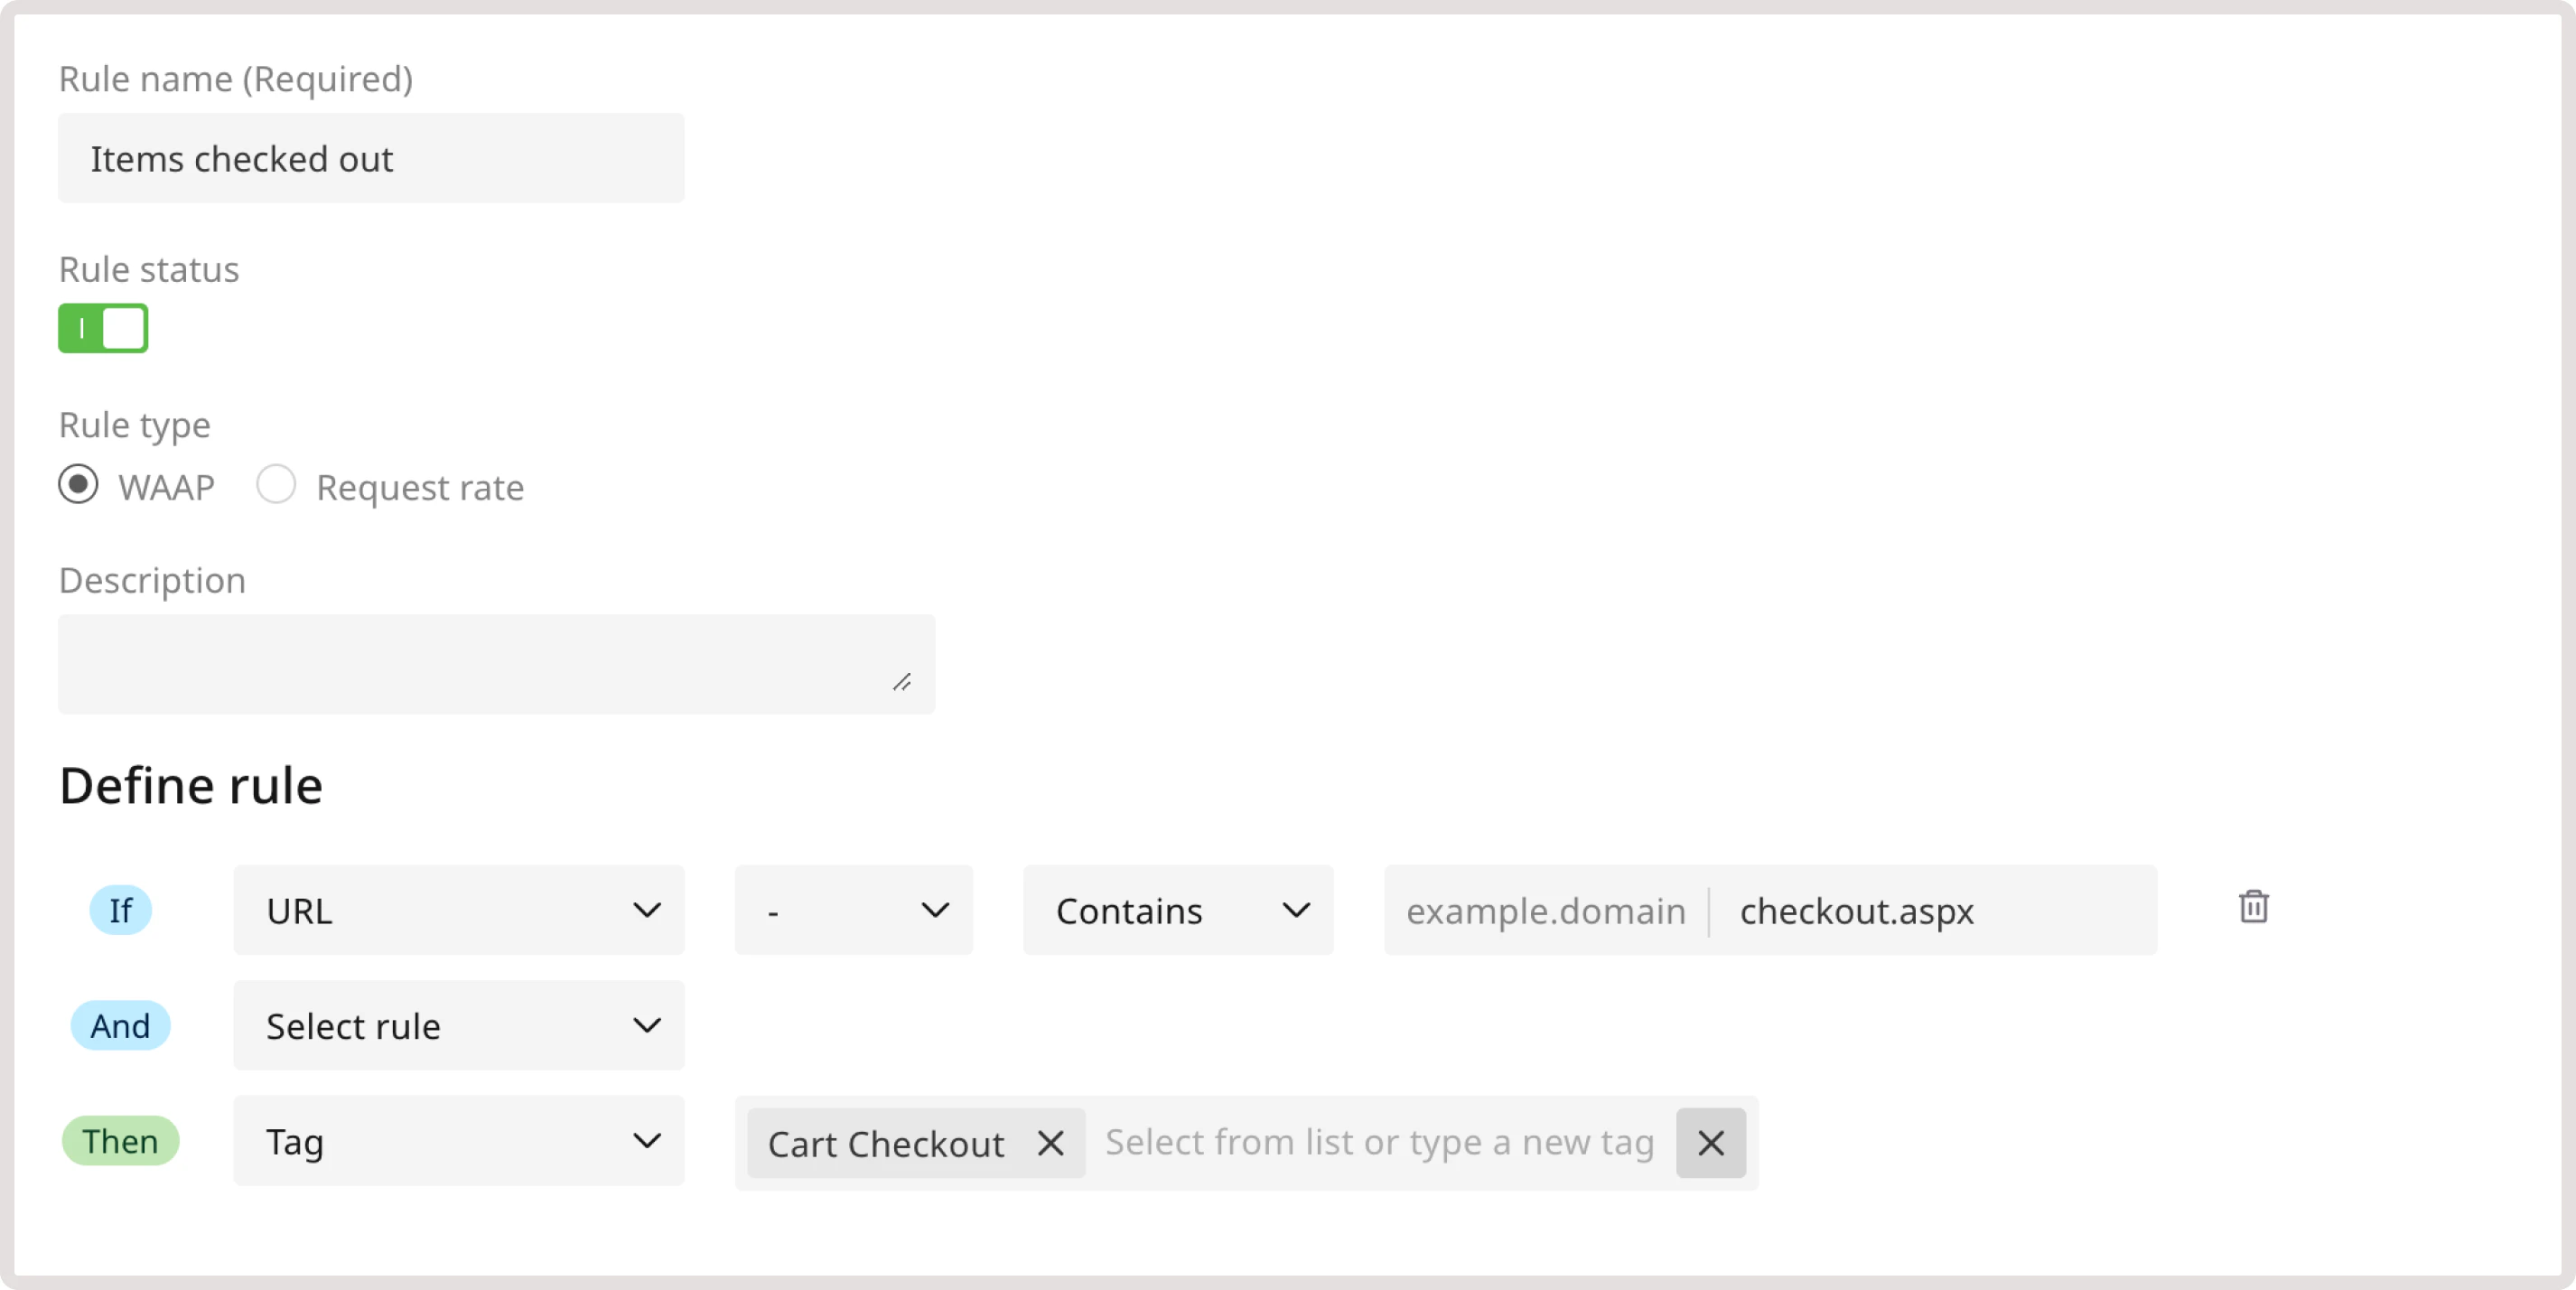
Use reserved tags for API protection
There’s a range of tags that you can use to manage access to API endpoints. These tags include:- API Privileged Access
- API Admin Access
- Indicate API Privileged User
- Indicate API Admin User
- Auth Endpoint
- Ignore Email Address Detection
- Ignore Phone Number Detection