API
The Gcore Customer Portal is being updated. Screenshots may not show the current version.
CDN
CDN
BillingCDN resources overviewOrigin groupPurgePrefetchReports
API
Chosen image
Home/CDN/CDN resource options/Image optimization (paid)/Image stack tools/Change quality

Change image quality

About the Quality feature

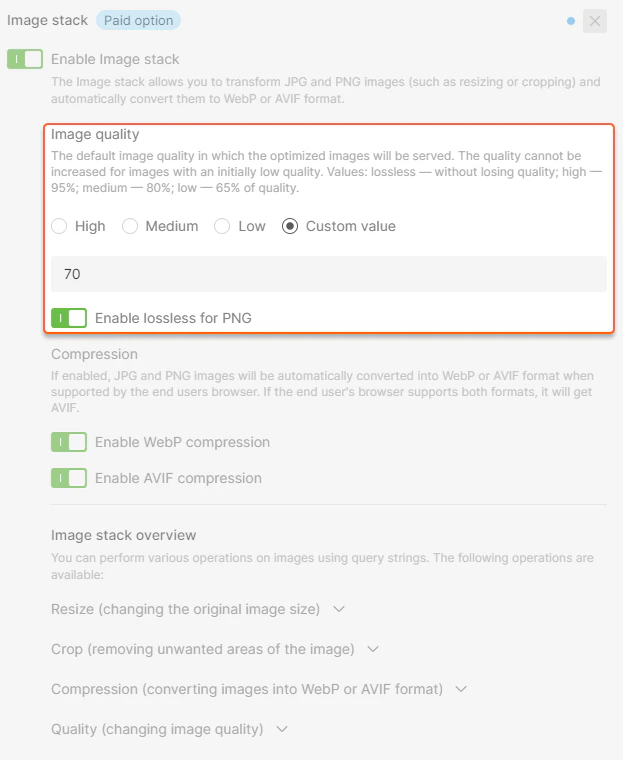
What is it? Quality is a feature included in the Image Stack option. The feature helps to reduce the quality of the images in conjunction with other features such as compression. Quality cannot be performed on its own and must be done as part of another feature. This means that you can’t just downgrade the quality of the picture without also changing its format to WebP or AVIF, or applying other features such as Crop or Resize.

Below is a photo to which we have applied the Quality feature. The appearance of the photo has not changed much, even though the last picture’s quality is half that of the original.

Example of high image quality Example of medium image quality Example of low image quality Example of custom value of image 
quality
 High (90%) Medium (80%) Low (65%) Custom value (50%) 

The final appearance of the image depends on its granularity and color scheme. So, if the image has a monolithic figure standing out against a contrasting background (e.g., a brown bird on a green background), the changes in quality will be more noticeable. If the image is detailed and non-contrasted, the changes will be less obvious.

How it works. To change image quality, you need to set the required option in the control panel or add the appropriate query string to the image URL in your website source. The configuration is described in the Use Quality section. When a user requests an image from the site, the CDN will change the image quality and deliver the modified image to the user.

For example: An origin server hosts a JPG image with its original quality, but you set the quality to Low (65%). When the image gets to the CDN cache, our CDN automatically reduces its quality. The origin still has the high-resolution image, but end users receive its low-resolution version.

Enable Quality

Quality is included in the paid Image Stack option. This option helps optimize images, such as by converting them to WebP or AVIF formats, cropping them, or changing their quality and size. To use Quality, you need to activate Image stack according to the "Enable Image stack" guide.

Use Quality

There are two ways to use the Quality feature: in the Control panel and by query strings. If you want to reduce the quality of all images, use the first method. If you want to reduce the quality of individual images you’ve added in query strings, use the second one.

Use Quality in the Control panel

1. Go to the Rules section in the settings of the CDN resource you want to apply Quality to and open the Image optimization rule.
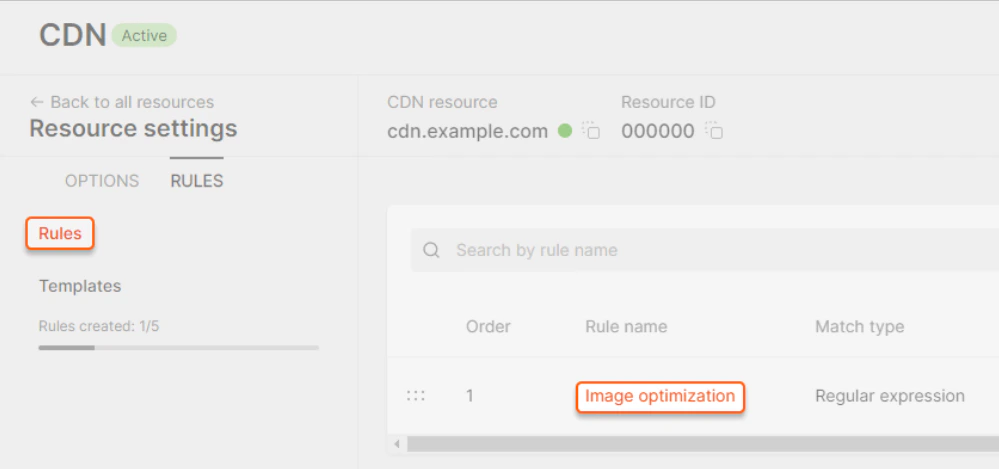
Control panel

2. Select one of the built-in presets: High (95%), Medium (80%), Low (65%), or set a Custom Value. By default, after enabling the Image Stack option, the quality will be High (95%).

You can also toggle on Enable lossless for PNG to avoid quality reduction for images with the PNG extension. If this function is enabled, the quality configurations are applied only for JPG images.

Note: You cannot set the quality to more than 100%.

Selection of the built-in presets

3. Click Save changes at the top right corner of the page.

The setup is complete. After that, images are delivered to end users at the quality you have set.

Use Quality via query parameters

1. Open the website source code.

2. Find strings with the URLs of the images whose quality you want to change.

3. Add the query strings to the URLs of the images as follows:

image.jpg?quality=value1&tool2=value2

where:

  • value1 is a number between 0 and 100
  • tool2=value2 represents query parameters for any other Image Stack function such as Compression, Resize, or Crop.

For example, to reduce the quality to 76%, convert it to AVIF format, and crop the area 200×200 px from the center, you should use the following query string:

image.jpg?quality=76&fmt=avif&crop=200,200

4. Save the changes in the website source code. Images on the website will now be shown to the end user with the quality that you set.

Let’s see how the photo of Charly, our business analyst’s pet, will change when we set different quality values.

Before After

Link: img.jpg

Size: 813 KB

Quality: 100%

The original image before WebP compression:
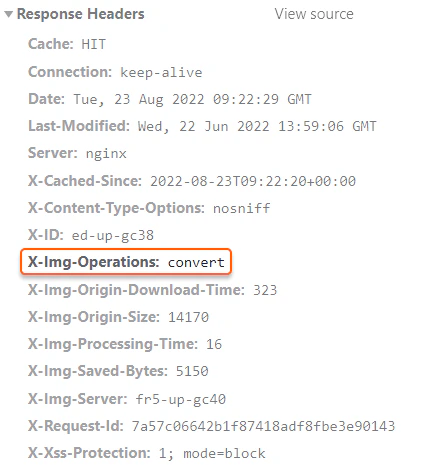
Before webp compression

Link: img.jpg?quality=95&fmt=webp

Size: 97.4 KB

Quality: 95%

The image with the default quality:

After webp compression

Link: img.jpg?quality=50&fmt=avif

Size: 97.4 KB

Quality: 48%

After avif compression 50%

Link: img.jpg?quality=10&crop=300,600

Size: 18.5 KB

Quality: 10%

After avif compression 10%

Check HTTP headers

After converting, an image does not change its URL or extension. So you can use the HTTP header value of the image to check if the changes have been applied.

The X-Img-Operations header reflects all the conversions performed. If the value includes “convert”, the image quality has changed.

Check HTTP headers

If the HTTP header contains no convert value and CDN returns the image with original quality, check the Img-Skip-Reason HTTP header. This will explain the reason why the operation could not be done. For example, “converted image bigger than origin value” appears when the value that you set is higher than the original one. You can also try to use Quality within other features.

Check HTTP headers

Was this article helpful?

Not a Gcore user yet?

Learn more about our next-gen CDN

Go to the product page