About the resize feature
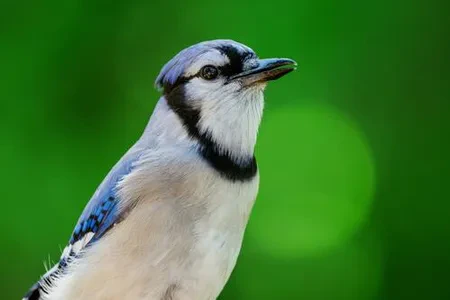
What is it? Resize is a feature that reduces the height and width of an original JPG or PNG before it is delivered over the CDN. You set the height, width, and reduction method (compression or cropping) for each image. Example. An origin server hosts an 1100×1500 px image, but you set the following Resize parameters: height=200, width=150. As soon as the image gets to the CDN cache, it is automatically reduced in size. As a result, the origin still has the 1100×1500 image, but end users receive the 200×150 reduced version:- Original image
- Resized image


Enable resize
Resize is included in the paid Image Stack option. This option helps optimize images, such as by converting them to WebP or AVIF format, cropping them, or changing their quality and size. To use Resize, you need to activate Image Stack according to the Enable Image Stack guide.Use resize
1. Open the website source code. 2. Find the strings with the URLs of the images that you want to reduce using Resize. 3. Add the query strings to the URLs of the images. A query parameter should be set as follows:Width
Width
Width compresses an image while preserving the aspect ratio of the original image. This parameter is used to set the target width of the new image in pixels. The height will be automatically adjusted to maintain the original aspect ratio.
Example. An origin server hosts a 900×600 image (W×H). You set the target width: width=300. The width must be reduced by three. The height will also be reduced by three, and you will get a 300×200 image.
Example. An origin server hosts a 900×600 image (W×H). You set the target width: width=300. The width must be reduced by three. The height will also be reduced by three, and you will get a 300×200 image.
- Before: image.jpg
- After: image.jpg?width=300

Height
Height
Height compresses an image while preserving the aspect ratio of the original image. This parameter is used to specify the target height of the new image in pixels. The width will be automatically adjusted to maintain the original aspect ratio.
Example. An origin server hosts a 900×600 image (W×H). You set the target height: height=300. The height must be reduced by two. The width will also be reduced by two, and you will get a 450×300 image.
Example. An origin server hosts a 900×600 image (W×H). You set the target height: height=300. The height must be reduced by two. The width will also be reduced by two, and you will get a 450×300 image.
- Before: image.jpg
- After: image.jpg?height=300
Fit
Fit
Fit controls how the image will be reduced: cropped from sides, compressed keeping the original aspect ratio, or compressed ignoring the original aspect ratio.
To use fit, specify both the width and height of a future image and then add the fit parameter as follows: image.jpg?width=300&height=100&fit=…
If you specify only width and height, without the fit parameter, the default value fit=fit will be applied.There are four possible values for fit:
To use fit, specify both the width and height of a future image and then add the fit parameter as follows: image.jpg?width=300&height=100&fit=…
If you specify only width and height, without the fit parameter, the default value fit=fit will be applied.There are four possible values for fit:
- Before: image.jpg
- After

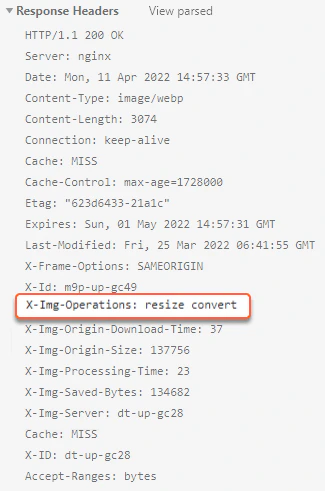
Check HTTP headers
You can use the HTTP header value of the image to check if the changes have been applied. The X-Img-Operations header reflects all the conversions performed. If the value includes “resize”, the image size has changed.