Configure a 10 Gbps interface for Ubuntu/Debian servers
1. Install the necessary tools: ethtool, net-tools, and nano. Instead of nano, you can use a text editor of your choice.ip
You will get the similar output where ‘eth0’ is the required interface.

ifconfig’ command instead.
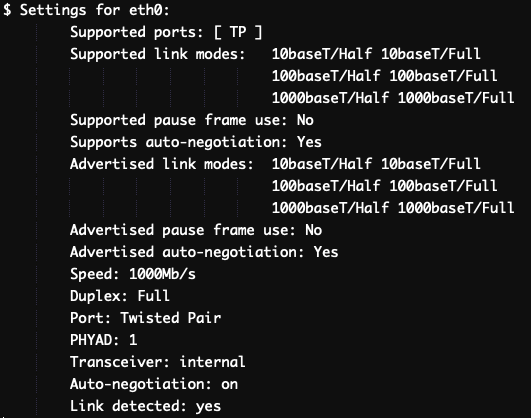
3. Check the settings of the interface:

1000baseT/Full’, which means the interface supports a maximum speed of 1 Gbps.
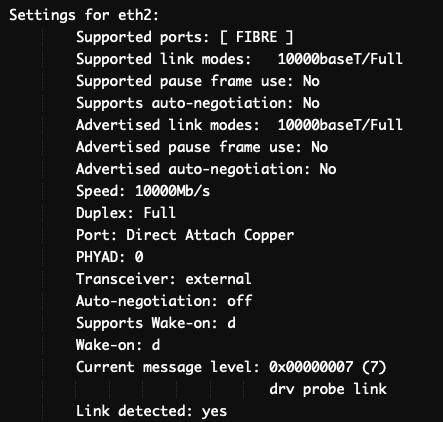
You need to find an interface that would mention ‘10000baseT/Full’, which means that the interface supports a speed of 10 Gbps.
4. Check other interfaces, including inactive ones:

ifconfig’ command instead.
5. Activate inactive interfaces:
eth1 and eth2 interfaces. If you are using an older version of Linux,and the ‘ip link set eth1 up’ command is not found, you can try using the ‘ifconfig eth1 up’ command instead.
You can verify that the interface is up by using the following command to view the status of the interface: ip
If the interface is up, you will see the line state UP in the output. If the interface is down, you will see the line state DOWN.
If you are using an older version of Linux, and the ‘ip’ command is not found, you can try using the ‘ifconfig’ command instead.
6. Run the following command for each interface until you find the one that supports 10 Gbps.

nano /etc/network/interfaces’ command instead.
In the network configuration file, find every line where eth0 is mentioned and change it to eth2. Note that the lo interface doesn’t require any changes.
8. Save the changes to the file and exit the text editor. You will need to reboot the server for the changes to take effect.
9. After the reboot, you can use the ethtool command to verify that the active interface is set to 10 Gbps.
If you fail to connect, it may indicate that something went wrong. You can use IPMI to recover your server or try reinstalling the OS.
Configure a 10 Gbps interface for CentOS
1. Install the necessary tools: ethtool, net-tools, and nano. Instead of nano, you can use a text editor of your choice.ip
You will get the similar output where eno1 is the required interface.

ifconfig’ command instead.
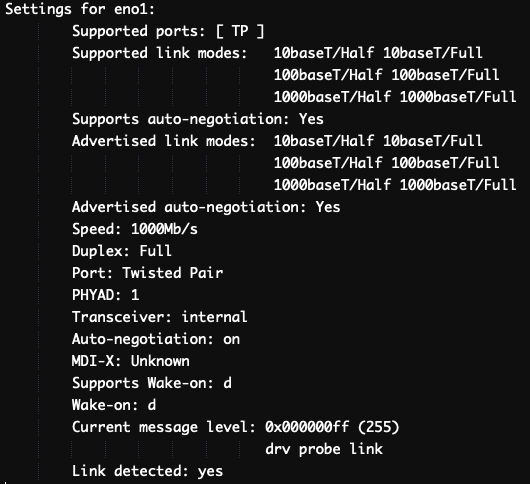
3. Check the settings of the interface:

1000baseT/Full’, which means the interface supports a maximum speed of 1 Gbps.
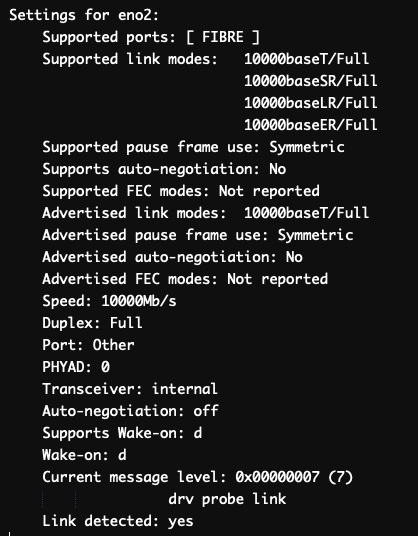
You need to find an interface that would mention ‘10000baseT/Full’, which means that the interface supports a speed of 10 Gbps.
4. Check other interfaces, including inactive ones:

ifconfig’ command instead.
5. Activate inactive interfaces:
ip link set eno2 up’ command is not found, you can try using the ‘ifconfig eno2 up’ command instead.
You can verify that the interface is up by using the following command to view the status of the interface: ip
If the interface is up, you will see the line state UP in the output. If the interface is down, you will see the line state DOWN.
If you are using an older version of Linux, and the ‘ip’ command is not found, you can try using the ‘ifconfig’ command instead.
6. Run the following command for each interface until you find the one that supports 10 Gbps.
