
Curl is a versatile tool used for transferring data over a plethora of protocols. Whether you’re a developer, system administrator, or simply an enthusiast, knowing how to install Curl on Ubuntu can streamline your web interactions. In this guide, we’ll walk you through a straightforward process to get Curl up and running on your Ubuntu machine.
What is Curl Command in Linux?
Curl (Client URL) is a command-line tool used for transferring data with various protocols, including HTTP, HTTPS, FTP, and many more. Ubuntu, being one of the most popular Linux distributions, often has curl available in its software repositories. This allows users to easily install and update curl using Ubuntu’s package management tools like apt.
On Ubuntu, as with many Linux distributions, curl is used for numerous tasks including:
- Fetching web content. You can use curl to download files or web pages from the command line.
- API interactions. Developers use curl to test and interact with RESTful services and APIs directly.
- Debugging and testing. curl allows users to view detailed network protocol data, making it useful for debugging network issues or application interactions.
- Data transfer. Beyond just HTTP and HTTPS, curl supports a wide range of protocols like FTP, SCP, LDAP, and more, making it a versatile tool for transferring data in various scenarios.
Installing Curl on Ubuntu
Here’s a step-by-step guide on how to install curl on Ubuntu:
1. Update the Package Index. Before installing any package, it’s a good practice to update the package list so that you get the latest version available. Run the command:
sudo apt update
2. Install curl. Now, you can install the curl package.
sudo apt install curl
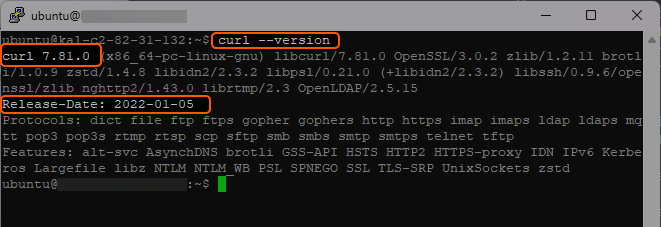
3. Verify Installation. After installing, you can check the version of curl to verify that it has been installed correctly.
curl --version
This will output the curl version and the release date.
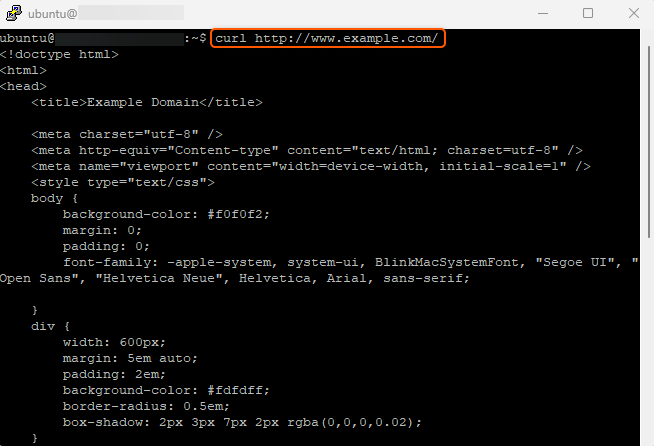
4. Testing curl. To ensure that curl is functioning correctly, you can use it to fetch the contents of a webpage. For example:
curl http://www.example.com/
This will display the HTML contents of the example.com webpage.
And that’s it! You’ve successfully installed and tested curl on your Ubuntu system.
Installing Curl on Ubuntu is a straightforward process that equips your system with a versatile tool for data transfers across various protocols. Whether you’re interacting with web services, downloading files, or debugging network issues, having Curl on your Ubuntu machine amplifies your command-line capabilities. By following a few simple steps, you can seamlessly integrate this powerful utility into your workflow.
Conclusion
Want to run Ubuntu in a virtual environment? With Gcore Cloud, you can choose from Basic VM, Virtual Instances, or VPS/VDS suitable for Ubuntu:
- Gcore Basic VM offers shared virtual machines from €3.2 per month
- Virtual Instances are virtual machines with a variety of configurations and an application marketplace
- Virtual Dedicated Servers provide outstanding speed of 200+ Mbps in 20+ global locations


