
Managing user accounts is a foundational aspect of Ubuntu system administration. Whether you’re setting up a shared workstation, configuring a server, or simply trying to understand who else has access to your system, knowing how to view users is crucial. In this guide, we’ll walk you through various methods to list and understand user accounts on Ubuntu, ensuring you have full visibility and control over your system’s access points.
Advantages of Viewing Users on Ubuntu
Knowing how to view users on Ubuntu brings several advantages, especially in terms of system administration, security, and user management. Here are some key benefits:
- Security and Monitoring. Identifying all users on the system helps in detecting unauthorized accounts that might pose security threats. By regularly checking active users can help you spot any unexpected or unauthorized access.
- System Administration. By viewing users, administrators can manage permissions, allocate resources, and set quotas more efficiently. This helps in diagnosing issues related to user-specific configurations and applications.
- Resource Management. Administrators can identify which users consume the most resources, potentially optimizing system performance.
- Troubleshooting. Knowing which users are currently logged in or were recently active can be valuable when diagnosing system issues or user-specific problems.
- Documentation and Reporting. For IT teams, having a clear view of all system users aids in documenting system setups and configurations
How to List All Users on Ubuntu
To begin learning how to view users on Ubuntu, follow this step-by-step guide.
#1 Open the Terminal
Your first step is to open the terminal. You can do this by searching for “Terminal” in the application menu or by using the keyboard shortcut Ctrl + Alt + T.
#2 List Users from /etc/passwd File
All users on a Linux system, including system users, are stored in the /etc/passwd file. To see a list of all users run this command.
cat /etc/passwd
Sample Output:
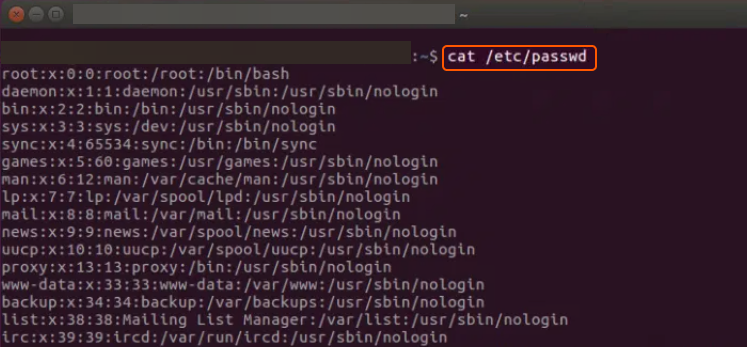
#3 Interpreting the Output
The /etc/passwd file’s output consists of multiple colon-separated fields. Here’s a quick breakdown of these fields:
| Username | The user’s login name. |
| Password | An x here indicates that the password is stored in the /etc/shadow file. |
| User ID (UID) | A unique user identification number. |
| Group ID (GID) | The primary group ID, which references a group in /etc/group. |
| User Info | This field can be used for extra user description, but it’s often left empty or just contains the user’s full name. |
| Home Directory | The path to the user’s home directory. |
| Command/Shell | The command/shell that’s executed upon user login. Typically, this will be /bin/bash for users, but it can be another shell or command, especially for system users. |
#4 Filtering for Human Users
Not all users listed in /etc/passwd are human users. Many are system users created for specific services. If you want to see a more concise list of human users, typically those with a user ID (UID) greater than 1000, you can use:
getent passwd {1000..60000} | cut -d: -f1
#5 Using the id Command
To get detailed information about a specific user, including their groups, you can use the id command followed by the username:
id username
Replace username with the name of the user you want to inspect.
Keep in mind, Ubuntu offers a variety of tools and commands to manage and access user information. The methods highlighted in this context are among the most frequently used. With this knowledge, you can now list all users on your Ubuntu system.
Conclusion
Want to run Ubuntu in a virtual environment? With Gcore Cloud, you can choose from Basic VM, Virtual Instances, or VPS/VDS suitable for Ubuntu:
- Gcore Basic VM offers shared virtual machines from €3.2 per month
- Virtual Instances are virtual machines with a variety of configurations and an application marketplace
- Virtual Dedicated Servers provide outstanding speed of 200+ Mbps in 20+ global locations


