For businesses, acquiring an email associated with their domain name is a must-know. For example, support@gcore.com is preferable to gcoresupport@gmail.com. A domain-based email creates a polished image for your company, leaving a positive impression on your clients. DNS MX (Domain Name System Mail Exchanger) records allow you to create and manage such email addresses. MX records act as pointers, ensuring your emails reach the intended recipients by guiding them to the correct mail server. By the time you finish reading, you will understand what MX records are, how they work, best practices, how to set up and use them, and their significance in seamless email delivery.
What Is a DNS MX Record and How Does It Work?
Imagine a mail server as your digital post office, collecting, sorting, and delivering your emails to the right recipients’ mailboxes. MX records serve as the postmen, taking mail on its digital delivery routes. The final destination is the recipient’s inbox, much like the final postal address. Without MX records, your emails would have no way to reach their mail server, so they wouldn’t be able to reach their intended recipient’s inbox.
MX records (Mail Exchanger records) are a type of DNS resource record that helps to guarantee that email messages are delivered successfully. DNS (Domain Name System) plays a critical role in making sure that MX records fulfill their purpose. For instance, let’s say you want to visit our website, gcore.com. The DNS system will guide you to our website by checking the IP address of our server. Similarly, when you send an email to support@gcore.com, the DNS system will refer to the MX record associated with gcore.com to determine which mail server should handle the message. So when you send an email, your email app or server will check the DNS to locate the MX record connected with the recipient’s domain.
What Are the Components of an MX Record?
Here is a table with an example of an MX record:
| Domain Name | Mail Server | Record type | Priority | TTL |
| @ (example.com) | mail1.example.com | MX | 10 | 3600 seconds |
| @ (example.com) | mail2.example.com | 20 | 3600 seconds |
Let’s take a deeper look at the various components of an MX record shown in this table.
In order to have a thorough understanding of the MX record, let’s examine each of its elements and functions in detail.
- Domain name. The domain name refers to the specific domain for which the MX record is configured, such as “example.com” or “example.org.” The “@” symbol is also commonly used in DNS records to represent the root domain name or zone origin, not only for MX records but for various other DNS record types. For example, if the domain is “example.com,” an MX record with the “@” symbol in the name field signifies that it applies to “example.com” directly. The left column (above) shows how this looks.
- Mail server. The mail server indicates the specific host name responsible for handling incoming emails for the domain. For instance, if the domain name is example.com, the mail server could be “mail.example.com” or “smtp.example.com.” The configuration may involve multiple mail servers, all based on the specific settings laid out by the email provider. These multiple servers work together to ensure seamless handling and delivery of emails, regardless of volume or traffic.
- Record type. The record type for MX records is always set to “MX” to identify them as Mail Exchanger records. The MX record type indicates that the record is used for routing emails.
- Priority. The priority field assigns a numerical value to each MX record, indicating the order in which email servers should be contacted. Lower values indicate higher priority, and servers with lower preference values are tried first. Certain email providers, such as Google, set one of their MX records to 0 to guarantee that their mail server is given top priority in the email routing process.
- TTL (time-to-live.) The TTL field represents the time duration in seconds for which the MX record should be cached by DNS resolvers. After the specified TTL expires, resolvers will refresh the record by querying the authoritative DNS servers again. In the chart above, the TTL of 3600 means the MX record will be cached for one hour.
How Does Email Communication Work?
Let’s take a closer look at how an email gets from the sender to the recipient with the help of an MX record.

Here’s a step-by-step breakdown of how email communication works, emphasizing the important role played by MX records.
- Sender composes and sends email. The sender creates an email and specifies the recipient’s email address.
- DNS lookup and MX record retrieval. The sender’s mail server performs a DNS lookup query, consulting the DNS server associated with the recipient’s domain. It retrieves the MX records, which identify the mail servers responsible for handling incoming emails, and determines the MX record’s components, such as associated IP addresses, priority values, and TTL.
- Sender mail server. The sender’s mail server establishes an SMTP connection with the selected mail server using the obtained IP address. An SMTP connection is a communication between two mail servers that facilitates the transfer of email messages.
- Email transfer. The sender’s mail server transfers the email to the recipient’s mail server over the SMTP connection. The sending mail server sends the email to the receiving mail server using a series of commands, including EHLO (Extended HELO,) MAIL FROM, RCPT TO, DATA, and QUIT. These commands ensure proper handshaking, message routing, and data transfer between the servers.
- Receiver mail server. The recipient’s mail server receives the email and conducts various checks, including spam filtering and authentication. After these checks, the email is delivered to the recipient’s mailbox.
In many cases, sending emails doesn’t require you to understand this process, or interact with it directly. However, there might be times when you need to set up a third-party email server, such as Microsoft or Google, or resolve issues with emails not being sent or received from a company server. It’s important for you to verify the proper setup by viewing the MX records. In the next section, we will explore how you can easily check the MX record of a domain name using a command prompt in a Windows OS.
How to View MX Records using NSLOOKUP
Keep in mind that the exact method for checking MX records may vary depending on your operating system. For Windows, we will be using the command prompt.
- Open a command prompt or terminal on your computer. To do this, type cmd on the Windows search bar, then click Command Prompt to open the app. Another option is the press the Windows logo key + R, then enter cmd and click OK.
- Type the following command and replace example.com with the domain name you want to check:
nslookup -type=MX example.com
- Press Enter to execute the command.
- The command output will display the MX records for the specified domain. Each MX record will typically include a priority value (prefixed with “Preference”) and the mail server address.
Non-authoritative answer:
Non-authoritative answer:
example.com     MX preference = 10, mail exchanger = mail.example.com
In this example, the MX record indicates that the mail server responsible for handling email for example.com is mail.example.com with a priority of 10.
Another way to view MX records is with the Dig (DNS lookup) tool.
How to Set Up an MX Record
In order to set up an MX record, you will need to access the DNS management settings for your domain. The process may vary slightly depending on your domain registrar or DNS hosting provider, but here are the general steps to follow.
#1 Identify Your Domain Name Provider
When purchasing and registering a domain name, such as example.com, it is common to do so through a domain name provider. The domain name provider acts as a host for your domain name and handles the management of your Domain Name System (DNS) records. These DNS records are responsible for connecting your domain name to your website, email services, and other online services.
If you’re uncertain about where you bought your domain name, use ICANN Lookup to discover your domain provider’s information. When using the tool, search for your domain name and navigate to the Registrar Information section, where you find your domain name provider.
It’s important to keep in mind that while your domain name provider typically handles DNS hosting, there are situations where it might be managed by a third-party company. Therefore, it is recommended to contact and verify with your domain host whether your DNS is hosted by them or by another company.
#2 Access Your DNS Management Settings
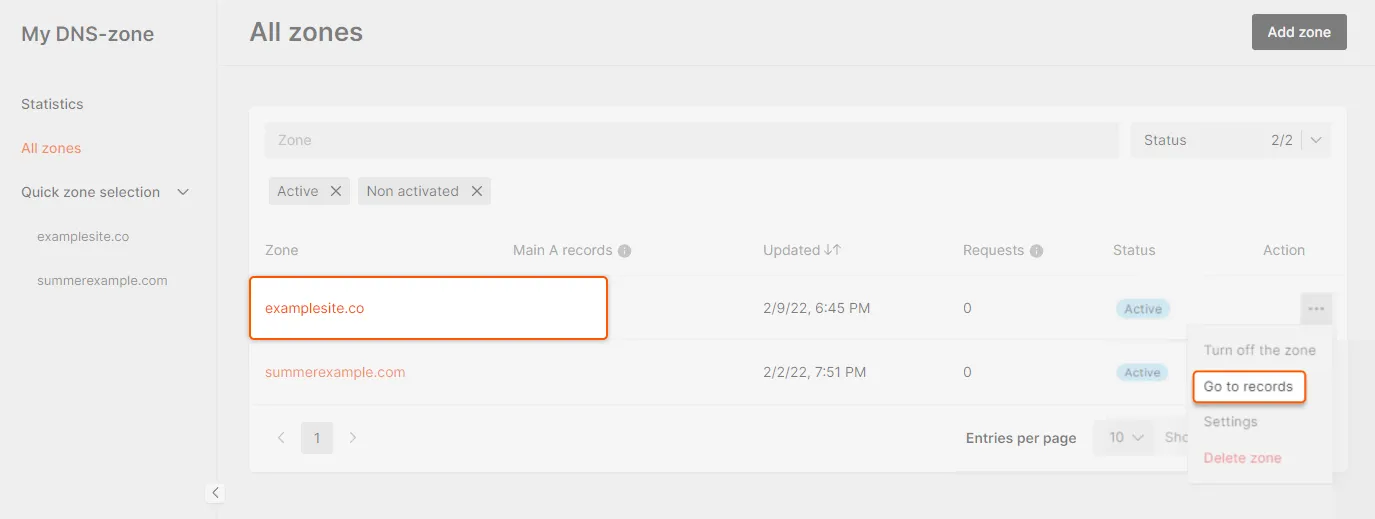
Now you have identified where your DNS is being hosted, log in to your DNS hosting account to access the DNS records for your domain name. Look for the DNS management section to get started. If you’re using Gcore for DNS hosting, click on the name of the zone or use the Go to records button to access the records for the specific DNS zone you need.
#3 Locate and Add the MX Records
Once you’re in the DNS settings, you should find an option to choose the type of record you want to add. For example, if you need to add Google MX records and you purchased a service before 2023, Google will typically require you to include 5 MX records on your DNS hosting server.
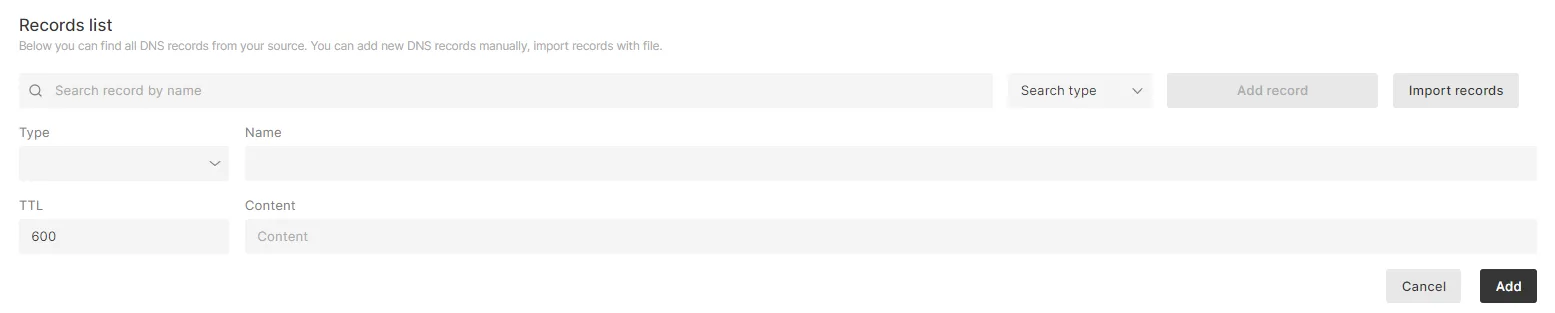
Here’s Gcore’s DNS records list, where you can select the record type, name (hostname,) TTL, and content.
#4 Save the changes and verify the MX record
After entering the MX record details, save the changes or update the DNS records. To ensure the MX record is correctly set up, you can use NSLOOKUP in Command Prompt (as we described earlier in this article,) test with online DNS lookup tools, or wait for the changes to propagate throughout the DNS system, which typically takes 48–72 hours.
MX Record Best Practices
Now you know how to set up MX records, let’s review some key best practices for configuring them.
Fully Qualified Domain Names (FQDNs)
Another term for FQDNs is absolute domain name, which means a domain written in a complete format to indicate the precise location of a computer or host. For example, instead of using “example.com,” it is more accurate to use “www.example.com” for a website or “mail.example.com” for a mail server. Instead of directly using IP addresses, it is recommended to use valid and fully qualified domain names for your MX records.
Example:
- Direct IP address [192.168.0.1]
- FQDN [mail.example.com]
In this example, the “mail.example.com” represents the FQDN. This ensures compatibility and facilitates the management and updating of your email infrastructure.
Load Balancing
Assign priority values (also known as preferences) to your MX records. This allows you to specify the preferred order of mail server destinations. The lowest value of the MX record is the highest priority; 1 is higher priority than 5. Strategically set up priority values to distribute the email load across multiple servers, a form of load balancing. Additionally, in the event that the higher-priority mail server becomes unavailable, lower-priority servers serve as backups.
Example: Imagine we have set up mailserver1 and mailserver2 as two MX records with different priorities. We have assigned the top priority to mailserver1 to ensure it receives the highest preference for email delivery. The second MX record, mailserver2, serves as a backup in case mailserver1 is unavailable or unreachable.
| Hostname | Priority | TTL |
| mailserver1.example.com | 10 | 3600 seconds |
| mailserver1.example.com | 20 | 3600 seconds |
TTL Management
Setting up the appropriate time-to-live (TTL) value is crucial in any type of DNS record, including MX records. Appropriate TTL values ensure a balance between caching efficiency and flexibility.
Redundancy
Having multiple MX records is essential for reliable email delivery. It is already a standard practice among email providers to have different MX records. This ensures that if one server becomes unavailable, incoming email messages can still be delivered successfully.
How Does Gcore DNS Hosting Help You to Manage DNS MX Records?
At Gcore, we provide a user-friendly interface to empower clients to manage their DNS MX records effortlessly. We have developed two comprehensive guides: one for non-advanced users and another for advanced interface mode (with balancing.) Our aim is to make DNS management accessible to everyone using our Gcore DNS hosting service.
We are committed to providing our clients with fast and dependable DNS hosting to ensure exceptional service. To achieve this, we prioritize three important factors:
- Superior performance. Global minimal response times guarantee that your applications load quickly and smoothly, meeting your users’ expectations for high-speed and hassle-free access.
- Mission-critical availability. We ensure the availability and responsiveness of your services in the event of DDoS attacks, maintenance errors, and other incidents.
- Avoid downtimes. If one of your servers goes down, our DNS failover system will automatically redirect your user requests to an available server, without affecting the performance or uptime of your service.
Gcore DNS Hosting is feature-rich, and includes the following benefits:
- Anycast routing. To improve our DNS infrastructure on a global scale, we use Anycast routing. This method involves assigning the same IP to multiple servers located in different regions, enabling the closest server to promptly respond to all requests.
- GeoDNS functionality. Our DNS hosting service can help you to improve the performance of your online services by utilizing a GeoDNS mechanism. This provides customized DNS responses based on the location of the client, meaning that users are directed to the nearest server based on their geographical location—a user in Asia is sent to an Asian server, whereas a user in Europe is sent to a European server.
Learn more about Gcore DNS Hosting.
Conclusion
The MX record plays a vital role in email communication as it specifies the mail server responsible for handling incoming and outgoing emails for a specific domain. It acts as a guiding system, ensuring that emails are directed accurately to their intended recipients. It is worthwhile for business owners and users to familiarize themselves with configuring and verifying MX records. This knowledge helps in understanding the significance of having a dependable DNS hosting service in addition to a reliable email provider.
At Gcore, we recognize the importance of efficient DNS management, including MX records, to maintain uninterrupted email services. That’s why we offer a user-friendly interface and comprehensive guides designed for both novice and advanced users. Our objective is to simplify the process of managing DNS records, including MX records, to guarantee prompt and dependable email delivery for our valued clients. If you have any further inquiries, please don’t hesitate to reach out to our dedicated support team and we’ll be glad to assist.