
WSL 2 (Windows Subsystem for Linux 2) is a powerful tool that allows you to run a Linux distribution alongside your Windows operating system. This article provides a step-by-step guide on how to install WSL 2 on your Windows system, enabling you to seamlessly work with Linux commands and applications within your Windows environment.
What is WSL 2?
WSL 2, short for Windows Subsystem for Linux 2, is a compatibility layer provided by Microsoft for Windows 10 and later versions. It enables Windows users to run a full-fledged Linux kernel and user space alongside their Windows operating system, effectively creating a seamless integration of Windows and Linux environments on the same machine.
Key features and characteristics of WSL 2 include:
- Full Linux Kernel. Unlike its predecessor, WSL 1, which relied on a translation layer, WSL 2 includes a complete Linux kernel. This provides better compatibility and performance for Linux applications.
- Improved Performance. WSL 2 offers significantly improved performance compared to WSL 1, making it suitable for more demanding workloads and applications.
- Native Docker Support. WSL 2 includes native Docker support, allowing you to run Docker containers with ease and better compatibility.
- Kernel-Level Virtualization. It utilizes Hyper-V virtualization technology to run a real Linux kernel in a lightweight virtual machine (VM), resulting in better performance and compatibility.
- Seamless Integration. It allows you to seamlessly integrate Linux tools, commands, and applications with your Windows environment. You can use both Windows and Linux applications side by side.
- Multiple Linux Distributions. You can install and run multiple Linux distributions from the Microsoft Store or other sources within WSL 2.
- Command-Line Interface (CLI). WSL 2 is primarily accessed through the command line, providing a familiar Linux terminal experience.
WSL 2 proves to be an invaluable asset for developers, system administrators, and users who require Linux-based tools and applications while predominantly utilizing Windows as their operating system. It serves as a unifying force between the Windows and Linux realms, providing a unified and adaptable computing environment. In the following section, we will explore the steps to install WSL 2 on a Windows system.
Installing WSL 2 on Windows
Installing WSL 2 (Windows Subsystem for Linux 2) on Windows involves several steps, each with its own description and potential output. Here’s a step-by-step guide on how to install WSL 2 on Windows:
#1 Enable Windows Subsystem for Linux (WSL)
Before installing WSL 2, you need to enable the WSL feature on your Windows system.
- Open PowerShell as an administrator.
- Run the following command.
dism.exe /online /enable-feature /featurename:Microsoft-Windows-Subsystem-Linux /all /norestart
Sample Output:
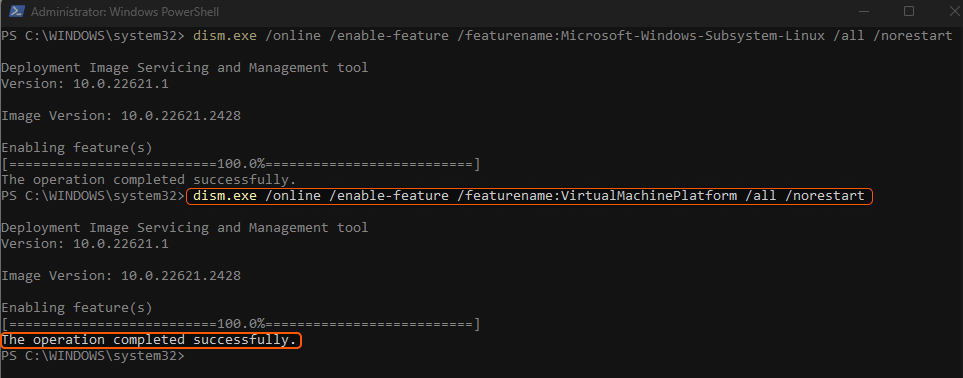
#2 Enable Virtual Machine Platform
WSL 2 requires the Virtual Machine Platform feature to be enabled.
- In PowerShell, run this command:
dism.exe /online /enable-feature /featurename:VirtualMachinePlatform /all /norestart
Sample Output:

#3 Install a WSL 2 Linux Kernel Update Package
Download and install the WSL 2 Linux kernel update package from Microsoft.
- Download the package from Microsoft’s WSL 2 Kernel page.
- Double-click the downloaded package to install it.
#4 Set WSL 2 as the Default Version
After installing the kernel update, set WSL 2 as the default version for new Linux distributions.
- Open PowerShell.
- Run this command to set WSL 2 as the default:
wsl --set-default-version 2
#5 Install a Linux Distribution
You can now install a Linux distribution of your choice. You can do this through the Microsoft Store or by using the wsl --install command.
- Open Microsoft Store.
- Search for your preferred Linux distribution (e.g., Ubuntu).
- Click “Install.”
#6 Initialize the Installed Linux Distribution
After installation, initialize the distribution by setting up a user account and password.
- Launch the installed distribution (e.g., “Ubuntu”) from the Start menu.
- Follow the on-screen instructions to create a user account and set a password.
#7 Update and Upgrade the Distribution
To ensure your Linux distribution is up to date, run the update and upgrade commands. In the Linux terminal, run:
sudo apt update && sudo apt upgrade
#8 Using WSL 2
You can now use WSL 2 to run Linux commands and applications within your Windows environment. Simply open the Linux terminal and start working.
- Open the installed Linux distribution from the Start menu.
- Start using Linux commands and applications as you would on a native Linux system.
Congratulations on installing WSL 2 on Windows! These step-by-step instructions cover the entire process, from enabling required features to setting up a Linux distribution within your Windows environment. Outputs may vary by system, but the provided commands are your guide to a successful installation.
Conclusion
Need to run Windows on a virtual machine? With Gcore Cloud, you can choose from Basic VM, Virtual Instances, or VPS/VDS suitable for Windows:
- Gcore Basic VM offers shared virtual machines from €3.2 per month
- Virtual Instances are virtual machines with a variety of configurations and an application marketplace
- Virtual Dedicated Servers provide outstanding speed of 200+ Mbps in 20+ global locations


