Kubernetes is a popular container orchestration platform that helps you to manage your application containers efficiently. Kubernetes’ autoscaling capabilities allow software applications to scale as they adapt to workload changes generated by users. This offers benefits including optimal resource utilization, cost-effectiveness, and the uninterrupted availability of your applications—but getting started can seem like a challenge. In this article, we’ll explain how Kubernetes autoscaling works and how to apply autoscaling for your Kubernetes pods and Kubernetes nodes so you can start reaping the benefits.
What Is Kubernetes Autoscaling?
Kubernetes autoscaling is a dynamic feature within the Kubernetes container orchestration system that automatically adjusts compute resources based on workload needs. This helps to maintain application performance and avoid financial waste by balancing and optimizing resource allocation. Traffic surges are handled by increased resources to ensure optimal performance, and during idle periods fewer resources are deployed to save money.
Kubernetes autoscaling ensures optimal resource utilization, cost-effectiveness, and the uninterrupted availability of your applications. Anyone using Kubernetes can benefit from autoscaling, especially if your app experiences busy and idle periods.
How Does Kubernetes Autoscaling Work?
In general, Kubernetes autoscaling works like any other kind of autoscaling: it dynamically adjusts server resources according to the current workload generated by end users.
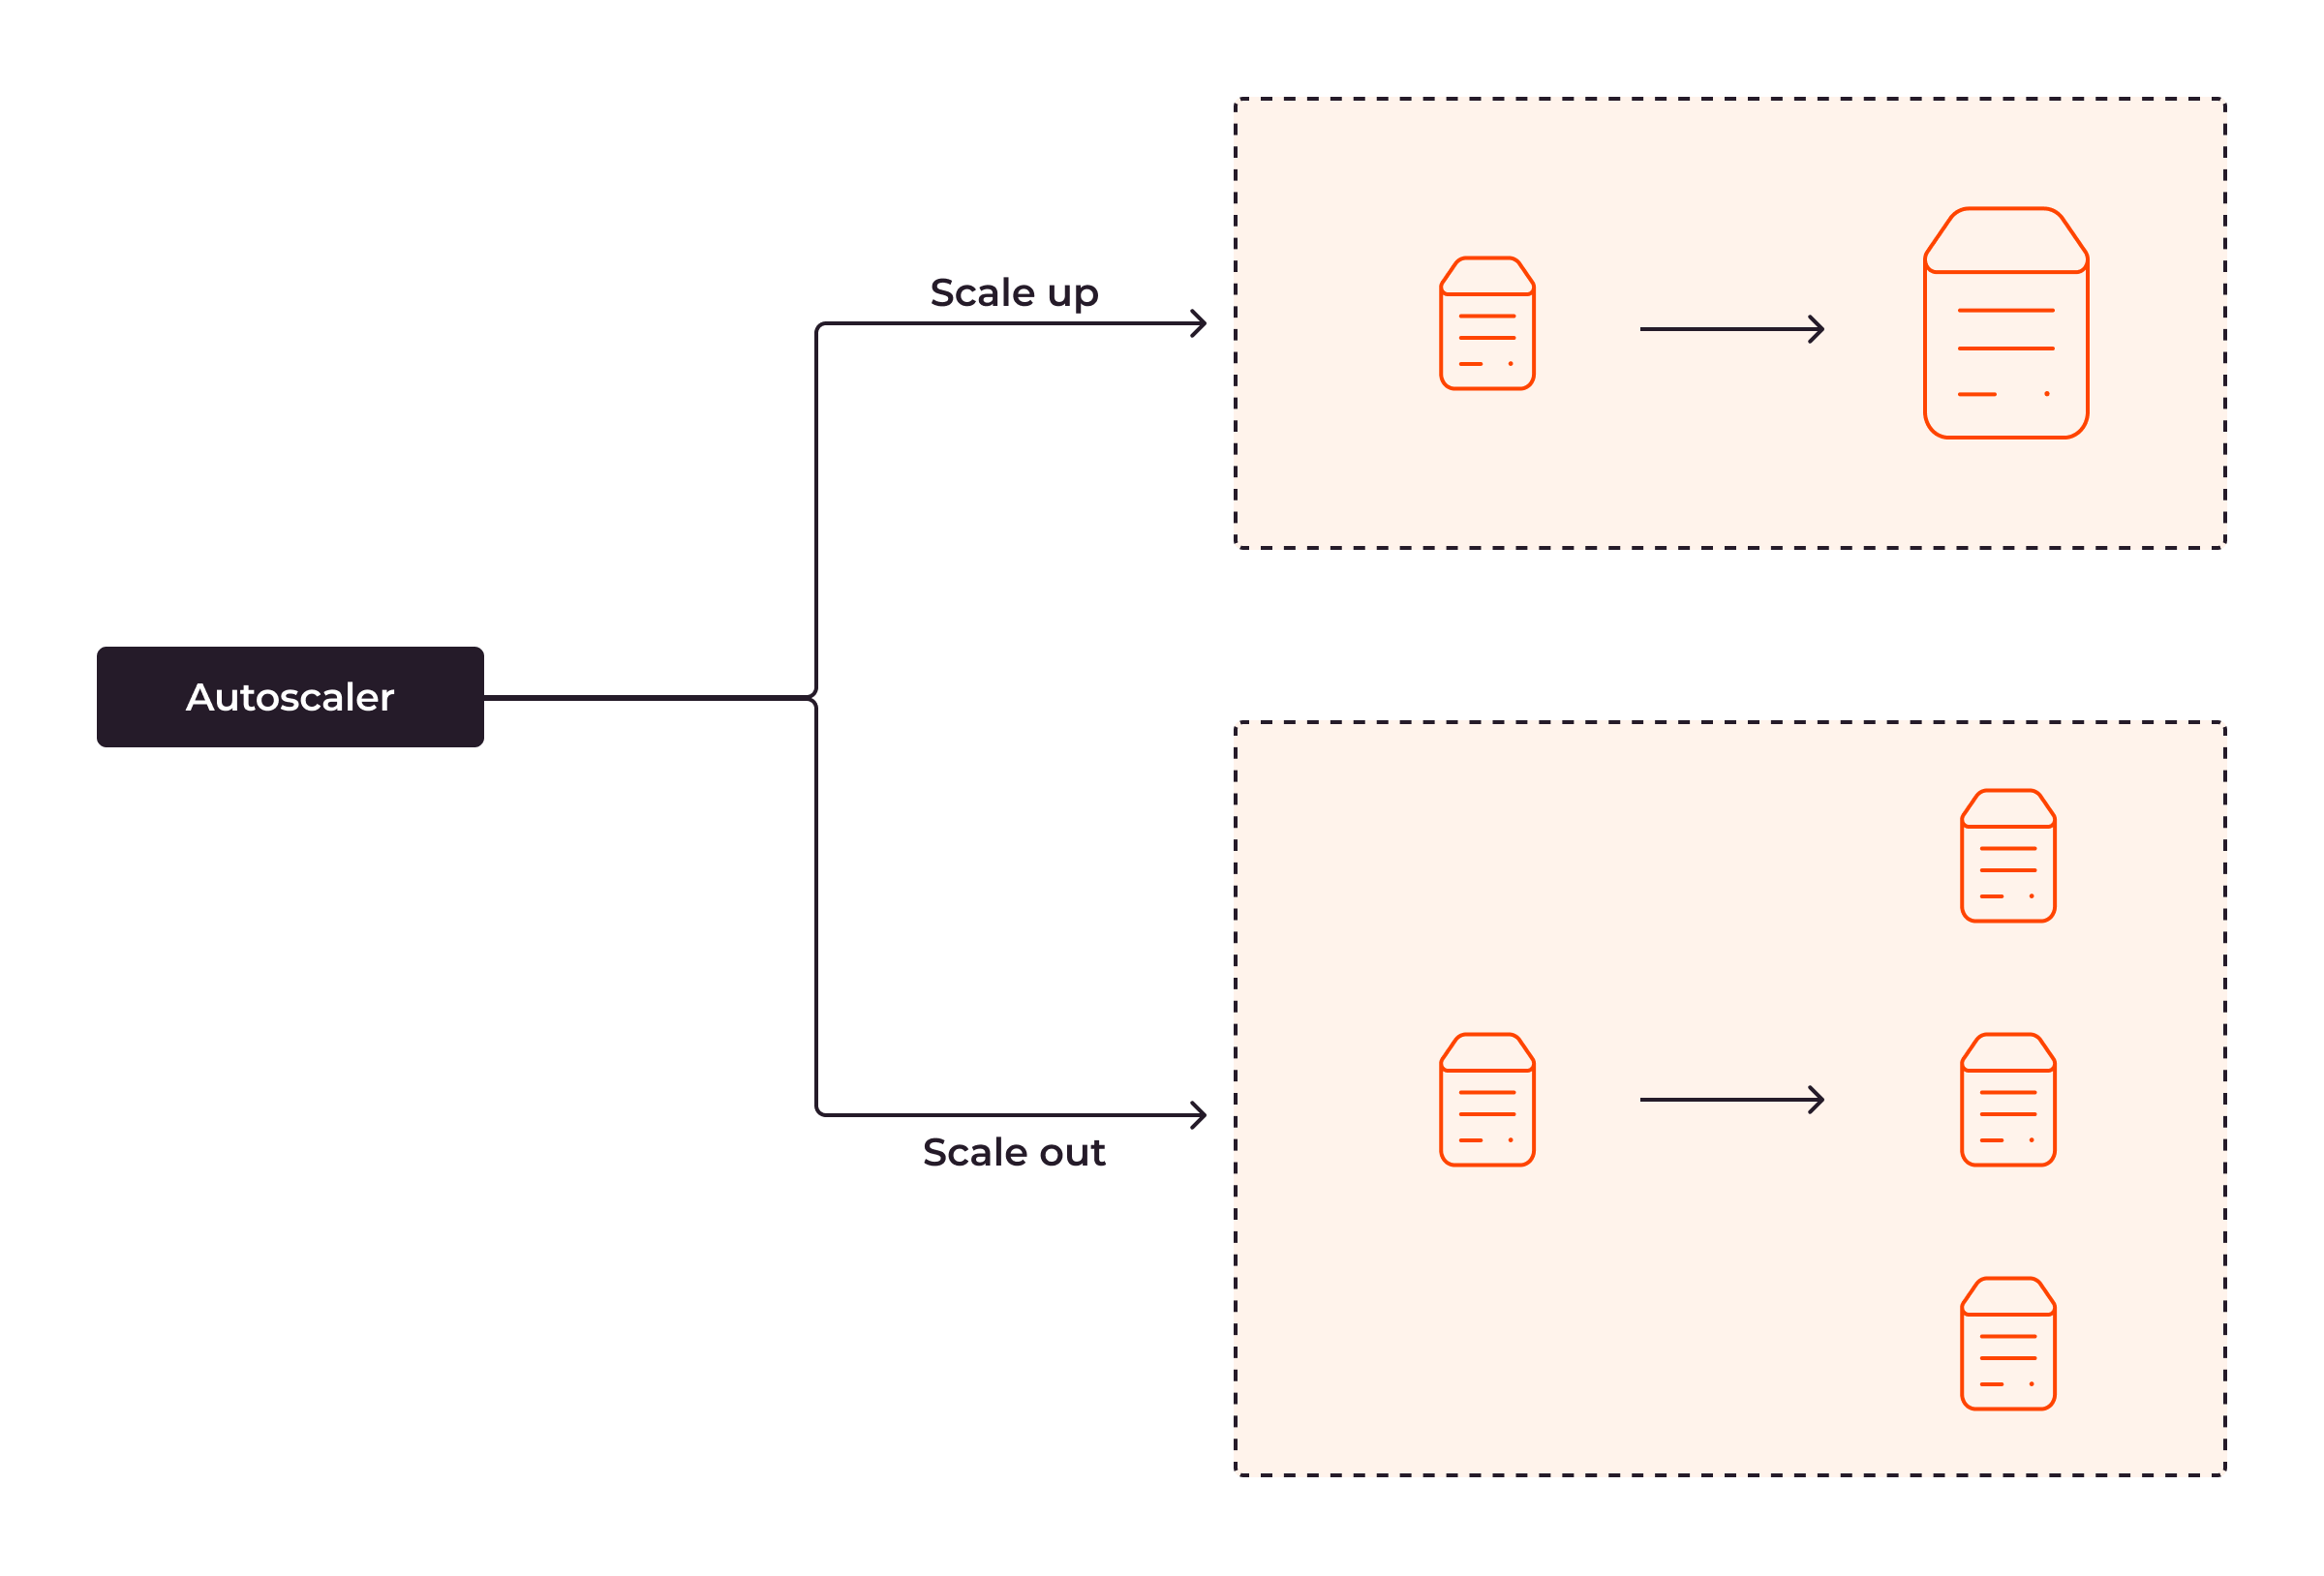
The autoscaler is responsible for scaling the computational resources to adapt to the workload generated by users. Let’s understand how this works assuming workload increases. There are two ways to scale the system: scaling up and scaling out. With scaling up, you add more system resources to the existing server, such as adding more RAM, CPUs, or disks. With scaling out, you do not add system resources directly to the existing server; instead, you add more servers to the system. As a result, your system has more resources to handle the growing traffic from users. If the workload decreases, the system scales down (opposite up scaling up) or in (opposite up scaling out.)
Scaling Pods and Nodes
Autoscaling in Kubernetes operates on two levels: pod level and node level. On the pod level, this involves adjusting the number of pod replicas (horizontal autoscaling) or the resources of a single pod (vertical autoscaling.) On the node level—known as cluster autoscaling—it refers to adding or removing nodes within the cluster.
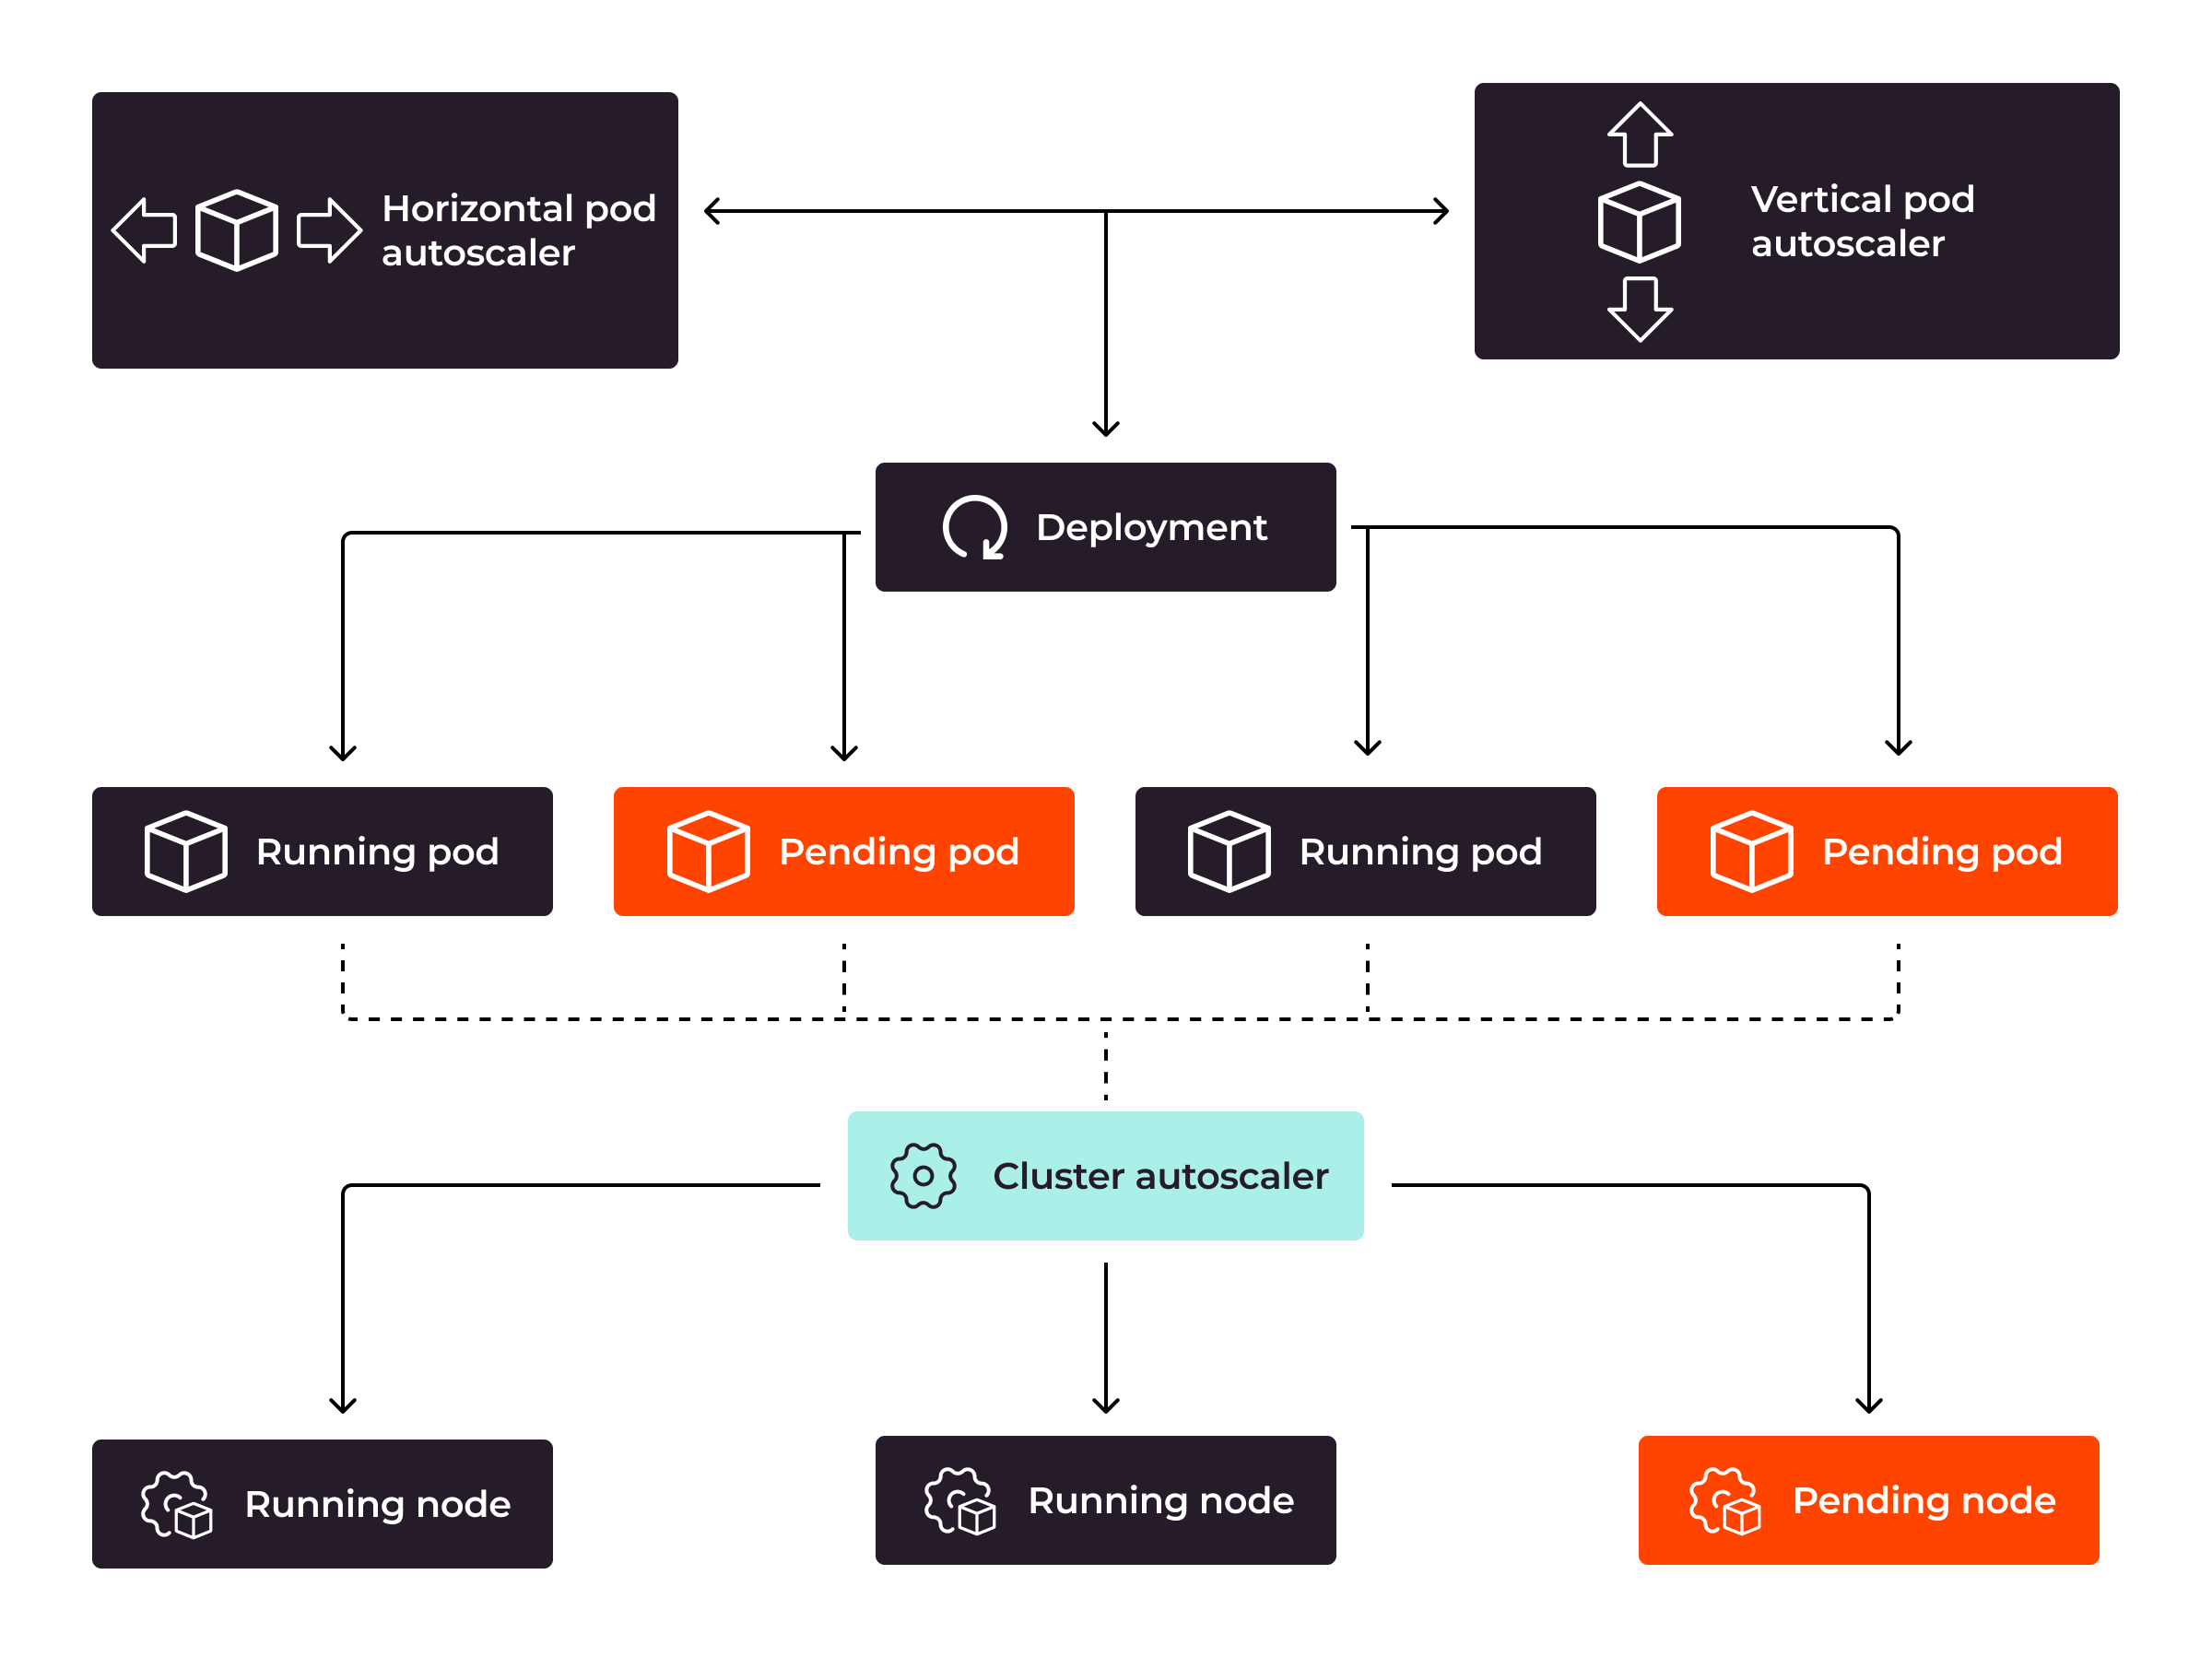
When Kubernetes notices that the current pod cannot handle the workload, it will scale the pods using HPA (Horizontal Pod Autoscaler) or VPA (Vertical Pod Autoscaler) depending on the commands it has received. If scaling out the pods using HPA, Kubernetes will create more pods. If scaling up the pod using VPA, Kubernetes will add more system resources to the pod. If Kubernetes cannot scale the pods due to insufficient resources from its existing nodes, the cluster autoscaler component will automatically add more nodes to the Kubernetes cluster. As a result, Kubernetes can continue scaling the pods to handle the workload more efficiently, even in extreme workload cases.
Autoscaling for a Kubernetes cluster should be applied to both the Kubernetes pods and the Kubernetes nodes. If the current Kubernetes nodes do not have sufficient resources to allocate to the pods, it does not matter how many pods Kubernetes has scaled up to handle user requests, the Kubernetes pods will still be stuck due to a lack of resources. As a result, your users will still encounter poor application performance—or even application inaccessibility.
How to Implement Autoscaling for Kubernetes Pods
There are three ways to implement Kubernetes Pod Autoscaling:
- Vertical autoscaling using the Kubernetes autoscaler GitHub repository.
- Horizontal autoscaling using Kubernetes built-in support.
- Kubernetes event-driven autoscaling (KEDA) to scale the pods by event.
Vertical Autoscaling
Vertical autoscaling in Kubernetes means adjusting the capacity of a pod according to demand.
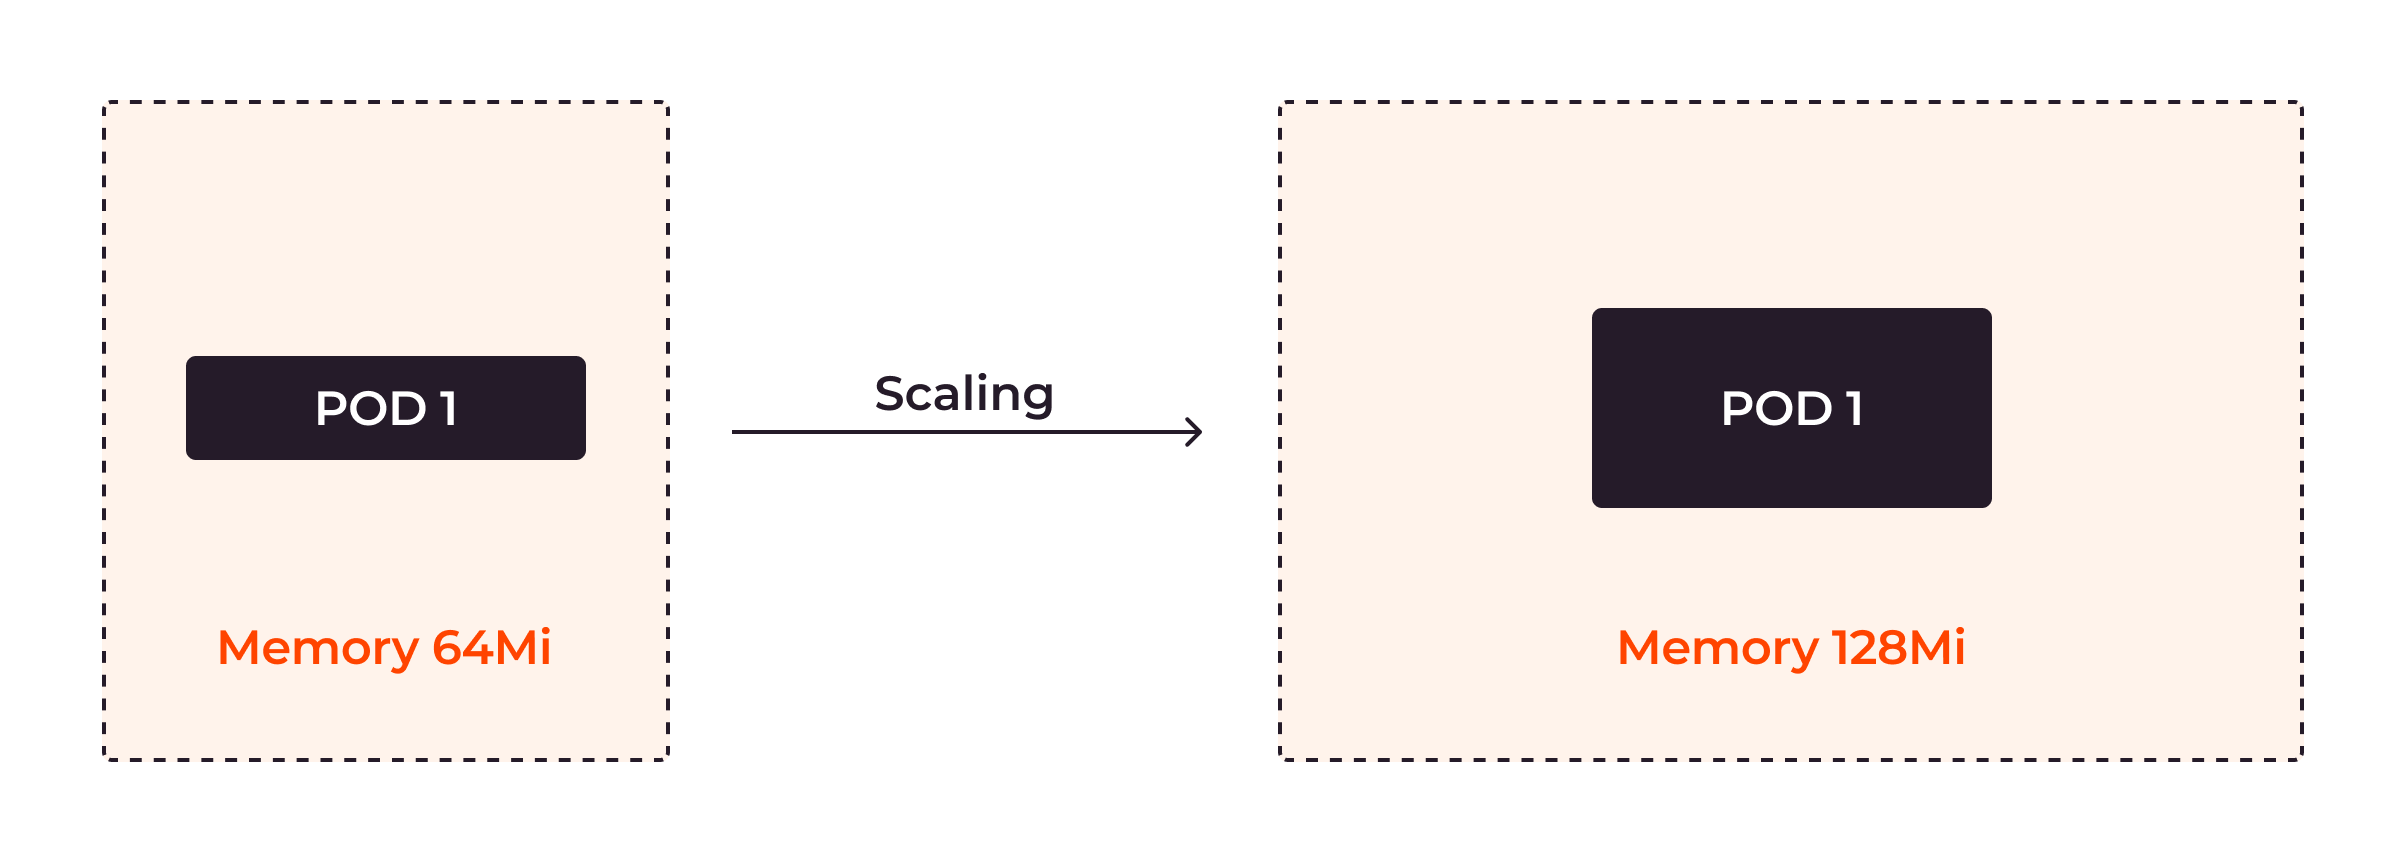
First, install the VPA.
git clone https://github.com/kubernetes/autoscaler.git
cd autoscaler
./hack/vpa-up.sh
With VPA, you can configure the minimum value and maximum value of CPU and memory usage for the pods so that the pods’ resource usage is guaranteed between the minimum and maximum values.
apiVersion: "autoscaling.k8s.io/v1"
kind: VerticalPodAutoscaler
metadata:
  name: example-vpa
spec:
  targetRef:
    apiVersion: "apps/v1"
    kind: Deployment
    name: example
    updatePolicy:
      updateMode: "Auto"
    resourcePolicy:
      containerPolicies:
      - containerName: '*'
      minAllowed:
        cpu: 100m
        memory: 50Mi
      maxAllowed:
        cpu: 1
        memory: 500Mi
     controlledResources: ["cpu", "memory"]
In the above configuration, you’re telling Kubernetes to set the CPU usage of the pod within the range of 100m (10% core) to 1 core. The pod’s memory-usage range is from 50–500 MiB (mebibytes.)
Horizontal Autoscaling
Horizontal autoscaling in Kubernetes means adjusting the number of pods according to demand.
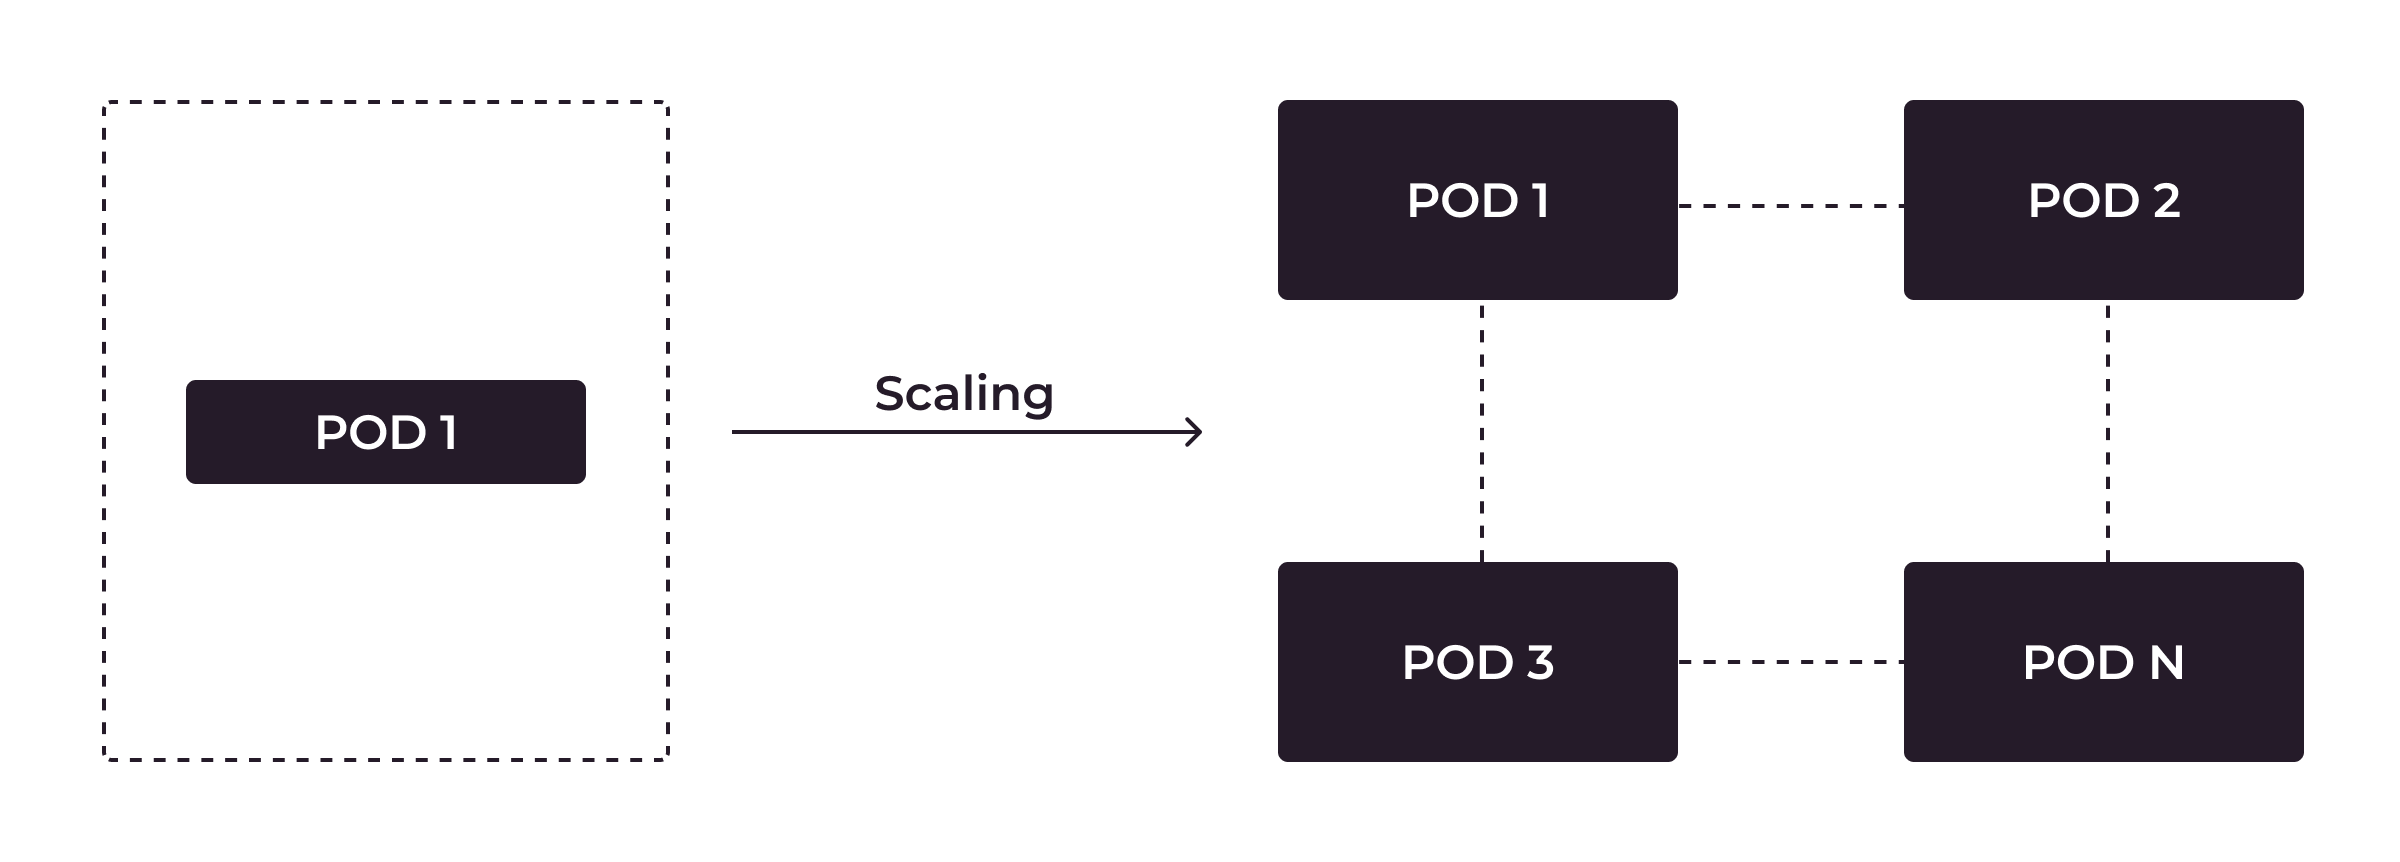
Horizontal autoscaling comes as a built-in feature with Kubernetes. You can set the HPA mechanism for the pods based on their CPU or memory usage.
apiVersion: autoscaling/v1
kind: HorizontalPodAutoscaler
metadata:
  name: app
spec:
  scaleTargetRef:
	apiVersion: apps/v1
	kind: Deployment
	name: appdeploy
  minReplicas: 1
  maxReplicas: 10
  targetCPUUtilizationPercentage: 70
With the above example for the HorizontalPodAutoscaler resource definition, if targetCPUUtilizationPercentage is above 70, Kubernetes will create more pods. The maximum number of pods is 10. If the targetCPUUtilizationPercentage is below 70, Kubernetes will remove unnecessary pods. The minimum number of pods is 1.
Kubernetes Event-Driven Autoscaling
With horizontal autoscaling, you can only autoscale pods based on CPU utilization and memory usage metrics. If you want to use a more sophisticated way to autoscale your pods, such as through different metrics like the total_http_request stored in a Prometheus database, you can use KEDA, which stands for “Kubernetes Event-driven Autoscaling.”
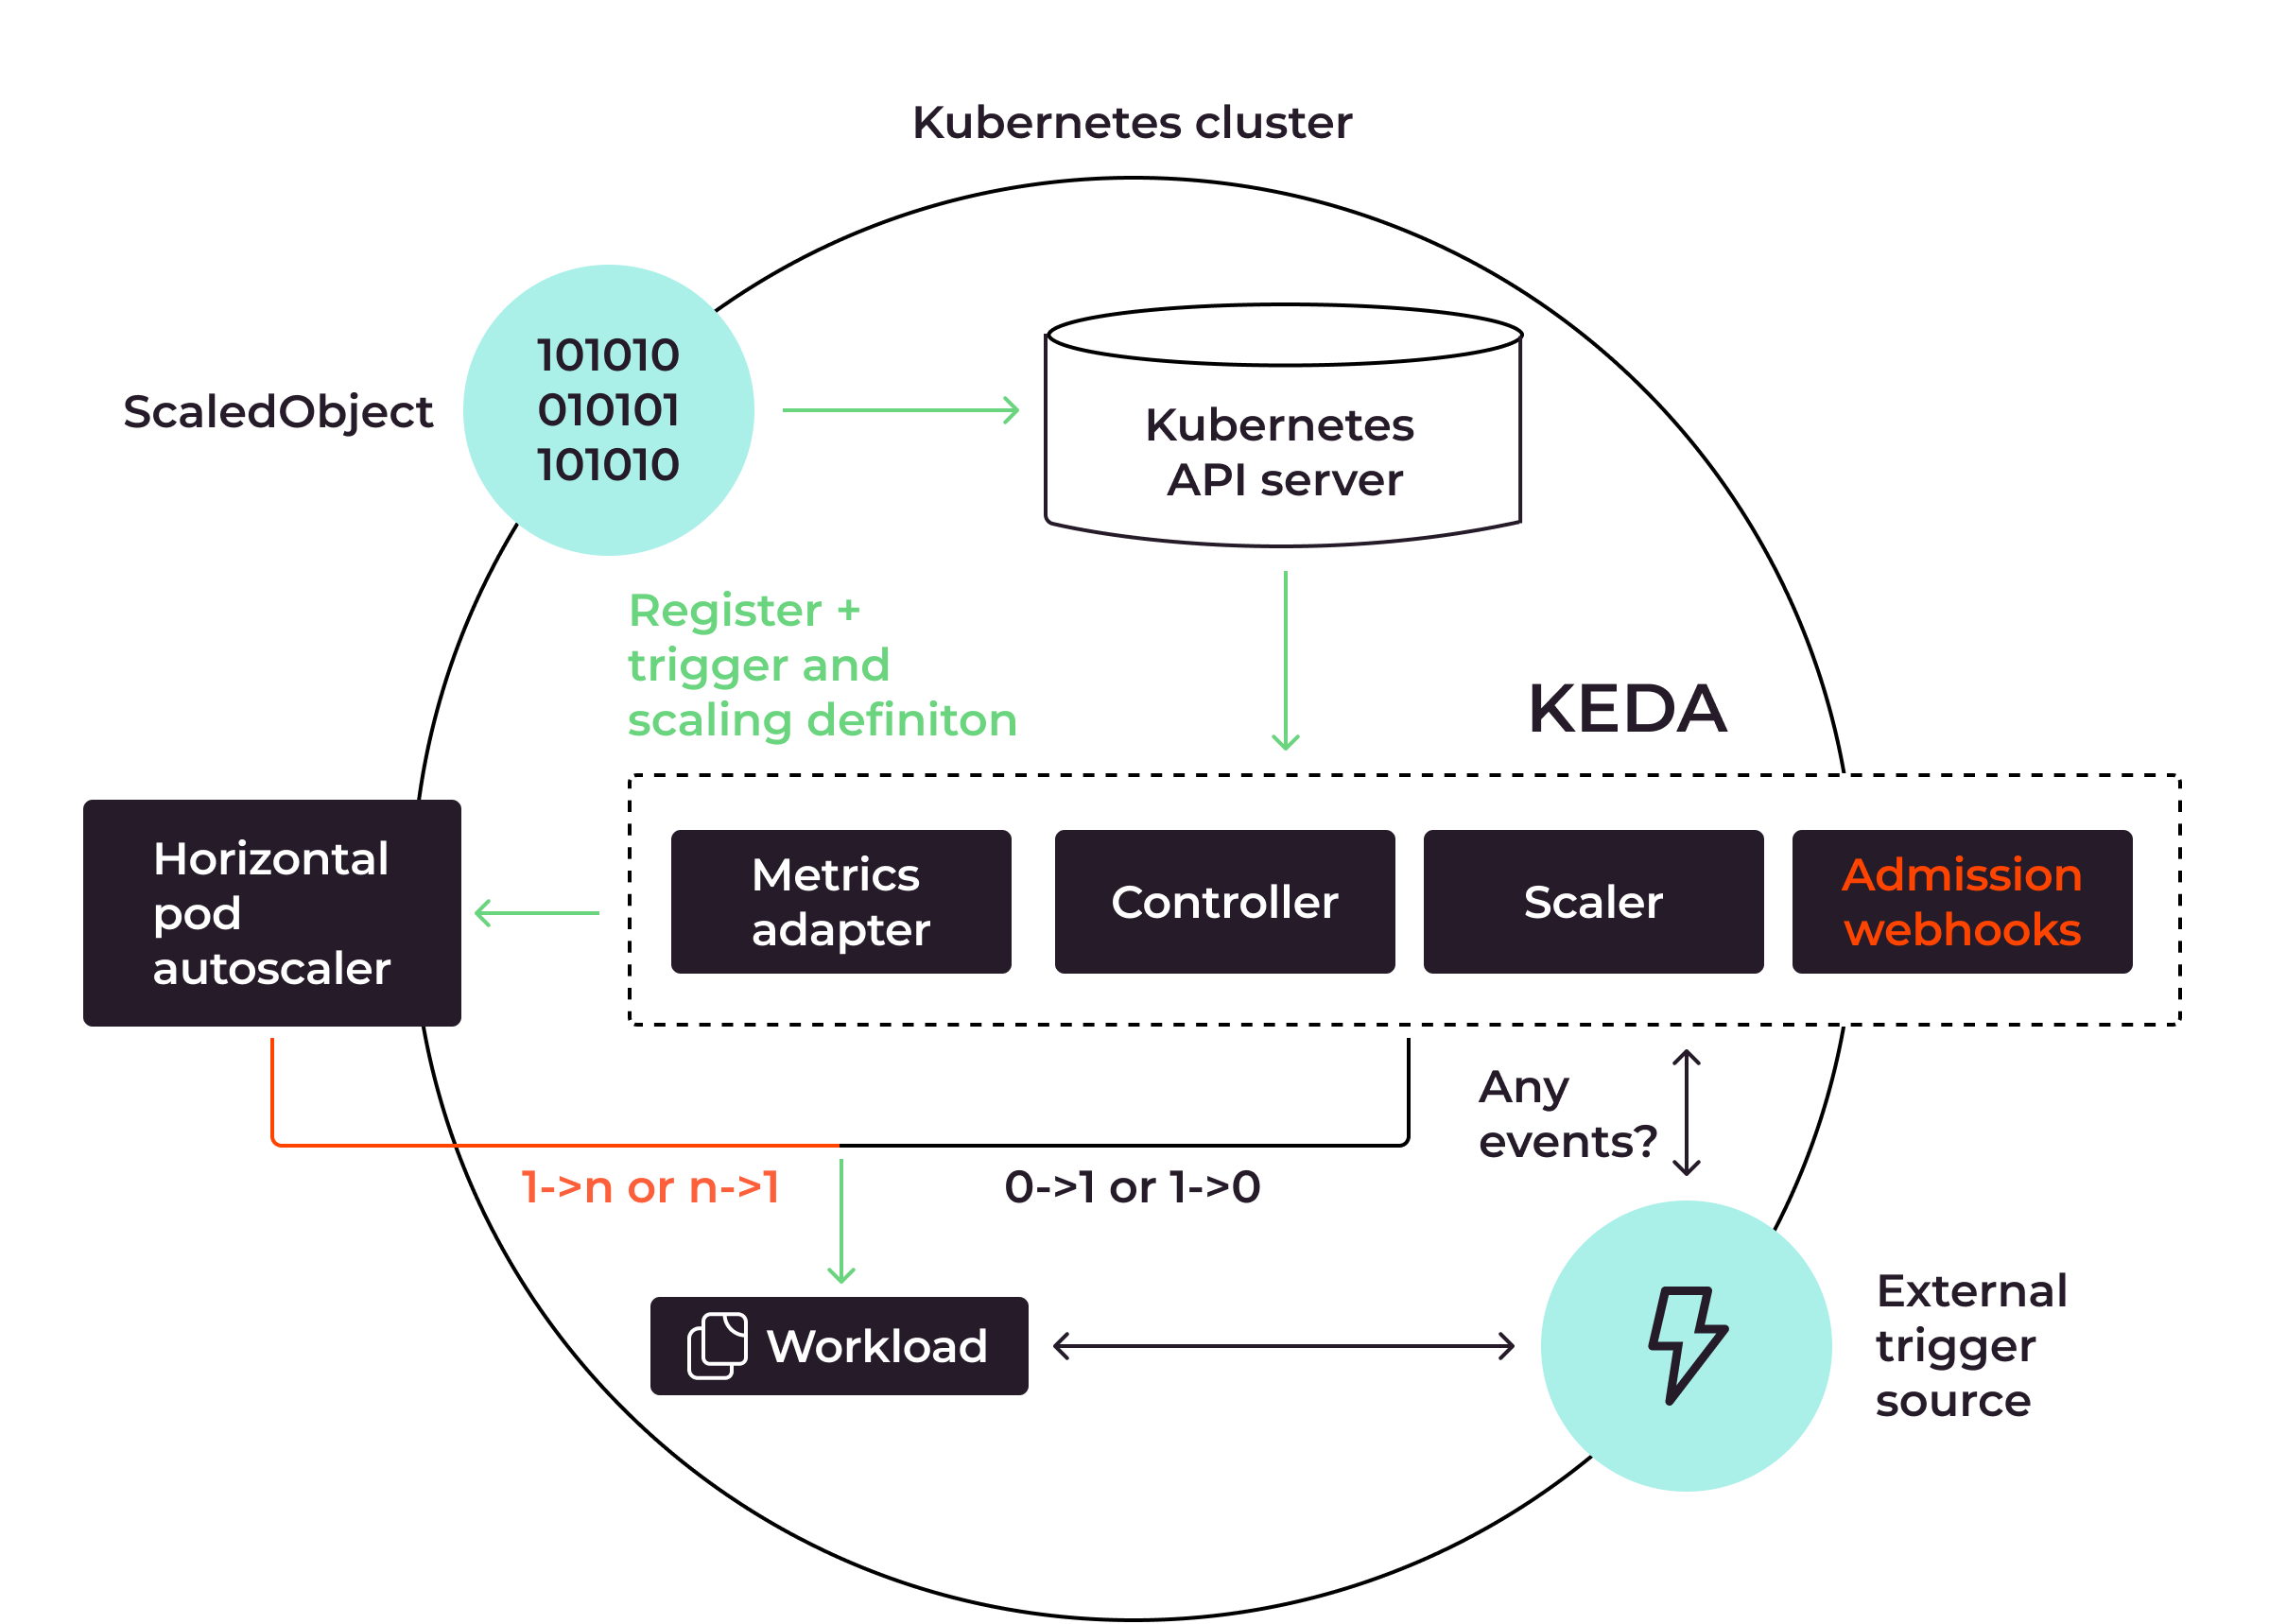
The above diagram demonstrates how KEDA works with HPA to apply pods autoscaling:
- Kubernetes API server acts as a bridge to allow the integration between KEDA and Kubernetes
- KEDA
ScaledObjectis the Kubernetes custom resource definition which defines the autoscaling mechanisms such as the triggering types or the minimum and maximum of the pods - KEDA core components are Metrics Adapter, Controller, Scaler, and Admission Webhooks. The Metrics Adapter and Admission Webhooks collect metrics from External Trigger Sources like Apache Kafka or Prometheus, depending on the trigger types in the
ScaledObjectdefinition. If the metrics thresholds are met, the Controller and Scaler will instruct the Horizontal Pod Autoscaler to apply the scaling task. - The External Trigger Source, which could be any source like Apache Kafka or Prometheus, is responsible to collect system metrics directly from the running service. If the workload is high, the pods will be scaled out. If the workload is low, the pods will be scaled in. If there is no workload at all, the pods will be deleted to ultimately optimize the infrastructure resources.
Here’s an example of KEDA using Prometheus metrics to trigger the autoscaling mechanism:
apiVersion: keda.sh/v1alpha1
kind: ScaledObject
metadata:
  name: prometheus-scale
  namespace: default
spec:
  scaleTargetRef:
	name: app
  minReplicaCount: 3
  maxReplicaCount: 10
  triggers:
  - type: prometheus
	metadata:
  	serverAddress: http://103.56.156.199:9090/
  	metricName: total_http_request
  	threshold: '60'
  	query: sum(irate(by_path_counter_total{}[60s]))
In the above ScaledObject definition for KEDA, you’re telling KEDA to notify HPA to scale the pods such that the minimum number of pods is 3 and the maximum number is 10. The serverAddress of the Prometheus database is http://103.56.156.199:9090/. Autoscaling is triggered by examining a metric named total_http_request, which is retrieved through the use of the query sum(irate(by_path_counter_total{}[60s])) to the Prometheus database. If the result of the metric is greater than 60, Kubernetes will create more pods.
Autoscaling for Kubernetes Nodes
You now know how to implement autoscaling for Kubernetes pods. However, autoscaling for Kubernetes pods alone is insufficient if the pods cannot be created due to the lack of system resources that the current Kubernetes nodes offer. To autoscale your application efficiently when working with Kubernetes, you should apply autoscaling for both your pods and Kubernetes nodes so that you don’t have to add more nodes to your cluster manually.
Kubernetes Cluster Autoscaler is a component of the Kubernetes Autoscaler tool which supports autoscaling nodes. If the Kubernetes cluster lacks resources, more nodes will be added to the current cluster. If Kubernetes nodes are not utilized, they will be removed from the cluster so you can use them for other purposes.
Kubernetes Cluster Autoscaler is currently not supported for on-premise infrastructure because with on-premise infrastructure, you cannot automatically create or delete virtual machines; this is required for Kubernetes Cluster Autoscaler to work. If you want to use Kubernetes Cluster Autoscaler to autoscale the Kubernetes nodes, you can use a managed Kubernetes cloud service like Gcore Managed Kubernetes.
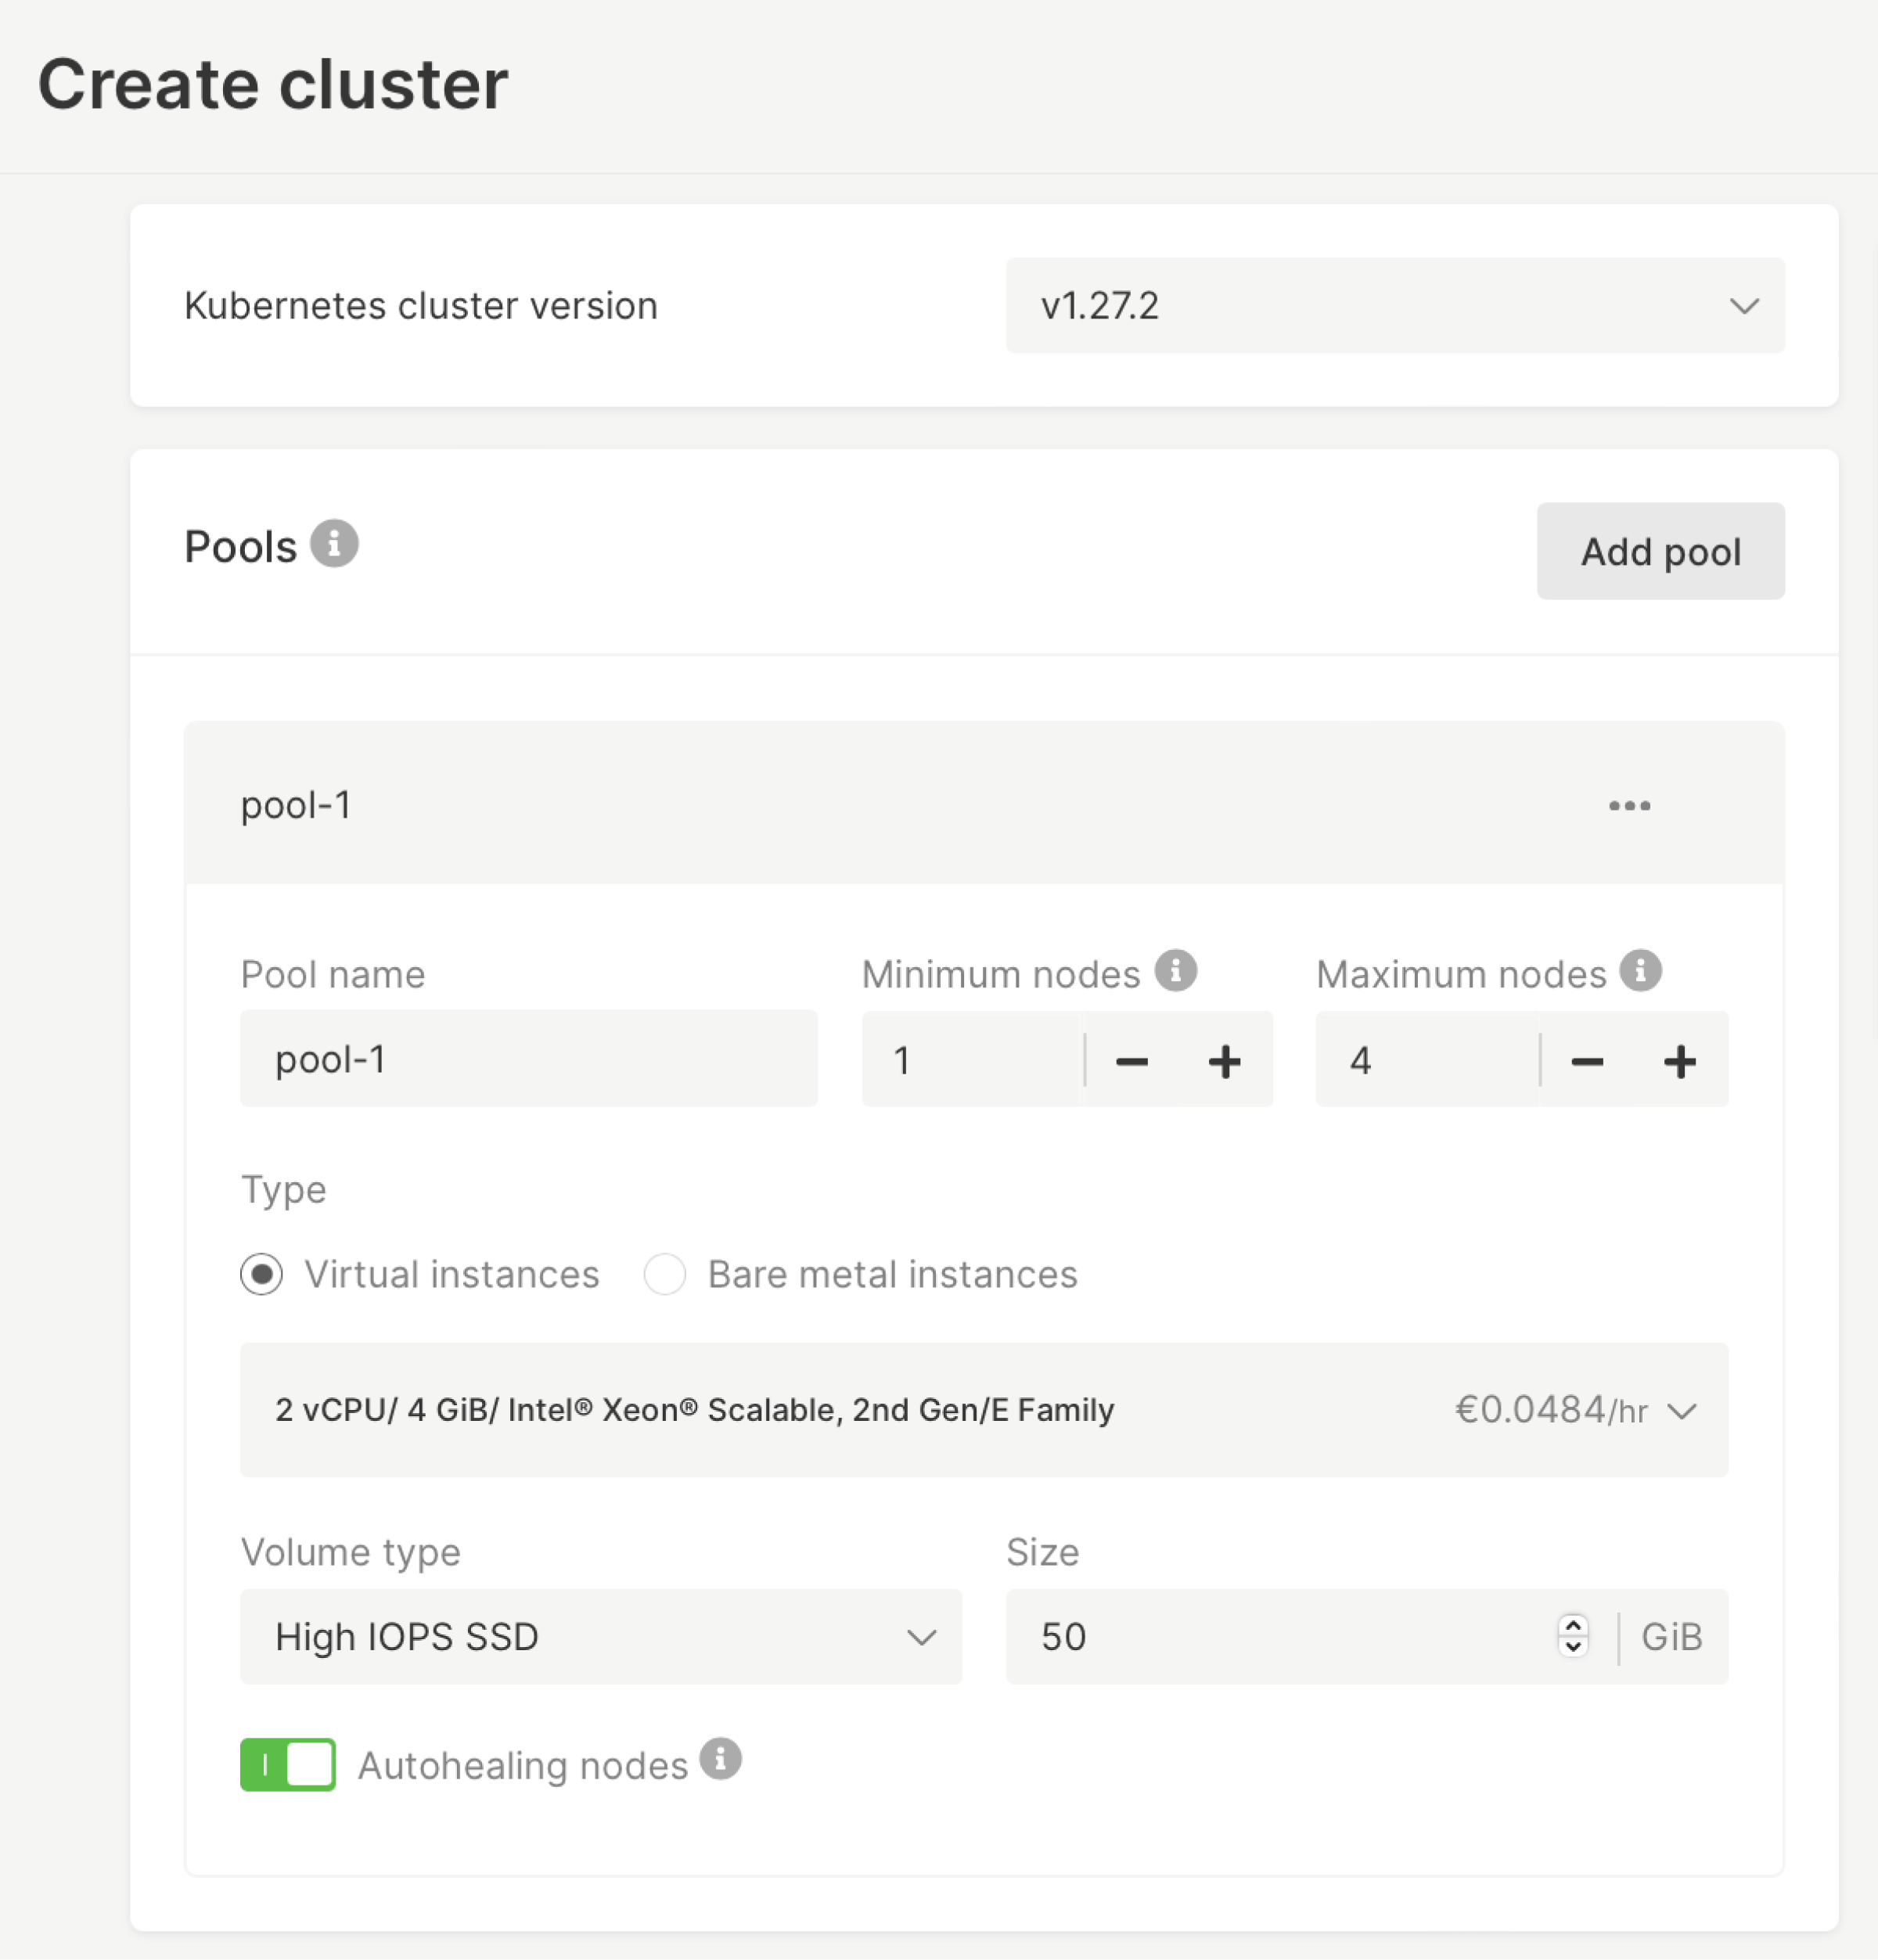
With Gcore Managed Kubernetes, you can create a pool of nodes with specific information about the minimum and maximum nodes your Kubernetes cluster needs. In the pool of nodes, you can specify the nodes’ type—Virtual instances or Bare Metal instances—with the exact specification of the system resource you want. You can even create multiple pools so your cluster can have different types of nodes, such as different sizes of virtual instances or both virtual and bare metal instances for your cluster.
Best Practices for Implementing Kubernetes Autoscaling
To apply autoscaling for your Kubernetes cluster efficiently, you should adopt the following best practices:
- Favor HPA over VPA when applying autoscaling for your pods. VPA should only be applied when you anticipate working with predictably increasing workloads or you need to store large files that can’t be split over multiple Kubernetes nodes. Otherwise, you should use HPA because it allows you to infinitely scale out your app with more pods. Moreover, your running pods do not have to be recreated to add more resources which improves your application availability, unlike with VPA.
- Do not mix VPA with HPA based on CPU and memory metrics because it would confuse the autoscalers, since both VPA and HPA rely on the CPU and memory metrics to apply autoscaling. If you want to mix these two autoscalers, apply HPA using custom metrics.
- Always set the minimum and maximum values for applying autoscaling pods. This way, your application always has the minimum capacity required to run effectively. It also minimizes financial risk if a DDoS attack or a critical bug in the application causes the pods to be added infinitely.
- Set appropriate thresholds to trigger the autoscaling. A low threshold can lead to unnecessary scale out. With a high threshold, your application can experience downtime since your Kubernetes cannot scale out fast enough to meet the growing user traffic.
- Apply cluster autoscaling to prevent the application from experiencing downtime. When your Kubernetes pods cannot be autoscaled due to the lack of system resources from Kubernetes nodes, you need to add more nodes to your Kubernetes cluster. However, manually adding nodes takes a long time because you need to set up the node to access the Kubernetes cluster, then wait for the Kubernetes cluster to distribute tasks to the new node. This could lead to significant downtime to your application. By applying cluster autoscaling, you can add more nodes to Kubernetes when the cluster is approaching the limit of its current system resources. This allows the cluster to autoscale smoothly without causing any impact on your users.
- Use KEDA to autoscale your pods if you need a more flexible way to trigger the pod autoscaling rather than solely relying on CPU and memory metrics. You can use KEDA with different events from diverse sources, including Apache Kafka and Prometheus. This lets you choose the type of triggering mechanism that fits your business requirement most. KEDA also supports zero autoscaling, which Kubernetes does not support. With zero autoscaling, you don’t need to have even one pod running if it’s not required. This means you can optimize the cost of your infrastructure with zero autoscaling.
- Implement a pod disruption budget to ensure your application always has the minimum required pods to run, specifically when your pods need to be rescheduled. This includes cases such as application updates or if the Kubernetes cluster is dealing with a node failure. This way, you can maintain your application’s high availability.
Conclusion
Kubernetes is a powerful platform that allows you to efficiently manage your application containers, making your application more resilient and fault-tolerant. By applying autoscaling for your Kubernetes, you can be confident that your application can scale to meet a growing number of your users. Kubernetes autoscaling also helps to optimize the cost of your infrastructure by being able to scale in the resources when the workload is low.
However, Kubernetes currently does not support on-premise cluster autoscaling. Without the ability to autoscale your cluster, you need to manually adjust the Kubernetes nodes by yourself, which can lead your application to have significant downtime when your Kubernetes cannot create more pods due to insufficient system resources. Gcore Managed Kubernetes cluster allows you to add nodes to your Kubernetes cluster immediately, enabling your application to run smoothly without downtime. We provide Bare Metal servers as an option, which allows you to maximize the Kubernetes cluster’s performance by removing the overhead virtualization experienced with virtual machines.
Want to experience the power and ease of Gcore Managed Kubernetes cluster? Get started for free.


