
Ubuntu is a popular, Linux-based, open-source operating system. In this Ubuntu installation guide, we will explore how to install Ubuntu Desktop from scratch, either to replace or alongside your current operating system.
Millions of laptops and PCs use the Ubuntu Desktop operating system, which comes pre-installed with an office suite, browser, media, and email apps, among others. Ubuntu Desktop is feature-rich, free, easy to install, customizable, and user friendly.
You can install Ubuntu on a computer running Windows, macOS, or FreeDOS. The process is pretty similar across operating systems. In this guide, we’ll demonstrate how to install Ubuntu Desktop on a Windows device.
Minimum System Requirements to Install Ubuntu
To install Ubuntu Desktop, you’ll need a computer with the following minimum system requirements:
- 25GB of storage space
- 4GB of RAM or system memory
- 2GHz dual-core processor
- Internet access
- Either a USB port and an 8-12 GB FAT-32 formatted USB flash drive to create a live bootable USB drive
- Or a DVD drive and a DVD to burn the Ubuntu ISO image
Ubuntu works on almost all desktops and laptops, but works best on Ubuntu certified hardware which meets or exceeds these minimum system requirements.
Read: How to Run OpenVPN on Ubuntu Server
Step 1: Back Up Your Data
If you plan to install Ubuntu on previously used hardware, we recommend that you back up your data to avoid potential data loss. If you’re using a previously used flash drive to download the Ubuntu ISO file, back up the flash drive.
Step 2: Download the Ubuntu ISO File
To get started, we need to download the Ubuntu ISO file. An ISO file—also known as an ISO image or optical image disc—is an archive file that contains an exact copy or image of the entire data found on a CD, DVD, or Blu-Ray. It is a technology that allows large file sets, including original software, to be distributed at scale and burned onto optical discs.
To download the Ubuntu Desktop ISO image, go to the Ubuntu download page. You’ll find two versions of Ubuntu Desktop: Ubuntu Desktop LTS (long-term support) which offers five years of support, and Ubuntu, which comes with only nine months of support.
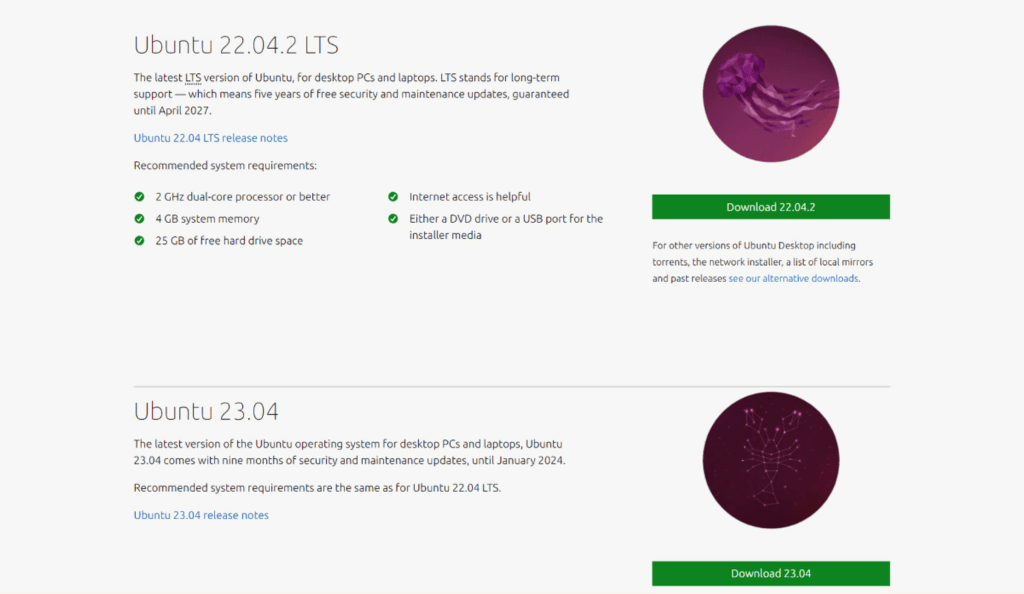
Scroll down the page and select your preferred package. For this tutorial, we’ll use Ubuntu LTS. Click the Ubuntu 22.04.2 download button (or the button for the current version) to start the download.
If you are installing an older version of Ubuntu or Ubuntu LTS, note that the layout and user interface may differ, but the overall flow and steps should remain the same.
Read: How to Set Up macOS on Bare Metal with Ubuntu Using Docker
Step 3: Download UNetbootin: a Bootable Live USB Drive Maker
To install Ubuntu via a USB flash drive, you’ll need a USB flashing tool to flash the Ubuntu ISO image onto the flash drive. For this guide, we’ll use UNetbootin. UNetbootin is a powerful and easy-to-use multi-platform SD card and USB flashing tool. Etcher and Rufus are also good options.

While the Ubuntu ISO image is still downloading, go to the UNetbootin page and download and install the appropriate tool for your operating system. Skip this step if you prefer to install Ubuntu via a DVD instead of a USB flash drive.
If you’re using a DVD, you can burn the Ubuntu ISO image onto it using the built-in burner in your Windows 7, 8, 10, or 11 computer. Alternatively, you can download a third-party CD/DVD burner, like BurnAware or DeepBurner Free.
Step 4: Create a Live, Bootable USB Drive
After downloading the Ubuntu ISO file and installing the UNetbootin flashing tool, you’ll need to create a live, bootable USB drive. To do so, insert the flash drive into your computer’s USB port and run UNetbootin (grant permission if requested.)
Click Distribution, scroll all the way down the Select Distribution drop-down menu, and select Ubuntu. This will automatically populate the latest version. Select Diskimage, click on the three dots button to the right, select the Ubuntu ISO file you just downloaded, and click OK.

The process will start immediately and will take a few minutes to go through the four stages of flashing. Once completed, click Exit. Whichever USB flashing tool you use, ensure that you format the USB flash drive for FAT-32 (Windows.)
If you encounter a “write protected flash drive” error, use the SD Formatter tool to reformat the USB drive. Then try again to create the live, bootable USB drive, but this time, with a different flashing tool.
If using a DVD, insert the blank DVD into your computer’s DVD drive, right-click the Ubuntu ISO file, click Burn disc image, select the appropriate drive from the Disc burner drop-down, and click Burn.
Step 5: Boot From USB Flash Drive
After creating a live bootable USB flash drive or DVD, reboot your computer with the installation media still inside. If the Ubuntu installation window doesn’t appear automatically, reboot your computer again, and enter BIOS. Your computer will tell you which key to press to enter BIOS. For most computers, pressing F12 does the trick. On other computers, it could be F2, F10, Esc, or Del.
Now, go to Boot Order and select USB Storage Device as the primary boot device, or DVD drive if using DVD. If the BIOS menu lists your flash drive more than once, the rule of thumb is to go with the first mention or listing. Similarly, if there are multiple UEFI listings, always go with the first UEFI listing with your USB flash drive name.
If you can’t find your USB flash drive in the menu at all, select BIOS Setup > Advanced Boot Options > Enable Legacy Option ROMs > Apply. When in UEFI boot mode, this will allow Legacy Option ROMs to load.
Step 6: Install Ubuntu
On the next screen, you will have the option to either try or install Ubuntu.
Try Ubuntu
Choosing “Try Ubuntu” will not make any permanent changes to your computer. This is ideal if you’re still on the fence about using Ubuntu or have limited system resources. If you follow this route, you will still have the option to complete the installation later directly from the test homepage by clicking Install Ubuntu.
Install Ubuntu
Installing Ubuntu will overwrite any other operating system on your computer or in the allocated partition. This will erase all your data, including settings, documents, files, photos, and videos. Be sure to back up your data beforehand! Now, click Install Ubuntu.
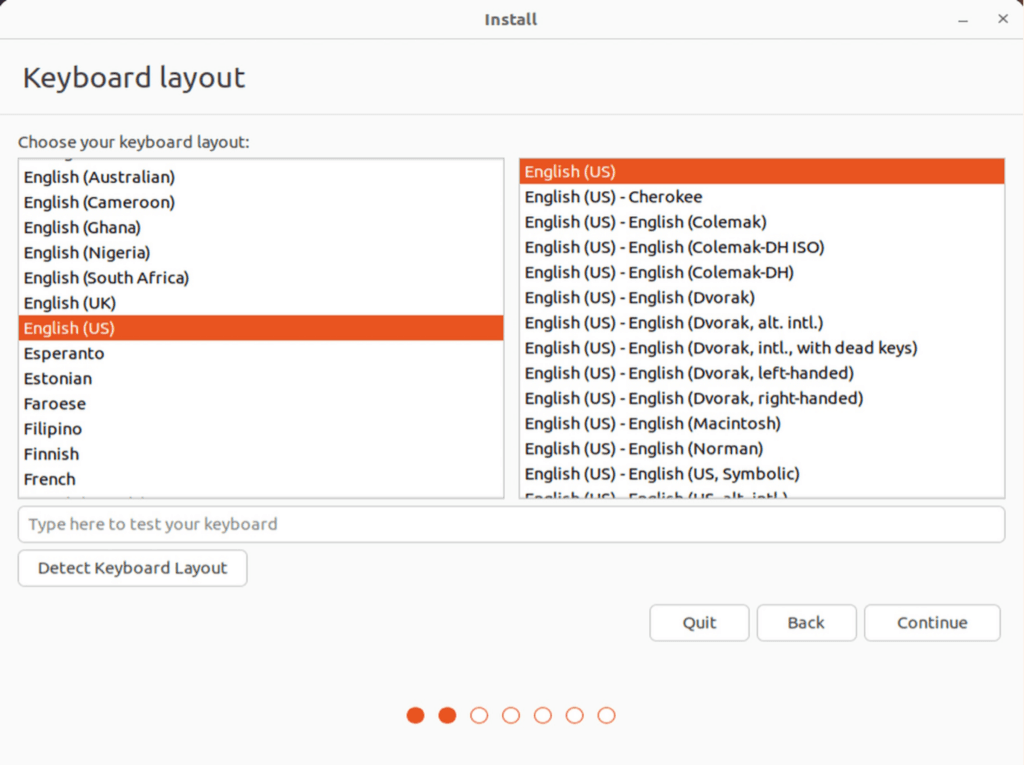
Select your language; this is set to English (US) by default. Next, select your keyboard layout and click Continue.
Step 7: Connect to the Internet
You can choose whether or not to connect to a wireless network, but we recommend doing so. An internet connection allows you to install third-party software, download updates, automatically detect your timezone, and install full support for your language. This way, you can hit the ground running.
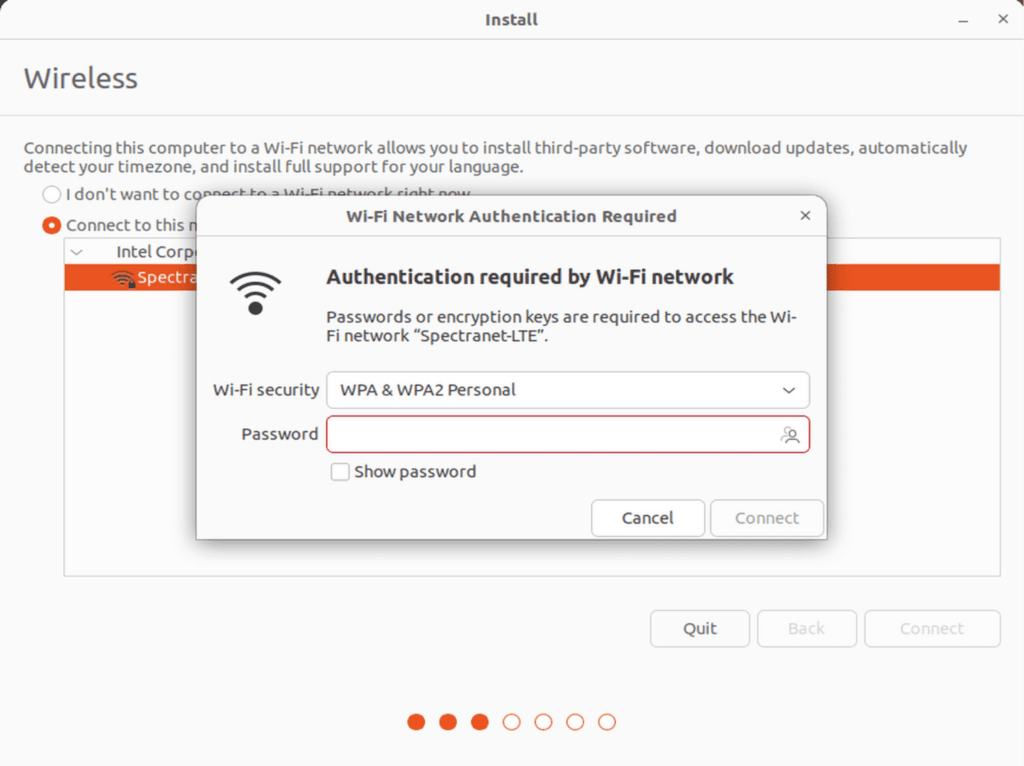
To connect to a wireless network, select the Connect to this network button, then select your Wi-Fi network, and click Connect. Enter your Wi-Fi password if required, click Connect, then click Continue. Note that you can also opt for a wired ethernet connection.
Read: How to Set Up Odoo on Ubuntu Using Docker
Step 8: Installation Setup
Next, you’ll be asked to install updates and other software. There are two options available: normal and minimal. Normal installation comes with a web browser, utilities, office software, games, and media players. Minimal installation comes with a web browser and basic utilities, and is ideal for light users or those with smaller hard drives.
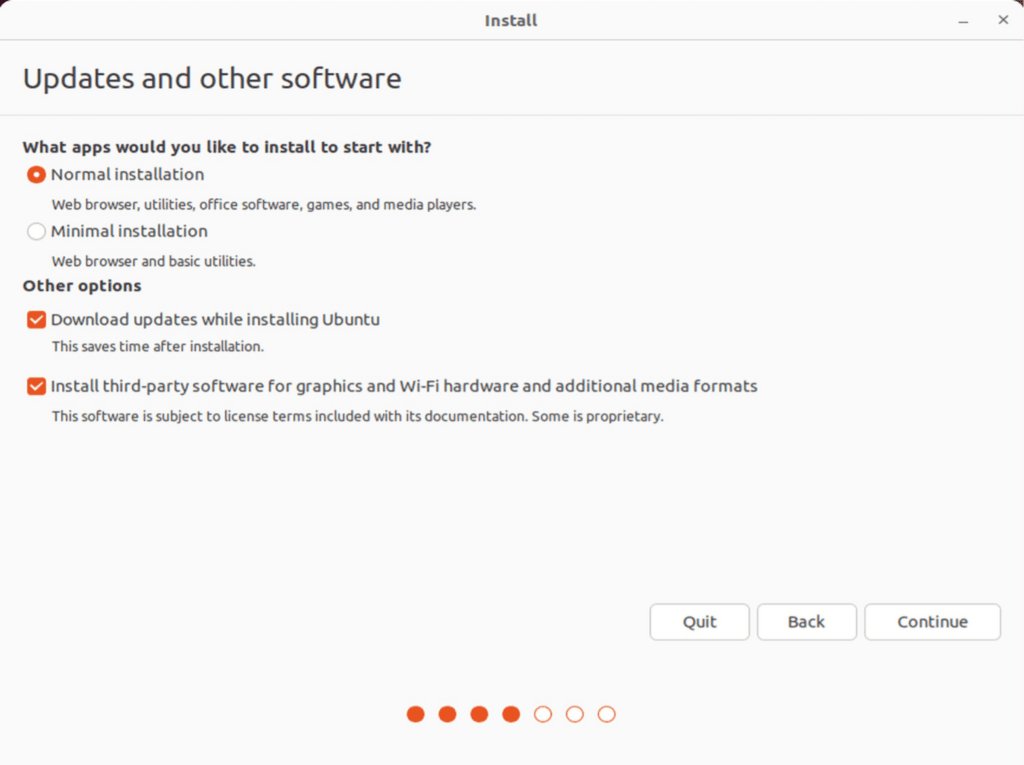
Under Other options, we recommend leaving Download updates while installing Ubuntu checked. This slows the initial installation, but saves having to install updates manually down the road. Also check Install third-party software for graphics and Wi-Fi hardware and additional media formats for the best experience. Then click Continue.
Installation Type
The next screen allows you to decide how you want to install Ubuntu. If you want Ubuntu to be the only operating system, select Erase disk and install Ubuntu. This will delete all your programs, documents, photos, music, and files in all operating systems. For this guide, we will choose Erase disk and install Ubuntu.
Choose Something else if you want to install Ubuntu alongside your current operating system. This option allows you to create or resize partitions yourself, or choose multiple partitions for Ubuntu. If you’re going this route, select the partition where you want to install Ubuntu or click New Partition Table…
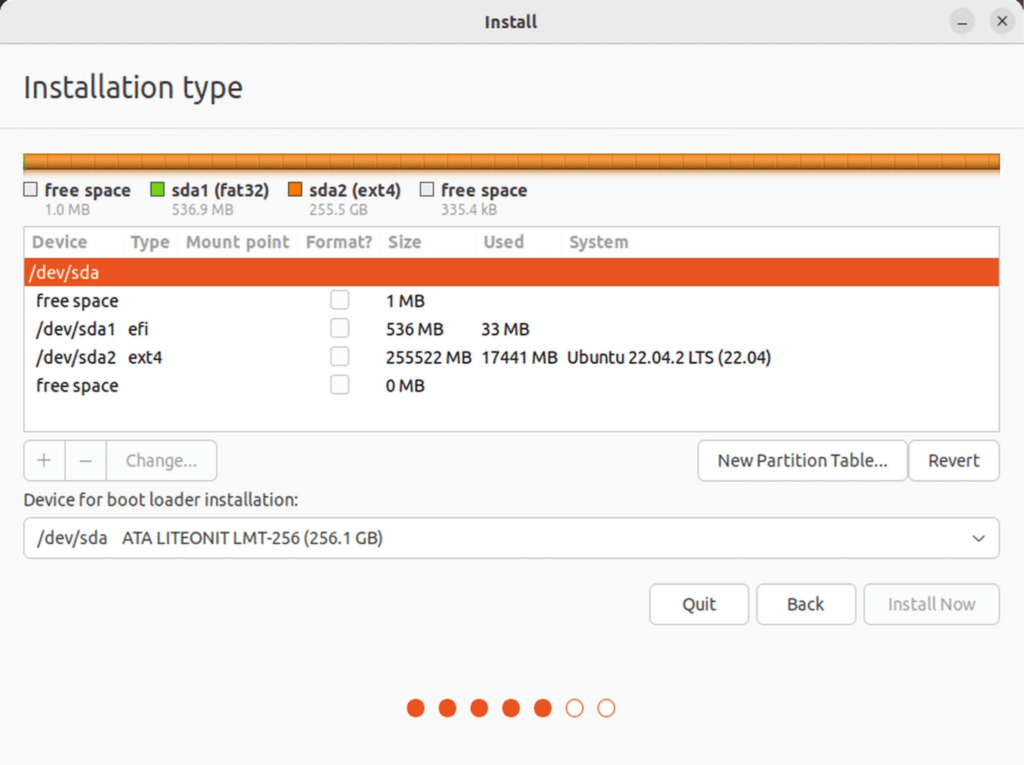
This will create a new partition table on your computer and replace all other partitions. You can undo this later if you wish. Then click Continue. Make your selection and click Install Now, then Continue. Review the warning information and click Continue.
Location, Timezone, and Personal Info Settings
Now, choose your location and set your time zone. If you are connected to the internet, this step won’t be necessary as Ubuntu will automatically detect your location and timezone. If it gets it wrong, simply edit the entry by typing your location in the location text box and click Continue.

On the Who are you screen that follows, enter your name and your computer’s name, and a username will be auto-generated. You can always change these later. Then choose and confirm your password.

Now, select how you want to log in, automatically or via a password. If you select the latter, Ubuntu will require the password every time you want to log in or perform certain tasks in the Terminal. There’s also an option to use Active Directory.
Sit back and wait for the installation to complete. Meanwhile, you can watch or scroll through the Ubuntu slideshow on the splash screen to get a feel for what to expect from Ubuntu. Once the installation is complete, remove the installation media and press Enter.
Step 9: Update Ubuntu
It’s always a good idea to try to update Ubuntu after installation to ensure you have the latest features, security patches, and software updates. There are two ways to update Ubuntu: via the Software Updater app or via Terminal.
Update Ubuntu via Software Updater
To update Ubuntu via Software Updater, you can either click on Search and type “Update” or click on the app menu (the icon with nine tiny squares in the bottom-left corner of your screen,) look for and click Software Updater, then Install now. You can also ask it to remind you later.
Update Ubuntu via Terminal
Terminal, command prompt, or shell, is Ubuntu’s native command line tool. Here’s how to update Ubuntu via Terminal. Either press Ctrl+Alt+T or click the app menu and select Terminal, then type the following commands and press Enter one after the other in this order:
sudo apt-get updatesudo apt-get upgradesudo rebootNote that this process may take a few minutes depending on the number of updates available to install, and especially if you chose the minimal installation option during setup.
Step 10: Start Using Ubuntu
Congratulations! You’re now ready to start using Ubuntu for a variety of tasks. For instance, you can create and edit documents with LibreOffice which is a popular full office-suite compatible with DOC, DOCX, XLS, XLSX, PPT, and PPTX files. Other popular apps that can spice up your Ubuntu experience include WPS Office, VLC Media Player, GIMP, Steam, Kdenlive, Krita, VirtualBox, Google Chrome/Firefox/Brave, Scribus, OpenShot, Geary, Atom, and Darktable.
Conclusion
In this comprehensive guide, we’ve walked you through the detailed process of installing Ubuntu on a Windows device, starting from understanding the minimum system requirements, to the actual installation, and finally to updating the system. By following these steps, you should now be able to enjoy Ubuntu’s open-source capabilities and numerous pre-installed applications, providing you with a robust and user-friendly operating system experience.
Check out our other articles about Ubuntu that will take your experience to the next level:
Related articles


Imagine discovering that migrating your company's data to a new cloud provider will cost hundreds of thousands of dollars in egress fees alone, before you've even touched the re-engineering work. Or worse, picture being in Synapse Financial

Subscribe to our newsletter
Get the latest industry trends, exclusive insights, and Gcore updates delivered straight to your inbox.