SSH is a way to access and manage computers securely remotely over a network. A widely-used remote administration protocol, it offers a robust and secure mechanism to access, control, and modify remote servers over the internet. This article provides a comprehensive overview of SSH, its functionalities, benefits, and practical use cases, enabling you to establish secure connections and mitigate potential security threats effectively.
What Is SSH?
SSH, or Secure Shell Protocol, is like a secure key to a computer that’s physically located at a distance to you. It uses encryption as the main way to ensure that your data is protected when sent over potentially insecure networks. Encryption guards against threats, enhancing the security of remote login and data sharing.
When you use SSH, you’re working with three main parts: the SSH command, your username, and the server’s details—its IP address or domain. Think of these as the lock, key, and door to your distant computer. Namely, the SSH command serves as the lock, setting up the secure connection. Your username acts like the key, identifying you to gain access, and the server’s details represent the door, specifying which computer you’re connecting to. These components work together to ensure you can securely interact with a remote computer.
Versions of SSH
SSH comes in two versions: SSH-1 and SSH-2. Of these, SSH-2 is the one you’ll generally want to use, and the one we focus on in this how-to guide. It has improved security features compared to SSH-1. Importantly, SSH-2 is not interchangeable with SSH-1 due to design differences.
Who Uses SSH and Why?
SSH serves as a versatile and crucial protocol with various use cases.

- System administrators use SSH to log into and manage a server located in another part of the world, establishing a secure connection from their own computer to the remote server. This is useful for tasks like software updates, which can be done without the need to travel to the server’s physical location.
- When it comes to transferring files, SSH is more secure than alternatives like FTP (file transfer protocol.) When you use SSH to send sensitive files, such as financial documents, the protocol encrypts the data, making it difficult for unauthorized users to access or tamper with the data while it’s in transit.
- SSH provides a secure way to access cloud services. For example, if you have an online business and store customer data in the cloud, you can use SSH to retrieve this information securely, keeping your clients’ data safe from potential online threats.
- SSH can get around firewall restrictions by routing your connection through another server, which isn’t restricted by the same firewalls.
SSH Benefits
Now that we have an understanding of what SSH is, let’s understand what benefits it offers.
- Enhances security through encryption: SSH encrypts the data traveling between the client and the server by using mathematical algorithms to turn it into a code. This process ensures that only authorized parties can decipher the data in transit, essential for companies taking payment details or dealing with medical information, for example.
- Symmetric and asymmetric encryption: SSH first uses symmetric encryption, where the same key both encodes and decodes the initial data. Then it switches to asymmetric encryption, using two different keys—one for encoding and another for decoding the ongoing data exchange. This ensures a secure initial connection while verifying the identity of both parties involved.
- Tunneling and port forwarding: SSH can wrap less secure data in a layer of encryption, creating a secure tunnel for web traffic, without breaching any firewalls (more on this later.) This adds another layer of security.
- Improves data integrity: SSH uses a technique called hashing to create a unique digital fingerprint of the data, which confirms that data in contracts and other sensitive documents remain unchanged when it reaches the other party. This makes SSH a powerful benefit for data integrity, useful for verifying contracts and digital signatures, and confirming that software downloads haven’t been tampered with.
- Facilitates hybrid and flex work environments: A feature called X11 forwarding allows you to run graphical user interface (GUI) applications installed on a remote server and display them on your local machine. You can use and interact with visual software programs as if you were at the computer where they’re installed. For example, you could use a drawing program installed on your work computer while you’re sitting at home, seeing all the functions just as you would in the office. In this way, SSH users enjoy greater flexibility and productivity, regardless of location.
SSH Features
Before turning to how SSH works, let’s briefly learn about three key SSH features that underlie its functionality.
- SSHD: The remote computer runs an SSH daemon (sshd,) which is a program that waits for incoming connections on a specific online pathway, known as port 22. Once a connection request comes in, it checks for authorization before allowing secure data exchange.
- RFC: This stands for Request for Comments. It’s a set of rules that SSH follows to make sure all data exchanges are secure. These rules cover everything from encryption methods to security certificates.
- SSH layers: SSH is organized into three main layers. The transport layer handles making the connection secure through encryption. The user authentication layer is responsible for verifying who is trying to connect. The connection layer manages the flow of data once the connection is established.
How Does SSH Work?
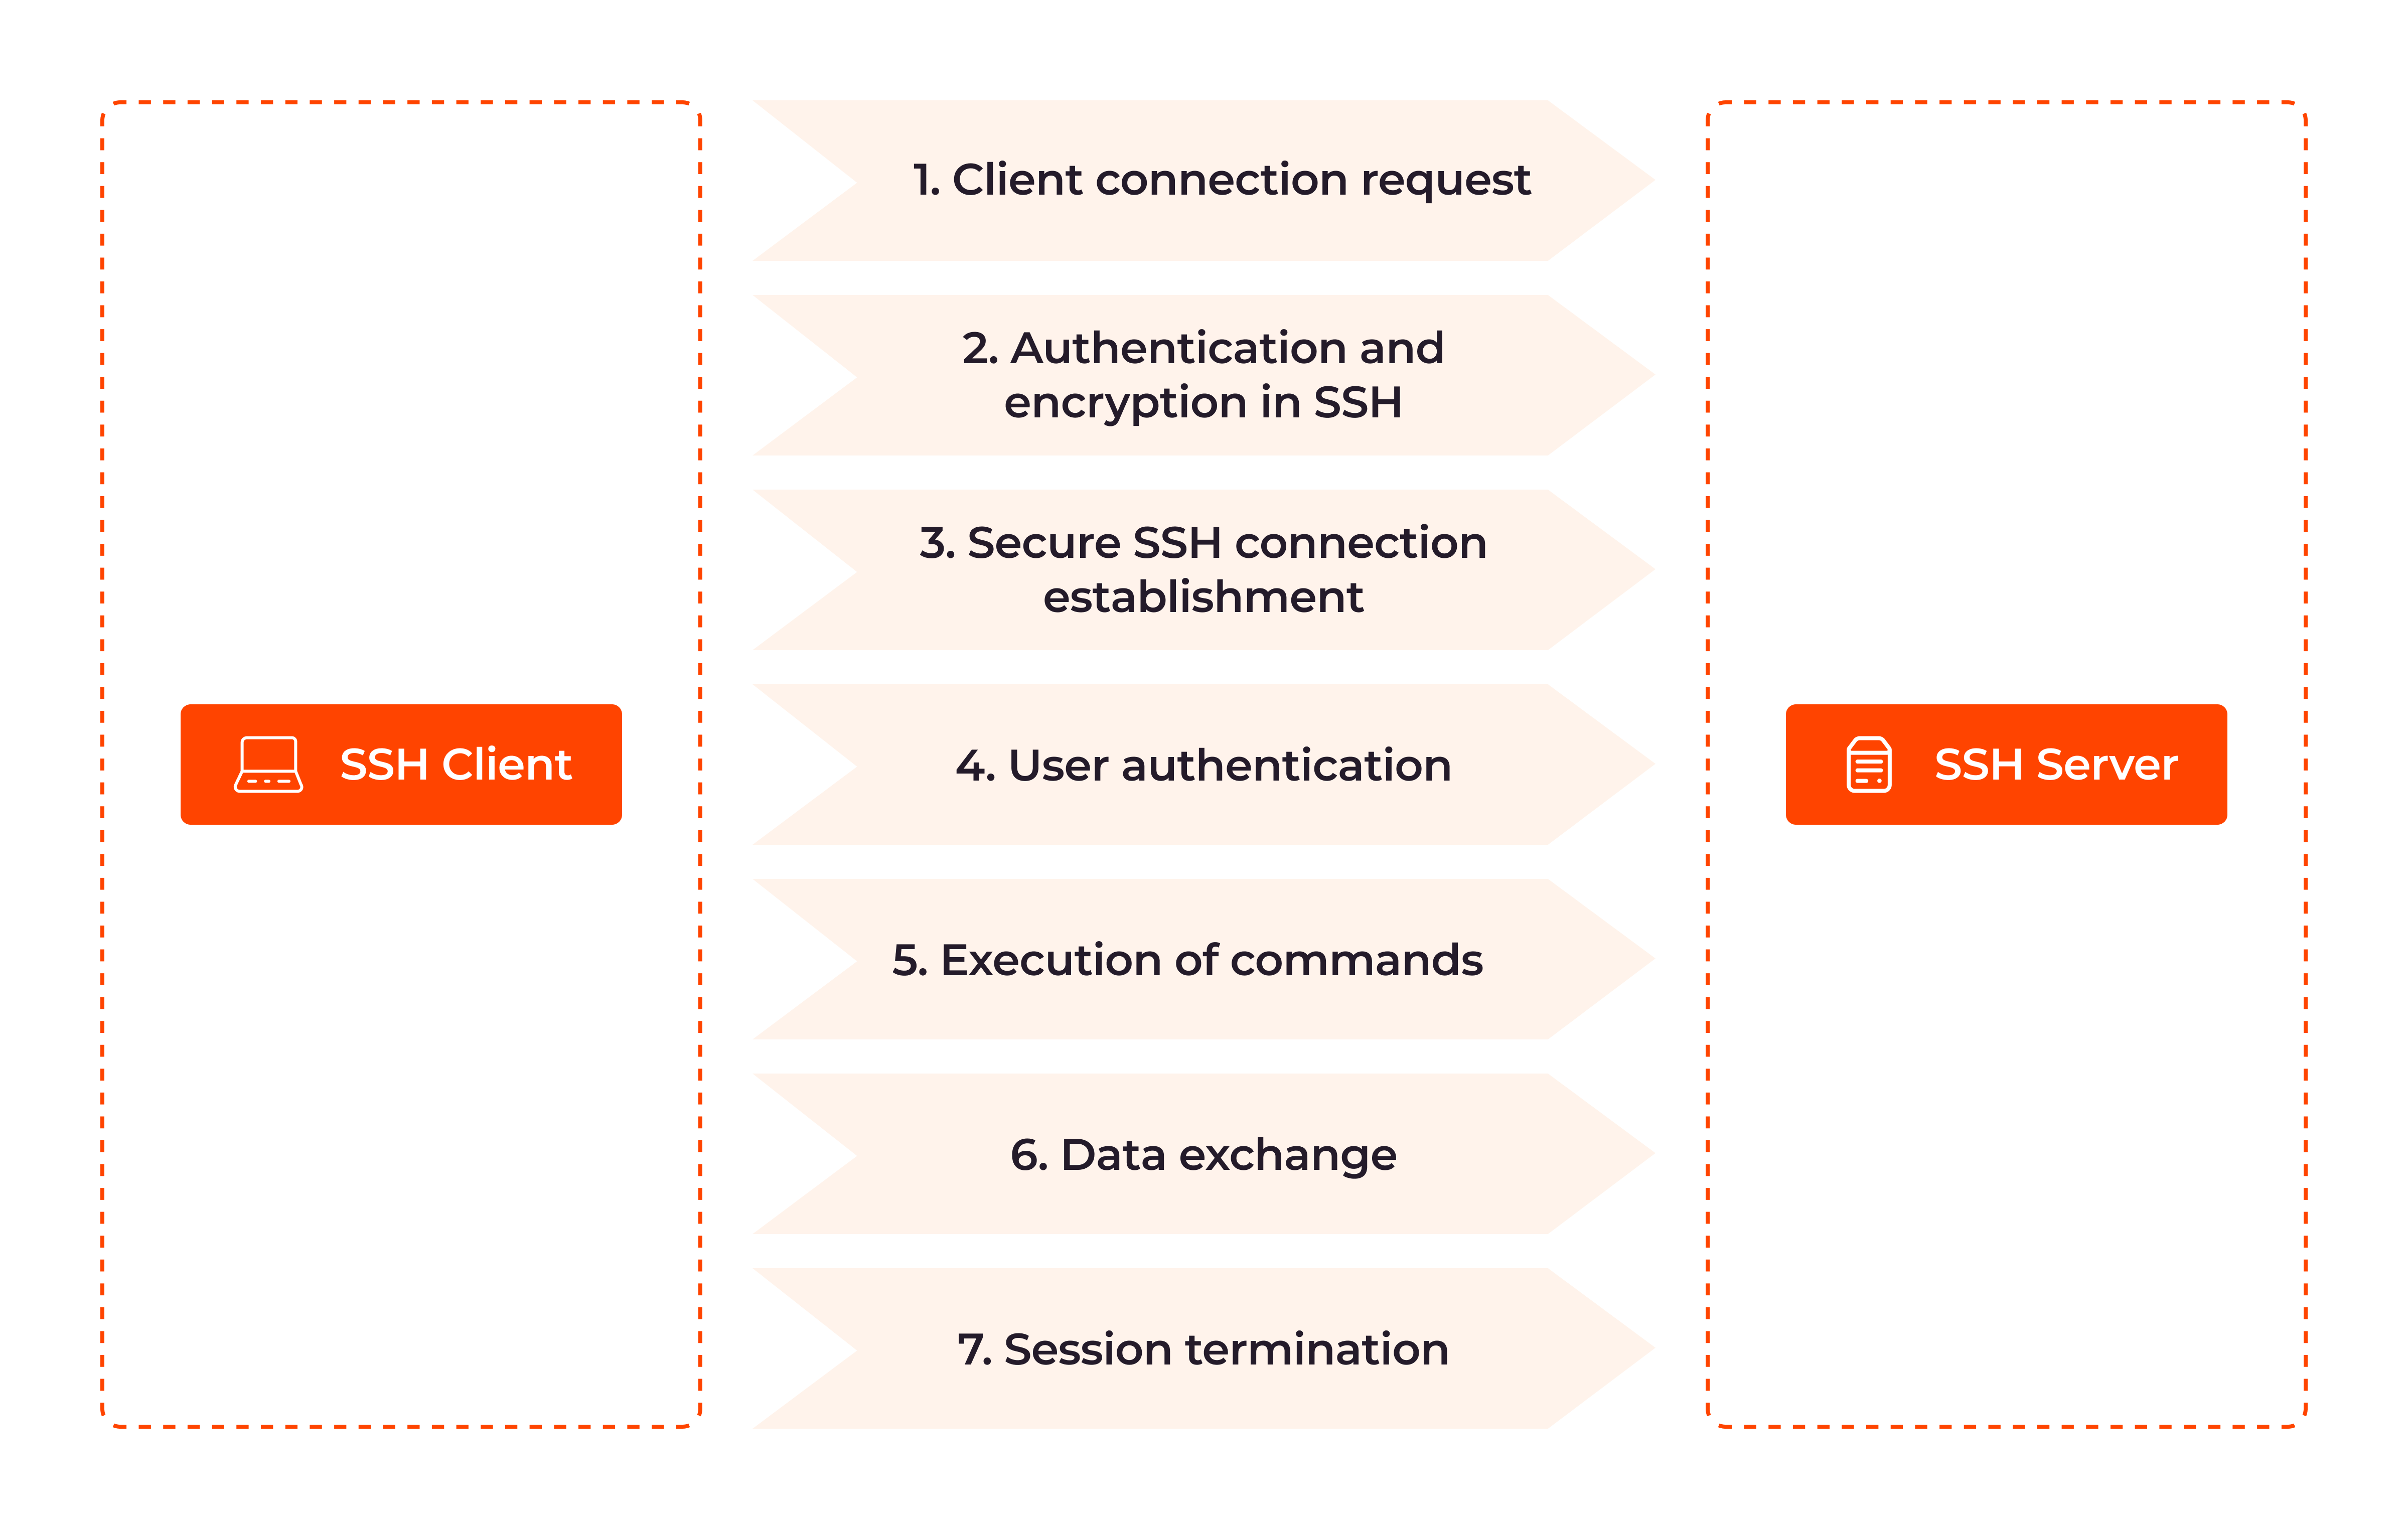
Here’s how SSH works, step by step. We’ll first explain each step, and then show the code snippet that performs that step, so you can apply SSH for yourself.
1. Client connection request: The SSH process begins with the client initiating a connection request to the remote server. The client sends a TCP handshake to establish the connection, indicating its intent to communicate securely with the server over SSH.
def initiate_ssh_connection(hostname, port, username, password):
ssh_client = paramiko.SSHClient()
ssh_client.set_missing_host_key_policy(paramiko.AutoAddPolicy())

try:
ssh_client.connect(hostname, port, username, password)
print("Connected successfully.")
except paramiko.AuthenticationException:
print("Authentication failed.")
except paramiko.SSHException as ssh_ex:
print(f"SSH error: {ssh_ex}")
except socket.error as sock_ex:
print(f"Socket error: {sock_ex}")
finally:
ssh_client.close()
2. Authentication and encryption in SSH: SSH uses public key cryptography for authentication. The server presents its public key to the client, which the client uses to verify the server’s identity. Simultaneously, the client generates a shared secret key through a secure exchange process with the server. This symmetric encryption key will be used to protect the data transmitted during the session.
SSH (using password-based authentication)
def password_authentication(username, password):
return paramiko.Password(username, password)
3. Secure SSH connection establishment: SSH relies on the TCP/IP protocol suite for its underlying communication. During the connection setup, the client and server negotiate encryption protocols to protect future communications. The Diffie-Hellman key exchange algorithm is employed to create symmetric encryption keys, ensuring that both parties agree on a shared encryption key without transmitting it directly over the network.
Establishment (SSH handshake)
def establish_secure_connection(ssh_client, hostname, port):
ssh_client.connect(hostname, port)
4. User authentication: Once the secure connection is established, the client must authenticate itself to the server by entering a username and password, or by using SSH keys which provide a more secure and automated means of access.
def authenticate_user(ssh_client, username, password):
ssh_client.auth_password(username, password)
5. Execution of commands: With successful authentication, the client gains access to the remote server and can execute commands as if it were operating directly on the server’s terminal. These commands are securely transmitted through the encrypted connection, ensuring confidentiality and integrity.
def execute_ssh_command(ssh_client, command):
stdin, stdout, stderr = ssh_client.exec_command(command)
return stdout.read().decode()
6. Data exchange: SSH facilitates secure file transfers through its built-in SSH File Transfer Protocol (SFTP.) Any data exchanged between the client and the server, such as file transfers or responses to commands, is encrypted.
def secure_file_transfer(ssh_client, local_path, remote_path):
sftp_client = ssh_client.open_sftp()
sftp_client.put(local_path, remote_path)
sftp_client.close()
7. Session termination: When the user ends the SSH session or logs out, the secure connection is terminated, and the encryption keys used for that session are discarded. This helps maintain the security of future sessions and prevents unauthorized access.
def close_ssh_connection(ssh_client):
ssh_client.close()

# Example usage:
if _name_ == "__main__":
# Replace these with your server credentials
hostname = "your_server_ip_or_domain"
port = 22
username = "your_username"
password = "your_password"
How to Connect SSH to a Remote Server
Once SSH is installed and configured on an organization’s computer per the above steps, connecting to that remote server using Secure Shell Protocol is a straightforward process that allows secure access and administration:
- Open a terminal window. The terminal provides a command-line interface through which you can interact with the system.
ssh_client = paramiko.SSHClient()
ssh_client.load_system_host_keys()
ssh_client.set_missing_host_key_policy(paramiko.AutoAddPolicy())
- Use the ssh command followed by the username and the remote server’s hostname or IP address to connect to the remote server. For example, to connect to a server named freeserver.com with the username user, you would use the following command: ssh user@freeserver.com
ssh_client.connect(hostname, port, username, password)
- Enter the password for the user account on the remote server. You will then be prompted to enter the password associated with the specified username on the remote server. Type the password carefully, as characters will not be displayed on the screen to ensure security.
# Open an interactive shell session

ssh_shell = ssh_client.invoke_shell()

# Print the welcome message (terminal window)

print(ssh_shell.recv(1024).decode())
- Confirm the authenticity of the remote server. This is a security measure to ensure that you are connecting to the correct server. Verify that the fingerprint of the host key matches the expected value. If it does, type yes and press Enter to continue.
response = input("Are you sure you want to continue connecting? (yes/no): ")
if response.lower() == "yes":
ssh_shell.send("yes\n")
else:
ssh_client.close()
Return
- Establish the SSH connection. You will be logged into the remote server. At this point, you can start running commands on the remote server just as if you were using its local terminal.
print("SSH connection established. You are now logged in to the remote server.")
print("You can start running commands on the remote server.").

# To close the SSH connection:
# ssh_client.close()

except paramiko.AuthenticationException:
print("Authentication failed. Please check your credentials.")
except paramiko.SSHException as e:
print(f"SSH connection failed: {e}")
except Exception as e:
print(f"Error: {e}")
if _name_ == "__main__":

# Replace these values with your remote server details
remote_hostname = "freetees.com"
remote_port = 22 # Default SSH port is 22
remote_username = "your_username"
remote_password = "your_password"

establish_ssh_connection(remote_hostname, remote_port, remote_username, remote_password)
How to Connect to a Linux Server via SSH
Connecting to a Linux server via SSH is straightforward. Refer to Gcore’s tutorial on connecting to a Linux server via SSH.
Prerequisites for Linux Server SSH Connection
Before establishing a secure SSH connection to a remote Linux server, ensure that the following requirements are met:
- Ensure SSH is enabled and running on the remote Linux server. SSH typically operates on port 22 by default, allowing secure communication between the client and the server.
- Obtain the server’s IP address or domain name. You can obtain the IP address from your server administrator or use domain name resolution tools to find the server’s domain name.
- Verify that your client machine has SSH client software installed. Most Linux and macOS systems come with an SSH client pre-installed, making it easy to establish SSH connections. However, on Windows, you may need to install an SSH client application such as PuTTY, which provides a user-friendly interface for SSH connections.
Troubleshooting Linux SSH Connection Issues
If you encounter difficulties while connecting to a Linux server via SSH, follow these troubleshooting steps to identify and resolve common issues:
- Check that the SSH service is running on the remote server. You can verify this by logging into the server directly or contacting your server administrator to confirm the SSH service status.
- Verify firewall settings and port forwarding rules on the server to ensure that SSH traffic is allowed. Make sure that the SSH port (usually port 22) is open and accessible on the server’s firewall settings.
- Ensure that you are using the correct username and password or that your SSH key pair is correctly configured. If you are using SSH key authentication, ensure that your public key is correctly added to the remote server’s “authorized_keys” file.
- If you are connecting from behind a corporate network or restrictive firewall, check if any restrictions or proxy settings are causing the issue. Consult your network administrator to understand any limitations or proxy configurations that may be affecting your SSH connection.
SSH Security: Risks and Best Practices
To ensure the integrity and confidentiality of SSH connections, it’s important to understand the common risks associated with SSH and how to mitigate these concerns. Below, we outline some key security risks and the best practices for addressing them.
Weak Passwords
- Risk: Attackers can exploit weak passwords to gain unauthorized entry, leading to potential data breaches and system compromises.
- Remedy: Enforce strong authentication protocols and encourage users to adopt robust, unique passwords. This minimizes the risk of attackers exploiting weak passwords and enhances SSH security.
SSH Key Management Failures
- Risk: Inadequately protected SSH keys can be compromised or stolen, allowing malicious actors to bypass authentication.
- Remedy: Implement a robust SSH key management strategy. Regularly audit, rotate, and promptly revoke SSH keys to safeguard your network against unauthorized entry and key theft.
Man-in-the-Middle Attacks
- Risk: During a MITM attack, an attacker may intercept SSH connections and eavesdrop on communications.
- Remedy: Use public key infrastructure (PKI) for SSH keys to achieve a secure framework for cryptographic key generation, distribution, and management.
Outdated Software
- Risk: Running outdated SSH software exposes your system to known vulnerabilities.
- Remedy: Update your SSH software whenever a new update is available to ensure that known vulnerabilities are promptly patched.
SSH Agent Forwarding
- Risk: Inappropriate use of SSH agent forwarding can result in privilege escalation.
- Remedy: Limit SSH agent forwarding to minimize the risk of exposing sensitive credentials by disabling agent forwarding in your SSH configuration file (often located at
/etc/ssh/sshd_configon the server) by setting theAllowAgentForwardingoption tono. On the client side, refrain from using the-Aflag when initiating SSH connections.
Excessive User Privileges
- Risk: Granting excessive privileges increases the risk and potential damage of unauthorized access.
- Remedy: Embrace the principle of least privilege by granting only the necessary access aligned for each user role.
Insecure Configuration
- Risk: Misconfigurations, such as allowing root login or using weak encryption algorithms, can compromise security.
- Remedy: Disable direct root login and transition to SSHv2 for a more secure connection, thereby reducing the risk of unauthorized access. To disable root login, edit your SSH server configuration file, usually located at
/etc/ssh/sshd_config, and set thePermitRootLoginoption to no. After making this change, restart the SSH service to apply the new settings. To transition to SSHv2, locate the Protocol option in the same SSH configuration file and set it to2. Again, restart the SSH service to apply the update.
Logging and Auditing
- Risk: Without sufficient logs, it becomes challenging to identify unauthorized access and security breaches.
- Remedy: Monitor SSH logs for signs of suspicious (unexpected) activity and establish audit trails for compliance and incident investigation.
SSH Tunneling
- Risk: SSH tunneling can be misused to bypass firewalls and establish unauthorized communication channels.
- Remedy: Establish firewall rules that restrict SSH access exclusively to authorized IP addresses. For example, if you’re using iptables on a Linux server, you can use the command sudo iptables
-A INPUT -p tcp --dport 22 -s [AUTHORIZED_IP_ADDRESS] -j ACCEPTto allow SSH access only from[AUTHORIZED_IP_ADDRESS]. Deny all other SSH traffic with a command likesudo iptables -A INPUT -p tcp --dport 22 -j DROP.
Denial-of-Service (DoS) Attacks
- Risk: SSH servers may face DoS attacks, disrupting legitimate access.
- Remedy: Implement protective measures against DoS attacks to ensure service availability, like Gcore DDoS Protection.
Insufficient User Training
- Risk: Lack of proper user training can lead to inadvertent security breaches.
- Remedy: Educate users on SSH security best practices and potential threats to foster a security-aware culture.
Conclusion
SSH facilitates encrypted connections and secure data transmission between client and server—essential in modern IT environments. By recognizing the importance of SSH and implementing it appropriately, individuals and organizations can enhance their cybersecurity, safeguard sensitive data, and effectively protect against potential threats.
Discover how Gcore can protect your website, application, and server against complex DDoS and other cyberattacks.